- JavaFX 教程
- JavaFX - 首頁
- JavaFX - 概述
- JavaFX 安裝和架構
- JavaFX - 環境
- JavaFX - 使用 Netbeans 安裝
- JavaFX - 使用 Eclipse 安裝
- JavaFX - 使用 Visual Studio Code 安裝
- JavaFX - 架構
- JavaFX - 應用程式
- JavaFX 2D 形狀
- JavaFX - 2D 形狀
- JavaFX - 繪製線條
- JavaFX - 繪製矩形
- JavaFX - 繪製圓角矩形
- JavaFX - 繪製圓形
- JavaFX - 繪製橢圓
- JavaFX - 繪製多邊形
- JavaFX - 繪製折線
- JavaFX - 繪製三次貝塞爾曲線
- JavaFX - 繪製二次貝塞爾曲線
- JavaFX - 繪製弧線
- JavaFX - 繪製 SVGPath
- JavaFX 2D 物件的屬性
- JavaFX - 描邊型別屬性
- JavaFX - 描邊寬度屬性
- JavaFX - 描邊填充屬性
- JavaFX - 描邊屬性
- JavaFX - 描邊連線屬性
- JavaFX - 描邊斜接限制屬性
- JavaFX - 描邊端點屬性
- JavaFX - 平滑屬性
- JavaFX 路徑物件
- JavaFX - 路徑物件
- JavaFX - LineTo 路徑物件
- JavaFX - HLineTo 路徑物件
- JavaFX - VLineTo 路徑物件
- JavaFX - QuadCurveTo 路徑物件
- JavaFX - CubicCurveTo 路徑物件
- JavaFX - ArcTo 路徑物件
- JavaFX 顏色和紋理
- JavaFX - 顏色
- JavaFX - 線性漸變圖案
- JavaFX - 徑向漸變圖案
- JavaFX 文字
- JavaFX - 文字
- JavaFX 效果
- JavaFX - 效果
- JavaFX - 顏色調整效果
- JavaFX - 顏色輸入效果
- JavaFX - 影像輸入效果
- JavaFX - 混合效果
- JavaFX - 輝光效果
- JavaFX - 發光效果
- JavaFX - 方框模糊效果
- JavaFX - 高斯模糊效果
- JavaFX - 運動模糊效果
- JavaFX - 反射效果
- JavaFX - 棕褐色效果
- JavaFX - 陰影效果
- JavaFX - 投影效果
- JavaFX - 內陰影效果
- JavaFX - 照明效果
- JavaFX - Light.Distant 效果
- JavaFX - Light.Spot 效果
- JavaFX - Point.Spot 效果
- JavaFX - 位移對映
- JavaFX - 透視變換
- JavaFX 動畫
- JavaFX - 動畫
- JavaFX - 旋轉轉換
- JavaFX - 縮放轉換
- JavaFX - 平移轉換
- JavaFX - 淡入淡出轉換
- JavaFX - 填充轉換
- JavaFX - 描邊轉換
- JavaFX - 順序轉換
- JavaFX - 並行轉換
- JavaFX - 暫停轉換
- JavaFX - 路徑轉換
- JavaFX 影像
- JavaFX - 影像
- JavaFX 3D 形狀
- JavaFX - 3D 形狀
- JavaFX - 建立立方體
- JavaFX - 建立圓柱體
- JavaFX - 建立球體
- 3D 物件的屬性
- JavaFX - 剔除面屬性
- JavaFX - 繪製模式屬性
- JavaFX - 材質屬性
- JavaFX 事件處理
- JavaFX - 事件處理
- JavaFX - 使用便捷方法
- JavaFX - 事件過濾器
- JavaFX - 事件處理程式
- JavaFX UI 控制元件
- JavaFX - UI 控制元件
- JavaFX - ListView
- JavaFX - Accordion
- JavaFX - ButtonBar
- JavaFX - ChoiceBox
- JavaFX - HTMLEditor
- JavaFX - MenuBar
- JavaFX - Pagination
- JavaFX - ProgressIndicator
- JavaFX - ScrollPane
- JavaFX - Separator
- JavaFX - Slider
- JavaFX - Spinner
- JavaFX - SplitPane
- JavaFX - TableView
- JavaFX - TabPane
- JavaFX - ToolBar
- JavaFX - TreeView
- JavaFX - Label
- JavaFX - CheckBox
- JavaFX - RadioButton
- JavaFX - TextField
- JavaFX - PasswordField
- JavaFX - FileChooser
- JavaFX - Hyperlink
- JavaFX - Tooltip
- JavaFX - Alert
- JavaFX - DatePicker
- JavaFX - TextArea
- JavaFX 圖表
- JavaFX - 圖表
- JavaFX - 建立餅圖
- JavaFX - 建立折線圖
- JavaFX - 建立面積圖
- JavaFX - 建立條形圖
- JavaFX - 建立氣泡圖
- JavaFX - 建立散點圖
- JavaFX - 建立堆疊面積圖
- JavaFX - 建立堆疊條形圖
- JavaFX 佈局窗格
- JavaFX - 佈局窗格
- JavaFX - HBox 佈局
- JavaFX - VBox 佈局
- JavaFX - BorderPane 佈局
- JavaFX - StackPane 佈局
- JavaFX - TextFlow 佈局
- JavaFX - AnchorPane 佈局
- JavaFX - TilePane 佈局
- JavaFX - GridPane 佈局
- JavaFX - FlowPane 佈局
- JavaFX CSS
- JavaFX - CSS
- JavaFX 中的媒體
- JavaFX - 處理媒體
- JavaFX - 播放影片
- JavaFX 有用資源
- JavaFX - 快速指南
- JavaFX - 有用資源
- JavaFX - 討論
JavaFX - 繪製橢圓
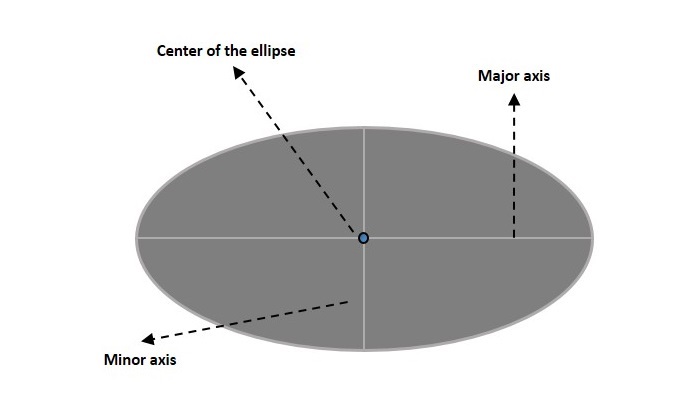
橢圓由兩個點定義,每個點稱為焦點。如果取橢圓上的任意一點,則到焦點點的距離之和為常數。橢圓的大小由這兩個距離之和決定。這兩個距離之和等於長軸的長度(橢圓的最長直徑)。實際上,圓是橢圓的特例。
橢圓具有三個屬性,它們是:
中心 - 橢圓內部的一個點,它是連線兩個焦點的線段的中點。長軸和短軸的交點。
長軸 - 橢圓的最長直徑。
短軸 - 橢圓的最短直徑。
JavaFX 中的橢圓
在 JavaFX 中,橢圓由名為 Ellipse 的類表示。此類屬於 javafx.scene.shape 包。
透過例項化此類,您可以在 JavaFX 中建立橢圓節點。
此類具有 4 個 double 資料型別的屬性,即:
centerX - 橢圓中心點的 x 座標(以畫素為單位)。
centerY - 橢圓中心點的 y 座標(以畫素為單位)。
radiusX - 橢圓的寬度(以畫素為單位)。
radiusY - 橢圓的高度(以畫素為單位)。
要繪製橢圓,您需要將值傳遞給這些屬性,可以透過按相同順序將它們傳遞給此類的建構函式,或者使用 setter 方法。
繪製橢圓的步驟
請按照以下步驟在 JavaFX 中繪製橢圓。
步驟 1:建立橢圓
您可以在 JavaFX 中透過例項化名為 Ellipse 的類來建立橢圓,該類屬於 javafx.scene.shape 包,位於 start() 方法內部。您可以按如下方式例項化此類。
public class ClassName extends Application {
   public void start(Stage primaryStage) throws Exception {
      //Creating an Ellipse object
      Ellipse ellipse = new Ellipse();
   }
}
步驟 2:設定橢圓的屬性
指定橢圓中心的 x、y 座標→橢圓沿 x 軸和 y 軸的寬度(長軸和短軸),透過設定 X、Y、RadiusX 和 RadiusY 屬性來設定圓。
這可以透過使用它們各自的 setter 方法來完成,如下面的程式碼塊所示。
ellipse.setCenterX(300.0f);
ellipse.setCenterY(150.0f);
ellipse.setRadiusX(150.0f);
ellipse.setRadiusY(75.0f);
步驟 3:建立 Group 物件
在 start() 方法中,透過例項化名為 Group 的類來建立一個組物件,該類屬於 javafx.scene 包。透過將前面步驟中建立的 Ellipse(節點)物件作為引數傳遞給 Group 類的建構函式來例項化此類。這應該為了將其新增到組中,如下面的程式碼塊所示:
Group root = new Group(ellipse);
步驟 4:啟動應用程式
建立 2D 物件後,請按照以下步驟正確啟動應用程式:
首先,透過將 Group 物件作為引數值傳遞給其建構函式來例項化名為 Scene 的類。對於此建構函式,您還可以將應用程式螢幕的尺寸作為可選引數傳遞。
然後,使用 Stage 類的 setTitle() 方法設定舞臺的標題。
現在,使用名為 Stage 的類的 setScene() 方法將 Scene 物件新增到舞臺。
使用名為 show() 的方法顯示場景的內容。
最後,使用 launch() 方法啟動應用程式。
示例
以下是一個使用 JavaFX 生成橢圓的程式。將此程式碼儲存在名為 EllipseExample.java 的檔案中。
import javafx.application.Application;
import javafx.scene.Group;
import javafx.scene.Scene;
import javafx.stage.Stage;
import javafx.scene.shape.Ellipse;

public class EllipseExample extends Application {
   @Override
   public void start(Stage stage) {
      //Drawing an ellipse
      Ellipse ellipse = new Ellipse();

      //Setting the properties of the ellipse
      ellipse.setCenterX(300.0f);
      ellipse.setCenterY(150.0f);
      ellipse.setRadiusX(150.0f);
      ellipse.setRadiusY(75.0f);

      //Creating a Group object
      Group root = new Group(ellipse);

      //Creating a scene object
      Scene scene = new Scene(root, 600, 300);

      //Setting title to the Stage
      stage.setTitle("Drawing an Ellipse");

      //Adding scene to the stage
      stage.setScene(scene);

      //Displaying the contents of the stage
      stage.show();
   }
   public static void main(String args[]){
      launch(args);
   }
}
使用以下命令從命令提示符編譯並執行儲存的 Java 檔案。
javac --module-path %PATH_TO_FX% --add-modules javafx.controls EllipseExample.java
java --module-path %PATH_TO_FX% --add-modules javafx.controls EllipseExample
輸出
執行上述程式後,將生成一個 JavaFX 視窗,其中顯示如下所示的橢圓。

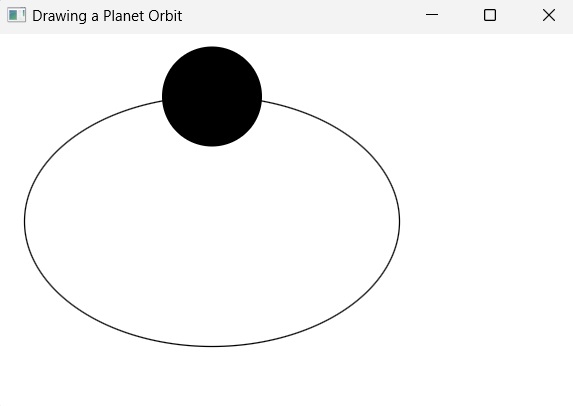
示例
在下面給出的另一個示例中,讓我們嘗試繪製一個圓形行星的橢圓軌道。將此檔案命名為 PlanetOrbit.java。
import javafx.application.Application;
import javafx.scene.Group;
import javafx.scene.Scene;
import javafx.stage.Stage;
import javafx.scene.shape.Ellipse;
import javafx.scene.shape.Circle;
import javafx.scene.paint.Color;
import javafx.animation.PathTransition;
import javafx.application.Application;
import javafx.stage.Stage;
import javafx.util.Duration;

public class PlanetOrbit extends Application {
   @Override
   public void start(Stage stage) {
      //Drawing an orbit
      Ellipse orbit = new Ellipse();
      orbit.setFill(Color.WHITE);
      orbit.setStroke(Color.BLACK);

      //Setting the properties of the ellipse
      orbit.setCenterX(300.0f);
      orbit.setCenterY(150.0f);
      orbit.setRadiusX(150.0f);
      orbit.setRadiusY(100.0f);

      // Drawing a circular planet
      Circle planet = new Circle(300.0f, 50.0f, 40.0f);

      //Creating the animation
      PathTransition pathTransition = new PathTransition();
      pathTransition.setDuration(Duration.millis(1000));
      pathTransition.setNode(planet);
      pathTransition.setPath(orbit);
      pathTransition.setOrientation(PathTransition.OrientationType.ORTHOGONAL_TO_TANGENT);
      pathTransition.setCycleCount(50);
      pathTransition.setAutoReverse(false);
      pathTransition.play();

      //Creating a Group object
      Group root = new Group();
      root.getChildren().addAll(orbit, planet);

      //Creating a scene object
      Scene scene = new Scene(root, 600, 300);

      //Setting title to the Stage
      stage.setTitle("Drawing a Planet Orbit");

      //Adding scene to the stage
      stage.setScene(scene);

      //Displaying the contents of the stage
      stage.show();
   }
   public static void main(String args[]){
      launch(args);
   }
}
使用以下命令從命令提示符編譯並執行儲存的 Java 檔案。
javac --module-path %PATH_TO_FX% --add-modules javafx.controls PlanetOrbit.java
java --module-path %PATH_TO_FX% --add-modules javafx.controls PlanetOrbit
輸出
執行上述程式後,將生成一個 JavaFX 視窗,其中顯示如下所示的軌道。