- 密碼學教程
- 密碼學 - 首頁
- 密碼學 - 起源
- 密碼學 - 歷史
- 密碼學 - 原理
- 密碼學 - 應用
- 密碼學 - 優點與缺點
- 密碼學 - 現代
- 密碼學 - 傳統密碼
- 密碼學 - 加密需求
- 密碼學 - 雙重強度加密
- 密碼系統
- 密碼系統
- 密碼系統 - 組成部分
- 密碼系統攻擊
- 密碼系統 - 彩虹表攻擊
- 密碼系統 - 字典攻擊
- 密碼系統 - 暴力破解攻擊
- 密碼系統 - 密碼分析技術
- 密碼學型別
- 密碼系統 - 型別
- 公鑰加密
- 現代對稱金鑰加密
- 密碼學雜湊函式
- 金鑰管理
- 密碼系統 - 金鑰生成
- 密碼系統 - 金鑰儲存
- 密碼系統 - 金鑰分發
- 密碼系統 - 金鑰撤銷
- 分組密碼
- 密碼系統 - 流密碼
- 密碼學 - 分組密碼
- 密碼學 - Feistel 分組密碼
- 分組密碼操作模式
- 分組密碼操作模式
- 電子密碼本 (ECB) 模式
- 密碼分組連結 (CBC) 模式
- 密碼反饋 (CFB) 模式
- 輸出反饋 (OFB) 模式
- 計數器 (CTR) 模式
- 經典密碼
- 密碼學 - 反向密碼
- 密碼學 - 凱撒密碼
- 密碼學 - ROT13 演算法
- 密碼學 - 換位密碼
- 密碼學 - 加密換位密碼
- 密碼學 - 解密換位密碼
- 密碼學 - 乘法密碼
- 密碼學 - 仿射密碼
- 密碼學 - 簡單替換密碼
- 密碼學 - 簡單替換密碼加密
- 密碼學 - 簡單替換密碼解密
- 密碼學 - 維吉尼亞密碼
- 密碼學 - 實現維吉尼亞密碼
- 現代密碼
- Base64 編碼和解碼
- 密碼學 - XOR 加密
- 替換技術
- 密碼學 - 單字母替換密碼
- 密碼學 - 破解單字母替換密碼
- 密碼學 - 多字母替換密碼
- 密碼學 - Playfair 密碼
- 密碼學 - 希爾密碼
- 多字母替換密碼
- 密碼學 - 一次性密碼本密碼
- 一次性密碼本密碼的實現
- 密碼學 - 換位技術
- 密碼學 - 柵欄密碼
- 密碼學 - 列置換
- 密碼學 - 密碼隱寫術
- 對稱演算法
- 密碼學 - 資料加密
- 密碼學 - 加密演算法
- 密碼學 - 資料加密標準
- 密碼學 - 三重DES
- 密碼學 - 雙重DES
- 高階加密標準
- 密碼學 - AES 結構
- 密碼學 - AES 變換函式
- 密碼學 - 位元組替換變換
- 密碼學 - 行移位變換
- 密碼學 - 列混合變換
- 密碼學 - 輪金鑰加變換
- 密碼學 - AES 金鑰擴充套件演算法
- 密碼學 - Blowfish 演算法
- 密碼學 - SHA 演算法
- 密碼學 - RC4 演算法
- 密碼學 - Camellia 加密演算法
- 密碼學 - ChaCha20 加密演算法
- 密碼學 - CAST5 加密演算法
- 密碼學 - SEED 加密演算法
- 密碼學 - SM4 加密演算法
- IDEA - 國際資料加密演算法
- 公鑰(非對稱)密碼學演算法
- 密碼學 - RSA 演算法
- 密碼學 - RSA 加密
- 密碼學 - RSA 解密
- 密碼學 - 建立 RSA 金鑰
- 密碼學 - 破解 RSA 密碼
- 密碼學 - ECDSA 演算法
- 密碼學 - DSA 演算法
- 密碼學 - Diffie-Hellman 演算法
- 密碼學中的資料完整性
- 密碼學中的資料完整性
- 訊息認證
- 密碼學數字簽名
- 公鑰基礎設施
- 雜湊
- MD5(訊息摘要演算法 5)
- SHA-1(安全雜湊演算法 1)
- SHA-256(安全雜湊演算法 256 位)
- SHA-512(安全雜湊演算法 512 位)
- SHA-3(安全雜湊演算法 3)
- 雜湊密碼
- Bcrypt 雜湊模組
- 現代密碼學
- 量子密碼學
- 後量子密碼學
- 密碼學協議
- 密碼學 - SSL/TLS 協議
- 密碼學 - SSH 協議
- 密碼學 - IPsec 協議
- 密碼學 - PGP 協議
- 影像和檔案加密
- 密碼學 - 影像
- 密碼學 - 檔案
- 密碼隱寫術 - 影像
- 檔案加密和解密
- 密碼學 - 檔案加密
- 密碼學 - 檔案解密
- 物聯網中的密碼學
- 物聯網安全挑戰、威脅和攻擊
- 物聯網安全中的加密技術
- 物聯網裝置的通訊協議
- 常用的加密技術
- 自定義構建加密演算法(混合加密)
- 雲加密
- 量子密碼學
- 密碼學中的影像隱寫術
- DNA 密碼學
- 密碼學中的一次性密碼 (OTP) 演算法
- 區別
- 密碼學 - MD5 與 SHA1
- 密碼學 - RSA 與 DSA
- 密碼學 - RSA 與 Diffie-Hellman
- 密碼學與密碼學
- 密碼學 - 密碼學與密碼分析
- 密碼學 - 經典與量子
- 密碼學與隱寫術
- 密碼學與加密
- 密碼學與網路安全
- 密碼學 - 流密碼與分組密碼
- 密碼學 - AES 與 DES 密碼
- 密碼學 - 對稱與非對稱
- 密碼學有用資源
- 密碼學 - 快速指南
- 密碼學 - 討論
密碼學 - 檔案加密
檔案加密是一種加密方法,它將您的檔案轉換為密文或不可讀資料。使用此方法可確保即使未經授權的人員訪問您的資料,也無法在沒有解密金鑰的情況下讀取內容。
簡單來說,加密檔案為保護敏感資訊免受外部人員侵害增加了額外的安全層。
在本章中,我們將瞭解不同的加密技術來加密檔案資料。所以讓我們深入探討一下。
檔案加密的基本方法
任何加密方法都有其自身的一套特徵和優勢。因此,選擇最適合公司的加密方法非常重要。這些方法包括:
對稱加密
對稱加密是一種流行的加密方法,它使用相同的金鑰來加密和解密資料。雖然使用單個金鑰來加密和解密資訊看起來已經過時,但如果執行得當,它非常高效。
對稱加密的金鑰在傳送方和預期接收方之間共享並保密。當檔案被加密時,加密金鑰將明文轉換為密文。接收方使用相同的金鑰來反轉解密檔案的過程並恢復原始明文。
非對稱加密
非對稱加密,也稱為公鑰加密,是在加密檔案時對稱加密的替代方案。非對稱加密使用兩個獨立但數學相關的金鑰。公鑰被分發,但私鑰被隱藏,只有所有者知道。在加密檔案時,傳送方使用接收方的公鑰將明文轉換為密文。然後,接收方使用其私鑰解密密文以獲取原始明文。
混合加密
對於希望獲得對稱和非對稱加密優勢的公司來說,混合加密是一個完美的選擇。該技術首先為每個檔案或會話建立一個唯一的對稱金鑰。然後使用對稱金鑰加密檔案,這提供了快速有效的加密。資料不是使用對稱金鑰而是使用接收方的非對稱加密公鑰進行加密。然後傳輸加密檔案以及加密的對稱金鑰。如果接收方擁有正確的私鑰,他們可以使用對稱金鑰來解密檔案。
實現(加密檔案)
現在我們將嘗試使用不同的程式語言(如 Python、Java、C++ 等)來實現檔案加密。因此,藉助不同的程式語言來加密檔案是學習加密和練習編碼技能的最佳方法。以下是如何使用 Python、Java 和 C++ 加密檔案的簡單示例:
使用 Python
此程式碼展示瞭如何在 Python 中使用 cryptography 庫中提供的 Fernet 對稱加密方法進行檔案加密。在此程式碼中,我們將提供一個作為輸入的文字檔案,我們需要對其進行加密。加密後,我們將獲得一個加密檔案,其中內容使用對稱加密進行加密。
因此,請參閱以下使用 Python 的 Fernet 方法的實現
from cryptography.fernet import Fernet

# Generate a key
key = Fernet.generate_key()
cipher_suite = Fernet(key)

# Read the file
with open('plain_text.txt', 'rb') as f:
   plaintext = f.read()

# Encrypt the file
encrypted_text = cipher_suite.encrypt(plaintext)

# Write the encrypted file
with open('encrypted_file.txt', 'wb') as f:
   f.write(encrypted_text)

# Print message after file is encrypted
print("File encrypted successfully.")
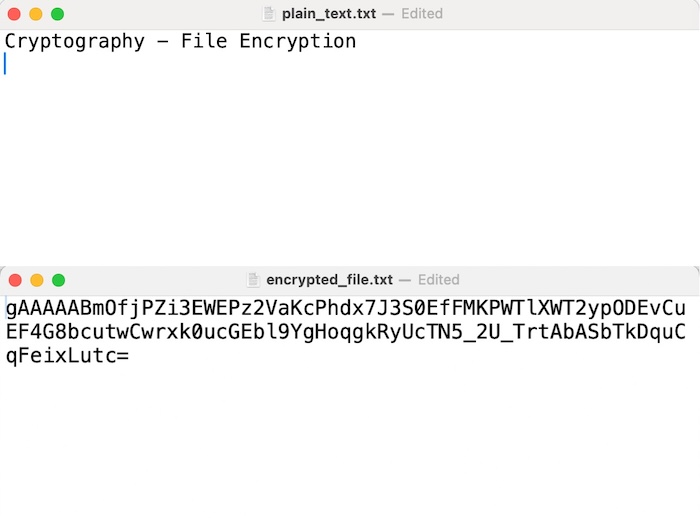
輸出
File encrypted successfully.
請參閱下面的輸出影像,其中顯示了 plain_text.txt 和 encrypted_file.txt 檔案。
使用 Java
在此 Java 程式碼中,我們將使用 AES 加密演算法在 ECB 模式下執行檔案加密。因此,基本上我們需要加密給定的文字檔案。並且程式碼將使用 Files.readAllBytes() 方法將名為“plain_text.txt”的檔案的內容讀入位元組陣列。並且從加密步驟獲得的加密位元組陣列將使用 Files.write() 方法寫入名為“encrypted_file.txt”的新檔案。
因此,請參閱以下 Java 中的實現:
import javax.crypto.Cipher;
import javax.crypto.SecretKey;
import javax.crypto.SecretKeyFactory;
import javax.crypto.spec.PBEKeySpec;
import javax.crypto.spec.SecretKeySpec;
import java.nio.file.Files;
import java.nio.file.Paths;
import java.security.spec.KeySpec;
import java.util.Base64;

public class Program {

   public static void main(String[] args) throws Exception {
      // Read the file
      byte[] plaintext = Files.readAllBytes(Paths.get("plain_text.txt"));

      // Generate a key
      String password = "your_password";
      byte[] salt = "your_salt".getBytes();
      SecretKeyFactory factory = SecretKeyFactory.getInstance("PBKDF2WithHmacSHA256");
      KeySpec spec = new PBEKeySpec(password.toCharArray(), salt, 65536, 256);
      SecretKey tmp = factory.generateSecret(spec);
      SecretKey secret = new SecretKeySpec(tmp.getEncoded(), "AES");

      // Encrypt the file
      Cipher cipher = Cipher.getInstance("AES/ECB/PKCS5Padding");
      cipher.init(Cipher.ENCRYPT_MODE, secret);
      byte[] encryptedText = cipher.doFinal(plaintext);

      // Write the encrypted file
      Files.write(Paths.get("encrypted_file.txt"), encryptedText);
      System.out.println("File is encrypted successfully!");
   }
}
輸入/輸出
File is encrypted successfully!
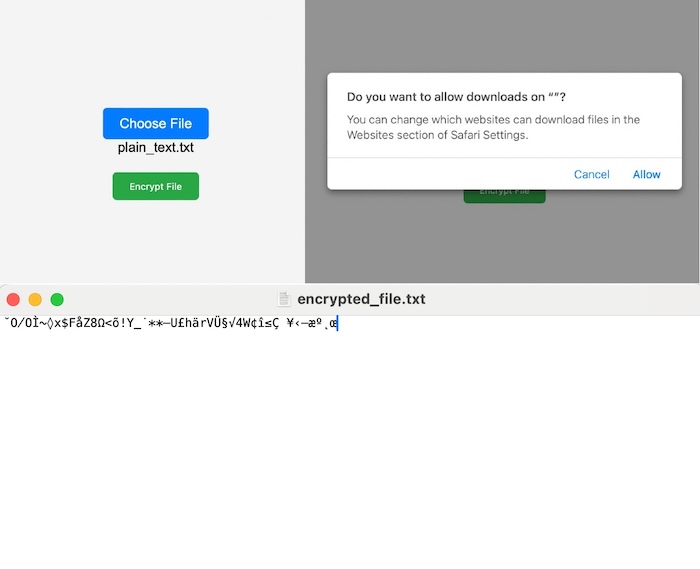
使用 Javascript
在 JavaScript 中,您可以使用 Web Crypto API 在瀏覽器環境中執行檔案加密。下面是一個使用 JavaScript 加密檔案的示例:
<!DOCTYPE html>
<html lang="en">
<head>
<meta charset="UTF-8">
<meta name="viewport" content="width=device-width, initial-scale=1.0">
<title>File Encryption</title>
<style>
   body {
      font-family: Arial, sans-serif;
      margin: 0;
      padding: 0;
      display: flex;
      justify-content: center;
      align-items: center;
      height: 100vh;
      background-color: #f4f4f4;
   }

   #container {
      text-align: center;
   }

   #fileLabel {
      padding: 10px 20px;
      background-color: #007bff;
      color: #fff;
      border: none;
      border-radius: 5px;
      cursor: pointer;
      transition: background-color 0.3s;
   }

   #fileLabel:hover {
      background-color: #0056b3;
   }

   #fileInput {
      display: none;
   }

   #fileName {
      margin-top: 10px;
   }

   #encryptButton {
      margin-top: 20px;
      padding: 10px 20px;
      background-color: #28a745;
      color: #fff;
      border: none;
      border-radius: 5px;
      cursor: pointer;
      transition: background-color 0.3s;
   }

   #encryptButton:hover {
      background-color: #218838;
   }
</style>
</head>
<body>
<div id="container">
   <label for="fileInput" id="fileLabel">Choose File</label>
   <input type="file" id="fileInput" onchange="displayFileName()">
   <div id="fileName"></div>
   <button id="encryptButton" onclick="encryptFile()">Encrypt File</button>
</div>
<script>
function displayFileName() {
   const fileInput = document.getElementById('fileInput');
   const fileName = document.getElementById('fileName');
   fileName.textContent = fileInput.files[0].name;
}

async function encryptFile() {
   const fileInput = document.getElementById('fileInput');
   const file = fileInput.files[0];
   if (!file) {
      alert('Please select a file.');
      return;
   }

   const reader = new FileReader();
   reader.onload = async function(event) {
      const data = event.target.result;
      const password = 'your_password';

      const encodedData = new TextEncoder().encode(data);
      const encodedPassword = new TextEncoder().encode(password);

      const key = await crypto.subtle.importKey(
         'raw',
         encodedPassword,
         { name: 'PBKDF2' },
         false,
         ['deriveKey']
      );

      const derivedKey = await crypto.subtle.deriveKey(
         { name: 'PBKDF2', salt: new Uint8Array(16), iterations: 1000, hash: 'SHA-256' },
         key,
         { name: 'AES-GCM', length: 256 },
         true,
         ['encrypt', 'decrypt']
      );

      const iv = crypto.getRandomValues(new Uint8Array(12));
      const encryptedData = await crypto.subtle.encrypt(
         { name: 'AES-GCM', iv: iv },
         derivedKey,
         encodedData
      );

      const encryptedBlob = new Blob([iv, new Uint8Array(encryptedData)]);
      const encryptedFile = new File([encryptedBlob], 'encrypted_file.txt', { type: 'text/plain' });

      const downloadLink = document.createElement('a');
      downloadLink.href = URL.createObjectURL(encryptedFile);
      downloadLink.download = 'encrypted_file.txt';
      downloadLink.click();
   };

   reader.readAsBinaryString(file);
}
</script>
</body>
</html>
輸入/輸出
執行上述程式碼後,我們將看到以下頁面,其中將有兩個按鈕,第一個按鈕是“選擇檔案”,我們可以透過它選擇要加密的檔案。第二個按鈕是加密上傳的檔案,因此它將要求將加密檔案下載到我們的系統中。因此,我們可以看到加密檔案,如下面的輸出所示。