- Android 基礎
- Android - 首頁
- Android - 概述
- Android - 環境設定
- Android - 架構
- Android - 應用元件
- Android - Hello World 示例
- Android - 資源
- Android - 活動
- Android - 服務
- Android - 廣播接收器
- Android - 內容提供器
- Android - 碎片
- Android - 意圖/過濾器
- Android - 使用者介面
- Android - UI 佈局
- Android - UI 控制元件
- Android - 事件處理
- Android - 樣式和主題
- Android - 自定義元件
- Android 高階概念
- Android - 拖放
- Android - 通知
- 基於位置的服務
- Android - 傳送電子郵件
- Android - 傳送簡訊
- Android - 電話呼叫
- 釋出 Android 應用
- Android 實用示例
- Android - 警報對話方塊
- Android - 動畫
- Android - 音訊捕獲
- Android - 音訊管理器
- Android - 自動完成
- Android - 最佳實踐
- Android - 藍牙
- Android - 相機
- Android - 剪貼簿
- Android - 自定義字型
- Android - 資料備份
- Android - 開發者工具
- Android - 模擬器
- Android - Facebook 整合
- Android - 手勢
- Android - Google 地圖
- Android - 影像效果
- Android - ImageSwitcher
- Android - 內部儲存
- Android - JetPlayer
- Android - JSON 解析器
- Android - Linkedin 整合
- Android - 載入微調器
- Android - 本地化
- Android - 登入螢幕
- Android - MediaPlayer
- Android - 多點觸控
- Android - 導航
- Android - 網路連線
- Android - NFC 指南
- Android - PHP/MySQL
- Android - 進度圓圈
- Android - 進度條
- Android - 推送通知
- Android - RenderScript
- Android - RSS 閱讀器
- Android - 螢幕錄製
- Android - SDK 管理器
- Android - 感測器
- Android - 會話管理
- Android - 共享首選項
- Android - SIP 協議
- Android - 拼寫檢查器
- Android - SQLite 資料庫
- Android - 支援庫
- Android - 測試
- Android - 文字轉語音
- Android - TextureView
- Android - Twitter 整合
- Android - UI 設計
- Android - UI 模式
- Android - UI 測試
- Android - WebView 佈局
- Android - Wi-Fi
- Android - 小部件
- Android - XML 解析器
- Android 實用資源
- Android - 問題與解答
- Android - 實用資源
- Android - 討論
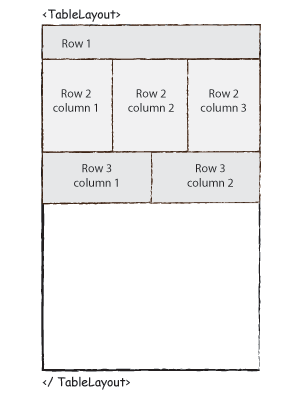
Android 表格佈局
Android TableLayout 用於將檢視組排列成行和列。您將使用 <TableRow> 元素構建表格中的行。每一行都包含零個或多個單元格;每個單元格可以容納一個 View 物件。
TableLayout 容器不會為其行、列或單元格顯示邊框線。
TableLayout 屬性
以下是 TableLayout 特有的重要屬性:
| 序號 | 屬性 & 描述 |
|---|---|
| 1 |
android:id 這是唯一標識佈局的 ID。 |
| 2 |
android:collapseColumns 這指定要摺疊的列的基於零的索引。列索引必須用逗號分隔:1, 2, 5。 |
| 3 |
android:shrinkColumns 要收縮的列的基於零的索引。列索引必須用逗號分隔:1, 2, 5。 |
| 4 |
android:stretchColumns 要拉伸的列的基於零的索引。列索引必須用逗號分隔:1, 2, 5。 |
示例
本示例將引導您完成簡單的步驟,演示如何使用表格佈局建立您自己的 Android 應用程式。請按照以下步驟修改我們在“Hello World 示例”一章中建立的 Android 應用程式:
| 步驟 | 描述 |
|---|---|
| 1 | 您將使用 Android Studio IDE 建立一個 Android 應用程式,並在包 com.example.demo 下將其命名為 demo,如“Hello World 示例”一章中所述。 |
| 2 | 修改 res/layout/activity_main.xml 檔案的預設內容,以在表格佈局中包含一些小部件。 |
| 3 | 無需修改 string.xml,Android studio 會處理預設常量 |
| 4 | 執行應用程式以啟動 Android 模擬器,並驗證對應用程式所做的更改的結果。 |
以下是修改後的主活動檔案 src/com.example.demo/MainActivity.java 的內容。此檔案可以包含每個基本生命週期方法。
package com.example.demo;

import android.os.Bundle;
import android.app.Activity;
import android.view.Menu;

public class MainActivity extends Activity {
   @Override
   protected void onCreate(Bundle savedInstanceState) {
      super.onCreate(savedInstanceState);
      setContentView(R.layout.activity_main);
   }

}
以下是 res/layout/activity_main.xml 檔案的內容:
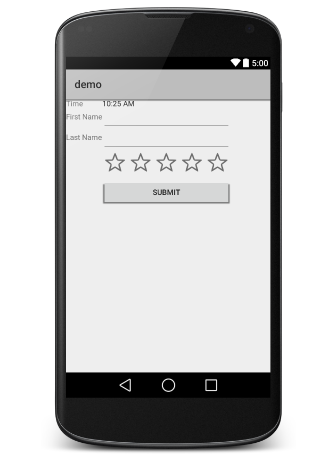
<TableLayout xmlns:android="http://schemas.android.com/apk/res/android"
   android:layout_width="fill_parent"
   android:layout_height="fill_parent">

   <TableRow
      android:layout_width="fill_parent"
      android:layout_height="fill_parent">

      <TextView
         android:text="Time"
         android:layout_width="wrap_content"
         android:layout_height="wrap_content"
         android:layout_column="1" />

      <TextClock
         android:layout_width="wrap_content"
         android:layout_height="wrap_content"
         android:id="@+id/textClock"
         android:layout_column="2" />

   </TableRow>

   <TableRow>

      <TextView
         android:text="First Name"
         android:layout_width="wrap_content"
         android:layout_height="wrap_content"
         android:layout_column="1" />

      <EditText
         android:width="200px"
         android:layout_width="wrap_content"
         android:layout_height="wrap_content" />
   </TableRow>

   <TableRow>

      <TextView
         android:text="Last Name"
         android:layout_width="wrap_content"
         android:layout_height="wrap_content"
         android:layout_column="1" />

      <EditText
         android:width="100px"
         android:layout_width="wrap_content"
         android:layout_height="wrap_content" />
   </TableRow>

   <TableRow
      android:layout_width="fill_parent"
      android:layout_height="fill_parent">

      <RatingBar
         android:layout_width="wrap_content"
         android:layout_height="wrap_content"
         android:id="@+id/ratingBar"
         android:layout_column="2" />
   </TableRow>

   <TableRow
      android:layout_width="fill_parent"
      android:layout_height="fill_parent"/>

   <TableRow
      android:layout_width="fill_parent"
      android:layout_height="fill_parent">

      <Button
         android:layout_width="wrap_content"
         android:layout_height="wrap_content"
         android:text="Submit"
         android:id="@+id/button"
         android:layout_column="2" />
   </TableRow>

</TableLayout>
以下是 res/values/strings.xml 檔案的內容,用於定義兩個新的常量:
<?xml version="1.0" encoding="utf-8"?>
<resources>
   <string name="app_name">HelloWorld</string>
   <string name="action_settings">Settings</string>
</resources>
讓我們嘗試執行我們剛剛修改的 Hello World! 應用程式。我假設您在進行環境設定時已建立了 AVD。要在 Android Studio 中執行該應用程式,請開啟專案的某個活動檔案,然後從工具欄中點選執行  圖示。Android studio 將應用程式安裝到您的 AVD 上並啟動它,如果您的設定和應用程式一切正常,它將顯示以下模擬器視窗: