
- Android 基礎
- Android - 首頁
- Android - 概述
- Android - 環境搭建
- Android - 架構
- Android - 應用元件
- Android - Hello World 示例
- Android - 資源
- Android - 活動 (Activities)
- Android - 服務 (Services)
- Android - 廣播接收器 (Broadcast Receivers)
- Android - 內容提供者 (Content Providers)
- Android - 碎片 (Fragments)
- Android - 意圖/過濾器 (Intents/Filters)
- Android - 使用者介面
- Android - UI 佈局
- Android - UI 控制元件
- Android - 事件處理
- Android - 樣式和主題
- Android - 自定義元件
- Android 高階概念
- Android - 拖放
- Android - 通知
- 基於位置的服務
- Android - 傳送電子郵件
- Android - 傳送簡訊
- Android - 電話呼叫
- 釋出 Android 應用
- Android 實用示例
- Android - 警報對話方塊
- Android - 動畫
- Android - 音訊捕獲
- Android - AudioManager
- Android - 自動完成
- Android - 最佳實踐
- Android - 藍牙
- Android - 相機
- Android - 剪貼簿
- Android - 自定義字型
- Android - 資料備份
- Android - 開發者工具
- Android - 模擬器
- Android - Facebook 整合
- Android - 手勢
- Android - Google 地圖
- Android - 圖片特效
- Android - ImageSwitcher
- Android - 內部儲存
- Android - JetPlayer
- Android - JSON 解析器
- Android - Linkedin 整合
- Android - 載入旋轉器
- Android - 本地化
- Android - 登入介面
- Android - MediaPlayer
- Android - 多點觸控
- Android - 導航
- Android - 網路連線
- Android - NFC 指南
- Android - PHP/MySQL
- Android - 進度圓圈
- Android - ProgressBar
- Android - 推送通知
- Android - RenderScript
- Android - RSS 閱讀器
- Android - 螢幕錄製
- Android - SDK 管理器
- Android - 感測器
- Android - 會話管理
- Android - 共享首選項
- Android - SIP 協議
- Android - 拼寫檢查器
- Android - SQLite 資料庫
- Android - 支援庫
- Android - 測試
- Android - 文字轉語音
- Android - TextureView
- Android - Twitter 整合
- Android - UI 設計
- Android - UI 模式
- Android - UI 測試
- Android - WebView 佈局
- Android - Wi-Fi
- Android - 小部件
- Android - XML 解析器
- Android 實用資源
- Android - 問答
- Android - 實用資源
- Android - 討論
Android - 自定義元件
透過擴充套件子類和自定義類,在預建元件中實現自己的元件
Android 提供了大量預構建的小部件,例如 Button、TextView、EditText、ListView、CheckBox、RadioButton、Gallery、Spinner、AutoCompleteTextView 等,可以直接在 Android 應用開發中使用,但有時您可能對現有小部件的功能不滿意。Android 提供了建立自定義元件的方法,您可以根據需要對其進行自定義。
如果您只需要對現有小部件或佈局進行少量調整,只需對小部件或佈局進行子類化並重寫其方法即可,這將使您可以精確控制螢幕元素的外觀和功能。
本教程將向您解釋如何使用簡單易懂的步驟建立自定義檢視並在您的應用程式中使用它們。

自定義檢視層次結構中自定義元件的示例
建立簡單的自定義元件
| 步驟 | 描述 |
|---|---|
| 1 | 您將使用 Android Studio IDE 建立一個 Android 應用程式,並將其命名為 myapplication,其包名為 com.example.tutorialspoint7.myapplication,如Hello World 示例章節所述。 |
| 2 | 建立一個 XML 檔案 res/values/attrs.xml 來定義新的屬性及其資料型別。 |
| 3 | 建立 src/mainactivity.java 檔案並新增程式碼來定義您的自定義元件。 |
| 4 | 修改 res/layout/activity_main.xml 檔案並新增程式碼以建立 Colour 複合檢視例項,以及一些預設屬性和新屬性。 |
| 5 | 執行應用程式以啟動 Android 模擬器並驗證對應用程式所做更改的結果。 |
在您的 res/values 資料夾中建立名為 attrs.xml 的屬性檔案。
<?xml version="1.0" encoding="utf-8"?>
<resources>
   <declare-styleable name="TimeView">
      <declare-styleable name="TimeView">
         <attr name="title" format="string" />
         <attr name="setColor" format="boolean"/>
      </declare-styleable>
   </declare-styleable>
</resources>
將活動使用的佈局檔案更改為如下所示。
<?xml version="1.0" encoding="utf-8"?>
<RelativeLayout xmlns:android="http://schemas.android.com/apk/res/android"
   xmlns:tools="http://schemas.android.com/tools"
   xmlns:custom="http://schemas.android.com/apk/res-auto"
   android:layout_width="match_parent"
   android:layout_height="match_parent"
   tools:context=".MainActivity" >

   <com.example.tutorialspoint7.myapplication.TimeView
      android:id="@+id/timeView"
      android:layout_width="match_parent"
      android:layout_height="wrap_content"
      android:textColor="#fff"
      android:textSize="40sp"
      custom:title="my time view"
      custom:setColor="true" />

   <TextView
      android:layout_width="match_parent"
      android:layout_height="wrap_content"
      android:id="@+id/simple"
      android:layout_below="@id/timeView"
      android:layout_marginTop="10dp" />
</RelativeLayout>
為您的複合檢視建立名為 timeview 的 Java 檔案。
package com.example.tutorialspoint7.myapplication;
/**
 * Created by TutorialsPoint7 on 9/14/2016.
 */
import java.text.SimpleDateFormat;
import java.util.Calendar;

import android.content.Context;
import android.content.res.TypedArray;

import android.graphics.Color;
import android.util.AttributeSet;
import android.widget.TextView;

public class TimeView extends TextView {
   private String titleText;
   private boolean color;

   public TimeView(Context context) {
      super(context);
      setTimeView();
   }

   public TimeView(Context context, AttributeSet attrs) {
      super(context, attrs);
      // retrieved values correspond to the positions of the attributes
         TypedArray typedArray = context.obtainStyledAttributes(attrs,
            R.styleable.TimeView);
      int count = typedArray.getIndexCount();
      try{

         for (int i = 0; i < count; ++i) {

            int attr = typedArray.getIndex(i);
            // the attr corresponds to the title attribute
            if(attr == R.styleable.TimeView_title) {

               // set the text from the layout
               titleText = typedArray.getString(attr);
               setTimeView();
            } else if(attr == R.styleable.TimeView_setColor) {
               // set the color of the attr "setColor"
               color = typedArray.getBoolean(attr, false);
               decorateText();
            }
         }
      }

      // the recycle() will be executed obligatorily
      finally {
         // for reuse
         typedArray.recycle();
      }
   }

   public TimeView(Context context, AttributeSet attrs, int defStyle) {
      super(context, attrs, defStyle);
      setTimeView();
   }

   private void setTimeView() {
      // has the format hour.minuits am/pm
      SimpleDateFormat dateFormat = new SimpleDateFormat("hh.mm aa");
      String time = dateFormat.format(Calendar.getInstance().getTime());

      if(this.titleText != null )
      setText(this.titleText+" "+time);
      else
         setText(time);
   }

   private void decorateText() {
      // when we set setColor attribute to true in the XML layout
      if(this.color == true){
         // set the characteristics and the color of the shadow
         setShadowLayer(4, 2, 2, Color.rgb(250, 00, 250));
         setBackgroundColor(Color.CYAN);
      } else {
         setBackgroundColor(Color.RED);
      }
   }
}
將您的 MainActivity Java 檔案更改為以下程式碼並執行您的應用程式。
package com.example.tutorialspoint7.myapplication;

import android.os.Bundle;
import android.widget.TextView;
import android.app.Activity;

public class MainActivity extends Activity {

   @Override
   protected void onCreate(Bundle savedInstanceState) {
      super.onCreate(savedInstanceState);
      setContentView(R.layout.activity_main);

      TextView simpleText = (TextView) findViewById(R.id.simple);
      simpleText.setText("That is a simple TextView");
   }
}
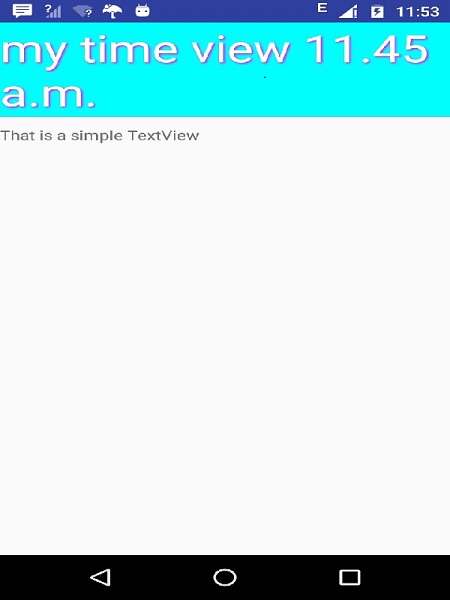
執行的應用程式應該如下面的螢幕截圖所示。
廣告