- Android 基礎
- Android - 首頁
- Android - 概述
- Android - 環境搭建
- Android - 架構
- Android - 應用元件
- Android - Hello World 示例
- Android - 資源
- Android - 活動(Activity)
- Android - 服務(Service)
- Android - 廣播接收器(Broadcast Receiver)
- Android - 內容提供器(Content Provider)
- Android - 碎片(Fragment)
- Android - 意圖/過濾器(Intents/Filters)
- Android - 使用者介面
- Android - UI 佈局
- Android - UI 控制元件
- Android - 事件處理
- Android - 樣式和主題
- Android - 自定義元件
- Android 高階概念
- Android - 拖放
- Android - 通知
- 基於位置的服務
- Android - 傳送郵件
- Android - 傳送簡訊
- Android - 電話呼叫
- 釋出 Android 應用
- Android 實用示例
- Android - 警報對話方塊
- Android - 動畫
- Android - 音訊捕獲
- Android - AudioManager
- Android - 自動完成
- Android - 最佳實踐
- Android - 藍牙
- Android - 相機
- Android - 剪貼簿
- Android - 自定義字型
- Android - 資料備份
- Android - 開發者工具
- Android - 模擬器
- Android - Facebook 整合
- Android - 手勢
- Android - Google 地圖
- Android - 圖片特效
- Android - ImageSwitcher
- Android - 內部儲存
- Android - JetPlayer
- Android - JSON 解析器
- Android - LinkedIn 整合
- Android - 載入 Spinner
- Android - 本地化
- Android - 登入螢幕
- Android - MediaPlayer
- Android - 多點觸控
- Android - 導航
- Android - 網路連線
- Android - NFC 指南
- Android - PHP/MySQL
- Android - 進度圓圈
- Android - 進度條
- Android - 推送通知
- Android - RenderScript
- Android - RSS 閱讀器
- Android - 螢幕錄製
- Android - SDK 管理器
- Android - 感測器
- Android - 會話管理
- Android - 共享首選項
- Android - SIP 協議
- Android - 拼寫檢查器
- Android - SQLite 資料庫
- Android - 支援庫
- Android - 測試
- Android - 文字轉語音
- Android - TextureView
- Android - Twitter 整合
- Android - UI 設計
- Android - UI 模式
- Android - UI 測試
- Android - WebView 佈局
- Android - Wi-Fi
- Android - 小部件
- Android - XML 解析器
- Android 實用資源
- Android - 問答
- Android - 實用資源
- Android - 討論
Android - Google 地圖
Android 允許我們在我們的應用程式中整合 Google 地圖。您可以在地圖上顯示任何位置,或在地圖上顯示不同的路線等等。您還可以根據您的選擇自定義地圖。
Google 地圖 - 佈局檔案
現在您需要將地圖片段新增到 xml 佈局檔案中。其語法如下所示:
<fragment
   android:id="@+id/map"
   android:name="com.google.android.gms.maps.MapFragment"
   android:layout_width="match_parent"
   android:layout_height="match_parent"/>
Google 地圖 - AndroidManifest 檔案
接下來您需要做的是在 AndroidManifest.XML 檔案中新增一些許可權以及 Google 地圖 API 金鑰。其語法如下所示:
<!--Permissions-->

<uses-permission android:name="android.permission.ACCESS_NETWORK_STATE" />
<uses-permission android:name="android.permission.INTERNET" />
<uses-permission android:name="com.google.android.providers.gsf.permission.
   READ_GSERVICES" />
<uses-permission android:name="android.permission.WRITE_EXTERNAL_STORAGE" />

<!--Google MAP API key-->

<meta-data
   android:name="com.google.android.maps.v2.API_KEY"
   android:value="AIzaSyDKymeBXNeiFWY5jRUejv6zItpmr2MVyQ0" />
自定義 Google 地圖
您可以輕鬆地從其預設檢視自定義 Google 地圖,並根據您的需求進行更改。
新增標記
您可以在地圖上放置一個帶有某些文字的標記,以顯示您的位置。這可以透過 **addMarker()** 方法完成。其語法如下所示:
final LatLng TutorialsPoint = new LatLng(21 , 57);
Marker TP = googleMap.addMarker(new MarkerOptions()
   .position(TutorialsPoint).title("TutorialsPoint"));
更改地圖型別
您還可以更改地圖的型別。有四種不同的地圖型別,每種型別都提供地圖的不同檢視。這些型別是普通、混合、衛星和地形。您可以按如下方式使用它們:
googleMap.setMapType(GoogleMap.MAP_TYPE_NORMAL);
googleMap.setMapType(GoogleMap.MAP_TYPE_HYBRID);
googleMap.setMapType(GoogleMap.MAP_TYPE_SATELLITE);
googleMap.setMapType(GoogleMap.MAP_TYPE_TERRAIN);
啟用/停用縮放
您還可以透過呼叫 **setZoomControlsEnabled(boolean)** 方法啟用或停用地圖中的縮放手勢。其語法如下所示:
googleMap.getUiSettings().setZoomGesturesEnabled(true);
除了這些自定義之外,GoogleMap 類中還有其他方法可幫助您進一步自定義地圖。它們列在下面:
| 序號 | 方法和描述 |
|---|---|
| 1 |
addCircle(CircleOptions options) 此方法在地圖上新增一個圓圈。 |
| 2 |
addPolygon(PolygonOptions options) 此方法在地圖上新增一個多邊形。 |
| 3 |
addTileOverlay(TileOverlayOptions options) 此方法在地圖上新增瓦片覆蓋層。 |
| 4 |
animateCamera(CameraUpdate update) 此方法根據更新使用動畫移動地圖。 |
| 5 |
clear() 此方法從地圖中刪除所有內容。 |
| 6 |
getMyLocation() 此方法返回當前顯示的使用者位置。 |
| 7 |
moveCamera(CameraUpdate update) 此方法根據更新中定義的指令重新定位相機。 |
| 8 |
setTrafficEnabled(boolean enabled) 此方法切換交通圖層是否開啟。 |
| 9 |
snapshot(GoogleMap.SnapshotReadyCallback callback) 此方法擷取地圖的快照。 |
| 10 | stopAnimation() 如果正在進行相機動畫,此方法會停止該動畫。 |
示例
這是一個演示 GoogleMap 類用法的示例。它建立了一個基本的 M 應用程式,允許您在地圖中導航。
要試驗此示例,您可以在實際裝置或模擬器上執行它。
建立一個專案,其中包含如下所示的 Google 地圖活動:

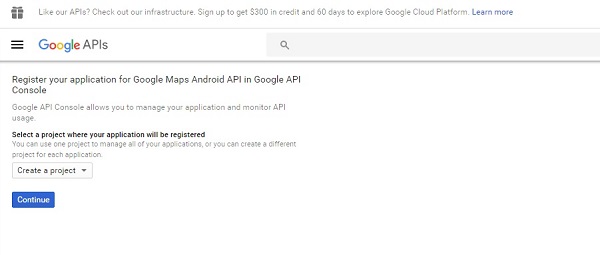
它將開啟以下螢幕,並複製 API 金鑰的控制檯 URL,如下所示:

複製並將其貼上到您的瀏覽器中。它將顯示以下螢幕:

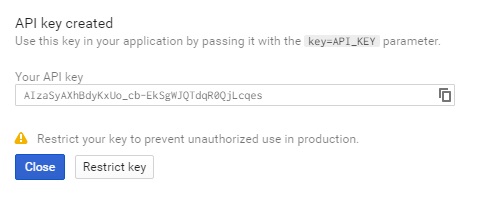
點選繼續並點選建立 API 金鑰,然後它將顯示以下螢幕:

以下是 **activity_main.xml** 的內容。
<fragment xmlns:android="http://schemas.android.com/apk/res/android"
   xmlns:map="http://schemas.android.com/apk/res-auto"
   xmlns:tools="http://schemas.android.com/tools"
   android:id="@+id/map"
   android:name="com.google.android.gms.maps.SupportMapFragment"
   android:layout_width="match_parent"
   android:layout_height="match_parent"
   tools:context="com.example.tutorialspoint7.myapplication.MapsActivity" />
以下是 **MapActivity.java** 的內容。
在下面的程式碼中,我們給出了示例緯度和經度詳細資訊。
package com.example.tutorialspoint7.myapplication;

import android.support.v4.app.FragmentActivity;
import android.os.Bundle;

import com.google.android.gms.maps.CameraUpdateFactory;
import com.google.android.gms.maps.GoogleMap;
import com.google.android.gms.maps.OnMapReadyCallback;
import com.google.android.gms.maps.SupportMapFragment;
import com.google.android.gms.maps.model.LatLng;
import com.google.android.gms.maps.model.MarkerOptions;

public class MapsActivity extends FragmentActivity implements OnMapReadyCallback {

   private GoogleMap mMap;

   @Override
   protected void onCreate(Bundle savedInstanceState) {
      super.onCreate(savedInstanceState);
      setContentView(R.layout.activity_maps);
      // Obtain the SupportMapFragment and get notified when the map is ready to be used.
      SupportMapFragment mapFragment = (SupportMapFragment) getSupportFragmentManager()
         .findFragmentById(R.id.map);
      mapFragment.getMapAsync(this);
   }

   /**
      * Manipulates the map once available.
      * This callback is triggered when the map is ready to be used.
      * This is where we can add markers or lines, add listeners or move the camera.
      * In this case, we just add a marker near Sydney, Australia.
      * If Google Play services is not installed on the device.
      * This method will only be triggered once the user has installed
         Google Play services and returned to the app.
   */

   @Override
   public void onMapReady(GoogleMap googleMap) {
      mMap = googleMap;
      // Add a marker in Sydney and move the camera
      LatLng TutorialsPoint = new LatLng(21, 57);
      mMap.addMarker(new
         MarkerOptions().position(TutorialsPoint).title("Tutorialspoint.com"));
      mMap.moveCamera(CameraUpdateFactory.newLatLng(TutorialsPoint));
   }
}
以下是 **AndroidManifest.xml** 檔案的內容。
<?xml version="1.0" encoding="utf-8"?>
<manifest xmlns:android="http://schemas.android.com/apk/res/android"
    package="com.example.tutorialspoint7.myapplication">

   <!--
      The ACCESS_COARSE/FINE_LOCATION permissions are not required to use
      Google Maps Android API v2, but you must specify either coarse or fine
      location permissions for the 'MyLocation' functionality.
   -->

   <uses-permission android:name="android.permission.ACCESS_FINE_LOCATION" />
   <uses-permission android:name="android.permission.ACCESS_COARSE_LOCATION" />
   <uses-permission android:name="android.permission.INTERNET" />
   <application
      android:allowBackup="true"
      android:icon="@mipmap/ic_launcher"
      android:label="@string/app_name"
      android:supportsRtl="true"
      android:theme="@style/AppTheme">

      <!--
         The API key for Google Maps-based APIs is defined as a string resource.
         (See the file "res/values/google_maps_api.xml").
         Note that the API key is linked to the encryption key used to sign the APK.
         You need a different API key for each encryption key, including the release key
         that is used to sign the APK for publishing.
         You can define the keys for the debug and
            release targets in src/debug/ and src/release/.
      -->

      <meta-data
         android:name="com.google.android.geo.API_KEY"
         android:value="AIzaSyAXhBdyKxUo_cb-EkSgWJQTdqR0QjLcqes" />

      <activity
         android:name=".MapsActivity"
         android:label="@string/title_activity_maps">
         <intent-filter>
            <action android:name="android.intent.action.MAIN" />
            <category android:name="android.intent.category.LAUNCHER" />
         </intent-filter>
      </activity>
   </application>

</manifest>
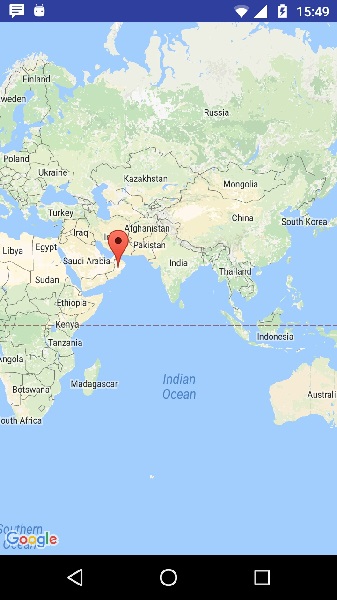
輸出應如下所示:

