
- Android 基礎
- Android - 首頁
- Android - 概述
- Android - 環境搭建
- Android - 架構
- Android - 應用元件
- Android - Hello World 示例
- Android - 資源
- Android - 活動
- Android - 服務
- Android - 廣播接收器
- Android - 內容提供器
- Android - 碎片
- Android - 意圖/過濾器
- Android - 使用者介面
- Android - UI 佈局
- Android - UI 控制元件
- Android - 事件處理
- Android - 樣式和主題
- Android - 自定義元件
- Android 高階概念
- Android - 拖放
- Android - 通知
- 基於位置的服務
- Android - 傳送郵件
- Android - 傳送簡訊
- Android - 打電話
- 釋出 Android 應用
- Android 實用示例
- Android - 警報對話方塊
- Android - 動畫
- Android - 音訊捕獲
- Android - 音訊管理器
- Android - 自動完成
- Android - 最佳實踐
- Android - 藍牙
- Android - 相機
- Android - 剪貼簿
- Android - 自定義字型
- Android - 資料備份
- Android - 開發者工具
- Android - 模擬器
- Android - Facebook 整合
- Android - 手勢
- Android - Google 地圖
- Android - 影像特效
- Android - ImageSwitcher
- Android - 內部儲存
- Android - JetPlayer
- Android - JSON 解析器
- Android - Linkedin 整合
- Android - 載入微調器
- Android - 本地化
- Android - 登入介面
- Android - MediaPlayer
- Android - 多點觸控
- Android - 導航
- Android - 網路連線
- Android - NFC 指南
- Android - PHP/MySQL
- Android - 進度圓圈
- Android - 進度條
- Android - 推送通知
- Android - RenderScript
- Android - RSS 閱讀器
- Android - 螢幕錄製
- Android - SDK 管理器
- Android - 感測器
- Android - 會話管理
- Android - 共享首選項
- Android - SIP 協議
- Android - 拼寫檢查器
- Android - SQLite 資料庫
- Android - 支援庫
- Android - 測試
- Android - 文字轉語音
- Android - TextureView
- Android - Twitter 整合
- Android - UI 設計
- Android - UI 模式
- Android - UI 測試
- Android - WebView 佈局
- Android - Wi-Fi
- Android - 小部件
- Android - XML 解析器
- Android 實用資源
- Android - 常見問題解答
- Android - 實用資源
- Android - 討論
Android - 基於位置的服務
Android 位置 API 使您能夠輕鬆構建位置感知應用程式,而無需關注底層位置技術的細節。
這得益於 **Google Play 服務**,它透過自動位置跟蹤、地理圍欄和活動識別來簡化在您的應用中新增位置感知功能。
本教程將向您展示如何在您的 APP 中使用位置服務來獲取當前位置、獲取定期位置更新、查詢地址等。
位置物件
**Location** 物件表示一個地理位置,它可以包含緯度、經度、時間戳以及其他資訊,如方位角、海拔和速度。您可以使用以下重要方法來獲取位置特定資訊:
| 序號 | 方法及描述 |
|---|---|
| 1 |
float distanceTo(Location dest) 返回此位置與給定位置之間的近似距離(單位:米)。 |
| 2 |
float getAccuracy() 獲取此位置的估計精度(單位:米)。 |
| 3 |
double getAltitude() 獲取海拔(如果可用),單位為海平面以上米數。 |
| 4 |
float getBearing() 獲取方位角(單位:度)。 |
| 5 |
double getLatitude() 獲取緯度(單位:度)。 |
| 6 | double getLongitude() 獲取經度(單位:度)。 |
| 7 | float getSpeed() 獲取速度(如果可用),單位為地面上的米/秒。 |
| 8 |
boolean hasAccuracy() 如果此位置具有精度,則返回 true。 |
| 9 |
boolean hasAltitude() 如果此位置具有海拔,則返回 true。 |
| 10 |
boolean hasBearing() 如果此位置具有方位角,則返回 true。 |
| 11 |
boolean hasSpeed() 如果此位置具有速度,則返回 true。 |
| 12 |
void reset() 清除位置內容。 |
| 13 |
void setAccuracy(float accuracy) 設定此位置的估計精度(單位:米)。 |
| 14 |
void setAltitude(double altitude) 設定海拔(單位:海平面以上米數)。 |
| 15 |
void setBearing(float bearing) 設定方位角(單位:度)。 |
| 16 |
void setLatitude(double latitude) 設定緯度(單位:度)。 |
| 17 |
void setLongitude(double longitude) 設定經度(單位:度)。 |
| 18 | void setSpeed(float speed) 設定速度(單位:地面上的米/秒)。 |
| 19 |
String toString() 返回一個包含此物件的簡潔、易於理解的描述的字串。 |
獲取當前位置
要獲取當前位置,請建立一個位置客戶端,即 **LocationClient** 物件,使用 **connect()** 方法將其連線到位置服務,然後呼叫其 **getLastLocation()** 方法。此方法返回最近的位置,以 **Location** 物件的形式,其中包含緯度和經度座標以及如上所述的其他資訊。要在您的活動中使用基於位置的功能,您必須實現兩個介面:
- GooglePlayServicesClient.ConnectionCallbacks
- GooglePlayServicesClient.OnConnectionFailedListener
這些介面提供以下重要的回撥方法,您需要在您的活動類中實現它們:
| 序號 | 回撥方法及描述 |
|---|---|
| 1 |
abstract void onConnected(Bundle connectionHint) 當位置服務成功連線到位置客戶端時,將呼叫此回撥方法。您將使用 **connect()** 方法連線到位置客戶端。 |
| 2 |
abstract void onDisconnected() 當客戶端斷開連線時,將呼叫此回撥方法。您將使用 **disconnect()** 方法斷開與位置客戶端的連線。 |
| 3 |
abstract void onConnectionFailed(ConnectionResult result) 當客戶端連線到服務時發生錯誤時,將呼叫此回撥方法。 |
您應該在活動的 **onCreate()** 方法中建立位置客戶端,然後在 **onStart()** 中連線它,以便位置服務在您的活動完全可見時維護當前位置。您應該在 **onStop()** 方法中斷開客戶端的連線,以便當您的應用不可見時,位置服務不會維護當前位置。這有助於在很大程度上節省電池電量。
獲取更新的位置
如果您希望獲得位置更新,那麼除了上面提到的介面之外,您還需要實現 **LocationListener** 介面。此介面提供以下回調方法,您需要在您的活動類中實現它:
| 序號 | 回撥方法及描述 |
|---|---|
| 1 |
abstract void onLocationChanged(Location location) 此回撥方法用於接收來自 LocationClient 的通知,通知位置已更改。 |
位置服務質量
**LocationRequest** 物件用於從 **LocationClient** 請求位置更新的服務質量 (QoS)。以下是一些可用於處理 QoS 的有用 setter 方法。在 Android 官方文件中,您可以檢視相應的 getter 方法。
| 序號 | 方法及描述 |
|---|---|
| 1 |
setExpirationDuration(long millis) 設定此請求的持續時間(單位:毫秒)。 |
| 2 |
setExpirationTime(long millis) 設定請求過期時間(單位:自啟動以來的毫秒數)。 |
| 3 |
setFastestInterval(long millis) 顯式設定位置更新的最短間隔(單位:毫秒)。 |
| 4 |
setInterval(long millis) 設定活動位置更新的所需間隔(單位:毫秒)。 |
| 5 |
setNumUpdates(int numUpdates) 設定位置更新次數。 |
| 6 |
setPriority(int priority) 設定請求的優先順序。 |
例如,如果您的應用程式需要高精度位置,則應建立一個位置請求,將 **setPriority(int)** 設定為 PRIORITY_HIGH_ACCURACY,並將 **setInterval(long)** 設定為 5 秒。您還可以使用更大的間隔和/或其他優先順序(如 PRIORITY_LOW_POWER 以請求“城市”級別的精度或 PRIORITY_BALANCED_POWER_ACCURACY 以請求“街區”級別的精度)。
活動應認真考慮在進入後臺時(例如在 onPause() 中)刪除所有位置請求,或者至少將請求切換到更大的間隔和更低的質量以節省電量。
顯示位置地址
獲得 **Location** 物件後,您可以使用 **Geocoder.getFromLocation()** 方法獲取給定緯度和經度的地址。此方法是同步的,可能需要很長時間才能完成其工作,因此您應該從 **AsyncTask** 類的 **doInBackground()** 方法中呼叫此方法。
**AsyncTask** 必須進行子類化才能使用,子類將覆蓋 **doInBackground(Params...)** 方法在後臺執行任務,並且 **onPostExecute(Result)** 方法在後臺計算完成後以及在顯示結果時在 UI 執行緒上被呼叫。AsyncTask 中還有一個重要的可用方法,即 **execute(Params... params)**,此方法使用指定的引數執行任務。
示例
以下示例將向您展示如何在實踐中使用應用中的位置服務來獲取當前位置及其相應的地址等。
要體驗此示例,您需要配備最新 Android 作業系統的實際移動裝置,否則您將不得不與可能無法正常工作的模擬器作鬥爭。
建立 Android 應用
| 步驟 | 描述 |
|---|---|
| 1 | 您將使用 Android Studio IDE 建立一個 Android 應用,並將其命名為 *Tutorialspoint*,位於包 *com.example.tutorialspoint7.myapplication* 下。 |
| 2 | 新增 *src/GPSTracker.java* 檔案並新增所需的程式碼。 |
| 3 | 修改 *src/MainActivity.java* 檔案,並新增如下所示的所需程式碼,以處理獲取當前位置及其相應地址。 |
| 4 | 修改佈局 XML 檔案 *res/layout/activity_main.xml*,新增所有 GUI 元件,包括三個按鈕和兩個文字檢視以顯示位置/地址。 |
| 5 | 修改 *res/values/strings.xml* 以定義所需的常量值 |
| 6 | 修改 *AndroidManifest.xml*,如下所示 |
| 7 | 執行應用以啟動 Android 模擬器並驗證對應用所做的更改的結果。 |
以下是修改後的主活動檔案 **MainActivity.java** 的內容。
package com.example.tutorialspoint7.myapplication;

import android.Manifest;
import android.app.Activity;
import android.os.Bundle;
import android.support.v4.app.ActivityCompat;
import android.test.mock.MockPackageManager;
import android.view.View;
import android.widget.Button;
import android.widget.Toast;

public class MainActivity extends Activity {

   Button btnShowLocation;
   private static final int REQUEST_CODE_PERMISSION = 2;
   String mPermission = Manifest.permission.ACCESS_FINE_LOCATION;

   // GPSTracker class
   GPSTracker gps;

   @Override
   public void onCreate(Bundle savedInstanceState) {
      super.onCreate(savedInstanceState);
      setContentView(R.layout.activity_main);

      try {
         if (ActivityCompat.checkSelfPermission(this, mPermission)
            != MockPackageManager.PERMISSION_GRANTED) {

            ActivityCompat.requestPermissions(this, new String[]{mPermission},
               REQUEST_CODE_PERMISSION);

            // If any permission above not allowed by user, this condition will
               execute every time, else your else part will work
         }
      } catch (Exception e) {
         e.printStackTrace();
      }

      btnShowLocation = (Button) findViewById(R.id.button);

      // show location button click event
      btnShowLocation.setOnClickListener(new View.OnClickListener() {

         @Override
         public void onClick(View arg0) {
            // create class object
            gps = new GPSTracker(MainActivity.this);

            // check if GPS enabled
            if(gps.canGetLocation()){

               double latitude = gps.getLatitude();
               double longitude = gps.getLongitude();

               // \n is for new line
               Toast.makeText(getApplicationContext(), "Your Location is - \nLat: "
                  + latitude + "\nLong: " + longitude, Toast.LENGTH_LONG).show();
            }else{
               // can't get location
               // GPS or Network is not enabled
               // Ask user to enable GPS/network in settings
               gps.showSettingsAlert();
            }

         }
      });
   }
}
以下是修改後的主活動檔案 **GPSTracker.java** 的內容。
package com.example.tutorialspoint7.myapplication;

import android.app.AlertDialog;
import android.app.Service;
import android.content.Context;
import android.content.DialogInterface;
import android.content.Intent;
import android.location.Location;
import android.location.LocationListener;
import android.location.LocationManager;
import android.os.Bundle;
import android.os.IBinder;
import android.provider.Settings;
import android.util.Log;

public class GPSTracker extends Service implements LocationListener {

   private final Context mContext;

   // flag for GPS status
   boolean isGPSEnabled = false;

   // flag for network status
   boolean isNetworkEnabled = false;

   // flag for GPS status
   boolean canGetLocation = false;

   Location location; // location
   double latitude; // latitude
   double longitude; // longitude

   // The minimum distance to change Updates in meters
   private static final long MIN_DISTANCE_CHANGE_FOR_UPDATES = 10; // 10 meters

   // The minimum time between updates in milliseconds
   private static final long MIN_TIME_BW_UPDATES = 1000 * 60 * 1; // 1 minute

   // Declaring a Location Manager
   protected LocationManager locationManager;

   public GPSTracker(Context context) {
      this.mContext = context;
      getLocation();
   }

   public Location getLocation() {
      try {
         locationManager = (LocationManager) mContext.getSystemService(LOCATION_SERVICE);

         // getting GPS status
         isGPSEnabled = locationManager.isProviderEnabled(LocationManager.GPS_PROVIDER);

         // getting network status
         isNetworkEnabled = locationManager
            .isProviderEnabled(LocationManager.NETWORK_PROVIDER);

         if (!isGPSEnabled && !isNetworkEnabled) {
            // no network provider is enabled
         } else {
            this.canGetLocation = true;
            // First get location from Network Provider
            if (isNetworkEnabled) {
               locationManager.requestLocationUpdates(
                  LocationManager.NETWORK_PROVIDER,
                  MIN_TIME_BW_UPDATES,
                  MIN_DISTANCE_CHANGE_FOR_UPDATES, this);

               Log.d("Network", "Network");
               if (locationManager != null) {
                  location = locationManager
                     .getLastKnownLocation(LocationManager.NETWORK_PROVIDER);

                  if (location != null) {
                     latitude = location.getLatitude();
                     longitude = location.getLongitude();
                  }
               }
            }

            // if GPS Enabled get lat/long using GPS Services
            if (isGPSEnabled) {
               if (location == null) {
                  locationManager.requestLocationUpdates(
                     LocationManager.GPS_PROVIDER,
                     MIN_TIME_BW_UPDATES,
                     MIN_DISTANCE_CHANGE_FOR_UPDATES, this);

                  Log.d("GPS Enabled", "GPS Enabled");
                  if (locationManager != null) {
                     location = locationManager
                        .getLastKnownLocation(LocationManager.GPS_PROVIDER);

                     if (location != null) {
                        latitude = location.getLatitude();
                        longitude = location.getLongitude();
                     }
                  }
               }
            }
         }

      } catch (Exception e) {
         e.printStackTrace();
      }

      return location;
   }

   /**
      * Stop using GPS listener
      * Calling this function will stop using GPS in your app
   * */

   public void stopUsingGPS(){
      if(locationManager != null){
         locationManager.removeUpdates(GPSTracker.this);
      }
   }

   /**
      * Function to get latitude
   * */

   public double getLatitude(){
      if(location != null){
         latitude = location.getLatitude();
      }

      // return latitude
      return latitude;
   }

   /**
      * Function to get longitude
   * */

   public double getLongitude(){
      if(location != null){
         longitude = location.getLongitude();
      }

      // return longitude
      return longitude;
   }

   /**
      * Function to check GPS/wifi enabled
      * @return boolean
   * */

   public boolean canGetLocation() {
      return this.canGetLocation;
   }

   /**
      * Function to show settings alert dialog
      * On pressing Settings button will lauch Settings Options
   * */

   public void showSettingsAlert(){
      AlertDialog.Builder alertDialog = new AlertDialog.Builder(mContext);

      // Setting Dialog Title
      alertDialog.setTitle("GPS is settings");

      // Setting Dialog Message
      alertDialog.setMessage("GPS is not enabled. Do you want to go to settings menu?");

      // On pressing Settings button
      alertDialog.setPositiveButton("Settings", new DialogInterface.OnClickListener() {
         public void onClick(DialogInterface dialog,int which) {
            Intent intent = new Intent(Settings.ACTION_LOCATION_SOURCE_SETTINGS);
            mContext.startActivity(intent);
         }
      });

      // on pressing cancel button
      alertDialog.setNegativeButton("Cancel", new DialogInterface.OnClickListener() {
         public void onClick(DialogInterface dialog, int which) {
            dialog.cancel();
         }
      });

      // Showing Alert Message
      alertDialog.show();
   }

   @Override
   public void onLocationChanged(Location location) {
   }

   @Override
   public void onProviderDisabled(String provider) {
   }

   @Override
   public void onProviderEnabled(String provider) {
   }

   @Override
   public void onStatusChanged(String provider, int status, Bundle extras) {
   }

   @Override
   public IBinder onBind(Intent arg0) {
      return null;
   }
}
**res/layout/activity_main.xml** 檔案的內容如下:
<?xml version = "1.0" encoding = "utf-8"?>
<LinearLayout xmlns:android = "http://schemas.android.com/apk/res/android"
   android:layout_width = "fill_parent"
   android:layout_height = "fill_parent"
   android:orientation = "vertical" >


   <Button
      android:id = "@+id/button"
      android:layout_width = "fill_parent"
      android:layout_height = "wrap_content"
      android:text = "getlocation"/>

</LinearLayout>
**res/values/strings.xml** 檔案的內容如下,用於定義兩個新的常量:
<?xml version = "1.0" encoding = "utf-8"?>
<resources>
   <string name = "app_name">Tutorialspoint</string>
</resources>
**AndroidManifest.xml** 檔案的預設內容如下:
<?xml version = "1.0" encoding = "utf-8"?>
<manifest xmlns:android = "http://schemas.android.com/apk/res/android"
   package = "com.example.tutorialspoint7.myapplication">
   <uses-permission android:name = "android.permission.ACCESS_FINE_LOCATION" />
   <uses-permission android:name = "android.permission.INTERNET" />
   <application
      android:allowBackup = "true"
      android:icon = "@mipmap/ic_launcher"
      android:label = "@string/app_name"
      android:supportsRtl = "true"
      android:theme = "@style/AppTheme">

      <activity android:name = ".MainActivity">
         <intent-filter>
            <action android:name = "android.intent.action.MAIN" />

            <category android:name = "android.intent.category.LAUNCHER" />
         </intent-filter>
      </activity>
   </application>

</manifest>
讓我們嘗試執行您的Tutorialspoint應用程式。我假設您已將您的實際Android移動裝置連線到您的電腦。要從Android Studio執行應用程式,請開啟專案中的一個活動檔案,然後點選工具欄中的執行 圖示。在啟動應用程式之前,Android Studio安裝程式將顯示以下視窗,供您選擇要執行Android應用程式的位置。
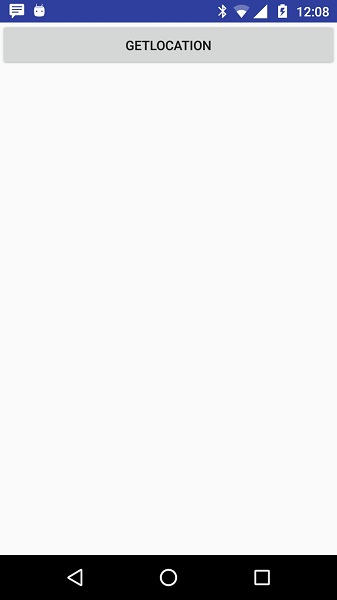
現在要檢視位置,請選擇“獲取位置”按鈕,它將顯示如下位置資訊:
