- Android基礎
- Android - 首頁
- Android - 概述
- Android - 環境搭建
- Android - 架構
- Android - 應用元件
- Android - Hello World 示例
- Android - 資源
- Android - 活動(Activity)
- Android - 服務(Service)
- Android - 廣播接收器(Broadcast Receiver)
- Android - 內容提供器(Content Provider)
- Android - Fragment
- Android - Intent/過濾器
- Android - 使用者介面
- Android - UI 佈局
- Android - UI 控制元件
- Android - 事件處理
- Android - 樣式和主題
- Android - 自定義元件
- Android 高階概念
- Android - 拖放
- Android - 通知
- 基於位置的服務
- Android - 傳送郵件
- Android - 傳送簡訊
- Android - 打電話
- 釋出 Android 應用
- Android 實用示例
- Android - 警報對話方塊
- Android - 動畫
- Android - 音訊捕獲
- Android - AudioManager
- Android - 自動完成
- Android - 最佳實踐
- Android - 藍牙
- Android - 相機
- Android - 剪貼簿
- Android - 自定義字型
- Android - 資料備份
- Android - 開發者工具
- Android - 模擬器
- Android - Facebook 整合
- Android - 手勢
- Android - 谷歌地圖
- Android - 圖片特效
- Android - ImageSwitcher
- Android - 內部儲存
- Android - JetPlayer
- Android - JSON 解析器
- Android - LinkedIn 整合
- Android - 載入動畫
- Android - 本地化
- Android - 登入介面
- Android - MediaPlayer
- Android - 多點觸控
- Android - 導航
- Android - 網路連線
- Android - NFC 指南
- Android - PHP/MySQL
- Android - 進度圓圈
- Android - ProgressBar
- Android - 推送通知
- Android - RenderScript
- Android - RSS 閱讀器
- Android - 螢幕錄製
- Android - SDK 管理器
- Android - 感測器
- Android - 會話管理
- Android - Shared Preferences
- Android - SIP 協議
- Android - 拼寫檢查器
- Android - SQLite 資料庫
- Android - Support Library
- Android - 測試
- Android - 文字轉語音
- Android - TextureView
- Android - Twitter 整合
- Android - UI 設計
- Android - UI 模式
- Android - UI 測試
- Android - WebView 佈局
- Android - Wi-Fi
- Android - 小部件
- Android - XML 解析器
- Android 實用資源
- Android - 問答
- Android - 實用資源
- Android - 討論
Android - 列表Fragment
框架的ListFragment的靜態庫支援版本。用於編寫在Android 3.0之前的平臺上執行的應用程式。在Android 3.0或更高版本上執行時,仍然使用此實現。
列表Fragment的基本實現用於在Fragment中建立專案列表。
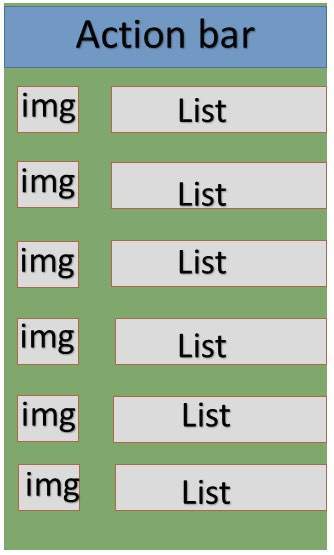
Fragment中的列表
示例
此示例將向您解釋如何基於ArrayAdapter建立自己的列表Fragment。因此,讓我們按照以下步驟操作,類似於我們在建立Hello World示例時所遵循的步驟:
| 步驟 | 描述 |
|---|---|
| 1 | 您將使用Android Studio建立一個Android應用程式,並將其命名為SimpleListFragment,包名為com.example.tutorialspoint7.myapplication,使用空白Activity。 |
| 2 | 修改字串檔案(位於res/values/string.xml),以新增新的字串常量。 |
| 3 | 建立一個名為list_fragment.xml的佈局(位於res/layout目錄下),以定義您的列表Fragment,並將fragment標籤(<fragment>)新增到您的activity_main.xml。 |
| 4 | 建立一個myListFragment.java檔案(位於java/myListFragment.java),其中包含onCreateView()、onActivityCreated()和OnItemClickListener()。 |
| 5 | 執行應用程式以啟動Android模擬器,並驗證對應用程式所做的更改的結果。 |
在開始編碼之前,我將在res/values目錄下的string.xml檔案中初始化字串常量。
<?xml version="1.0" encoding="utf-8"?>
<resources>
   <string name="app_name">ListFragmentDemo</string>
   <string name="action_settings">Settings</string>
   <string name="hello_world">Hello world!</string>
   <string name="imgdesc">imgdesc</string>

   <string-array name="Planets">
      <item>Sun</item>
      <item>Mercury</item>
      <item>Venus</item>
      <item>Earth</item>
      <item>Mars</item>
      <item>Jupiter</item>
      <item>Saturn</item>
      <item>Uranus</item>
      <item>Neptune</item>
   </string-array>

</resources>
以下是res/layout/activity_main.xml檔案的內容。它包含線性佈局和fragment標籤。
<?xml version="1.0" encoding="utf-8"?>
<LinearLayout
   xmlns:android="http://schemas.android.com/apk/res/android"
   android:layout_width="match_parent"
   android:layout_height="match_parent"
   android:orientation="vertical" >

   <fragment
      android:id="@+id/fragment1"
      android:name="com.example.tutorialspoint7.myapplication.MyListFragment"
      android:layout_width="match_parent"
      android:layout_height="match_parent" />

</LinearLayout>
以下是res/layout/list_fragment.xml檔案的內容。它包含線性佈局、ListView和TextView。
<?xml version="1.0" encoding="utf-8"?>
<LinearLayout
   xmlns:android="http://schemas.android.com/apk/res/android"
   android:layout_width="match_parent"
   android:layout_height="match_parent"
   android:orientation="vertical" >

   <ListView
      android:id="@android:id/list"
      android:layout_width="match_parent"
      android:layout_height="wrap_content" >
   </ListView>

   <TextView
      android:id="@android:id/empty"
      android:layout_width="match_parent"
      android:layout_height="wrap_content" >
   </TextView>
</LinearLayout>
以下是src/main/java/myListFragment.java檔案的內容。在編寫程式碼之前,需要按照以下步驟操作:
建立一個名為MyListFragment的類,並將其擴充套件到ListFragment。
在onCreateView()方法中,使用上面定義的list_fragment xml佈局填充檢視。
在onActivityCreated()方法中,從資源(即使用字串陣列R.array.planet,您可以在string.xml中找到它)建立一個ArrayAdapter,並將此介面卡設定為ListView,並設定OnItemClickListener。
在OnItemClickListener()方法中,顯示一條包含被點選項名稱的Toast訊息。
package com.example.tutorialspoint7.myapplication;

import android.annotation.SuppressLint;
import android.app.ListFragment;
import android.os.Bundle;

import android.view.LayoutInflater;
import android.view.View;
import android.view.ViewGroup;

import android.widget.AdapterView;
import android.widget.AdapterView.OnItemClickListener;
import android.widget.ArrayAdapter;
import android.widget.Toast;

public class MyListFragment extends ListFragment implements OnItemClickListener {
   @Override
   public View onCreateView(LayoutInflater inflater,
      ViewGroup container, Bundle savedInstanceState) {
      View view = inflater.inflate(R.layout.list_fragment, container, false);
      return view;
   }

   @Override
   public void onActivityCreated(Bundle savedInstanceState) {
      super.onActivityCreated(savedInstanceState);
      ArrayAdapter adapter = ArrayAdapter.createFromResource(getActivity(),
         R.array.Planets, android.R.layout.simple_list_item_1);
      setListAdapter(adapter);
      getListView().setOnItemClickListener(this);
   }

   @Override
   public void onItemClick(AdapterView<?> parent, View view, int position,long id) {
      Toast.makeText(getActivity(), "Item: " + position, Toast.LENGTH_SHORT).show();
   }
}
以下程式碼是MainActivity.java的內容。
package com.example.tutorialspoint7.myapplication;

import android.support.v7.app.AppCompatActivity;
import android.os.Bundle;

public class MainActivity extends AppCompatActivity {

   @Override
   protected void onCreate(Bundle savedInstanceState) {
      super.onCreate(savedInstanceState);
      setContentView(R.layout.activity_main);
   }
}
以下程式碼是AndroidManifest.xml的內容(位於res/AndroidManifest.xml)。
<?xml version="1.0" encoding="utf-8"?>
<manifest xmlns:android="http://schemas.android.com/apk/res/android"
   package="com.example.tutorialspoint7.myapplication">

   <application
      android:allowBackup="true"
      android:icon="@mipmap/ic_launcher"
      android:label="@string/app_name"
      android:supportsRtl="true"
      android:theme="@style/AppTheme">
      <activity android:name=".MainActivity">
         <intent-filter>
            <action android:name="android.intent.action.MAIN" />

            <category android:name="android.intent.category.LAUNCHER" />
         </intent-filter>
      </activity>
   </application>
</manifest>
執行應用程式
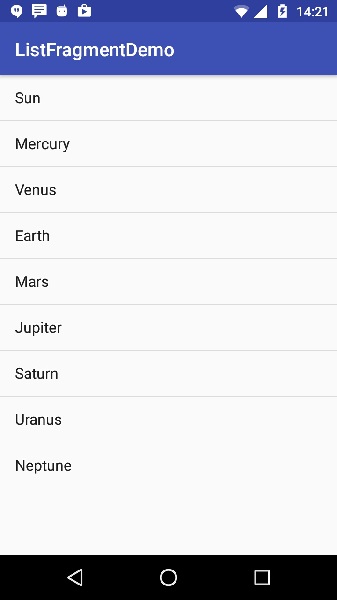
讓我們嘗試執行我們剛剛建立的SimpleListFragment應用程式。我假設您在進行環境設定時已經建立了您的AVD。要在Android Studio中執行該應用程式,請開啟專案中的一個activity檔案,然後點選工具欄中的執行 圖示。Android將應用程式安裝到您的AVD並啟動它,如果您的設定和應用程式一切正常,它將顯示以下模擬器視窗: