
- Android 基礎
- Android - 首頁
- Android - 概述
- Android - 環境搭建
- Android - 架構
- Android - 應用元件
- Android - Hello World 例子
- Android - 資源
- Android - 活動 (Activities)
- Android - 服務 (Services)
- Android - 廣播接收器 (Broadcast Receivers)
- Android - 內容提供者 (Content Providers)
- Android - 碎片 (Fragments)
- Android - 意圖/過濾器 (Intents/Filters)
- Android - 使用者介面
- Android - UI 佈局
- Android - UI 控制元件
- Android - 事件處理
- Android - 樣式和主題
- Android - 自定義元件
- Android 高階概念
- Android - 拖放
- Android - 通知
- 基於位置的服務
- Android - 傳送郵件
- Android - 傳送簡訊
- Android - 電話呼叫
- 釋出 Android 應用
- Android 實用示例
- Android - 警報對話方塊
- Android - 動畫
- Android - 音訊捕獲
- Android - AudioManager
- Android - 自動完成
- Android - 最佳實踐
- Android - 藍牙
- Android - 相機
- Android - 剪貼簿
- Android - 自定義字型
- Android - 資料備份
- Android - 開發者工具
- Android - 模擬器
- Android - Facebook 整合
- Android - 手勢
- Android - Google 地圖
- Android - 圖片特效
- Android - ImageSwitcher
- Android - 內部儲存
- Android - JetPlayer
- Android - JSON 解析器
- Android - LinkedIn 整合
- Android - 載入進度指示器
- Android - 本地化
- Android - 登入介面
- Android - MediaPlayer
- Android - 多點觸控
- Android - 導航
- Android - 網路連線
- Android - NFC 指南
- Android - PHP/MySQL
- Android - 進度圓圈
- Android - 進度條
- Android - 推送通知
- Android - RenderScript
- Android - RSS 閱讀器
- Android - 螢幕錄製
- Android - SDK 管理器
- Android - 感測器
- Android - 會話管理
- Android - 共享首選項
- Android - SIP 協議
- Android - 拼寫檢查器
- Android - SQLite 資料庫
- Android - 支援庫
- Android - 測試
- Android - 文字轉語音
- Android - TextureView
- Android - Twitter 整合
- Android - UI 設計
- Android - UI 模式
- Android - UI 測試
- Android - WebView 佈局
- Android - Wi-Fi
- Android - 小部件
- Android - XML 解析器
- Android 實用資源
- Android - 問答
- Android - 實用資源
- Android - 討論
Android - 複選框控制元件
複選框是一個使用者可以切換的開關。當向用戶呈現一組非互斥的可選項時,應該使用複選框。
複選框
複選框屬性
以下是與複選框控制元件相關的重要的屬性。您可以檢視 Android 官方文件以獲取屬性的完整列表以及可在執行時用於更改這些屬性的相關方法。
繼承自 **android.widget.TextView** 類 -
| 序號 | 屬性和描述 |
|---|---|
| 1 | android:autoText 如果設定,則指定此 TextView 具有文字輸入法,並自動更正一些常見的拼寫錯誤。 |
| 2 | android:drawableBottom 這是要在文字下方繪製的可繪製物件。 |
| 3 | android:drawableRight 這是要在文字右側繪製的可繪製物件。 |
| 4 | android:editable 如果設定,則指定此 TextView 具有輸入法。 |
| 5 | android:text 這是要顯示的文字。 |
繼承自 **android.view.View** 類 -
| 序號 | 屬性和描述 |
|---|---|
| 1 | android:background 這是用作背景的可繪製物件。 |
| 2 | android:contentDescription 這定義了簡要描述檢視內容的文字。 |
| 3 | android:id 這為該檢視提供一個識別符號名稱。 |
| 4 | android:onClick 這是在單擊檢視時要呼叫的此檢視上下文中的方法的名稱。 |
| 5 | android:visibility 這控制檢視的初始可見性。 |
示例
本示例將引導您完成簡單的步驟,演示如何使用線性佈局和複選框建立您自己的 Android 應用程式。
| 步驟 | 描述 |
|---|---|
| 1 | 您將使用 Android Studio IDE 建立一個 Android 應用程式,並將其命名為 _myapplication_,位於 _com.example.myapplication_ 包下,如 _Hello World 例子_ 一章中所述。 |
| 2 | 修改 _src/MainActivity.java_ 檔案以新增點選事件。 |
| 3 | 修改 _res/layout/activity_main.xml_ 檔案的預設內容以包含 Android UI 控制元件。 |
| 4 | 無需宣告預設字串常量。Android Studio 會在 strings.xml 中處理預設常量。 |
| 5 | 執行應用程式以啟動 Android 模擬器並驗證對應用程式所做的更改的結果。 |
以下是修改後的主活動檔案 **src/MainActivity.java** 的內容。此檔案可以包含每個基本生命週期方法。
package com.example.myapplication;

import android.os.Bundle;
import android.app.Activity;
import android.widget.Button;

import android.view.View;
import android.view.View.OnClickListener;

import android.widget.CheckBox;
import android.widget.Toast;

public class MainActivity extends Activity {
   CheckBox ch1,ch2;
   Button b1,b2;

   @Override
   protected void onCreate(Bundle savedInstanceState) {
      super.onCreate(savedInstanceState);
      setContentView(R.layout.activity_main);

      ch1=(CheckBox)findViewById(R.id.checkBox1);
      ch2=(CheckBox)findViewById(R.id.checkBox2);

      b1=(Button)findViewById(R.id.button);
      b2=(Button)findViewById(R.id.button2);
      b2.setOnClickListener(new View.OnClickListener() {

         @Override
         public void onClick(View v) {
            finish();
         }
      });
      b1.setOnClickListener(new View.OnClickListener() {

         @Override
         public void onClick(View v) {
            StringBuffer result = new StringBuffer();
            result.append("Thanks : ").append(ch1.isChecked());
            result.append("\nThanks: ").append(ch2.isChecked());
            Toast.makeText(MainActivity.this, result.toString(),
               Toast.LENGTH_LONG).show();
         }
      });
   }
}
以下是 **res/layout/activity_main.xml** 檔案的內容 -
<RelativeLayout
   xmlns:android="http://schemas.android.com/apk/res/android"
   xmlns:tools="http://schemas.android.com/tools"
   android:layout_width="match_parent"
   android:layout_height="match_parent"

   android:paddingBottom="@dimen/activity_vertical_margin"
   android:paddingLeft="@dimen/activity_horizontal_margin"
   android:paddingRight="@dimen/activity_horizontal_margin"
   android:paddingTop="@dimen/activity_vertical_margin"
   tools:context=".MainActivity">

   <TextView
      android:id="@+id/textView1"
      android:layout_width="wrap_content"
      android:layout_height="wrap_content"
      android:text="Example of checkbox"
      android:layout_alignParentTop="true"
      android:layout_centerHorizontal="true"
      android:textSize="30dp" />

   <CheckBox
      android:id="@+id/checkBox1"
      android:layout_width="wrap_content"
      android:layout_height="wrap_content"
      android:text="Do you like Tutorials Point"
      android:layout_above="@+id/button"
      android:layout_centerHorizontal="true" />

   <CheckBox
      android:id="@+id/checkBox2"
      android:layout_width="wrap_content"
      android:layout_height="wrap_content"
      android:text="Do you like android "
      android:checked="false"
      android:layout_above="@+id/checkBox1"
      android:layout_alignLeft="@+id/checkBox1"
      android:layout_alignStart="@+id/checkBox1" />

   <TextView
      android:id="@+id/textView2"
      android:layout_width="wrap_content"
      android:layout_height="wrap_content"
      android:layout_alignLeft="@+id/checkBox1"
      android:layout_below="@+id/textView1"
      android:layout_marginTop="39dp"
      android:text="Tutorials point"
      android:textColor="#ff87ff09"
      android:textSize="30dp"
      android:layout_alignRight="@+id/textView1"
      android:layout_alignEnd="@+id/textView1" />

   <Button
      android:layout_width="wrap_content"
      android:layout_height="wrap_content"
      android:text="Ok"
      android:id="@+id/button"
      android:layout_alignParentBottom="true"
      android:layout_alignLeft="@+id/checkBox1"
      android:layout_alignStart="@+id/checkBox1" />

   <Button
      android:layout_width="wrap_content"
      android:layout_height="wrap_content"
      android:text="Cancel"
      android:id="@+id/button2"
      android:layout_alignParentBottom="true"
      android:layout_alignRight="@+id/textView2"
      android:layout_alignEnd="@+id/textView2" />

   <ImageButton
      android:layout_width="wrap_content"
      android:layout_height="wrap_content"
      android:id="@+id/imageButton"
      android:src="@drawable/abc"
      android:layout_centerVertical="true"
      android:layout_centerHorizontal="true" />

</RelativeLayout>
以下是 **res/values/strings.xml** 檔案的內容,用於定義這些新常量 -
<?xml version="1.0" encoding="utf-8"?>
<resources>
   <string name="app_name">MyApplication</string>
</resources>
以下是 **AndroidManifest.xml** 的預設內容 -
<?xml version="1.0" encoding="utf-8"?>
<manifest xmlns:android="http://schemas.android.com/apk/res/android"
   package="com.example.myapplication" >

   <application
      android:allowBackup="true"
      android:icon="@drawable/ic_launcher"
      android:label="@string/app_name"
      android:theme="@style/AppTheme" >

      <activity
         android:name="com.example.myapplication.MainActivity"
         android:label="@string/app_name" >

         <intent-filter>
            <action android:name="android.intent.action.MAIN" />
            <category android:name="android.intent.category.LAUNCHER" />
         </intent-filter>

      </activity>

   </application>
</manifest>
讓我們嘗試執行您的 **MyApplication** 應用程式。我假設您在進行環境設定時建立了您的 **AVD**。要從 Android Studio 執行應用程式,請開啟專案的其中一個活動檔案,然後單擊工具欄中的執行  圖示。Android Studio 將應用程式安裝到您的 AVD 並啟動它,如果您的設定和應用程式一切正常,它將顯示以下模擬器視窗 -
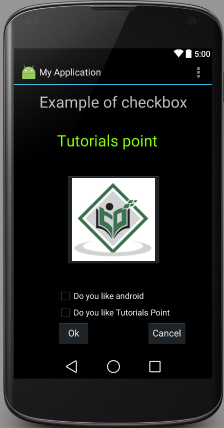
使用者需要勾選“您喜歡 Android 複選框”或“您喜歡 TutorialsPoint 複選框”中的一個,然後按“確定”按鈕,如果所有過程都正確,將顯示一條吐司訊息“謝謝”。否則,請按“取消”按鈕,如果使用者按下“取消”按鈕,應用程式將關閉。
練習
我建議您嘗試在佈局 XML 檔案中以及程式設計時使用複選框的不同屬性來嘗試以上示例,以獲得複選框的不同外觀和感覺。嘗試使其可編輯,更改字型顏色、字體系列、寬度、textSize 等,然後檢視結果。您也可以在一個活動中嘗試使用多個複選框控制元件的上述示例。