- iOS 教程
- iOS - 首頁
- iOS - 入門指南
- iOS - 環境設定
- iOS - Objective-C 基礎
- iOS - 第一個 iPhone 應用
- iOS - 動作和出口
- iOS - 代理
- iOS - UI 元素
- iOS - 加速度計
- iOS - 通用應用程式
- iOS - 相機管理
- iOS - 位置處理
- iOS - SQLite 資料庫
- iOS - 傳送郵件
- iOS - 音訊和影片
- iOS - 檔案處理
- iOS - 訪問地圖
- iOS - 應用內購買
- iOS - iAd 整合
- iOS - GameKit
- iOS - 故事板
- iOS - 自動佈局
- iOS - Twitter 和 Facebook
- iOS - 記憶體管理
- iOS - 應用程式除錯
- iOS 有用資源
- iOS 快速指南
- iOS - 有用資源
- iOS - 討論
iOS 快速指南
iOS - 入門指南
概述
iOS,之前稱為 iPhone OS,是蘋果公司開發的一款移動作業系統。它於 2007 年首次釋出,包括 iPhone 和 iPod Touch。iPad(第一代)於 2010 年 4 月釋出,iPad mini 於 2012 年 11 月釋出。
iOS 裝置更新頻率相當高,根據經驗,我們發現每年至少會發佈一個版本的 iPhone 和 iPad。現在,我們有了 iPhone 5,它的前身從 iPhone、iPhone 3gs、iPhone 4、iPhone 4s 開始。同樣,iPad 也從 iPad(第一代)發展到 iPad(第四代),以及一個額外的 iPad mini 版本。
iOS SDK 從 1.0 發展到 6.0。iOS 6.0 是最新的 SDK,也是 Xcode 4.5 及更高版本中唯一官方支援的版本。我們擁有豐富的蘋果文件,我們可以根據我們的部署目標找到可以使用哪些方法和庫。在當前版本的 Xcode 中,我們將能夠在 iOS 4.3、5.0 和 6.0 的部署目標之間進行選擇。
iOS 的強大功能可以透過以下一些作為裝置一部分提供的功能感受到。
- 地圖
- Siri
- Facebook 和 Twitter
- 多點觸控
- 加速度計
- GPS
- 高階處理器
- 相機
- Safari
- 強大的 API
- 遊戲中心
- 應用內購買
- 提醒事項
- 廣泛的手勢操作
使用 iPhone/iPad 的使用者數量大幅增加。這為開發者創造了機會,可以透過為蘋果的 App Store 建立 iPhone 和 iPad 應用程式來賺錢。
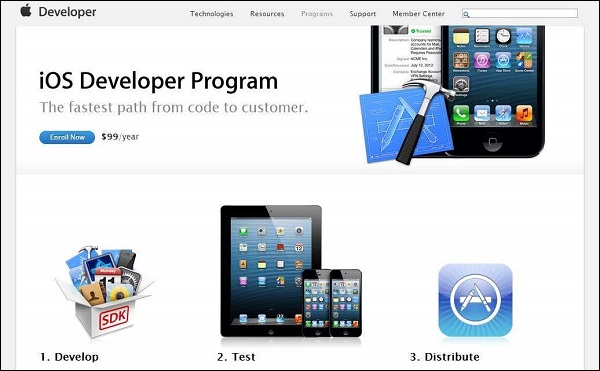
對於 iOS 新手,蘋果設計了一個應用商店,使用者可以在其中購買為其 iOS 裝置開發的應用。開發者可以建立免費和付費應用到 App Store。要開發應用程式並分發到商店,開發者需要註冊 iOS 開發者計劃,每年費用為 99 美元,以及一臺安裝了 Mountain Lion 或更高版本的 Mac 以及最新的 Xcode 進行開發。
註冊為蘋果開發者
如果您擁有任何蘋果裝置,並且是一名開發者,那麼 Apple ID 是必不可少的。它是免費的,因此擁有一個沒有任何問題。擁有 Apple 帳戶的好處如下:
訪問開發工具。
全球開發者大會 (WWDC) 影片。
在收到邀請時可以加入 iOS 開發者計劃團隊。
要註冊 Apple 帳戶,請按照以下步驟操作:
步驟 1 - 點選連結 https://developer.apple.com/programs/register/ 並選擇“建立 Apple ID”

步驟 2 - 提供必要的資訊,頁面中給出的資訊不言而喻。
步驟 3 - 使用您的電子郵件驗證來驗證您的帳戶,帳戶將變為活動狀態。
步驟 4 - 現在您將能夠下載開發者工具,例如 Xcode(打包了 iOS 模擬器和 iOS SDK)和其他開發者資源。
蘋果 iOS 開發者計劃
新開發者會提出的第一個問題是——為什麼要註冊 iOS 開發者計劃?答案很簡單;蘋果始終專注於為其使用者提供高質量的應用程式。如果沒有註冊費,可能會出現垃圾應用上傳的情況,這可能會給蘋果的應用稽核團隊造成問題。
加入 iOS 開發者計劃的好處如下:
在真實的 iOS 裝置上執行您開發的應用程式。
將應用程式分發到應用商店。
獲取開發者預覽版。
加入 iOS 開發者計劃的步驟如下:
步驟 1 - 要註冊,請點選連結 - (https://developer.apple.com/programs/ios/).
步驟 2 - 點選顯示頁面中的“立即註冊”。
步驟 3 - 您可以登入到您現有的 Apple 帳戶(如果您有的話)或建立一個新的 Apple ID。
步驟 4 - 之後,您必須在個人帳戶和公司帳戶之間進行選擇。如果您的團隊中有多個開發者,請使用公司帳戶。在個人帳戶中,您無法新增成員。
步驟 5 - 輸入個人資訊(對於新註冊的使用者),您可以透過信用卡支付並激活該程式(僅接受信用卡支付)。
步驟 6 - 現在,您將能夠透過在頁面中選擇“成員中心”選項來訪問開發者資源。
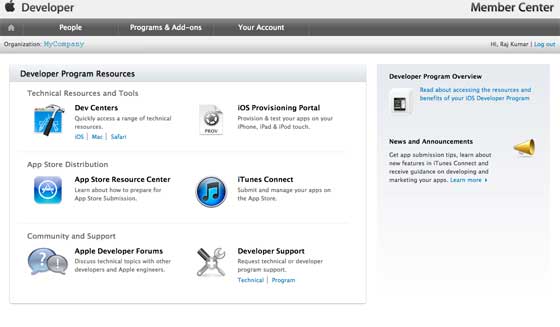
步驟 7 - 在這裡,您將能夠執行以下操作:
建立配置檔案。
管理您的團隊和裝置。
透過 iTunes Connect 管理應用程式到應用商店。
獲取論壇和技術支援。
iOS - 環境設定
iOS - Xcode 安裝
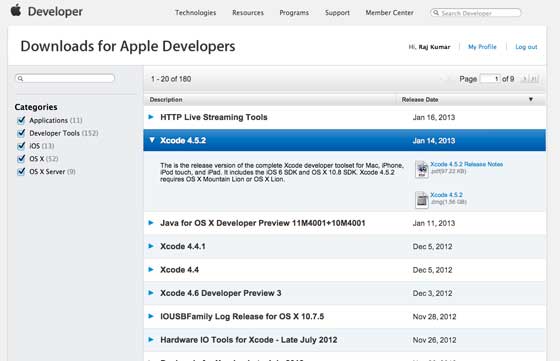
步驟 1 - 從 https://developer.apple.com/downloads/ 下載最新版本的 Xcode
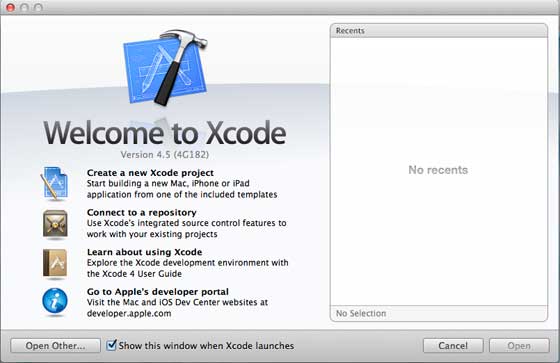
步驟 2 - 雙擊 Xcode dmg 檔案。
步驟 3 - 您將找到一個已掛載並開啟的裝置。
步驟 4 - 顯示的視窗中將有兩個專案,即 Xcode 應用程式和應用程式資料夾的快捷方式。
步驟 5 - 將 Xcode 拖到應用程式中,它將被複制到您的應用程式中。
步驟 6 - 現在 Xcode 將作為其他應用程式的一部分提供,您可以從中選擇並執行。
您還可以從 Mac App Store 下載 Xcode,然後按照螢幕上提供的分步操作進行安裝。
介面構建器
介面構建器是一種工具,可以輕鬆建立 UI 介面。您有一套豐富的 UI 元素可供使用。您只需將其拖放到您的 UI 檢視中即可。我們將在接下來的頁面中學習有關新增 UI 元素、為 UI 元素創建出口和動作的資訊。

您在右下角有物件庫,其中包含所有必要的 UI 元素。使用者介面通常稱為xib,這是其副檔名。每個 xib 都連結到相應的檢視控制器。
iOS 模擬器
iOS 模擬器實際上包含兩種型別的裝置,即 iPhone 和 iPad 及其不同版本。iPhone 版本包括 iPhone(普通版)、iPhone Retina、iPhone 5。iPad 有 iPad 和 iPad Retina。下面顯示了 iPhone 模擬器的螢幕截圖。

您可以在 iOS 模擬器中模擬位置,以玩弄應用程式的緯度和經度效果。您還可以在模擬器中模擬記憶體警告和通話狀態。您可以將模擬器用於大多數目的,但是您無法測試諸如加速度計之類的裝置功能。因此,您可能始終需要一個 iOS 裝置來徹底測試應用程式的所有場景。
iOS - Objective C
iOS 開發中使用的語言是 Objective C。它是一種面向物件的語言,因此對於那些有一些面向物件程式語言背景的人來說,它會很容易。
介面和實現
在 Objective C 中,宣告類的檔案稱為介面檔案,定義類的檔案稱為實現檔案。
一個簡單的介面檔案MyClass.h如下所示:
@interface MyClass:NSObject {
   // class variable declared here
}

// class properties declared here
// class methods and instance methods declared here
@end
實現檔案MyClass.m如下所示:
@implementation MyClass
   // class methods defined here
@end
物件建立
物件建立如下所示:
MyClass *objectName = [[MyClass alloc]init] ;
方法
在 Objective C 中宣告方法如下所示:
-(returnType)methodName:(typeName) variable1 :(typeName)variable2;
下面顯示了一個示例。
-(void)calculateAreaForRectangleWithLength:(CGfloat)length
andBreadth:(CGfloat)breadth;
您可能想知道andBreadth字串是做什麼用的;實際上它是一個可選字串,可以幫助我們輕鬆地閱讀和理解方法,尤其是在呼叫時。要在同一類中呼叫此方法,我們使用以下語句:
[self calculateAreaForRectangleWithLength:30 andBreadth:20];
如上所述,使用 andBreadth 可以幫助我們理解寬度為 20。self 用於指定它是一個類方法。
類方法
類方法可以直接訪問,無需為類建立物件。它們沒有任何變數和物件與之關聯。下面顯示了一個示例。
+(void)simpleClassMethod;
可以使用類名(假設類名為 MyClass)訪問它,如下所示:
[MyClass simpleClassMethod];
例項方法
例項方法只能在為類建立物件後訪問。記憶體分配給例項變數。下面顯示了一個示例例項方法。
-(void)simpleInstanceMethod;
建立類物件後,可以訪問它,如下所示:
MyClass  *objectName = [[MyClass alloc]init] ;
[objectName simpleInstanceMethod];
Objective C 中的重要資料型別
| 序號 | 資料型別 |
|---|---|
| 1 | NSString 用於表示字串。 |
| 2 | CGfloat 用於表示浮點值(也允許使用普通浮點數,但最好使用 CGfloat)。 |
| 3 | NSInteger 用於表示整數。 |
| 4 | BOOL 用於表示布林值(允許使用 YES 或 NO 布林型別)。 |
列印日誌
NSLog - 用於列印語句。它將分別在釋出和除錯模式下列印在裝置日誌和除錯控制檯中。例如,
NSlog(@"");
控制結構
大多數控制結構與 C 和 C++ 中的相同,除了少數新增,例如 for in 語句。
屬性
為了讓外部類訪問類,使用變數屬性。例如,
@property(nonatomic , strong) NSString *myString;
訪問屬性
您可以使用點運算子訪問屬性。要訪問上述屬性,我們將執行以下操作。
self.myString = @"Test";
您還可以使用 set 方法,如下所示:
[self setMyString:@"Test"];
類別
類別用於向現有類新增方法。透過這種方式,我們可以為那些我們甚至沒有其實現檔案的類新增方法,而這些檔案定義了實際的類。我們類的示例類別如下所示:
@interface MyClass(customAdditions)
- (void)sampleCategoryMethod;
@end

@implementation MyClass(categoryAdditions)

-(void)sampleCategoryMethod {
   NSLog(@"Just a test category");
}
陣列
NSMutableArray 和 NSArray 是 Objective C 中使用的陣列類。顧名思義,前者是可變的,後者是不可變的。下面顯示了一個示例。
NSMutableArray *aMutableArray = [[NSMutableArray alloc]init];
[anArray addObject:@"firstobject"];
NSArray *aImmutableArray = [[NSArray alloc]
initWithObjects:@"firstObject",nil];
字典
NSMutableDictionary 和 NSDictionary 是 Objective C 中使用的字典類。顧名思義,前者是可變的,後者是不可變的。下面顯示了一個示例。
NSMutableDictionary *aMutableDictionary = [[NSMutableArray alloc]init];
[aMutableDictionary setObject:@"firstobject" forKey:@"aKey"];
NSDictionary*aImmutableDictionary= [[NSDictionary alloc]initWithObjects:[NSArray arrayWithObjects:
@"firstObject",nil] forKeys:[ NSArray arrayWithObjects:@"aKey"]];
iOS - 第一個 iPhone 應用
建立第一個應用
現在我們將建立一個簡單的單檢視應用程式(一個空白應用程式),它將在 iOS 模擬器上執行。
步驟如下所示。
步驟 1 - 開啟 Xcode 並選擇建立新的 Xcode 專案。
步驟 2 - 選擇單檢視應用程式。

步驟 3 - 輸入產品名稱(即應用程式的名稱)、組織名稱,然後是公司識別符號。

步驟 4 - 確保選中使用自動引用計數,以便在資源超出範圍後自動釋放分配的資源。點選下一步。
步驟 5 - 選擇專案的目錄並選擇建立。

步驟 6 - 您將看到如下所示的螢幕:
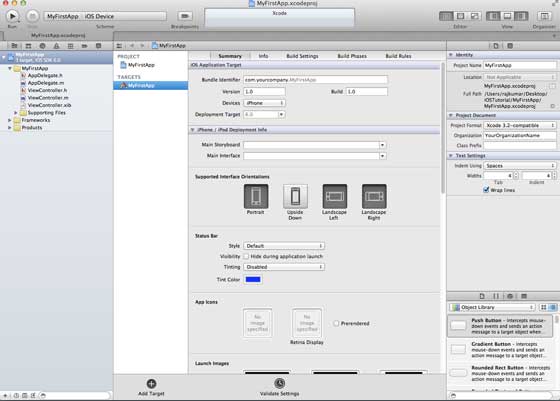
在上面的螢幕中,您將能夠選擇支援的方向、構建和釋出設定。有一個欄位部署目標,我們想要支援的裝置版本,讓我們選擇 4.3,這是現在允許的最小部署目標。目前,這些不是必需的,讓我們專注於執行應用程式。
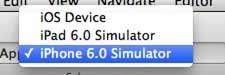
步驟 7 - 現在,在執行按鈕附近的下拉選單中選擇 iPhone 模擬器,然後選擇執行。
步驟 8 - 就這樣;您已成功運行了第一個應用程式。您將獲得如下所示的輸出:
現在讓我們更改背景顏色,只是為了開始使用介面構建器。選擇 ViewController.xib。在右側選擇背景選項,更改顏色並執行。
在上面的專案中,預設情況下,部署目標將設定為 iOS 6.0,並且將啟用自動佈局。為了確保我們的應用程式在 iOS 4.3 及更高版本的裝置上執行,我們已經在建立此應用程式的開始修改了部署目標,但我們沒有停用自動佈局。
要停用自動佈局,我們需要在每個 nib(即 xib 檔案)的檔案檢查器中取消選中自動佈局複選框。Xcode 專案 IDE 的各個部分如下圖所示(由 Apple Xcode 4 使用者文件提供)。

檔案檢查器位於如上所示的檢查器選擇器欄中,可以在其中取消選中自動佈局。當您只想針對 iOS 6 裝置時,可以使用自動佈局。此外,如果您將部署目標提高到 iOS 6,您將能夠使用許多新功能,例如 Passbook。目前,讓我們將 iOS 4.3 作為部署目標。
第一個 iOS 應用程式的程式碼
您會發現為您的應用程式生成的五個不同的檔案。它們列出如下:
- AppDelegate.h
- AppDelegate.m
- ViewController.h
- ViewController.m
- ViewController.xib
AppDelegate.h
// Header File that provides all UI related items.
#import <UIKit/UIKit.h>

// Forward declaration (Used when class will be defined /imported in future)
@class ViewController;

// Interface for Appdelegate
@interface AppDelegate : UIResponder <UIApplicationDelegate>

// Property window
@property (strong, nonatomic) UIWindow *window;

// Property Viewcontroller

@property (strong, nonatomic) ViewController *viewController;
//this marks end of interface
@end
程式碼中的重要專案:
AppDelegate 繼承自 UIResponder,用於處理 iOS 事件。
實現 UIApplicationDelegate 的委託方法,提供關鍵的應用程式事件,如完成啟動、即將終止等。
UIWindow 物件用於管理和協調 iOS 裝置螢幕上的各種檢視。它就像所有其他檢視載入的基礎檢視。通常,一個應用程式只有一個視窗。
UIViewController 用於處理螢幕流程。
AppDelegate.m
// Imports the class Appdelegate's interface
import "AppDelegate.h"

// Imports the viewcontroller to be loaded
#import "ViewController.h"

// Class definition starts here
@implementation AppDelegate


// Method to intimate us that the application launched successfully
- (BOOL)application:(UIApplication *)application
didFinishLaunchingWithOptions:(NSDictionary *)launchOptions {
   self.window = [[UIWindow alloc] initWithFrame:[[UIScreen mainScreen] bounds]];

   // Override point for customization after application launch.
   self.viewController = [[ViewController alloc]
   initWithNibName:@"ViewController" bundle:nil];
   self.window.rootViewController = self.viewController;
   [self.window makeKeyAndVisible];
   return YES;
}

- (void)applicationWillResignActive:(UIApplication *)application {
   /* Use this method to release shared resources, save user data,
   invalidate timers, and store enough application state information
   to restore your application to its current state in case it is
   terminated later. If your application supports background
   execution, this method is called instead of
   applicationWillTerminate: when the user quits.*/
}

- (void)applicationWillEnterForeground:(UIApplication *)application {
   /* Called as part of the transition from the background to the
   inactive state. Here you can undo many of the changes made on
   entering the background.*/
}

- (void)applicationDidBecomeActive:(UIApplication *)application {
   /* Restart any tasks that were paused (or not yet started) while
   the application was inactive. If the application was previously in
   the background, optionally refresh the user interface.*/
}

- (void)applicationWillTerminate:(UIApplication *)application {
   /* Called when the application is about to terminate. Save data if
   appropriate. See also applicationDidEnterBackground:. */
}

- (void)applicationWillTerminate:(UIApplication *)application {
   /* Called when the application is about to terminate. Save data if appropriate.
   See also applicationDidEnterBackground:. */
}
@end
程式碼中的重要專案:
UIApplication 委託在此處定義。上面定義的所有方法都是 UI 應用程式委託,不包含使用者定義的方法。
分配 UIWindow 物件以儲存分配的應用程式。
將 UIViewController 分配為視窗的初始檢視控制器。
要使視窗可見,會呼叫 makeKeyAndVisible 方法。
ViewController.h
#import <UIKit/UIKit.h>

// Interface for class ViewController
@interface ViewController : UIViewController

@end
程式碼中的重要專案:
ViewController 類繼承自 UIViewController,它為 iOS 應用程式提供了基本的檢視管理模型。
ViewController.m
#import "ViewController.h"

// Category, an extension of ViewController class
@interface ViewController ()

@end

@implementation ViewController

- (void)viewDidLoad {
   [super viewDidLoad];
   // Do any additional setup after loading the view, typically from a nib.
}

- (void)didReceiveMemoryWarning {
   [super didReceiveMemoryWarning];
   // Dispose of any resources that can be recreated.
}
@end
程式碼中的重要專案:
此處實現的兩種方法在基類 UIViewController 中定義。
在 viewDidLoad 中進行初始設定,該方法在檢視載入後呼叫。
如果出現記憶體警告,則呼叫 didReceiveMemoryWarning 方法。
iOS - 動作和出口
iOS 中的操作和出口分別稱為ibActions和ibOutlets,其中ib代表介面構建器。這些與 UI 元素相關,在瞭解如何以可視方式實現它們之後,我們將探討它們。
操作和出口 - 涉及的步驟
步驟 1 - 讓我們使用我們的第一個 iPhone 應用程式。
步驟 2 - 從導航器部分的檔案中選擇 ViewController.xib 檔案。
步驟 3 - 現在,您可以從視窗右側的庫窗格中選擇 UI 元素,如下所示。

步驟 4 - 您可以將 UI 元素拖放到介面構建器中的檢視中。
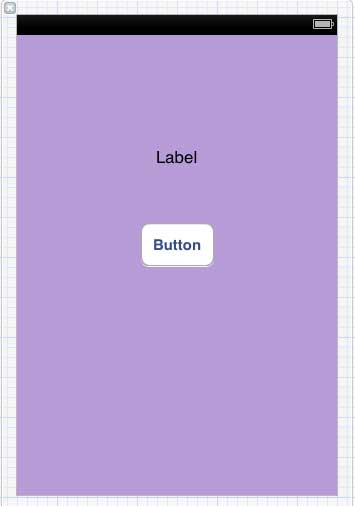
步驟 5 - 讓我們向檢視新增一個標籤和一個圓角矩形按鈕。
步驟 6 - 從位於右上角的工作區工具欄中的編輯器選擇器按鈕中。
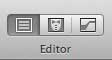
選擇助手編輯器按鈕。

步驟 7 - 我們將在中心的編輯器區域看到兩個視窗,一個是 ViewController.xib 檔案,另一個是 ViewController.h。
步驟 8 - 現在,右鍵單擊標籤並選擇、按住並拖動新的引用出口,如下所示。
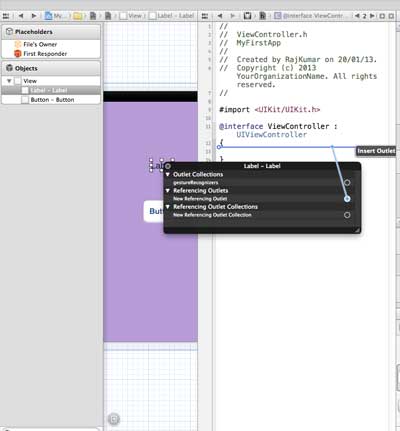
步驟 9 - 放到 ViewController.h 中的花括號之間。如果檔案中沒有花括號,請在執行此操作之前新增 ViewController。您會看到如下所示的彈出視窗。
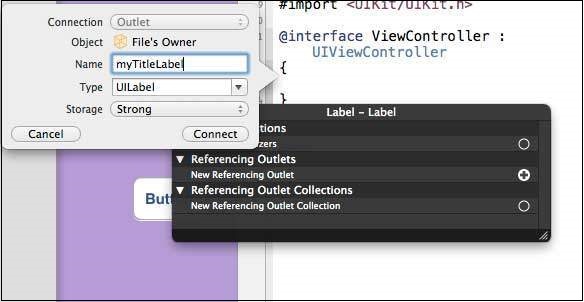
步驟 10 - 為出口鍵入標籤名稱,這裡我們使用了標籤 myTitleLabel。單擊連線,ibOutlet 將完成。
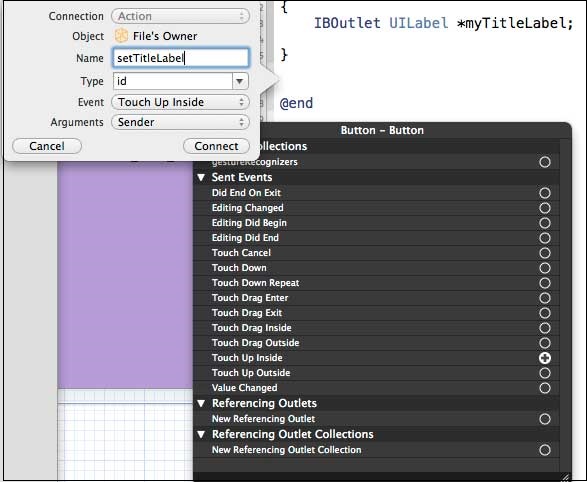
步驟 11 - 同樣,要新增操作,請右鍵單擊圓角矩形按鈕,選擇觸控內部並將其拖到花括號下方。

步驟 12 - 放下它並將其命名為 setTitleLabel。
步驟 13 - 選擇 ViewController.m 檔案,您會找到如下所示的方法。
-(IBAction) setTitleLabel:(id)sender {
}
步驟 14 - 在上述方法內部新增如下所示的語句。
[myTitleLabel setText:@"Hello"];
步驟 15 - 現在讓我們透過選擇執行按鈕來執行程式。您將看到以下輸出。
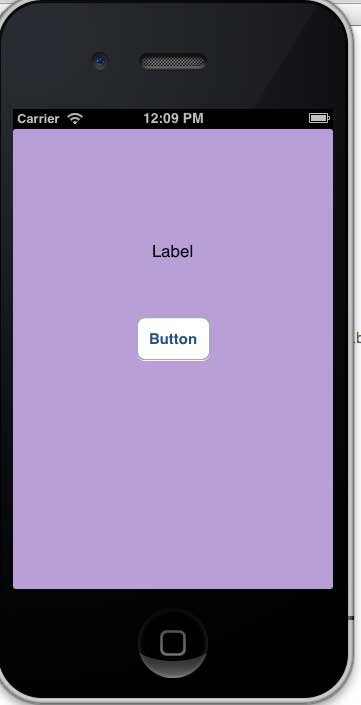
步驟 16 - 現在單擊按鈕。
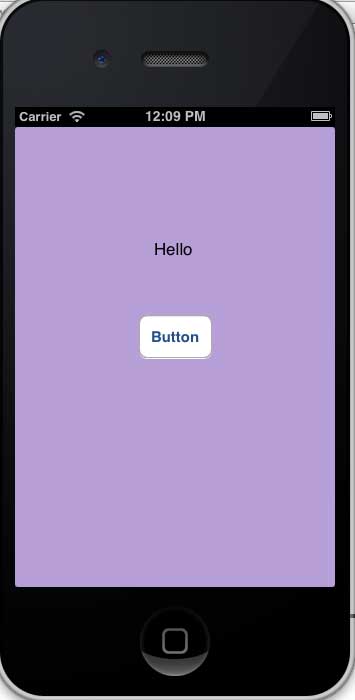
步驟 17 - 我們建立的標籤已透過按鈕上的操作更改。
步驟 18 - 從上面的示例中,我們可以得出結論,IBOutlet 建立了對 UIElement 的引用(此處用於 UILabel)。同樣,IBAction 將 UIButton 與一個方法連結起來,該方法在事件觸控內部時被呼叫。
步驟 19 - 您可以透過在建立操作時選擇不同的事件來玩轉操作。
iOS - 代理
委託示例
假設物件 A 呼叫物件 B 來執行操作。操作完成後,物件 A 應該知道 B 已完成任務並採取必要的操作。這是藉助委託實現的。
上面示例中的關鍵概念是:
A 是 B 的委託物件。
B 將擁有 A 的引用。
A 將實現 B 的委託方法。
B 將透過委託方法通知 A。
建立委託的步驟
步驟 1 - 首先,建立一個單檢視應用程式。
步驟 2 - 然後選擇檔案→新建→檔案…
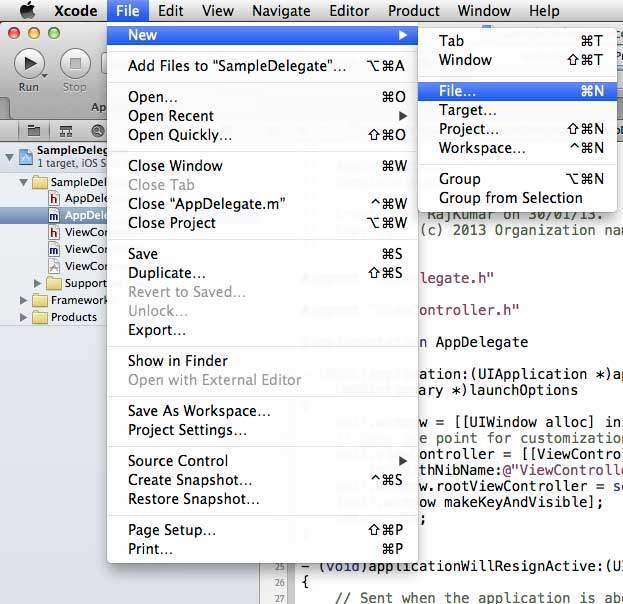
步驟 3 - 然後選擇 Objective C 類並點選下一步。
步驟 4 - 為類命名,例如 SampleProtocol,子類為 NSObject,如下所示。
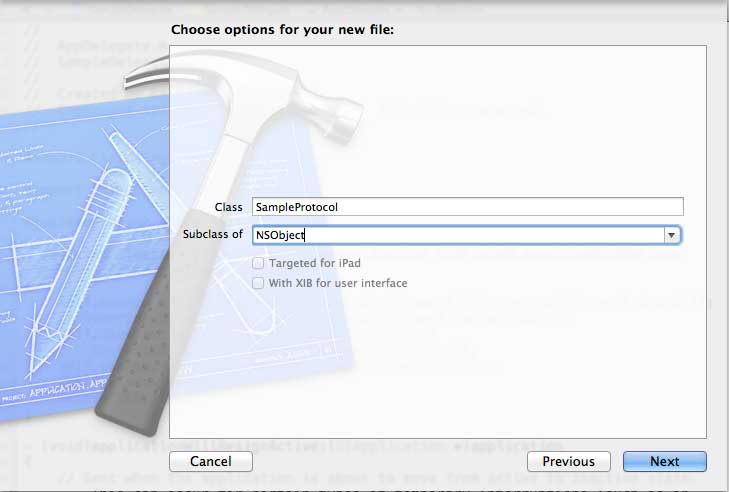
步驟 5 - 然後選擇建立。
步驟 6 - 向 SampleProtocol.h 檔案新增協議,更新後的程式碼如下所示:
#import <Foundation/Foundation.h>

// Protocol definition starts here
@protocol SampleProtocolDelegate <NSObject>
@required
- (void) processCompleted;
@end

// Protocol Definition ends here
@interface SampleProtocol : NSObject {
   // Delegate to respond back
   id <SampleProtocolDelegate> _delegate;
}
@property (nonatomic,strong) id delegate;

-(void)startSampleProcess; // Instance method
@end
步驟 7 - 透過更新 SampleProtocol.m 檔案來實現例項方法,如下所示。
#import "SampleProtocol.h"

@implementation SampleProtocol

-(void)startSampleProcess {
   [NSTimer scheduledTimerWithTimeInterval:3.0 target:self.delegate
	selector:@selector(processCompleted) userInfo:nil repeats:NO];
}
@end
步驟 8 - 透過將標籤從物件庫拖到 UIView 中,在 ViewController.xib 中新增一個 UILabel,如下所示。
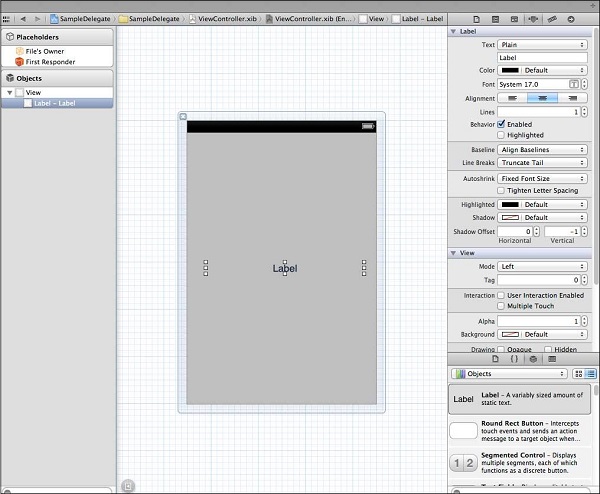
步驟 9 - 為標籤建立 IBOutlet 並將其命名為 myLabel,並更新程式碼以在 ViewController.h 中採用 SampleProtocolDelegate。
#import <UIKit/UIKit.h>
#import "SampleProtocol.h"

@interface ViewController : UIViewController<SampleProtocolDelegate> {
   IBOutlet UILabel *myLabel;
}
@end
步驟 10 實現委託方法,建立 SampleProtocol 的物件並呼叫 startSampleProcess 方法。更新後的 ViewController.m 檔案如下所示:
#import "ViewController.h"

@interface ViewController ()

@end

@implementation ViewController

- (void)viewDidLoad {
   [super viewDidLoad];
   SampleProtocol *sampleProtocol = [[SampleProtocol alloc]init];
   sampleProtocol.delegate = self;
   [myLabel setText:@"Processing..."];
   [sampleProtocol startSampleProcess];
   // Do any additional setup after loading the view, typically from a nib.
}

- (void)didReceiveMemoryWarning {
   [super didReceiveMemoryWarning];
   // Dispose of any resources that can be recreated.
}

#pragma mark - Sample protocol delegate
-(void)processCompleted {
   [myLabel setText:@"Process Completed"];
}
@end
步驟 11 我們將看到如下所示的輸出。最初,標籤顯示“處理中...”,一旦 SampleProtocol 物件呼叫委託方法,它就會更新。

iOS - UI 元素
什麼是 UI 元素?
UI 元素是我們可以在應用程式中看到的視覺元素。其中一些元素響應使用者互動,例如按鈕、文字欄位,而另一些則提供資訊,例如影像、標籤。
如何新增 UI 元素?
我們可以在程式碼中以及藉助介面構建器新增 UI 元素。根據需要,我們可以使用其中任何一個。
我們的重點
我們將更多地關注在應用程式中透過程式碼新增 UI 元素。使用介面構建器很簡單且直觀,我們只需要拖放 UI 元素即可。
我們的方法
我們將建立一個簡單的 iOS 應用程式,並使用它來解釋一些 UI 元素。
步驟 1 - 建立一個基於檢視的應用程式,就像我們在第一個 iOS 應用程式中所做的那樣。
步驟 2 - 我們將只更新 ViewController.h 和 ViewController.m 檔案。
步驟 3 - 然後,我們向 ViewController.m 檔案新增一個特定於建立 UI 元素的方法。
步驟 4 - 我們將在 viewDidLoad 方法中呼叫此方法。
步驟 5 - 程式碼中的重要程式碼行已在這些程式碼行上方的單行註釋中進行了說明。
UI 元素列表
下面解釋了 UI 特定元素及其相關功能:
| 序號 | UI 特定元素 |
|---|---|
| 1 | 文字欄位
它是一個 UI 元素,使應用程式能夠獲取使用者輸入。 |
| 2 | 輸入型別 - 文字欄位
我們可以透過使用 UITextField 的 keyboard 屬性來設定使用者可以使用鍵盤輸入的型別。 |
| 3 | 按鈕
它用於處理使用者操作。 |
| 4 | 標籤
它用於顯示靜態內容。 |
| 5 | 工具欄
如果我們想根據當前檢視操作某些內容,則可以使用它。 |
| 6 | 狀態列
它顯示裝置的關鍵資訊。 |
| 7 | 導航欄
它包含導航控制器的導航按鈕,導航控制器是一個檢視控制器的堆疊,可以進行推入和彈出操作。 |
| 8 | 標籤欄
它通常用於在同一檢視內的各種子任務、檢視或模型之間切換。 |
| 9 | 影像檢視
它用於顯示簡單的影像或影像序列。 |
| 10 | 滾動檢視
它用於顯示超出螢幕區域的內容。 |
| 11 | 表格檢視
它用於以多行和多節的形式顯示可滾動的列表資料。 |
| 12 | 分割檢視
它用於顯示兩個窗格,其中主窗格控制詳細資訊窗格上的資訊。 |
| 13 | 文字檢視
它用於顯示可滾動的文字資訊列表,可以選擇進行編輯。 |
| 14 | 檢視轉換
它解釋了檢視之間各種檢視轉換。 |
| 15 | 拾取器
它用於顯示從列表中選擇特定資料。 |
| 16 | 開關
它用作操作的停用和啟用。 |
| 17 | 滑塊
它允許使用者在允許值的範圍內調整值或過程。 |
| 18 | 警報
它用於向用戶提供重要資訊。 |
| 19 | 圖示
它是用於操作或描述與應用程式相關內容的影像表示。 |
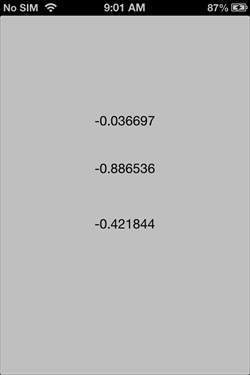
iOS - 加速度計
加速計用於檢測裝置在三個方向(x、y 和 z)上的位置變化。我們可以知道裝置相對於地面的當前位置。要測試此示例,您需要在**裝置**上執行它,並且它在模擬器上不起作用。
加速計 - 涉及的步驟
**步驟 1** - 建立一個簡單的**基於檢視的應用程式**。
**步驟 2** - 在**ViewController.xib**中新增三個標籤,並建立名為 xlabel、ylabel 和 zlabel 的 ibOutlets。
**步驟 3** - 如下更新 ViewController.h -
#import <UIKit/UIKit.h>

@interface ViewController : UIViewController<UIAccelerometerDelegate> {
   IBOutlet UILabel *xlabel;
   IBOutlet UILabel *ylabel;
   IBOutlet UILabel *zlabel;
}
@end
**步驟 4** - 如下更新**ViewController.m** -
#import "ViewController.h"

@interface ViewController ()
@end

@implementation ViewController

- (void)viewDidLoad {
   [super viewDidLoad];
   [[UIAccelerometer sharedAccelerometer]setDelegate:self];
   //Do any additional setup after loading the view,typically from a nib
}

- (void)didReceiveMemoryWarning {
   [super didReceiveMemoryWarning];
   // Dispose of any resources that can be recreated.
}

- (void)accelerometer:(UIAccelerometer *)accelerometer didAccelerate:
   (UIAcceleration *)acceleration {
   [xlabel setText:[NSString stringWithFormat:@"%f",acceleration.x]];
   [ylabel setText:[NSString stringWithFormat:@"%f",acceleration.y]];
   [zlabel setText:[NSString stringWithFormat:@"%f",acceleration.z]];
}
@end
輸出
當我們在**iPhone**裝置上執行應用程式時,我們將獲得以下輸出 -
iOS - 通用應用程式
通用應用程式是在單個二進位制檔案中同時為 iPhone 和 iPad 設計的應用程式。通用應用程式允許程式碼重用和快速更新。
通用應用程式 - 涉及的步驟
**步驟 1** - 建立一個簡單的**基於檢視的應用程式**。
**步驟 2** - 將檔名**ViewController.xib**檔案更改為**ViewController_iPhone.xib**,如下所示,位於右側的檔案檢查器中。

**步驟 3** - 選擇檔案→新建→檔案...然後選擇子部分**“使用者介面”**並選擇**檢視**。點選下一步。
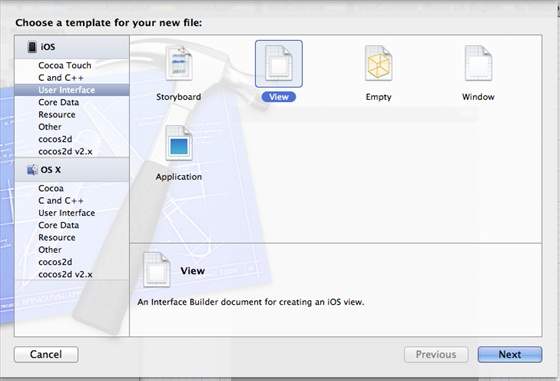
**步驟 4** - 選擇裝置系列為**iPad**,然後點選下一步。

**步驟 5** - 將檔案儲存為**ViewController_iPad.xib**並選擇建立。
**步驟 6** - 在**ViewController_iPhone.xib**和**ViewController_iPad.xib**中螢幕中央新增一個標籤。
**步驟 7** - 在**ViewController_iPad.xib**中,選擇**身份檢查器**並將自定義類設定為**ViewController**。

**步驟 8** - 如下更新 AppDelegate.m 中的 application:DidFinishLaunching:withOptions 方法 -
- (BOOL)application:(UIApplication *)application
   didFinishLaunchingWithOptions:(NSDictionary *)launchOptions {
   self.window = [[UIWindow alloc] initWithFrame:[[UIScreen
   mainScreen] bounds]];

   // Override point for customization after application launch.
   if (UI_USER_INTERFACE_IDIOM() == UIUserInterfaceIdiomPhone) {
      self.viewController = [[ViewController alloc]
      initWithNibName:@"ViewController_iPhone" bundle:nil];
   } else {
      self.viewController = [[ViewController alloc] initWithNibName:
      @"ViewController_iPad" bundle:nil];
   }
   self.window.rootViewController = self.viewController;
   [self.window makeKeyAndVisible];
   return YES;
}
**步驟 9** - 如下所示將專案摘要中的裝置更新為**通用** -
輸出
當我們執行應用程式時,我們將獲得以下輸出 -

當我們在 iPad 模擬器上執行應用程式時,我們將獲得以下輸出 -

iOS - 相機管理
攝像頭是移動裝置中常見的特性之一。我們可以使用攝像頭拍照並在我們的應用程式中使用它,而且操作也相當簡單。
攝像頭管理 - 涉及的步驟
**步驟 1** - 建立一個簡單的**基於檢視的應用程式**。
**步驟 2** - 在**ViewController.xib**中新增一個**按鈕**,併為該按鈕建立 IBAction。
**步驟 3** - 新增一個**影像檢視**並建立名為 imageView 的 IBOutlet。
**步驟 4** - 如下更新**ViewController.h** -
#import <UIKit/UIKit.h>

@interface ViewController : UIViewController<UIImagePickerControllerDelegate> {
   UIImagePickerController *imagePicker;
   IBOutlet UIImageView *imageView;
}

- (IBAction)showCamera:(id)sender;
@end
**步驟 5** - 如下更新**ViewController.m** -
#import "ViewController.h"

@interface ViewController ()
@end

@implementation ViewController

- (void)viewDidLoad {
   [super viewDidLoad];
}

- (void)didReceiveMemoryWarning {
   [super didReceiveMemoryWarning];
   // Dispose of any resources that can be recreated.
}

- (IBAction)showCamera:(id)sender {
   imagePicker.allowsEditing = YES;

   if ([UIImagePickerController isSourceTypeAvailable:
   UIImagePickerControllerSourceTypeCamera]) {
      imagePicker.sourceType = UIImagePickerControllerSourceTypeCamera;
   } else {
      imagePicker.sourceType =
      UIImagePickerControllerSourceTypePhotoLibrary;
   }
   [self presentModalViewController:imagePicker animated:YES];
}

-(void)imagePickerController:(UIImagePickerController *)picker
   didFinishPickingMediaWithInfo:(NSDictionary *)info {
      UIImage *image = [info objectForKey:UIImagePickerControllerEditedImage];

      if (image == nil) {
         image = [info objectForKey:UIImagePickerControllerOriginalImage];
      }
   imageView.image = image;
}

-(void)imagePickerControllerDidCancel:(UIImagePickerController *)picker {
   [self dismissModalViewControllerAnimated:YES];
}
@end
輸出
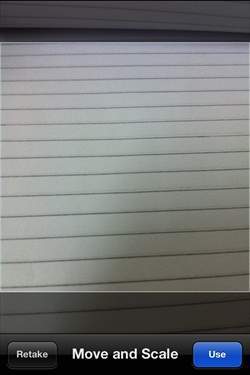
當我們執行應用程式並點選顯示攝像頭按鈕時,我們將獲得以下輸出 -

拍攝照片後,我們可以編輯照片,即移動和縮放,如下所示 -
iOS - 位置處理
我們可以輕鬆地找到使用者在 iOS 中的當前位置,前提是使用者允許應用程式在核心位置框架的幫助下訪問資訊。
位置處理 - 涉及的步驟
**步驟 1** - 建立一個簡單的基於檢視的應用程式。
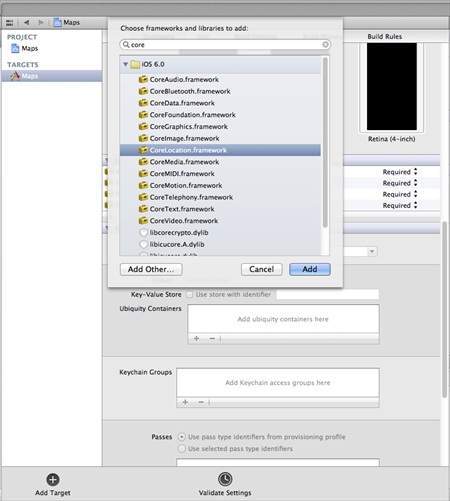
**步驟 2** - 選擇您的專案檔案,然後選擇目標,然後新增 CoreLocation.framework,如下所示 -
**步驟 3** - 在**ViewController.xib**中新增兩個標籤,並分別建立名為**latitudeLabel**和**longitudeLabel**的 ibOutlets。
**步驟 4** - 透過選擇檔案→新建→檔案...→選擇**Objective C 類**並點選下一步建立一個新檔案。
**步驟 5** - 將類命名為**LocationHandler**,並將**“子類”**設定為 NSObject。
**步驟 6** - 選擇建立。
**步驟 7** - 如下更新**LocationHandler.h** -
#import <Foundation/Foundation.h>
#import <CoreLocation/CoreLocation.h>

@protocol LocationHandlerDelegate <NSObject>

@required
-(void) didUpdateToLocation:(CLLocation*)newLocation
   fromLocation:(CLLocation*)oldLocation;
@end

@interface LocationHandler : NSObject<CLLocationManagerDelegate> {
   CLLocationManager *locationManager;
}
@property(nonatomic,strong) id<LocationHandlerDelegate> delegate;

+(id)getSharedInstance;
-(void)startUpdating;
-(void) stopUpdating;

@end
**步驟 8** - 如下更新**LocationHandler.m** -
#import "LocationHandler.h"
static LocationHandler *DefaultManager = nil;

@interface LocationHandler()

-(void)initiate;

@end

@implementation LocationHandler

+(id)getSharedInstance{
   if (!DefaultManager) {
      DefaultManager = [[self allocWithZone:NULL]init];
      [DefaultManager initiate];
   }
   return DefaultManager;
}

-(void)initiate {
   locationManager = [[CLLocationManager alloc]init];
   locationManager.delegate = self;
}

-(void)startUpdating{
   [locationManager startUpdatingLocation];
}

-(void) stopUpdating {
   [locationManager stopUpdatingLocation];
}

-(void)locationManager:(CLLocationManager *)manager didUpdateToLocation:
   (CLLocation *)newLocation fromLocation:(CLLocation *)oldLocation {
   if ([self.delegate respondsToSelector:@selector
   (didUpdateToLocation:fromLocation:)]) {
      [self.delegate didUpdateToLocation:oldLocation
      fromLocation:newLocation];
   }
}
@end
**步驟 9** - 如下更新**ViewController.h**,我們已在其中實現了**LocationHandler 委託**並建立了兩個 ibOutlets -
#import <UIKit/UIKit.h>
#import "LocationHandler.h"

@interface ViewController : UIViewController<LocationHandlerDelegate> {
   IBOutlet UILabel *latitudeLabel;
   IBOutlet UILabel *longitudeLabel;
}
@end
**步驟 10** - 如下更新**ViewController.m** -
#import "ViewController.h"
@interface ViewController ()
@end
@implementation ViewController
- (void)viewDidLoad {
[super viewDidLoad];
[[LocationHandler getSharedInstance]setDelegate:self];
[[LocationHandler getSharedInstance]startUpdating];
}
- (void)didReceiveMemoryWarning {
[super didReceiveMemoryWarning];
// Dispose of any resources that can be recreated.
}
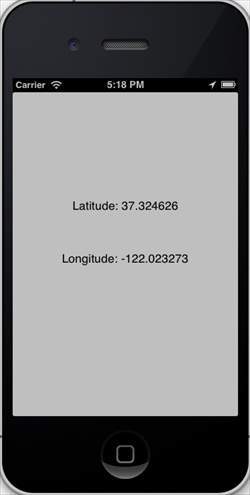
-(void)didUpdateToLocation:(CLLocation *)newLocation
fromLocation:(CLLocation *)oldLocation {
[latitudeLabel setText:[NSString stringWithFormat:
@"Latitude: %f",newLocation.coordinate.latitude]];
[longitudeLabel setText:[NSString stringWithFormat:
@"Longitude: %f",newLocation.coordinate.longitude]];
}
@end
輸出
當我們執行應用程式時,我們將獲得以下輸出 -
iOS - SQLite 資料庫
SQLite 可用於 iOS 處理資料。它使用 sqlite 查詢,這使得那些瞭解 SQL 的人更容易使用。
涉及的步驟
**步驟 1** - 建立一個簡單的**基於檢視的應用程式**。
**步驟 2** - 選擇您的專案檔案,然後選擇目標,然後在選擇框架中新增**libsqlite3.dylib**庫。
**步驟 3** - 透過選擇檔案→新建→檔案...→選擇**Objective C 類**並點選下一步建立一個新檔案。
**步驟 4** - 將類命名為**DBManager**,並將**“子類”**設定為 NSObject。
**步驟 5** - 選擇建立。
**步驟 6** - 如下更新**DBManager.h** -
#import <Foundation/Foundation.h>
#import <sqlite3.h>

@interface DBManager : NSObject {
   NSString *databasePath;
}

+(DBManager*)getSharedInstance;
-(BOOL)createDB;
-(BOOL) saveData:(NSString*)registerNumber name:(NSString*)name
   department:(NSString*)department year:(NSString*)year;
-(NSArray*) findByRegisterNumber:(NSString*)registerNumber;

@end
**步驟 7** - 如下更新**DBManager.m** -
#import "DBManager.h"
static DBManager *sharedInstance = nil;
static sqlite3 *database = nil;
static sqlite3_stmt *statement = nil;

@implementation DBManager

+(DBManager*)getSharedInstance {
   if (!sharedInstance) {
      sharedInstance = [[super allocWithZone:NULL]init];
      [sharedInstance createDB];
   }
   return sharedInstance;
}

-(BOOL)createDB {
   NSString *docsDir;
   NSArray *dirPaths;

   // Get the documents directory
   dirPaths = NSSearchPathForDirectoriesInDomains
   (NSDocumentDirectory, NSUserDomainMask, YES);
   docsDir = dirPaths[0];

   // Build the path to the database file
   databasePath = [[NSString alloc] initWithString:
   [docsDir stringByAppendingPathComponent: @"student.db"]];
   BOOL isSuccess = YES;
   NSFileManager *filemgr = [NSFileManager defaultManager];

   if ([filemgr fileExistsAtPath: databasePath ] == NO) {
      const char *dbpath = [databasePath UTF8String];
      if (sqlite3_open(dbpath, &database) == SQLITE_OK) {
         char *errMsg;
         const char *sql_stmt =
         "create table if not exists studentsDetail (regno integer
         primary key, name text, department text, year text)";

         if (sqlite3_exec(database, sql_stmt, NULL, NULL, &errMsg) != SQLITE_OK) {
            isSuccess = NO;
            NSLog(@"Failed to create table");
         }
         sqlite3_close(database);
         return  isSuccess;
      } else {
         isSuccess = NO;
         NSLog(@"Failed to open/create database");
      }
   }
   return isSuccess;
}

- (BOOL) saveData:(NSString*)registerNumber name:(NSString*)name
   department:(NSString*)department year:(NSString*)year; {
   const char *dbpath = [databasePath UTF8String];

   if (sqlite3_open(dbpath, &database) == SQLITE_OK) {
      NSString *insertSQL = [NSString stringWithFormat:@"insert into
      studentsDetail (regno,name, department, year) values
      (\"%d\",\"%@\", \"%@\", \"%@\")",[registerNumber integerValue],
      name, department, year];
      const char *insert_stmt = [insertSQL UTF8String];
      sqlite3_prepare_v2(database, insert_stmt,-1, &statement, NULL);

      if (sqlite3_step(statement) == SQLITE_DONE) {
         return YES;
      } else {
         return NO;
      }
      sqlite3_reset(statement);
   }
   return NO;
}

- (NSArray*) findByRegisterNumber:(NSString*)registerNumber {
   const char *dbpath = [databasePath UTF8String];

   if (sqlite3_open(dbpath, &database) == SQLITE_OK) {
      NSString *querySQL = [NSString stringWithFormat:
      @"select name, department, year from studentsDetail where
      regno=\"%@\"",registerNumber];
      const char *query_stmt = [querySQL UTF8String];
      NSMutableArray *resultArray = [[NSMutableArray alloc]init];

      if (sqlite3_prepare_v2(database, query_stmt, -1, &statement, NULL) == SQLITE_OK) {
         if (sqlite3_step(statement) == SQLITE_ROW) {
            NSString *name = [[NSString alloc] initWithUTF8String:
            (const char *) sqlite3_column_text(statement, 0)];
            [resultArray addObject:name];

            NSString *department = [[NSString alloc] initWithUTF8String:
            (const char *) sqlite3_column_text(statement, 1)];
            [resultArray addObject:department];

            NSString *year = [[NSString alloc]initWithUTF8String:
            (const char *) sqlite3_column_text(statement, 2)];
            [resultArray addObject:year];
            return resultArray;
         } else {
            NSLog(@"Not found");
            return nil;
         }
         sqlite3_reset(statement);
      }
   }
   return nil;
}
**步驟 8** - 如下更新**ViewController.xib**檔案 -

**步驟 9** - 為上述文字欄位建立 IBOutlets。
**步驟 10** - 為上述按鈕建立 IBAction。
**步驟 11** - 如下更新**ViewController.h** -
#import <UIKit/UIKit.h>
#import "DBManager.h"

@interface ViewController : UIViewController<UITextFieldDelegate> {
   IBOutlet UITextField *regNoTextField;
   IBOutlet UITextField *nameTextField;
   IBOutlet UITextField *departmentTextField;
   IBOutlet UITextField *yearTextField;
   IBOutlet UITextField *findByRegisterNumberTextField;
   IBOutlet UIScrollView *myScrollView;
}

-(IBAction)saveData:(id)sender;
-(IBAction)findData:(id)sender;
@end
**步驟 12** - 如下更新**ViewController.m** -
#import "ViewController.h"

@interface ViewController ()
@end

@implementation ViewController

- (id)initWithNibName:(NSString *)nibNameOrNil bundle:(NSBundle *)
   nibBundleOrNil {
   self = [super initWithNibName:nibNameOrNil bundle:nibBundleOrNil];

   if (self) {
      // Custom initialization
   }
   return self;
}

- (void)viewDidLoad {
   [super viewDidLoad];
   // Do any additional setup after loading the view from its nib.
}

- (void)didReceiveMemoryWarning {
   [super didReceiveMemoryWarning];
   // Dispose of any resources that can be recreated.
}

-(IBAction)saveData:(id)sender {
   BOOL success = NO;
   NSString *alertString = @"Data Insertion failed";

   if (regNoTextField.text.length>0 &&nameTextField.text.length>0 &&
      departmentTextField.text.length>0 &&yearTextField.text.length>0 ) {
      success = [[DBManager getSharedInstance]saveData:
      regNoTextField.text name:nameTextField.text department:
      departmentTextField.text year:yearTextField.text];
   } else {
      alertString = @"Enter all fields";
   }

   if (success == NO) {
      UIAlertView *alert = [[UIAlertView alloc]initWithTitle:
      alertString message:nil
      delegate:nil cancelButtonTitle:@"OK" otherButtonTitles:nil];
      [alert show];
   }
}

-(IBAction)findData:(id)sender {
   NSArray *data = [[DBManager getSharedInstance]findByRegisterNumber:
   findByRegisterNumberTextField.text];

   if (data == nil) {
      UIAlertView *alert = [[UIAlertView alloc]initWithTitle:
      @"Data not found" message:nil delegate:nil cancelButtonTitle:
      @"OK" otherButtonTitles:nil];
      [alert show];
      regNoTextField.text = @"";
      nameTextField.text =@"";
      departmentTextField.text = @"";
      yearTextField.text =@"";
   } else {
      regNoTextField.text = findByRegisterNumberTextField.text;
      nameTextField.text =[data objectAtIndex:0];
      departmentTextField.text = [data objectAtIndex:1];
      yearTextField.text =[data objectAtIndex:2];
   }
}

#pragma mark - Text field delegate
-(void)textFieldDidBeginEditing:(UITextField *)textField {
   [myScrollView setFrame:CGRectMake(10, 50, 300, 200)];
   [myScrollView setContentSize:CGSizeMake(300, 350)];
}

-(void)textFieldDidEndEditing:(UITextField *)textField {
   [myScrollView setFrame:CGRectMake(10, 50, 300, 350)];

}

-(BOOL) textFieldShouldReturn:(UITextField *)textField {
   [textField resignFirstResponder];
   return YES;
}
@end
輸出
當我們執行應用程式時,我們將獲得以下輸出,我們可以在其中新增和查詢學生詳細資訊 -

iOS - 傳送郵件
我們可以使用 iOS 裝置的電子郵件應用程式傳送電子郵件。
涉及的步驟
**步驟 1** - 建立一個簡單的**基於檢視的應用程式**。
**步驟 2** - 選擇您的專案檔案,然後選擇目標,然後新增**MessageUI.framework**。
**步驟 3** - 在**ViewController.xib**中新增一個按鈕,並建立一個用於傳送電子郵件的操作。
**步驟 4** - 如下更新**ViewController.h** -
#import <UIKit/UIKit.h>
#import <MessageUI/MessageUI.h>

@interface ViewController : UIViewController<MFMailComposeViewControllerDelegate> {
   MFMailComposeViewController *mailComposer;
}

-(IBAction)sendMail:(id)sender;

@end
**步驟 5** - 如下更新**ViewController.m** -
#import "ViewController.h"

@interface ViewController ()
@end

@implementation ViewController

- (void)viewDidLoad {
   [super viewDidLoad];
}

- (void)didReceiveMemoryWarning {
   [super didReceiveMemoryWarning];
   // Dispose of any resources that can be recreated.
}

-(void)sendMail:(id)sender {
   mailComposer = [[MFMailComposeViewController alloc]init];
   mailComposer.mailComposeDelegate = self;
   [mailComposer setSubject:@"Test mail"];
   [mailComposer setMessageBody:@"Testing message
   for the test mail" isHTML:NO];
   [self presentModalViewController:mailComposer animated:YES];
}

#pragma mark - mail compose delegate
-(void)mailComposeController:(MFMailComposeViewController *)controller
   didFinishWithResult:(MFMailComposeResult)result error:(NSError *)error{

   if (result) {
      NSLog(@"Result : %d",result);
   }

   if (error) {
      NSLog(@"Error : %@",error);
   }

   [self dismissModalViewControllerAnimated:YES];
}
@end
輸出
當我們執行應用程式時,我們將獲得以下輸出 -

點擊發送電子郵件,我們將獲得以下輸出 -

iOS - 音訊和影片
音訊和影片在最新的裝置中非常常見。它分別在 iOS 中透過**AVFoundation.framework**和**MediaPlayer.framework**的支援下實現。
涉及的步驟
**步驟 1** - 建立一個簡單的**基於檢視的應用程式**。
**步驟 2** - 選擇您的專案檔案,選擇目標,然後我們應該新增**AVFoundation.framework**和**MediaPlayer.framework**。
**步驟 3** - 在 ViewController.xib 中新增兩個按鈕,並分別建立一個用於播放音訊和影片的操作。
**步驟 4** - 如下更新**ViewController.h** -
#import <UIKit/UIKit.h>
#import <AVFoundation/AVFoundation.h>
#import <MediaPlayer/MediaPlayer.h>

@interface ViewController : UIViewController {
   AVAudioPlayer *audioPlayer;
   MPMoviePlayerViewController *moviePlayer;
}
-(IBAction)playAudio:(id)sender;
-(IBAction)playVideo:(id)sender;
@end
**步驟 5** - 如下更新**ViewController.m** -
#import "ViewController.h"

@interface ViewController ()
@end

@implementation ViewController

- (void)viewDidLoad {
   [super viewDidLoad];
}

- (void)didReceiveMemoryWarning {
   [super didReceiveMemoryWarning];
   // Dispose of any resources that can be recreated.
}

-(IBAction)playAudio:(id)sender {
   NSString *path = [[NSBundle mainBundle]
   pathForResource:@"audioTest" ofType:@"mp3"];
   audioPlayer = [[AVAudioPlayer alloc]initWithContentsOfURL:
   [NSURL fileURLWithPath:path] error:NULL];
   [audioPlayer play];
}

-(IBAction)playVideo:(id)sender {
   NSString *path = [[NSBundle mainBundle]pathForResource:
   @"videoTest" ofType:@"mov"];
   moviePlayer = [[MPMoviePlayerViewController
   alloc]initWithContentURL:[NSURL fileURLWithPath:path]];
   [self presentModalViewController:moviePlayer animated:NO];
}
@end
注意
我們需要新增音訊和影片檔案以確保我們獲得預期的輸出。
輸出
當我們執行應用程式時,我們將獲得以下輸出 -
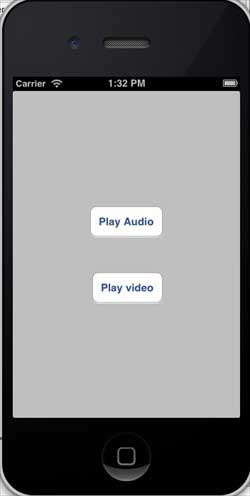
當我們點選播放影片時,我們將獲得如下所示的輸出 -

當我們點選播放音訊時,您將聽到音訊。
iOS - 檔案處理
檔案處理無法透過應用程式直觀地解釋,因此下面解釋了用於處理檔案的關鍵方法。請注意,應用程式包只有讀取許可權,我們無法修改檔案。無論如何,您可以修改應用程式的文件目錄。
檔案處理中使用的方法
下面討論了用於**訪問**和**操作**檔案的方法。在這裡,我們必須將 FilePath1、FilePath2 和 FilePath 字串替換為我們所需的完整檔案路徑,以獲得所需的 action。
檢查路徑是否存在檔案
NSFileManager *fileManager = [NSFileManager defaultManager];

//Get documents directory
NSArray *directoryPaths = NSSearchPathForDirectoriesInDomains
(NSDocumentDirectory, NSUserDomainMask, YES);
NSString *documentsDirectoryPath = [directoryPaths objectAtIndex:0];

if ([fileManager fileExistsAtPath:@""]==YES) {
   NSLog(@"File exists");
}
比較兩個檔案內容
if ([fileManager contentsEqualAtPath:@"FilePath1" andPath:@" FilePath2"]) {
   NSLog(@"Same content");
}
檢查是否可寫、可讀和可執行
if ([fileManager isWritableFileAtPath:@"FilePath"]) {
   NSLog(@"isWritable");
}

if ([fileManager isReadableFileAtPath:@"FilePath"]) {
   NSLog(@"isReadable");
}

if ( [fileManager isExecutableFileAtPath:@"FilePath"]) {
   NSLog(@"is Executable");
}
移動檔案
if([fileManager moveItemAtPath:@"FilePath1"
   toPath:@"FilePath2" error:NULL]) {
   NSLog(@"Moved successfully");
}
複製檔案
if ([fileManager copyItemAtPath:@"FilePath1"
   toPath:@"FilePath2"  error:NULL]) {
   NSLog(@"Copied successfully");
}
刪除檔案
if ([fileManager removeItemAtPath:@"FilePath" error:NULL]) {
   NSLog(@"Removed successfully");
}
讀取檔案
NSData *data = [fileManager contentsAtPath:@"Path"];
寫入檔案
[fileManager createFileAtPath:@"" contents:data attributes:nil];
iOS - 訪問地圖
地圖始終有助於我們找到地點。地圖透過 MapKit 框架整合到 iOS 中。
涉及的步驟
**步驟 1** - 建立一個簡單的基於檢視的應用程式。
**步驟 2** - 選擇您的專案檔案,然後選擇目標,然後新增 MapKit.framework。
**步驟 3** - 我們還應該新增 Corelocation.framework。
**步驟 4** - 將 MapView 新增到 ViewController.xib 並建立一個 ibOutlet 並將其命名為 mapView。
**步驟 5** - 透過選擇檔案→新建→檔案...→選擇 Objective C 類並點選下一步建立一個新檔案。
**步驟 6** - 將類命名為 MapAnnotation,並將“子類”設定為 NSObject。
**步驟 7** - 選擇建立。
**步驟 8** - 如下更新 MapAnnotation.h -
#import <Foundation/Foundation.h>
#import <MapKit/MapKit.h>

@interface MapAnnotation : NSObject<MKAnnotation>
@property (nonatomic, strong) NSString *title;
@property (nonatomic, readwrite) CLLocationCoordinate2D coordinate;

- (id)initWithTitle:(NSString *)title andCoordinate:
   (CLLocationCoordinate2D)coordinate2d;

@end
**步驟 9** - 如下更新**MapAnnotation.m** -
#import "MapAnnotation.h"

@implementation MapAnnotation
-(id)initWithTitle:(NSString *)title andCoordinate:
   (CLLocationCoordinate2D)coordinate2d {

   self.title = title;
   self.coordinate =coordinate2d;
   return self;
}
@end
**步驟 10** - 如下更新**ViewController.h** -
#import <UIKit/UIKit.h>
#import <MapKit/MapKit.h>
#import <CoreLocation/CoreLocation.h>

@interface ViewController : UIViewController<MKMapViewDelegate> {
   MKMapView *mapView;
}
@end
**步驟 11** - 如下更新**ViewController.m** -
#import "ViewController.h"
#import "MapAnnotation.h"

@interface ViewController ()
@end

@implementation ViewController

- (void)viewDidLoad {
   [super viewDidLoad];
   mapView = [[MKMapView alloc]initWithFrame:
   CGRectMake(10, 100, 300, 300)];
   mapView.delegate = self;
   mapView.centerCoordinate = CLLocationCoordinate2DMake(37.32, -122.03);
   mapView.mapType = MKMapTypeHybrid;
   CLLocationCoordinate2D location;
   location.latitude = (double) 37.332768;
   location.longitude = (double) -122.030039;

   // Add the annotation to our map view
   MapAnnotation *newAnnotation = [[MapAnnotation alloc]
   initWithTitle:@"Apple Head quaters" andCoordinate:location];
   [mapView addAnnotation:newAnnotation];
   CLLocationCoordinate2D location2;
   location2.latitude = (double) 37.35239;
   location2.longitude = (double) -122.025919;
   MapAnnotation *newAnnotation2 = [[MapAnnotation alloc]
   initWithTitle:@"Test annotation" andCoordinate:location2];
   [mapView addAnnotation:newAnnotation2];
   [self.view addSubview:mapView];
}

// When a map annotation point is added, zoom to it (1500 range)
- (void)mapView:(MKMapView *)mv didAddAnnotationViews:(NSArray *)views {
   MKAnnotationView *annotationView = [views objectAtIndex:0];
   id <MKAnnotation> mp = [annotationView annotation];
   MKCoordinateRegion region = MKCoordinateRegionMakeWithDistance
   ([mp coordinate], 1500, 1500);
   [mv setRegion:region animated:YES];
   [mv selectAnnotation:mp animated:YES];
}

- (void)didReceiveMemoryWarning {
   [super didReceiveMemoryWarning];
   // Dispose of any resources that can be recreated.
}
@end
輸出
當我們執行應用程式時,我們將獲得如下所示的輸出 -

當我們向上滾動地圖時,我們將獲得如下所示的輸出 -

iOS - 應用內購買
應用內購買用於購買應用程式的附加內容或升級功能。
涉及的步驟
**步驟 1** - 在 iTunes Connect 中,確保您擁有**唯一的 App ID**,並且當我們建立應用程式時,使用**bundle ID**更新,並在 Xcode 中使用相應的配置檔案進行程式碼簽名。
**步驟 2** - 建立一個新的應用程式並更新應用程式資訊。您可以在 Apple 的**新增新應用程式**文件中瞭解更多相關資訊。
**步驟 3** - 在應用程式頁面上的**管理應用內購買**中為應用內購買新增新產品。
**步驟 4** - 確保您已為您的應用程式設定了銀行詳細資訊。這需要為**應用內購買**設定才能正常工作。此外,使用 iTunes Connect 頁面上的**管理使用者**選項建立一個測試使用者帳戶。
**步驟 5** - 下一步與處理程式碼和為我們的應用內購買建立 UI 相關。
**步驟 6** - 建立一個**單檢視應用程式**,並將 bundle 識別符號輸入為 iTunes Connect 中指定的識別符號。
**步驟 7** - 如下所示更新**ViewController.xib** -
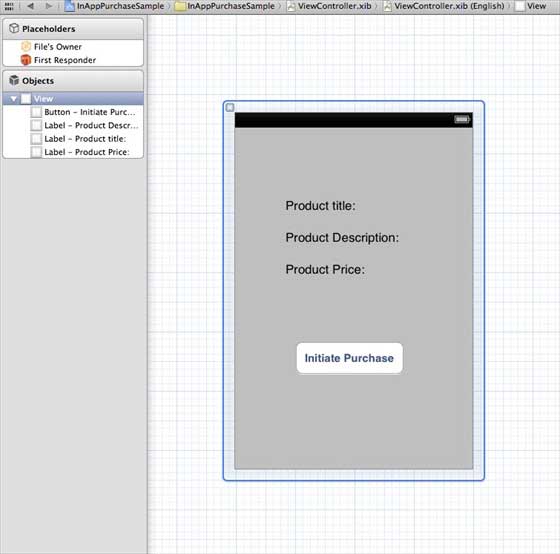
**步驟 8** - 為三個標籤和按鈕建立**IBOutlets**,分別命名為 productTitleLabel、productDescriptionLabel、productPriceLabel 和 purchaseButton。
**步驟 9** - 選擇您的專案檔案,然後選擇目標,然後新增**StoreKit.framework**。
**步驟 10** - 如下更新**ViewController.h** -
#import <UIKit/UIKit.h>
#import <StoreKit/StoreKit.h>

@interface ViewController : UIViewController<
SKProductsRequestDelegate,SKPaymentTransactionObserver> {
   SKProductsRequest *productsRequest;
   NSArray *validProducts;
   UIActivityIndicatorView *activityIndicatorView;
   IBOutlet UILabel *productTitleLabel;
   IBOutlet UILabel *productDescriptionLabel;
   IBOutlet UILabel *productPriceLabel;
   IBOutlet UIButton *purchaseButton;
}

- (void)fetchAvailableProducts;
- (BOOL)canMakePurchases;
- (void)purchaseMyProduct:(SKProduct*)product;
- (IBAction)purchase:(id)sender;

@end
**步驟 11** - 如下更新**ViewController.m** -
#import "ViewController.h"
#define kTutorialPointProductID
@"com.tutorialPoints.testApp.testProduct"

@interface ViewController ()
@end

@implementation ViewController

- (void)viewDidLoad {
   [super viewDidLoad];

   // Adding activity indicator
   activityIndicatorView = [[UIActivityIndicatorView alloc]
   initWithActivityIndicatorStyle:UIActivityIndicatorViewStyleWhiteLarge];
   activityIndicatorView.center = self.view.center;
   [activityIndicatorView hidesWhenStopped];
   [self.view addSubview:activityIndicatorView];
   [activityIndicatorView startAnimating];

   //Hide purchase button initially
   purchaseButton.hidden = YES;
   [self fetchAvailableProducts];
}

- (void)didReceiveMemoryWarning {
   [super didReceiveMemoryWarning];
   // Dispose of any resources that can be recreated.
}

-(void)fetchAvailableProducts {
   NSSet *productIdentifiers = [NSSet
   setWithObjects:kTutorialPointProductID,nil];
   productsRequest = [[SKProductsRequest alloc]
   initWithProductIdentifiers:productIdentifiers];
   productsRequest.delegate = self;
   [productsRequest start];
}

- (BOOL)canMakePurchases {
   return [SKPaymentQueue canMakePayments];
}

- (void)purchaseMyProduct:(SKProduct*)product {
   if ([self canMakePurchases]) {
      SKPayment *payment = [SKPayment paymentWithProduct:product];
      [[SKPaymentQueue defaultQueue] addTransactionObserver:self];
      [[SKPaymentQueue defaultQueue] addPayment:payment];
   } else {
      UIAlertView *alertView = [[UIAlertView alloc]initWithTitle:
      @"Purchases are disabled in your device" message:nil delegate:
      self cancelButtonTitle:@"Ok" otherButtonTitles: nil];
      [alertView show];
   }
}
-(IBAction)purchase:(id)sender {
   [self purchaseMyProduct:[validProducts objectAtIndex:0]];
   purchaseButton.enabled = NO;
}

#pragma mark StoreKit Delegate

-(void)paymentQueue:(SKPaymentQueue *)queue
updatedTransactions:(NSArray *)transactions {
   for (SKPaymentTransaction *transaction in transactions) {
      switch (transaction.transactionState) {
         case SKPaymentTransactionStatePurchasing:
            NSLog(@"Purchasing");
         break;

         case SKPaymentTransactionStatePurchased:
            if ([transaction.payment.productIdentifier
            isEqualToString:kTutorialPointProductID]) {
               NSLog(@"Purchased ");
               UIAlertView *alertView = [[UIAlertView alloc]initWithTitle:
               @"Purchase is completed succesfully" message:nil delegate:
               self cancelButtonTitle:@"Ok" otherButtonTitles: nil];
               [alertView show];
            }
            [[SKPaymentQueue defaultQueue] finishTransaction:transaction];
         break;

         case SKPaymentTransactionStateRestored:
            NSLog(@"Restored ");
            [[SKPaymentQueue defaultQueue] finishTransaction:transaction];
         break;

         case SKPaymentTransactionStateFailed:
            NSLog(@"Purchase failed ");
         break
         default:
         break;
      }
   }
}

-(void)productsRequest:(SKProductsRequest *)request
didReceiveResponse:(SKProductsResponse *)response {
   SKProduct *validProduct = nil;
   int count = [response.products count];

   if (count>0) {
      validProducts = response.products;
      validProduct = [response.products objectAtIndex:0];

      if ([validProduct.productIdentifier
         isEqualToString:kTutorialPointProductID]) {
         [productTitleLabel setText:[NSString stringWithFormat:
            @"Product Title: %@",validProduct.localizedTitle]];
         [productDescriptionLabel setText:[NSString stringWithFormat:
            @"Product Desc: %@",validProduct.localizedDescription]];
         [productPriceLabel setText:[NSString stringWithFormat:
            @"Product Price: %@",validProduct.price]];
      }
   } else {
      UIAlertView *tmp = [[UIAlertView alloc]
         initWithTitle:@"Not Available"
         message:@"No products to purchase"
         delegate:self
         cancelButtonTitle:nil
         otherButtonTitles:@"Ok", nil];
         [tmp show];
   }

   [activityIndicatorView stopAnimating];
   purchaseButton.hidden = NO;
}
@end
注意
您必須將 kTutorialPointProductID 更新為您為應用內購買建立的產品 ID。您可以透過更新 fetchAvailableProducts 中的 productIdentifiers 的 NSSet 來新增多個產品。類似地,處理您新增的產品 ID 的購買相關操作。
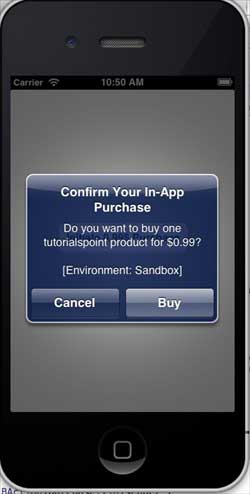
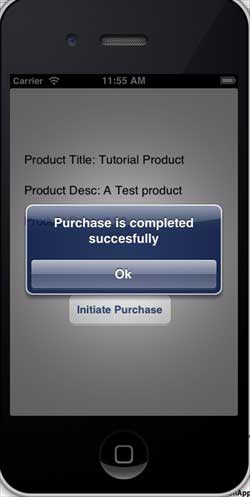
輸出
當我們執行應用程式時,我們將獲得以下輸出 -

確保您已在設定螢幕中退出帳戶。點選“發起購買”後,選擇“使用現有 Apple ID”。輸入您的有效測試帳戶使用者名稱和密碼。幾秒鐘後,您將看到以下警報。
一旦您的產品成功購買,您將收到以下警報。您可以在更新應用程式功能的相關程式碼中看到我們顯示此警報的位置。
iOS - iAd 整合
iAd 用於顯示廣告,由蘋果伺服器提供。iAd 有助於我們從 iOS 應用程式中獲得收入。
iAd 整合 – 涉及的步驟
**步驟 1** - 建立一個簡單的基於檢視的應用程式。
步驟 2 - 選擇您的專案檔案,然後選擇目標,然後在選擇框架中新增 iAd.framework。
**步驟 3** - 如下更新 ViewController.h -
#import <UIKit/UIKit.h>
#import <iAd/iAd.h>

@interface ViewController : UIViewController<ADBannerViewDelegate> {
   ADBannerView *bannerView;
}
@end
**步驟 4** - 如下更新**ViewController.m** -
#import "ViewController.h"

@interface ViewController ()
@end

@implementation ViewController

- (void)viewDidLoad {
   [super viewDidLoad];
   bannerView = [[ADBannerView alloc]initWithFrame:
   CGRectMake(0, 0, 320, 50)];

   // Optional to set background color to clear color
   [bannerView setBackgroundColor:[UIColor clearColor]];
   [self.view addSubview: bannerView];
}

- (void)didReceiveMemoryWarning {
   [super didReceiveMemoryWarning];
   // Dispose of any resources that can be recreated.
}

#pragma mark - AdViewDelegates

-(void)bannerView:(ADBannerView *)banner
   didFailToReceiveAdWithError:(NSError *)error {
   NSLog(@"Error loading");
}

-(void)bannerViewDidLoadAd:(ADBannerView *)banner {
   NSLog(@"Ad loaded");
}

-(void)bannerViewWillLoadAd:(ADBannerView *)banner {
   NSLog(@"Ad will load");
}

-(void)bannerViewActionDidFinish:(ADBannerView *)banner {
   NSLog(@"Ad did finish");
}
@end
輸出
當我們執行應用程式時,我們將獲得以下輸出 -

iOS - GameKit
GameKit 是一個框架,它為 iOS 應用程式提供排行榜、成就和更多功能。在本教程中,我們將解釋新增排行榜和更新分數的步驟。
涉及的步驟
**步驟 1** - 在 iTunes Connect 中,確保您擁有**唯一的 App ID**,並且當我們建立應用程式時,使用**bundle ID**更新,並在 Xcode 中使用相應的配置檔案進行程式碼簽名。
步驟 2 - 建立一個新的應用程式並更新應用程式資訊。您可以在 apple-add new apps 文件中瞭解更多相關資訊。
步驟 3 - 在應用程式頁面上的管理遊戲中心中設定排行榜,在其中新增一個排行榜並提供排行榜 ID和分數型別。在這裡,我們將排行榜 ID 設定為 tutorialsPoint。
步驟 4 - 接下來的步驟與處理程式碼和為我們的應用程式建立 UI 相關。
步驟 5 - 建立一個單檢視應用程式,並輸入bundle identifier,它是iTunes Connect中指定的識別符號。
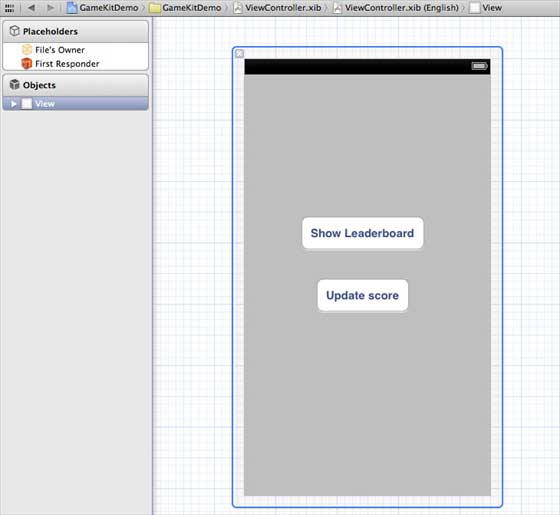
步驟 6 - 按如下所示更新 ViewController.xib -
步驟 7 - 選擇您的專案檔案,然後選擇目標,然後新增GameKit.framework。
步驟 8 - 為我們新增的按鈕建立IBActions。
步驟 9 - 按如下所示更新ViewController.h檔案 -
#import <UIKit/UIKit.h>
#import <GameKit/GameKit.h>

@interface ViewController : UIViewController
<GKLeaderboardViewControllerDelegate>

-(IBAction)updateScore:(id)sender;
-(IBAction)showLeaderBoard:(id)sender;

@end
**步驟 10** - 如下更新**ViewController.m** -
#import "ViewController.h"

@interface ViewController ()
@end

@implementation ViewController

- (void)viewDidLoad {
   [super viewDidLoad];
   if([GKLocalPlayer localPlayer].authenticated == NO) {
      [[GKLocalPlayer localPlayer]
      authenticateWithCompletionHandler:^(NSError *error) {
         NSLog(@"Error%@",error);
      }];
   }
}

- (void)didReceiveMemoryWarning {
   [super didReceiveMemoryWarning];
   // Dispose of any resources that can be recreated.
}

- (void) updateScore: (int64_t) score
   forLeaderboardID: (NSString*) category {
   GKScore *scoreObj = [[GKScore alloc]
   initWithCategory:category];
   scoreObj.value = score;
   scoreObj.context = 0;

   [scoreObj reportScoreWithCompletionHandler:^(NSError *error) {
      // Completion code can be added here
      UIAlertView *alert = [[UIAlertView alloc]
      initWithTitle:nil message:@"Score Updated Succesfully"
      delegate:self cancelButtonTitle:@"Ok" otherButtonTitles: nil];
      [alert show];
   }];
}

-(IBAction)updateScore:(id)sender {
   [self updateScore:200 forLeaderboardID:@"tutorialsPoint"];
}

-(IBAction)showLeaderBoard:(id)sender {
   GKLeaderboardViewController *leaderboardViewController =
   [[GKLeaderboardViewController alloc] init];
   leaderboardViewController.leaderboardDelegate = self;
   [self presentModalViewController:
   leaderboardViewController animated:YES];
}

#pragma mark - Gamekit delegates
- (void)leaderboardViewControllerDidFinish:
(GKLeaderboardViewController *)viewController {
   [self dismissModalViewControllerAnimated:YES];
}
@end
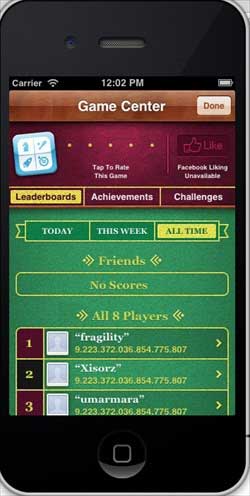
輸出
當我們執行應用程式時,我們將獲得以下輸出 -

當我們點選“顯示排行榜”時,我們會得到一個類似於以下內容的螢幕 -
當我們點選“更新分數”時,分數將更新到我們的排行榜,並且我們會收到如下所示的警報 -

iOS - 故事板
故事板在 iOS 5 中引入。當我們使用故事板時,我們的部署目標應為 5.0 或更高。故事板幫助我們建立應用程式的所有螢幕,並在一個介面 MainStoryboard.storyboard 下互連螢幕。它還有助於減少推送/呈現檢視控制器的編碼。
涉及的步驟
步驟 1 - 建立一個單檢視應用程式,並確保在建立應用程式時選中故事板複選框。
步驟 2 - 選擇MainStoryboard.storyboard,您可以在其中找到單檢視控制器。再新增一個檢視控制器,並按如下所示更新檢視控制器。
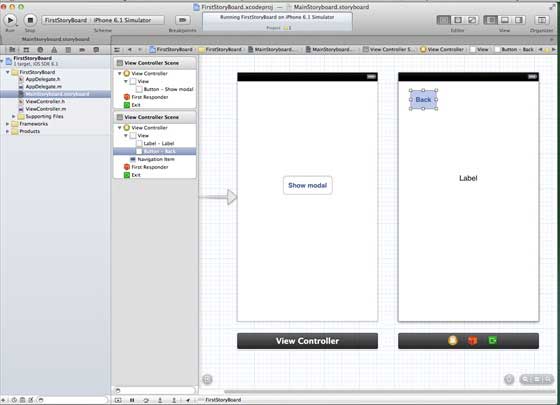
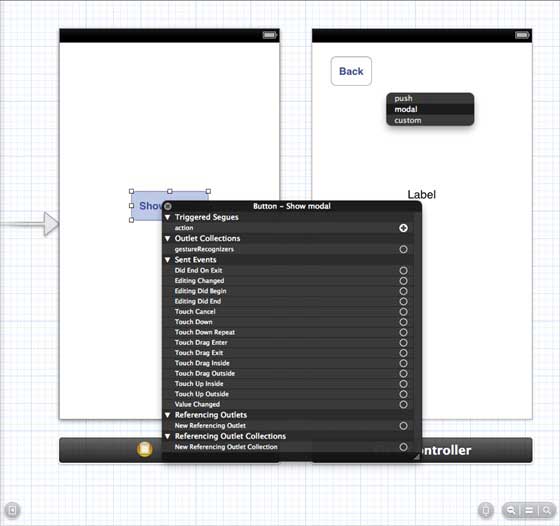
步驟 3 - 現在讓我們連線這兩個檢視控制器。右鍵單擊“顯示模態”按鈕,並將其拖到左側檢視控制器中的右側檢視控制器,如下所示。

步驟 4 - 從顯示的三個選項中選擇模態,如下所示。
步驟 5 - 按如下所示更新ViewController.h -
#import <UIKit/UIKit.h>

@interface ViewController : UIViewController

-(IBAction)done:(UIStoryboardSegue *)seque;

@end
步驟 6 - 按如下所示更新ViewController.m -
#import "ViewController.h"

@interface ViewController ()
@end

@implementation ViewController

- (void)viewDidLoad {
   [super viewDidLoad];
}

- (void)didReceiveMemoryWarning {
   [super didReceiveMemoryWarning];
   // Dispose of any resources that can be recreated.
}

-(IBAction)done:(UIStoryboardSegue *)seque {
   [self.navigationController popViewControllerAnimated:YES];
}

@end
步驟 7 - 選擇 MainStoryboard.storyboard,然後右鍵單擊右側檢視控制器中的“退出”按鈕,選擇“完成”,並將其與“返回”按鈕連線,如下所示。

輸出
當我們在iPhone裝置上執行應用程式時,我們將獲得以下輸出 -
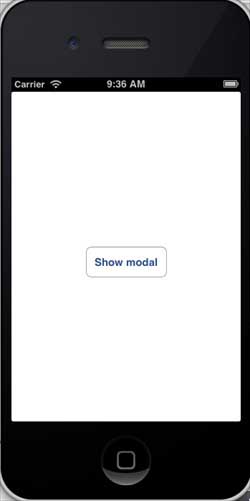
當我們選擇“顯示模態”時,我們將獲得以下輸出 -

iOS - 自動佈局
自動佈局在iOS 6.0中引入。當我們使用自動佈局時,我們的部署目標應為 6.0 或更高。自動佈局幫助我們建立可用於多種方向和多種裝置的介面。
我們示例的目標
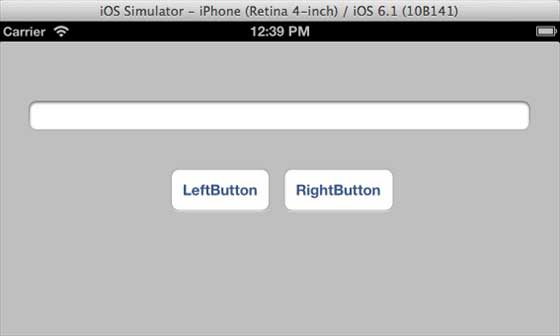
我們將新增兩個按鈕,它們將放置在距螢幕中心一定距離的位置。我們還將嘗試新增一個可調整大小的文字欄位,該欄位將放置在按鈕上方的某個距離。
我們的方法
我們將在程式碼中新增一個文字欄位和兩個按鈕以及它們的約束。每個 UI 元素的約束將被建立並新增到父檢視。我們必須停用我們新增的每個 UI 元素的自動調整大小才能獲得所需的結果。
涉及的步驟
**步驟 1** - 建立一個簡單的基於檢視的應用程式。
步驟 2 - 我們將只編輯 ViewController.m,如下所示 -
#import "ViewController.h"

@interface ViewController ()
@property (nonatomic, strong) UIButton *leftButton;
@property (nonatomic, strong) UIButton *rightButton;
@property (nonatomic, strong) UITextField *textfield;

@end
@implementation ViewController

- (void)viewDidLoad {
   [super viewDidLoad];
   UIView *superview = self.view;

   /*1. Create leftButton and add to our view*/
   self.leftButton = [UIButton buttonWithType:UIButtonTypeRoundedRect];
   self.leftButton.translatesAutoresizingMaskIntoConstraints = NO;
   [self.leftButton setTitle:@"LeftButton" forState:UIControlStateNormal];
   [self.view addSubview:self.leftButton];

   /* 2. Constraint to position LeftButton's X*/
   NSLayoutConstraint *leftButtonXConstraint = [NSLayoutConstraint
   constraintWithItem:self.leftButton attribute:NSLayoutAttributeCenterX
   relatedBy:NSLayoutRelationGreaterThanOrEqual toItem:superview attribute:
   NSLayoutAttributeCenterX multiplier:1.0 constant:-60.0f];

   /* 3. Constraint to position LeftButton's Y*/
   NSLayoutConstraint *leftButtonYConstraint = [NSLayoutConstraint
   constraintWithItem:self.leftButton attribute:NSLayoutAttributeCenterY
   relatedBy:NSLayoutRelationEqual toItem:superview attribute:
   NSLayoutAttributeCenterY multiplier:1.0f constant:0.0f];

   /* 4. Add the constraints to button's superview*/
   [superview addConstraints:@[ leftButtonXConstraint,
   leftButtonYConstraint]];

   /*5. Create rightButton and add to our view*/
   self.rightButton = [UIButton buttonWithType:UIButtonTypeRoundedRect];
   self.rightButton.translatesAutoresizingMaskIntoConstraints = NO;
   [self.rightButton setTitle:@"RightButton" forState:UIControlStateNormal];
   [self.view addSubview:self.rightButton];

   /*6. Constraint to position RightButton's X*/
   NSLayoutConstraint *rightButtonXConstraint = [NSLayoutConstraint
   constraintWithItem:self.rightButton attribute:NSLayoutAttributeCenterX
   relatedBy:NSLayoutRelationGreaterThanOrEqual toItem:superview attribute:
   NSLayoutAttributeCenterX multiplier:1.0 constant:60.0f];

   /*7. Constraint to position RightButton's Y*/
   rightButtonXConstraint.priority = UILayoutPriorityDefaultHigh;
   NSLayoutConstraint *centerYMyConstraint = [NSLayoutConstraint
   constraintWithItem:self.rightButton attribute:NSLayoutAttributeCenterY
   relatedBy:NSLayoutRelationGreaterThanOrEqual toItem:superview attribute:
   NSLayoutAttributeCenterY multiplier:1.0f constant:0.0f];
   [superview addConstraints:@[centerYMyConstraint,
   rightButtonXConstraint]];

   //8. Add Text field
   self.textfield = [[UITextField alloc]initWithFrame:
   CGRectMake(0, 100, 100, 30)];
   self.textfield.borderStyle = UITextBorderStyleRoundedRect;
   self.textfield.translatesAutoresizingMaskIntoConstraints = NO;
   [self.view addSubview:self.textfield];

   //9. Text field Constraints
   NSLayoutConstraint *textFieldTopConstraint = [NSLayoutConstraint
   constraintWithItem:self.textfield attribute:NSLayoutAttributeTop
   relatedBy:NSLayoutRelationGreaterThanOrEqual toItem:superview
   attribute:NSLayoutAttributeTop multiplier:1.0 constant:60.0f];
   NSLayoutConstraint *textFieldBottomConstraint = [NSLayoutConstraint
   constraintWithItem:self.textfield attribute:NSLayoutAttributeTop
   relatedBy:NSLayoutRelationGreaterThanOrEqual toItem:self.rightButton
   attribute:NSLayoutAttributeTop multiplier:0.8 constant:-60.0f];
   NSLayoutConstraint *textFieldLeftConstraint = [NSLayoutConstraint
   constraintWithItem:self.textfield attribute:NSLayoutAttributeLeft
   relatedBy:NSLayoutRelationEqual toItem:superview attribute:
   NSLayoutAttributeLeft multiplier:1.0 constant:30.0f];
   NSLayoutConstraint *textFieldRightConstraint = [NSLayoutConstraint
   constraintWithItem:self.textfield attribute:NSLayoutAttributeRight
   relatedBy:NSLayoutRelationEqual toItem:superview attribute:
   NSLayoutAttributeRight multiplier:1.0 constant:-30.0f];
   [superview addConstraints:@[textFieldBottomConstraint ,
   textFieldLeftConstraint, textFieldRightConstraint,
   textFieldTopConstraint]];
}

- (void)didReceiveMemoryWarning {
   [super didReceiveMemoryWarning];
   // Dispose of any resources that can be recreated.
}
@end
注意事項
在標記為 1、5 和 8 的步驟中,我們分別以程式設計方式添加了兩個按鈕和一個文字欄位。
在其餘步驟中,我們建立了約束並將這些約束新增到相應的父檢視,這些父檢視實際上是 self-views。左側按鈕之一的約束如下所示 -
NSLayoutConstraint *leftButtonXConstraint = [NSLayoutConstraint
constraintWithItem:self.leftButton attribute:NSLayoutAttributeCenterX
relatedBy:NSLayoutRelationGreaterThanOrEqual toItem:superview attribute:
NSLayoutAttributeCenterX multiplier:1.0 constant:-60.0f];
我們有 constraintWithItem 和 toItem,它們決定我們在哪些 UI 元素之間建立約束。屬性決定這兩個元素如何關聯在一起。“relatedBy”決定屬性在元素之間產生多少影響。乘數是乘法因子,常數將新增到乘數中。
在上面的示例中,leftButton 的 X 始終大於或等於相對於父檢視中心的 -60 畫素。類似地,定義了其他約束。
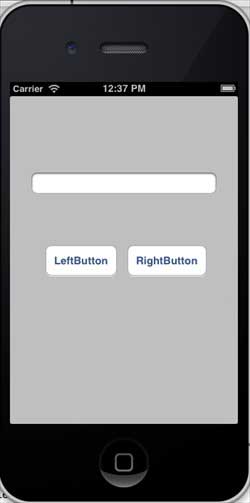
輸出
當我們執行應用程式時,我們將在 iPhone 模擬器上獲得以下輸出 -
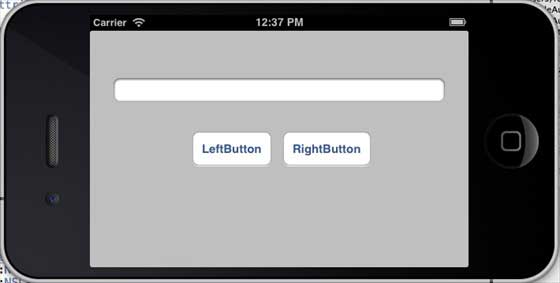
當我們將模擬器的方向更改為橫向時,我們將獲得以下輸出 -
當我們在 iPhone 5 模擬器上執行相同的應用程式時,我們將獲得以下輸出 -

當我們將模擬器的方向更改為橫向時,我們將獲得以下輸出 -
iOS - Twitter 和 Facebook
Twitter 已整合到iOS 5.0中,Facebook 已整合到iOS 6.0中。我們的教程重點介紹 Apple 提供的類,Twitter 和 Facebook 的部署目標分別為 iOS 5.0 和 iOS 6.0。
涉及的步驟
**步驟 1** - 建立一個簡單的基於檢視的應用程式。
步驟 2 - 選擇您的專案檔案,然後選擇目標,然後在選擇框架中新增Social.framework和Accounts.framework。
步驟 3 - 新增兩個名為 facebookPost 和 twitterPost 的按鈕,併為它們建立 ibActions。
**步驟 4** - 如下更新**ViewController.h** -
#import <Social/Social.h>
#import <Accounts/Accounts.h>
#import <UIKit/UIKit.h>

@interface ViewController : UIViewController

-(IBAction)twitterPost:(id)sender;
-(IBAction)facebookPost:(id)sender;

@end
**步驟 5** - 如下更新**ViewController.m** -
#import "ViewController.h"

@interface ViewController ()
@end

@implementation ViewController

- (void)viewDidLoad {
   [super viewDidLoad];
}

- (void)didReceiveMemoryWarning {
   [super didReceiveMemoryWarning];
   // Dispose of any resources that can be recreated.
}

-(IBAction)facebookPost:(id)sender {
   SLComposeViewController *controller = [SLComposeViewController
   composeViewControllerForServiceType:SLServiceTypeFacebook];
   SLComposeViewControllerCompletionHandler myBlock =
      ^(SLComposeViewControllerResult result){

      if (result == SLComposeViewControllerResultCancelled) {
         NSLog(@"Cancelled");
      } else {
         NSLog(@"Done");
      }
      [controller dismissViewControllerAnimated:YES completion:nil];
   };
   controller.completionHandler = myBlock;

   //Adding the Text to the facebook post value from iOS
   [controller setInitialText:@"My test post"];

   //Adding the URL to the facebook post value from iOS
   [controller addURL:[NSURL URLWithString:@"http://www.test.com"]];

   //Adding the Text to the facebook post value from iOS
   [self presentViewController:controller animated:YES completion:nil];
}

-(IBAction)twitterPost:(id)sender {
   SLComposeViewController *tweetSheet = [SLComposeViewController
   composeViewControllerForServiceType:SLServiceTypeTwitter];
   [tweetSheet setInitialText:@"My test tweet"];
   [self presentModalViewController:tweetSheet animated:YES];
}
@end
輸出
當我們執行應用程式並點選 facebookPost 時,我們將獲得以下輸出 -

當我們點選 twitterPost 時,我們將獲得以下輸出 -

iOS - 記憶體管理
iOS 中的記憶體管理最初是非 ARC(自動引用計數),我們必須保留和釋放物件。現在,它支援 ARC,我們不必保留和釋放物件。Xcode 會在編譯時自動處理這項工作。
記憶體管理問題
根據 Apple 文件,記憶體管理中的兩個主要問題是 -
釋放或覆蓋仍在使用的資料。這會導致記憶體損壞,通常會導致您的應用程式崩潰,或者更糟糕的是,使用者資料損壞。
不釋放不再使用的資料會導致記憶體洩漏。當分配的記憶體未被釋放,即使它永遠不會再次使用,這被稱為記憶體洩漏。洩漏會導致您的應用程式使用越來越多的記憶體,這反過來可能會導致系統性能下降或(在 iOS 中)您的應用程式被終止。
記憶體管理規則
我們擁有我們建立的物件,並且必須在不再需要它們時隨後釋放它們。
使用 Retain 獲取您未建立的物件的所有權。您也必須在不需要這些物件時釋放它們。
不要釋放您不擁有的物件。
在 ARC 中處理記憶體
您不需要在 ARC 中使用 release 和 retain。因此,所有檢視控制器的物件都將在檢視控制器被移除時釋放。同樣,任何物件的子物件都將在它們被釋放時被釋放。請注意,如果其他類對某個類的物件具有強引用,則整個類將不會被釋放。因此,建議對委託使用弱屬性。
記憶體管理工具
我們可以藉助 Xcode 工具 Instruments 分析記憶體的使用情況。它包括 Activity Monitor、Allocations、Leaks、Zombies 等工具。
分析記憶體分配的步驟
步驟 1 - 開啟一個現有的應用程式。
步驟 2 - 選擇 Product,然後選擇 Profile,如下所示。
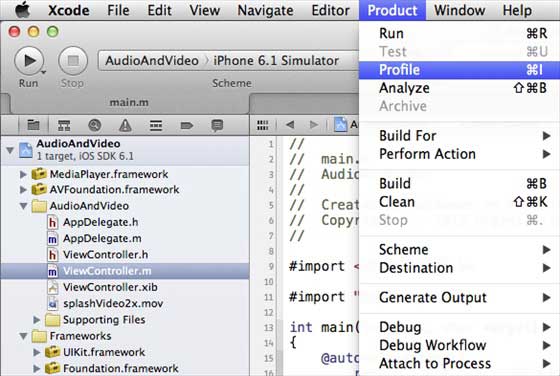
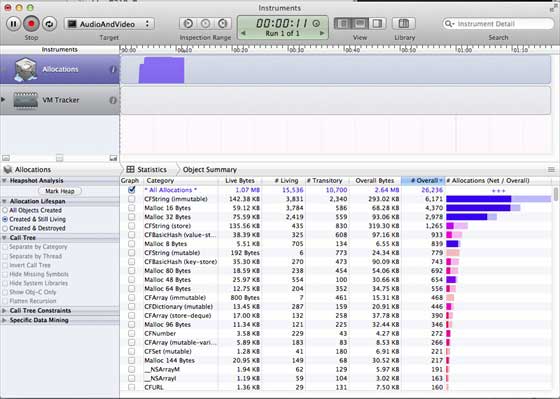
步驟 3 - 在下一個螢幕中選擇 Allocations,然後選擇 Profile。

步驟 4 - 我們將看到不同物件的記憶體分配,如下所示。
步驟 5 - 您可以在檢視控制器之間切換,並檢查記憶體是否已正確釋放。
步驟 6 - 同樣,我們可以使用 Activity Monitor 來檢視為應用程式分配的總記憶體,而不是 Allocations。
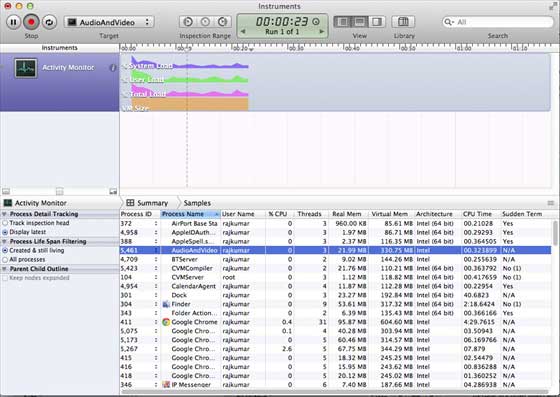
步驟 7 - 這些工具幫助我們訪問我們的記憶體消耗並找到可能發生洩漏的位置。
iOS - 應用程式除錯
在開發應用程式時,我們可能會犯錯誤,這會導致各種錯誤。為了修復這些錯誤或 bug,我們需要除錯應用程式。
選擇偵錯程式
Xcode 有兩個偵錯程式,即 GDB 和 LLDB 偵錯程式。預設情況下選擇 GDB。LLDB 是 LLVM 開源編譯器專案的一部分的偵錯程式。您可以透過“編輯活動方案”選項更改偵錯程式。
如何查詢編碼錯誤?
要查詢與編碼相關的錯誤,您需要構建您的應用程式,它將編譯程式碼。如果程式碼包含錯誤,編譯器將顯示所有訊息、錯誤和警告以及它們可能的原因。
您可以點選 Product,然後點選 Analyze 以查詢應用程式中可能存在的問題。
設定斷點
斷點幫助我們瞭解應用程式物件的不同狀態,這有助於我們識別許多缺陷,包括邏輯問題。我們只需要點選行號即可建立斷點。要刪除斷點,只需單擊並將其拖出即可。以下螢幕截圖顯示瞭如何設定斷點 -

當我們執行應用程式並選擇 playVideo 按鈕時,應用程式將在我們設定斷點的那一行暫停。它使我們有時間分析應用程式的狀態。當斷點被觸發時,我們將獲得如下所示的輸出。
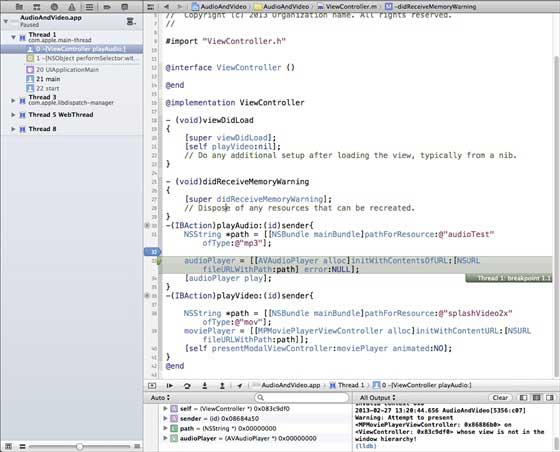
您可以輕鬆識別哪個執行緒觸發了斷點。在底部,您可以看到 self、sender 等物件,它們儲存相應物件的值,我們可以擴充套件其中一些物件,並檢視每個物件的狀態。
要繼續應用程式,我們將選擇繼續按鈕(最左邊的按鈕),如下圖所示的除錯區域中。其他選項包括單步進入、單步跳出和單步執行。

異常斷點
我們還有異常斷點,它會在發生異常的位置觸發應用程式停止。我們可以透過選擇除錯導航器後選擇“+”按鈕來插入異常斷點。您將看到以下視窗。

然後我們需要選擇“新增異常斷點”,這將顯示以下視窗。

您可以在Xcode 4 使用者指南中收集有關除錯和其他 Xcode 功能的更多資訊。