- iOS 教程
- iOS - 主頁
- iOS - 開始使用
- iOS - 環境設定
- iOS - Objective-C 基礎知識
- iOS - 第一個 iPhone 應用程式
- iOS - 操作和出口
- iOS - 委託
- iOS - UI 元素
- iOS - 加速計
- iOS - 通用應用程式
- iOS - 相機管理
- iOS - 位置處理
- iOS - SQLite 資料庫
- iOS - 傳送電子郵件
- iOS - 音訊和影片
- iOS - 檔案處理
- iOS - 訪問地圖
- iOS - 應用內購買
- iOS - iAd 整合
- iOS - GameKit
- iOS - 情節提要
- iOS - 自動佈局
- iOS - Twitter 和 Facebook
- iOS - 記憶體管理
- iOS - 應用程式除錯
- iOS 實用資源
- iOS - 快速指南
- iOS - 實用資源
- iOS - 討論
iOS - 音訊和影片
音訊和影片在最新裝置中十分常見。iOS 使用 AVFoundation.framework 和 MediaPlayer.framework 分別支援這兩種功能。
涉及的步驟
步驟 1 − 建立一個簡單的基於檢視的應用程式。
步驟 2 − 選擇你的專案檔案,選擇目標,然後新增 AVFoundation.framework 和 MediaPlayer.framework。
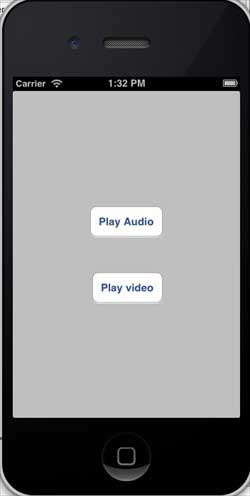
步驟 3 − 在 ViewController.xib 中新增兩個按鈕,分別建立播放音訊和影片的操作。
步驟 4 − 更新 ViewController.h 如下所示 −
#import <UIKit/UIKit.h>
#import <AVFoundation/AVFoundation.h>
#import <MediaPlayer/MediaPlayer.h>

@interface ViewController : UIViewController {
   AVAudioPlayer *audioPlayer;
   MPMoviePlayerViewController *moviePlayer;
}
-(IBAction)playAudio:(id)sender;
-(IBAction)playVideo:(id)sender;
@end
步驟 5 − 更新 ViewController.m 如下所示 −
#import "ViewController.h"

@interface ViewController ()
@end

@implementation ViewController

- (void)viewDidLoad {
   [super viewDidLoad];
}

- (void)didReceiveMemoryWarning {
   [super didReceiveMemoryWarning];
   // Dispose of any resources that can be recreated.
}

-(IBAction)playAudio:(id)sender {
   NSString *path = [[NSBundle mainBundle]
   pathForResource:@"audioTest" ofType:@"mp3"];
   audioPlayer = [[AVAudioPlayer alloc]initWithContentsOfURL:
   [NSURL fileURLWithPath:path] error:NULL];
   [audioPlayer play];
}

-(IBAction)playVideo:(id)sender {
   NSString *path = [[NSBundle mainBundle]pathForResource:
   @"videoTest" ofType:@"mov"];
   moviePlayer = [[MPMoviePlayerViewController
   alloc]initWithContentURL:[NSURL fileURLWithPath:path]];
   [self presentModalViewController:moviePlayer animated:NO];
}
@end
注意
我們需要新增音訊和影片檔案以確保獲得預期的輸出。
輸出
當我們執行此應用程式時,將獲得以下輸出 −
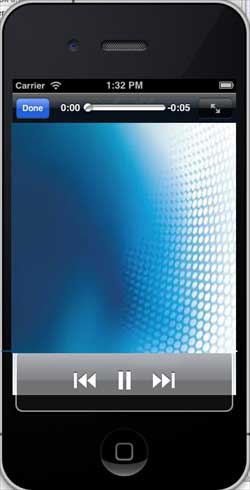
當我們單擊播放影片時,將獲得如下所示的輸出 −
當我們單擊播放音訊時,你將聽到音訊。
廣告