- iOS 教程
- iOS - 首頁
- iOS - 開始學習
- iOS - 環境設定
- iOS - Objective-C 基礎
- iOS - 第一個 iPhone 應用
- iOS - 動作和出口
- iOS - 委託
- iOS - UI 元素
- iOS - 加速計
- iOS - 通用應用程式
- iOS - 攝像頭管理
- iOS - 定位處理
- iOS - SQLite 資料庫
- iOS - 傳送電子郵件
- iOS - 音訊和影片
- iOS - 檔案處理
- iOS - 訪問地圖
- iOS - 應用內購買
- iOS - iAd 整合
- iOS - GameKit
- iOS - 故事板
- iOS - 自動佈局
- iOS - Twitter 和 Facebook
- iOS - 記憶體管理
- iOS - 應用除錯
- iOS 實用資源
- iOS - 快速指南
- iOS - 實用資源
- iOS - 討論
iOS - 檢視轉換
檢視轉換的使用
檢視轉換是將一個檢視新增到另一個檢視的有效方法,並帶有恰當的過渡動畫效果。
按如下方式更新 ViewController.xib −
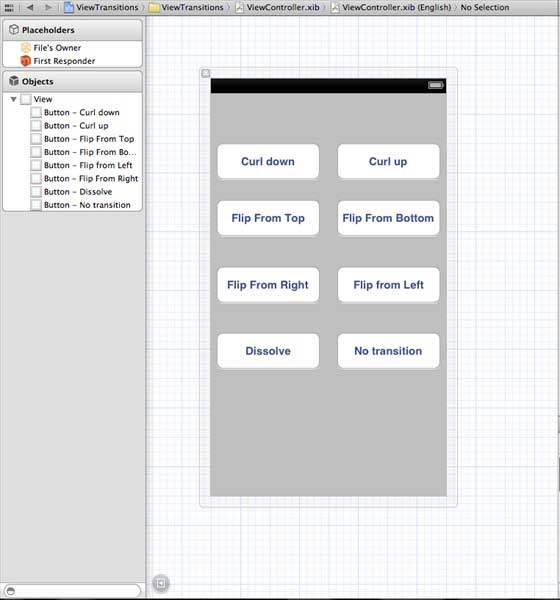
為 xib 中建立的按鈕建立動作。
更新 ViewController.h
在 ViewController 類中宣告兩個檢視例項。在建立動作後,ViewController.h 檔案如下所示:
#import <UIKit/UIKit.h>

@interface ViewController : UIViewController {
   UIView *view1;
   UIView *view2;
}

-(IBAction)flipFromLeft:(id)sender;
-(IBAction)flipFromRight:(id)sender;
-(IBAction)flipFromTop:(id)sender;
-(IBAction)flipFromBottom:(id)sender;
-(IBAction)curlUp:(id)sender;
-(IBAction)curlDown:(id)sender;
-(IBAction)dissolve:(id)sender;
-(IBAction)noTransition:(id)sender;

@end
更新 ViewController.m
我們將新增一個自定義方法 setUpView 以初始化檢視。我們還會建立另一個方法 doTransitionWithType:,該方法從 view1 到 view2 或反過來建立轉換。然後,我們將實現之前建立的動作方法,該方法呼叫帶有轉換型別的 doTransitionWithType: 方法。更新後的 ViewController.m 如下:
#import "ViewController.h"

@interface ViewController ()

@end

@implementation ViewController

- (void)viewDidLoad {
   [super viewDidLoad];
   [self setUpView];
   // Do any additional setup after loading the view, typically from a nib.
}

-(void)setUpView {
   view1 = [[UIView alloc]initWithFrame:self.view.frame];
   view1.backgroundColor = [UIColor lightTextColor];
   view2 = [[UIView alloc]initWithFrame:self.view.frame];
   view2.backgroundColor = [UIColor orangeColor];
   [self.view addSubview:view1];
   [self.view sendSubviewToBack:view1];
}

-(void)doTransitionWithType:(UIViewAnimationTransition)animationTransitionType {
   if ([[self.view subviews] containsObject:view2 ]) {
      [UIView transitionFromView:view2
      toView:view1
      duration:2
      options:animationTransitionType
      completion:^(BOOL finished) {
         [view2 removeFromSuperview];
      }];
      [self.view addSubview:view1];
      [self.view sendSubviewToBack:view1];
   } else {
      [UIView transitionFromView:view1
      toView:view2
      duration:2
      options:animationTransitionType
      completion:^(BOOL finished) {
         [view1 removeFromSuperview];
      }];
      [self.view addSubview:view2];
      [self.view sendSubviewToBack:view2];
   }
}

-(IBAction)flipFromLeft:(id)sender {
   [self doTransitionWithType:UIViewAnimationOptionTransitionFlipFromLeft];
}

-(IBAction)flipFromRight:(id)sender {
   [self doTransitionWithType:UIViewAnimationOptionTransitionFlipFromRight];
}

-(IBAction)flipFromTop:(id)sender {
   [self doTransitionWithType:UIViewAnimationOptionTransitionFlipFromTop];
}

-(IBAction)flipFromBottom:(id)sender {
   [self doTransitionWithType:UIViewAnimationOptionTransitionFlipFromBottom];
}

-(IBAction)curlUp:(id)sender {
   [self doTransitionWithType:UIViewAnimationOptionTransitionCurlUp];
}

-(IBAction)curlDown:(id)sender {
   [self doTransitionWithType:UIViewAnimationOptionTransitionCurlDown];
}

-(IBAction)dissolve:(id)sender {
   [self doTransitionWithType:UIViewAnimationOptionTransitionCrossDissolve];
}

-(IBAction)noTransition:(id)sender{
   [self doTransitionWithType:UIViewAnimationOptionTransitionNone];
}

- (void)didReceiveMemoryWarning {
   [super didReceiveMemoryWarning];
   // Dispose of any resources that can be recreated.
}
@end
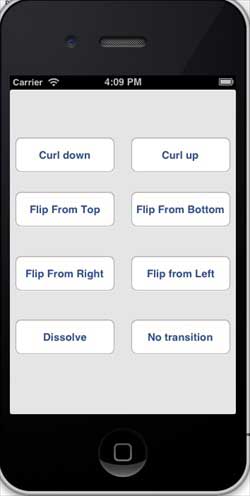
輸出
當我們執行應用程式時,我們將得到以下輸出 −
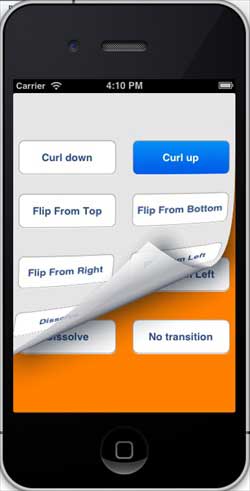
您可以選擇不同的按鈕,檢視轉換的工作方式。在選擇捲曲時,轉換將如下所示 −
ios_ui_elements.htm
廣告