- Google AMP 教程
- Google AMP - 首頁
- Google AMP - 概述
- Google AMP - 簡介
- Google AMP - 圖片
- Google AMP - 表單
- Google AMP - Iframes
- Google AMP - 影片
- Google AMP - 按鈕
- Google AMP - Timeago
- Google AMP - Mathml
- Google AMP - 適應文字
- Google AMP - 日期倒計時
- Google AMP - 日期選擇器
- Google AMP - 故事
- Google AMP - 選擇器
- Google AMP - 連結
- Google AMP - 字型
- Google AMP - 列表
- Google AMP - 使用者通知
- Google AMP - 下一頁
- Google AMP - 屬性
- 樣式和自定義 CSS
- Google AMP - 動態 CSS 類
- Google AMP - 操作和事件
- Google AMP - 動畫
- Google AMP - 資料繫結
- Google AMP - 佈局
- Google AMP - 廣告
- Google AMP - 分析
- Google AMP - 社交小部件
- Google AMP - 媒體
- Html 頁面到 Amp 頁面
- Google AMP - 基本語法
- Google AMP - 驗證
- Google AMP - 快取
- Google AMP - 自定義 Javascript
- Google AMP - CORS
- Google AMP 有用資源
- Google AMP - 快速指南
- Google AMP - 有用資源
- Google AMP - 討論
Google AMP - 列表
Amp-list 是一個 amp 元件,它呼叫一個 CORS json 端點並在模板內以 json 檔案的形式顯示資料。讓我們藉助工作示例來理解這一點。
要使用 amp-list,我們需要包含以下指令碼:
<script async custom-element = "amp-list"
   src = "https://cdn.ampproject.org/v0/amp-list-0.1.js">
</script>
這是 amp-list 標籤的格式:
<amp-list width = "auto" height = "100"
layout = "fixed-height" src = "amplist.json" class = "m1">
   <template type = "amp-mustache">
      <div class = "images_for_display">
         <amp-img width = "150"
            height = "100"
            alt = "{{title}}"
            src = "{{url}}">
         </amp-img>
      </div>
   </template>
</amp-list>
用於 amp-list 的 src 是一個 json 檔案,其中包含要列出的詳細資訊。我們可以在 amp-list 內使用普通的 html 標籤或 amp 元件來顯示 json 檔案中的資料。模板型別 amp-mustache 用於將要顯示的資料進行資料繫結。
讓我們藉助以下工作示例來理解這一點:
示例
<!doctype html>
<html amp lang = "en">
   <head>
      <meta charset = "utf-8">
      <script async src = "https://cdn.ampproject.org/v0.js"></script>
      <title>Google AMP - Amp List</title>
      <link rel = "canonical" href = "http://example.ampproject.org/article-metadata.html">
      <meta name = "viewport" content = "width = device-width,minimum-scale = 1,initial-scale = 1">

      <style amp-boilerplate>
         body{-webkit-animation:
            -amp-start 8s steps(1,end) 0s 1 normal both;-moz-animation:
            -amp-start 8s steps(1,end) 0s 1 normal both;-ms-animation:
            -amp-start 8s steps(1,end) 0s 1 normal both;animation:
            -amp-start 8s steps(1,end) 0s 1 normal both
         }
         @-webkit-keyframes
         -amp-start{from{visibility:hidden}to{visibility:visible}}@-moz-keyframes
         -amp-start{from{visibility:hidden}to{visibility:visible}}@-ms-keyframes
         -amp-start{from{visibility:hidden}to{visibility:visible}}@-o-keyframes
         -amp-start{from{visibility:hidden}to{visibility:visible}}@keyframes
         -amp-start{from{visibility:hidden}to{visibility:visible}}
      </style>

      <noscript>
         <style amp-boilerplate>
            body{
            -webkit-animation:none;-moz-animation:none;
            -ms-animation:none;animation:none}
         </style>
      </noscript>

      <script async custom-element = "amp-list"
         src = "https://cdn.ampproject.org/v0/amp-list-0.1.js">
      </script>

      <script async custom-template = "amp-mustache"
         src ="https://cdn.ampproject.org/v0/amp-mustache-0.2.js">
      </script>

      <style amp-custom>
         amp-img {
            border: 1px solid #ddd;
            border-radius: 4px;
            padding: 5px;
         }
      </style>
   </head>
   <body>
      <h3>Google AMP - Amp List</h3>
      <amp-list width = "auto" height = "100"
         layout = "fixed-height" src = "amplist.json" class = "m1">
         <template type = "amp-mustache">
            <div class = "images_for_display">
               <amp-img width = "150"
                  height = "100"
                  alt = "{{title}}"
                  src = "{{url}}">
               </amp-img>
            </div>
         </template>
      </amp-list>
   </body>
</html>
輸出
上面顯示的工作示例的輸出如下所示:

上面給出的工作示例中使用的 json 檔案如下所示:
{
   "items": [
      {
         "title": "Christmas Image 1",
         "url": "images/christmas1.jpg"
      },
      {
         "title": "Christmas Image 2",
         "url": "images/christmas2.jpg"
      },
      {
         "title": "Christmas Image 3",
         "url": "images/christmas3.jpg"
      },
      {
         "title": "Christmas Image 4",
         "url": "images/christmas4.jpg"
      }
   ]
}
我們可以使用 amp-list 上的事件重新整理列表,如下面的程式碼所示:
示例
<!doctype html>
<html amp lang = "en">
   <head>
      <meta charset = "utf-8">
      <script async src = "https://cdn.ampproject.org/v0.js"></script>
      <title>Google AMP - Amp List</title>
      <link rel = "canonical" href = "http://example.ampproject.org/article-metadata.html">
      <meta name = "viewport" content = "width = device-width,minimum-scale = 1,initial-scale = 1">

      <style amp-boilerplate>
         body{
            -webkit-animation:
            -amp-start 8s steps(1,end) 0s 1 normal both;-moz-animation:
            -amp-start 8s steps(1,end) 0s 1 normal both;-ms-animation:
            -amp-start 8s steps(1,end) 0s 1 normal both;animation:
            -amp-start 8s steps(1,end) 0s 1 normal both
         }
         @-webkit-keyframes
         -amp-start{from{visibility:hidden}to{visibility:visible}}@-moz-keyframes
         -amp-start{from{visibility:hidden}to{visibility:visible}}@-ms-keyframes
         -amp-start{from{visibility:hidden}to{visibility:visible}}@-o-keyframes
         -amp-start{from{visibility:hidden}to{visibility:visible}}@keyframes
         -amp-start{from{visibility:hidden}to{visibility:visible}}
      </style>

      <noscript>
         <style amp-boilerplate>
            body{
               -webkit-animation:none;
               -moz-animation:none;
               -ms-animation:none;
               animation:none}
         </style>
      </noscript>

      <script async custom-element = "amp-list"
         src = "https://cdn.ampproject.org/v0/amp-list-0.1.js">
      </script>

      <script async custom-template = "amp-mustache"
         src = "https://cdn.ampproject.org/v0/amp-mustache-0.2.js">
      </script>

      <style amp-custom>
         amp-img {
            border: 1px solid #ddd;
            border-radius: 4px;
            padding: 5px;
         }
         button{
            background-color: #ACAD5C;
            color: white;
            padding: 12px 20px;
            border: none;
            border-radius: 4px;
            cursor: pointer;
            float: right;
         }
      </style>
   </head>
   <body>
      <h3>Google AMP - Amp List</h3>
      <button on = "tap:amplist.refresh">Refresh Images</button>

      <amp-list id = "amplist" width = "auto" height = "100"
         layout = "fixed-height" src = "amplist.json" class = "m1">
      <template type = "amp-mustache">
         <div class = "images_for_display">
            <amp-img width = "150"
               height = "100"
               alt = "{{title}}"
               src = "{{url}}"></amp-img>
         </div>
      </template>
      </amp-list>
   </body>
</html>
輸出
上面給出的工作示例的輸出如下所示:
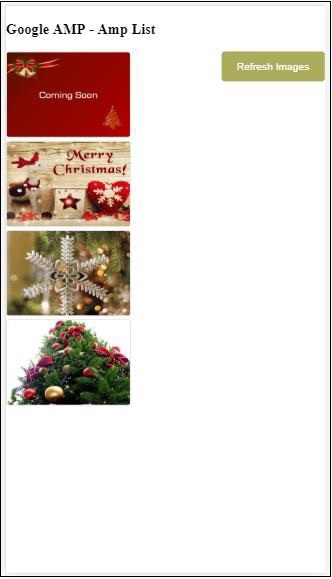
添加了一個按鈕,單擊該按鈕會使用 on 事件呼叫重新整理操作,如下所示:
<button on = "tap:amplist.refresh">
   Refresh Images
</button>
//amplist is the id used for amp-list
單擊按鈕後,將再次呼叫 json 檔案並載入其內容。如果已經載入了影像,則將快取它們。
廣告