- Google AMP 教程
- Google AMP - 首頁
- Google AMP - 概述
- Google AMP - 簡介
- Google AMP - 圖片
- Google AMP - 表單
- Google AMP - 內嵌框架 (iFrames)
- Google AMP - 影片
- Google AMP - 按鈕
- Google AMP - Timeago (時間顯示)
- Google AMP - MathML (數學標記語言)
- Google AMP - 自動調整文字大小
- Google AMP - 日期倒計時
- Google AMP - 日期選擇器
- Google AMP - 故事 (Story)
- Google AMP - 選擇器
- Google AMP - 連結
- Google AMP - 字型
- Google AMP - 列表
- Google AMP - 使用者通知
- Google AMP - 下一頁
- Google AMP - 屬性
- 樣式和自定義 CSS
- Google AMP - 動態 CSS 類
- Google AMP - 操作和事件
- Google AMP - 動畫
- Google AMP - 資料繫結
- Google AMP - 佈局
- Google AMP - 廣告
- Google AMP - 分析
- Google AMP - 社交小工具
- Google AMP - 媒體
- HTML 頁面轉換為 AMP 頁面
- Google AMP - 基本語法
- Google AMP - 驗證
- Google AMP - 快取
- Google AMP - 自定義 JavaScript
- Google AMP - 跨域資源共享 (CORS)
- Google AMP 有用資源
- Google AMP - 快速指南
- Google AMP - 有用資源
- Google AMP - 討論
Google AMP - 跨域資源共享 (CORS)
本章我們將嘗試瞭解 AMP 中的 CORS。在深入細節之前,讓我們先了解 CORS 的基礎知識及其用途。
什麼是 CORS?
CORS 代表跨域資源共享 (Cross-Origin Resource Sharing)。CORS 是一種需要額外 HTTP 頭部資料的過程,用於告知瀏覽器是否應允許在例如 xyz.com 來源執行的網頁發出的對某個 URL 的請求訪問該請求 URL 的資料。我們從網頁發出許多 HTTP 請求,為此我們需要 CORS 來獲取所需的資料。
當我們向與主機不同的伺服器發出 HTTP 請求時,我們將其稱為跨域請求,這意味著域、協議和埠與主機來源不同。在這種情況下,需要請求 URL 授權訪問資料;這意味著發出 GET/PUT/POST/DELETE 請求。
此附加資料可在發出的 HTTP 請求的瀏覽器頭部中找到。此許可權步驟主要是出於安全原因,這樣一來,任何網頁都不能在沒有必要許可權的情況下從另一個域獲取或傳送資料。
瀏覽器的頭部應包含諸如 Access-Control-Allow-Origin 之類的詳細資訊,其值如下所示:
Access-Control-Allow-Origin : *
將值設定為 "*" 表示它告訴瀏覽器允許任何來源的請求訪問資源。
Access-Control-Allow-Origin: https://www.example.com
將值設定為上述值表示告訴瀏覽器僅允許來自網頁 www.example.com 的請求獲取請求 URL 的資料。
必須考慮到共享資料的用途來進行 CORS 的伺服器配置。根據此情況,必須在伺服器端設定所需的頭部。
現在我們知道了 CORS 是什麼,讓我們更進一步。在 AMP 的情況下,我們有諸如 amp-form、amp-list 之類的元件,它們使用 HTTP 端點動態載入資料。
在 AMP 頁面中,即使 HTTP 請求來自同一來源,也需要啟用 CORS 設定。這裡出現了一個問題——即使請求和響應都來自同一來源,為什麼我們還需要啟用 CORS?從技術上講,在這種情況下我們不需要啟用 CORS,因為我們請求和顯示的是同一域、來源等的資料。
AMP 具有快取功能,該功能可加快向訪問頁面的使用者提供資料的速度。如果使用者已訪問過該頁面,則資料將快取在 Google CDN 中,下一個使用者將從快取中獲取資料。
資料儲存在 AMP 端,現在它擁有不同的域。當用戶點選任何按鈕以獲取最新資料時,將比較 AMP 快取 URL 與網頁域以獲取新資料。如果此時未啟用 CORS,因為它處理的是 AMP 快取 URL 和網頁域,則請求將無效,並且由於 CORS 許可權問題而失敗。這就是為什麼即使在 AMP 頁面的情況下,對於同一來源也需要啟用 CORS 的原因。
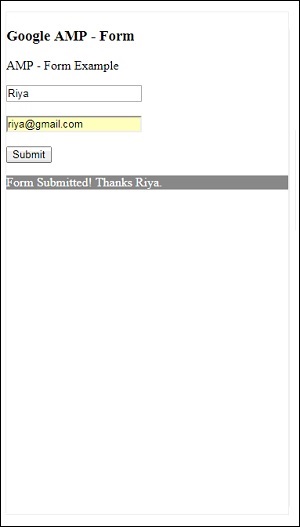
此處顯示了使用啟用了 CORS 的表單的工作示例:
<!doctype html>
<html amp lang = "en">
   <head>
      <meta charset = "utf-8">
      <script async src = "https://cdn.ampproject.org/v0.js">
      </script>
      <title>Google AMP - Form</title>
      <link rel = "canonical" href = "ampform.html">
      <meta name = "viewport" content = "width = device-width,
      minimum-scale = 1,initial-scale = 1">

      <style amp-boilerplate>
         body{
            -webkit-animation:
            -amp-start 8s steps(1,end) 0s 1 normal both;-moz-animation:
            -amp-start 8s steps(1,end) 0s 1 normal both;-ms-animation:
            -amp-start 8s steps(1,end) 0s 1 normal both;animation:
            -amp-start 8s steps(1,end) 0s 1 normal both
         }
         @-webkit-keyframes
         -amp-start{from{visibility:hidden}to{visibility:visible}}@-moz-keyframes
         -amp-start{from{visibility:hidden}to{visibility:visible}}@-ms-keyframes
         -amp-start{from{visibility:hidden}to{visibility:visible}}@-o-keyframes
         -amp-start{from{visibility:hidden}to{visibility:visible}}@keyframes
         -amp-start{from{visibility:hidden}to{visibility:visible}}
      </style>
      <noscript>
         <style amp-boilerplate>
            body{
               -webkit-animation:none;
               -moz-animation:none;
               -ms-animation:none;
               animation:none}
         </style>
      </noscript>
      <script async custom-element = "amp-form"
         src = "https://cdn.ampproject.org/v0/amp-form-0.1.js">
      </script>
      <script async custom-template = "amp-mustache"
         src = "https://cdn.ampproject.org/v0/amp-mustache-0.2.js">
      </script>
      <style amp-custom>
         form.amp-form-submit-success [submit-success],
         form.amp-form-submit-error [submit-error]{
            margin-top: 16px;
         }
         form.amp-form-submit-success [submit-success] {
            color: white;
            background-color:gray;
         }
         form.amp-form-submit-error [submit-error] {
            color: red;
         }
         form.amp-form-submit-success.hide-inputs > input {
            display: none;
         }
      </style>
   </head>
   <body>
      <h3>Google AMP - Form</h3>
      <form
         method = "post"
         class = "p2"
         action-xhr = "submitform.php"
         target = "_top">
            <p>AMP - Form Example</p>
            <div>
               <input
                  type = "text"
                  name = "name"
                  placeholder = "Enter Name" required>
               <br/>
               <br/>
               <input
                  type = "email"
                  name = "email"
                  placeholder = "Enter Email"
                  required>
               <br/>
               <br/>
            </div>
            <input type = "submit" value = "Submit">
            <div submit-success>
               <template type = "amp-mustache">
                  Form Submitted! Thanks {{name}}.
               </template>
            </div>
            <div submit-error>
               <template type = "amp-mustache">
                  Error! {{name}}, please try again.
               </template>
            </div>
      </form>
   </body>
</html>
submitform.php
<?php
   if(!empty($_POST)){
      $domain_url = (isset($_SERVER['HTTPS']) ? "https" : "http") .
         "://$_SERVER[HTTP_HOST]";
      header("Content-type: application/json");
      header("AMP-Access-Control-Allow-Source-Origin: " . $domain_url);
      header("Access-Control-Expose-Headers:
         AMP-Access-Control-Allow-Source-Origin");
      $myJSON = json_encode($_POST);
      echo $myJSON;
   }
?>
輸出
新增到 submitform.php 的響應頭部詳細資訊:
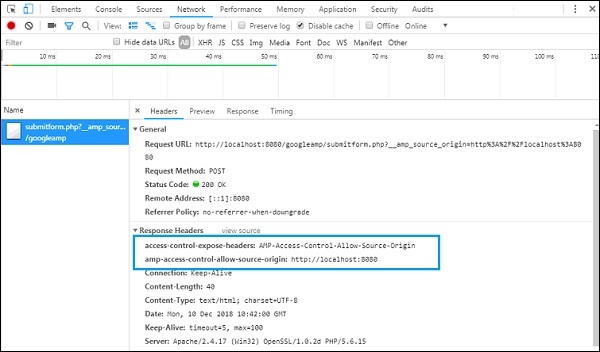
為了使表單正常工作,我們需要新增諸如 access-control-expose-headers(值為 AMP-Access-Control-Allow-Source-Origin)和 amp-access-control-allow-source-origin 頭部(值為 https://:8080)。
這裡我們使用的是 php 檔案,伺服器是 apache。在 php 檔案中,我們添加了如下所示的必需頭部:
<?php
   if(!empty($_POST)){
      $domain_url = (isset($_SERVER['HTTPS']) ? "https" : "http") .
         "://$_SERVER[HTTP_HOST]";
      header("Content-type: application/json");
      header("AMP-Access-Control-Allow-Source-Origin: " . $domain_url);
      header("Access-Control-Expose-Headers:
         AMP-Access-Control-Allow-Source-Origin");
      $myJSON = json_encode($_POST);
      echo $myJSON;
   }
?>
添加了必需的頭部後,將允許來源 https://:8080 進行互動並獲取返回的資料。