- Google AMP 教程
- Google AMP - 首頁
- Google AMP - 概述
- Google AMP - 簡介
- Google AMP - 圖片
- Google AMP - 表單
- Google AMP - iframe
- Google AMP - 影片
- Google AMP - 按鈕
- Google AMP - Timeago
- Google AMP - MathML
- Google AMP - 適應文字
- Google AMP - 日期倒計時
- Google AMP - 日期選擇器
- Google AMP - 故事
- Google AMP - 選擇器
- Google AMP - 連結
- Google AMP - 字型
- Google AMP - 列表
- Google AMP - 使用者通知
- Google AMP - 下一頁
- Google AMP - 屬性
- 樣式和自定義 CSS
- Google AMP - 動態 CSS 類
- Google AMP - 動作和事件
- Google AMP - 動畫
- Google AMP - 資料繫結
- Google AMP - 佈局
- Google AMP - 廣告
- Google AMP - 分析
- Google AMP - 社交小工具
- Google AMP - 媒體
- HTML 頁面轉換為 AMP 頁面
- Google AMP - 基本語法
- Google AMP - 驗證
- Google AMP - 快取
- Google AMP - 自定義 JavaScript
- Google AMP - CORS
- Google AMP 有用資源
- Google AMP - 快速指南
- Google AMP - 有用資源
- Google AMP - 討論
Google AMP - 分析
AMP 分析是一個用於跟蹤頁面資料的 AMP 元件。頁面上所有使用者互動都可以被記錄並儲存,以分析資料,以便進一步改進或用於業務目的。
要使用 amp-analytics 元件,需要在 head 部分新增以下指令碼:
<script async custom-element = "amp-analytics"
   src   = "https://cdn.ampproject.org/v0/amp-analytics-0.1.js">
</script>
要記錄 amp-analytics 中使用的事件,可以使用第三方供應商,也可以擁有內部跟蹤系統。
使用 Google Analytics 供應商的 amp-analytics 示例:
<amp-analytics type = googleanalytics>
   <script type = application/json>{
      "requests": {
         "pageview": "${eventId}"
      },
      "vars": {
         "account": "UA-44450152-1"
      },
      "triggers": {
         "trackPageview" : {
            "on": "visible",
            "request": "pageview",
            "vars": {
               "eventId": "pageview"
            }
         }
      }
   }
   </script>
</amp-analytics>
使用 comScore 供應商的 amp-analytics 示例
<amp-analytics type = comscore>
   <script type = application/json>
      {"vars": {"c2":"7922264"}}
   </script>
</amp-analytics>
使用 Chartbeat 供應商的 amp-analytics 示例
<amp-analytics type = chartbeat>
   <script type = application/json>{
      "vars": {
         "uid": "230",
         "domain": "dummyurl.com",
         "sections": "us",
         "authors": "Hello World"
      }
   }</script>
</amp-analytics>
供應商的詳細列表在此處。
下面給出了一個關於如何使用內部分析供應商的示例:
示例
<!doctype html>
<html amp>
   <head>
      <meta charset = "utf-8">
      <title>amp-analytics</title>
      <script async src = "https://cdn.ampproject.org/v0.js">
      </script>
      <script async custom-element = "amp-analytics"
         src = "https://cdn.ampproject.org/v0/amp-analytics-0.1.js">
      </script>
      <link rel = "canonical" href = "ampanalytics.html">
      <meta name = "viewport" content = "width = device-width,
      minimum-scale = 1,initial-scale = 1">

      <style amp-boilerplate>
         body{
            -webkit-animation:
            -amp-start 8s steps(1,end) 0s 1 normal both;-moz-animation:
            -amp-start 8s steps(1,end) 0s 1 normal both;-ms-animation:
            -amp-start 8s steps(1,end) 0s 1 normal both;animation:
            -amp-start 8s steps(1,end) 0s 1 normal both}
         @-webkit-keyframes
         -amp-start{from{visibility:hidden}to{visibility:visible}}@-moz-keyframes
         -amp-start{from{visibility:hidden}to{visibility:visible}}@-ms-keyframes
         -amp-start{from{visibility:hidden}to{visibility:visible}}@-o-keyframes
         -amp-start{from{visibility:hidden}to{visibility:visible}}@keyframes
         -amp-start{from{visibility:hidden}to{visibility:visible}}
      </style>

      <noscript>
         <style amp-boilerplate>
            body{
               -webkit-animation:none;
               -moz-animation:none;
               -ms-animation:none;
               animation:none}
         </style>
      </noscript>
   </head>
   <body>
      <h1>Google Amp - Analytics</h1>
      <amp-analytics>
         <script type = "application/json">
            {
               "requests": {
                  "event": "https://:8080/googleamp/tracking.php?
                  user=test&account=localhost&event=${eventId}"
               },
               "triggers": {
                  "trackPageview": {
                     "on": "visible",
                     "request": "event",
                        "vars": {
                           "eventId": "pageview"
                        }
                  }
               }
            }
         </script>
      </amp-analytics>
   </body>
</html>
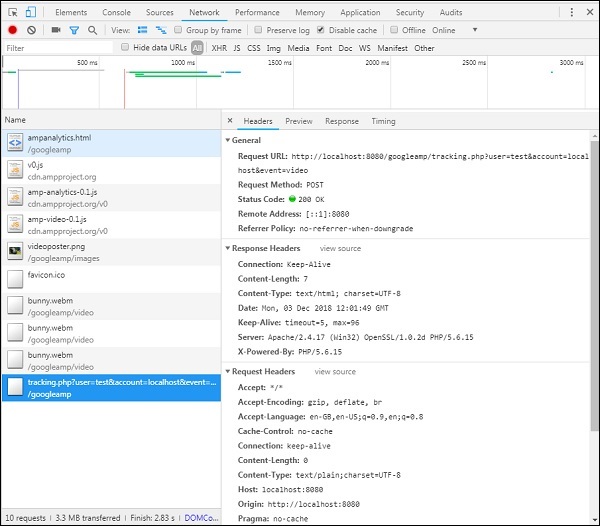
當瀏覽器訪問頁面時,將觸發頁面瀏覽量的跟蹤器。這可以在 Google 網路選項卡中看到,如下所示。

當頁面上特定元素可見時,您還可以觸發 amp-analytics 事件。此處的示例如下:
示例
<!doctype html>
<html amp>
<head>
<meta charset = "utf-8">
<title>amp-analytics</title>
<script async src = "https://cdn.ampproject.org/v0.js">
</script>
<script async custom-element = "amp-analytics"
src = "https://cdn.ampproject.org/v0/amp-analytics-0.1.js">
</script>
<link rel = "canonical" href = "ampanalytics.html">
<meta name = "viewport" content = "width = device-width,
minimum-scale = 1,initial-scale = 1">
<style amp-boilerplate>
body{
-webkit-animation:
-amp-start 8s steps(1,end) 0s 1 normal both;-moz-animation:
-amp-start 8s steps(1,end) 0s 1 normal both;-ms-animation:
-amp-start 8s steps(1,end) 0s 1 normal both;animation:
-amp-start 8s steps(1,end) 0s 1 normal both
}
@-webkit-keyframes
-amp-start{from{visibility:hidden}to{visibility:visible}}@-moz-keyframes
-amp-start{from{visibility:hidden}to{visibility:visible}}@-ms-keyframes
-amp-start{from{visibility:hidden}to{visibility:visible}}@-o-keyframes
-amp-start{from{visibility:hidden}to{visibility:visible}}@keyframes
-amp-start{from{visibility:hidden}to{visibility:visible}}
</style>
<noscript>
<style amp-boilerplate>
body{
-webkit-animation:none;
-moz-animation:none;
-ms-animation:none;
animation:none}
</style>
</noscript>
<script async custom-element = "amp-video"
src = "https://cdn.ampproject.org/v0/amp-video-0.1.js">
</script>
</head>
<body>
<h1>Google Amp - Analytics</h1>
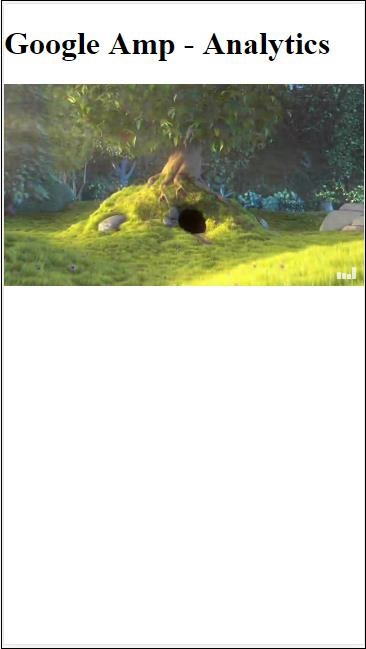
<amp-video controls
id = "videoplayer"
width = "640"
height = "360"
layout = "responsive"
poster = "images/videoposter.png"
autoplay>
<source src = "video/bunny.webm" type = "video/webm" />
<source src = "video/samplevideo.mp4" type = "video/mp4" />
<div fallback>
<p>This browser does not support the video element.</p>
</div>
</amp-video>
<amp-analytics>
<script type = "application/json">
{
"requests": {
"event": "https://:8080/googleamp/tracking.php?
user=test&account=localhost&event=${eventId}"
},
"triggers": {
"trackPageview": {
"on": "visible",
"request": "event",
"visibilitySpec": {
"selector": "#videoplayer",
"visiblePercentageMin": 20,
"totalTimeMin": 2000,
"continuousTimeMin": 200
},
"vars": {
"eventId": "video"
}
}
}
}
</script>
</amp-analytics>
</body>
</html>
輸出
Amp-analytics 元件需要將 JSON 物件傳遞給 script 標籤。JSON 的格式如下:
{
   "requests": {
      request-name: request-value,
      ...
   },
   "vars": {
      var-name: var-value,
      ...
   },
   "extraUrlParams": {
      extraurlparam-name: extraurlparam-value,
      ...
   },
   "triggers": {
      trigger-name: trigger-object,
      ...
   },
   "transport": {
      "beacon": *boolean*,
      "xhrpost": *boolean*,
      "image": *boolean*,
   }
}
上面指定的並非所有物件都必須傳遞給 amp-analytics。如果您使用的是第三方供應商,則該供應商將有其自身的格式,使用者需要按照該格式傳遞資料。
讓我們詳細瞭解每個物件:
請求
請求物件具有一個 url,當滿足條件時將使用該 url 來觸發。請求物件的示例如下:
"requests": {
   "request-name": "https://:8080/googleamp/tracking.php?
   user=test&account=localhost&event=${eventId}"
},
請求名稱將在觸發器物件中指定,並且必須為此使用相同的名稱。
變數
要在請求物件中使用的所有變數都在 vars 物件中指定。
"requests": {
   "event": "https://:8080/googleamp/tracking.php?
   user=test&account=localhost&event=${eventId}"
},
"vars": {
   "eventId": "video"
}
額外的 URL 引數
任何要作為查詢字串附加到請求 url 的附加引數都可以在此物件中定義。請觀察以下示例
"requests": {
   "event": "https://:8080/googleamp/tracking.php?
   user=test&account=localhost&event=${eventId}&x=1&y=2&z=3"
},
"vars": {
   "eventId": "video"
},
"extraUrlParams": {
   "x": "1",
   "y": "2",
   "z": "3"
}
觸發器
此物件將指示何時必須觸發請求 url。觸發器物件中可用的鍵值對如下所示:
on - 您應該提及要監聽的事件。on 可用的值有 render-start、ini-load、click、scroll、timer、visible、hidden、user-error、access-* 和 video-*
request - 這是請求的名稱。這必須與請求物件中的請求名稱匹配。
vars - 這是定義要在觸發器物件內使用或用於覆蓋已定義的 vars 鍵值的物件。
selector - 這顯示了設定觸發器的元素的詳細資訊。
scrollSpec - 這將包含滾動觸發器的詳細資訊。
timerSpec - 這將包含給定時間的詳細資訊。
videoSpec - 這將包含要為影片呼叫的詳細資訊。
這是一個示例,其中我們添加了 amp-video。當影片元素在頁面上可用、在頁面上至少可見 20%、影片至少播放 2 秒且連續觀看 200 毫秒時,amp-analytics 將觸發跟蹤器。滿足所有這些條件後,跟蹤器才會被觸發。詳細資訊如下:
要新增關於元素可見性和其他條件(例如元素必須至少可見 20%、影片應播放 2 秒)的條件,必須在visibilitySpec中指定這些條件,如下所示:
<amp-analytics>
  <script type = "application/json">
   {
      "requests": {
         "event": "https://:8080/googleamp/tracking.php?
         user=test&account=localhost&event=${eventId}"
      },
      "triggers": {
         "trackPageview": {
            "on": "visible",
            "request": "event",
               "visibilitySpec": {
                  "selector": "#videoplayer",
                  "visiblePercentageMin": 20,
                  "totalTimeMin": 2000,
                  "continuousTimeMin": 200
               },
               "vars": {
                  "eventId": "video"
               }
         }
      }
   }
   </script>
</amp-analytics>
videoSpec允許您定義基於其想要觸發跟蹤器觸發的條件。條件列在此處:
waitFor
此屬性用於可見性觸發器,以便在觸發之前等待特定情況。waitFor 可用的選項為none、ini-load和render-start。預設情況下,waitFor 的值為 ini-load。
reportWhen
此屬性用於可見性觸發器,以便在觸發之前等待特定情況。支援的值為 documentExit。您不能在visibilitySpec中同時使用reportWhen和repeat屬性。
continuousTimeMin 和 continuousTimeMax
此屬性指示可見性跟蹤器要觸發,它需要元素連續地在continuousTimeMin和continuousTimeMax之間位於視口中。如果未指定 continousTimeMin,則預設設定為 0。該值以毫秒為單位。
totalTimeMin 和 totalTimeMin
此屬性指示可見性跟蹤器要觸發,它需要元素總共在totalTimeMin和totalTimeMin之間位於視口中。如果未指定 totalTimeMin,則預設為 0。該值以毫秒為單位。
visiblePercentageMin 和 visiblePercentageMax
此屬性指示可見性跟蹤器要觸發,它需要元素在分配給 visiblePercetageMin 和 visiblePercentageMax 的百分比之間在視口中可見。visiblePercentageMin的預設值為 0,visibilePercentageMax的預設值為 100。如果兩者都為 0,則元素不可見時可見性觸發器將觸發;如果兩者都為 100,則元素完全可見時將觸發。
重複
如果設定為 true,則每次滿足 visibilitySpec 條件時,觸發器都會觸發。預設情況下,repeat 的值為 false。它不能與 reportWhen 屬性一起使用。
此處顯示點選觸發器的示例:
<!doctype html>
<html amp>
   <head>
      <meta charset = "utf-8">
      <title>amp-analytics</title>
      <script async src = "https://cdn.ampproject.org/v0.js">
      </script>
      <script async custom-element = "amp-analytics"
      src="https://cdn.ampproject.org/v0/amp-analytics-0.1.js">
      </script>
      <link rel = "canonical" href = "ampanalytics.html">
      <meta name = "viewport" content = "width = device-width,
      minimum-scale = 1,initial-scale = 1">

      <style amp-boilerplate>
         body{
            -webkit-animation:
            -amp-start 8s steps(1,end) 0s 1 normal both;-moz-animation:
            -amp-start 8s steps(1,end) 0s 1 normal both;-ms-animation:
            -amp-start 8s steps(1,end) 0s 1 normal both;animation:
            -amp-start 8s steps(1,end) 0s 1 normal both
         }
         @-webkit-keyframes
         -amp-start{from{visibility:hidden}to{visibility:visible}}@-moz-keyframes
         -amp-start{from{visibility:hidden}to{visibility:visible}}@-ms-keyframes
         -amp-start{from{visibility:hidden}to{visibility:visible}}@-o-keyframes
         -amp-start{from{visibility:hidden}to{visibility:visible}}@keyframes
         -amp-start{from{visibility:hidden}to{visibility:visible}}
      </style>
      <noscript>
         <style amp-boilerplate>
            body{
               -webkit-animation:none;
               -moz-animation:none;
               -ms-animation:none;
               animation:none}
         </style>
      </noscript>
      <script async custom-element = "amp-video"
         src = "https://cdn.ampproject.org/v0/amp-video-0.1.js">
      </script>
      <style amp-custom>
         a {
            color: blue;
         }
      </style>
   </head>
   <body>
      <h1>Google Amp - Analytics</h1>
      <a>Click Here</a>
      <amp-analytics>
         <script type = "application/json">
            {
               "requests": {
                  "event": "https://:8080/googleamp/tracking.php?
                  user=test&account=localhost&event=${eventId}"
               },
               "triggers": {
                  "trackAnchorClicks": {
                  "on": "click",
                  "selector": "a",
                  "request": "event",
                     "vars": {
                        "eventId": "clickonlink"
                     }
                  }
               }
            }
         </script>
      </amp-analytics>
   </body>
</html>
輸出

單擊連結時,將觸發事件,如下所示:
