- ReactJS 教程
- ReactJS - 首頁
- ReactJS - 簡介
- ReactJS - 路線圖
- ReactJS - 安裝
- ReactJS - 特性
- ReactJS - 優點與缺點
- ReactJS - 架構
- ReactJS - 建立 React 應用
- ReactJS - JSX
- ReactJS - 元件
- ReactJS - 巢狀元件
- ReactJS - 使用新建立的元件
- ReactJS - 元件集合
- ReactJS - 樣式
- ReactJS - 屬性 (props)
- ReactJS - 使用屬性建立元件
- ReactJS - props 驗證
- ReactJS - 建構函式
- ReactJS - 元件生命週期
- ReactJS - 事件管理
- ReactJS - 建立一個事件感知元件
- ReactJS - 在 Expense Manager 應用中引入事件
- ReactJS - 狀態管理
- ReactJS - 狀態管理 API
- ReactJS - 無狀態元件
- ReactJS - 使用 React Hooks 進行狀態管理
- ReactJS - 使用 React Hooks 進行元件生命週期管理
- ReactJS - 佈局元件
- ReactJS - 分頁
- ReactJS - Material UI
- ReactJS - Http 客戶端程式設計
- ReactJS - 表單程式設計
- ReactJS - 受控元件
- ReactJS - 非受控元件
- ReactJS - Formik
- ReactJS - 條件渲染
- ReactJS - 列表
- ReactJS - Keys
- ReactJS - 路由
- ReactJS - Redux
- ReactJS - 動畫
- ReactJS - Bootstrap
- ReactJS - 地圖
- ReactJS - 表格
- ReactJS - 使用 Flux 管理狀態
- ReactJS - 測試
- ReactJS - CLI 命令
- ReactJS - 構建和部署
- ReactJS - 示例
- Hooks
- ReactJS - Hooks 簡介
- ReactJS - 使用 useState
- ReactJS - 使用 useEffect
- ReactJS - 使用 useContext
- ReactJS - 使用 useRef
- ReactJS - 使用 useReducer
- ReactJS - 使用 useCallback
- ReactJS - 使用 useMemo
- ReactJS - 自定義 Hooks
- ReactJS 高階
- ReactJS - 可訪問性
- ReactJS - 程式碼分割
- ReactJS - Context
- ReactJS - 錯誤邊界
- ReactJS - 轉發 Refs
- ReactJS - 碎片
- ReactJS - 高階元件
- ReactJS - 整合其他庫
- ReactJS - 最佳化效能
- ReactJS - Profiler API
- ReactJS - Portals
- ReactJS - 無 ES6 ECMAScript 的 React
- ReactJS - 無 JSX 的 React
- ReactJS - 調和
- ReactJS - Refs 和 DOM
- ReactJS - 渲染 Props
- ReactJS - 靜態型別檢查
- ReactJS - 嚴格模式
- ReactJS - Web Components
- 其他概念
- ReactJS - 日期選擇器
- ReactJS - Helmet
- ReactJS - 內聯樣式
- ReactJS - PropTypes
- ReactJS - BrowserRouter
- ReactJS - DOM
- ReactJS - 走馬燈
- ReactJS - 圖示
- ReactJS - 表單元件
- ReactJS - 參考 API
- ReactJS 有用資源
- ReactJS - 快速指南
- ReactJS - 有用資源
- ReactJS - 討論
ReactJS - getChildContext() 方法
getChildContext() 函式是 React 中的元件生命週期函式。此函式允許父元件與其子元件交換指定的資訊。它類似於建立一個特定的盒子(上下文),父元件可以在其中儲存重要資料。父元件決定放入盒子中的內容,並允許子元件訪問它,而無需透過使用 getChildContext() 直接傳遞。這種通訊方式使事情井然有序,並簡化了應用程式不同部分之間如何相互通訊,類似於一個家庭有一種特定的方式來討論關鍵資訊,而無需單獨與每個成員溝通。
語法
getChildContext()
為了使用 getChildContext(),元件必須定義一個名為 childContextTypes 的靜態屬性,該屬性指定上下文資料的預期型別。
示例
示例 1
讓我們使用 getChildContext() 函式建立一個示例。在這個例子中,我們將建立一個簡單的應用程式,透過上下文傳遞使用者資料來顯示使用者資訊。
import PropTypes from 'prop-types';
import React, { Component } from 'react';

// Create a context
const UserContext = React.createContext({
   username: 'Guest',
   age: 0,
});

// Create a component
class UserProvider extends Component {
   // Define child context types
   static childContextTypes = {
      user: PropTypes.shape({
      username: PropTypes.string,
      age: PropTypes.number,
   }),
   };
   getChildContext() {
      return {
         user: {
            username: this.props.username,
            age: this.props.age,
         },
      };
   }

   render() {
      // Render the child components
      return this.props.children;
   }
}

// Create a component that consumes user data from context
class UserInfo extends Component {
   static contextTypes = {
      user: PropTypes.shape({
         username: PropTypes.string,
         age: PropTypes.number,
      }),
   };
   render() {
      return (
         <div>
            <p>Welcome, {this.context.user.username}!</p>
            <p>Your age: {this.context.user.age}</p>
         </div>
      );
   }
}

// Create the main App component
class App extends Component {
   render() {
      return (
         // Wrap the UserInfo component with the UserProvider
         <UserProvider username="Amit" age={25}>
            <UserInfo />
         </UserProvider>
      );
   }
}

export default App;
輸出
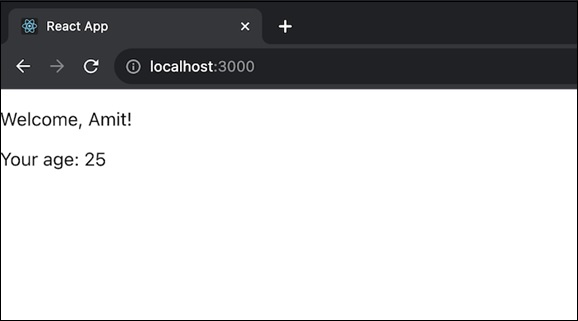
在上面的程式碼中,App 元件使用 UserProvider 包裝 UserInfo 元件,以透過上下文傳遞使用者資料。
示例 2
這是一個使用 getChildContext() 在 React 應用中建立簡單主題上下文的另一個示例 -
import React, { Component } from 'react';
import PropTypes from 'prop-types';

// Create a context for the theme
const ThemeContext = React.createContext({
   theme: 'light',
   toggleTheme: () => {},
});

// Create a component for providing the theme
class ThemeProvider extends Component {

   // Define child context types
   static childContextTypes = {
      themeContext: PropTypes.shape({
         theme: PropTypes.string,
         toggleTheme: PropTypes.func,
      }),
   };

   // Set initial state
   state = {
      theme: 'light',
   };

   // Define a function to toggle the theme
   toggleTheme = () => {
      this.setState((prevState) => ({
         theme: prevState.theme === 'light' ? 'dark' : 'light',
      }));
   };

   // Provide the theme context through getChildContext()
   getChildContext() {
      return {
         themeContext: {
            theme: this.state.theme,
            toggleTheme: this.toggleTheme,
         },
      };
   }

   render() {
      // Render the child components
      return this.props.children;
   }
}

// Create a component
class ThemedComponent extends Component {
   // Define context types
   static contextTypes = {
      themeContext: PropTypes.shape({
         theme: PropTypes.string,
         toggleTheme: PropTypes.func,
      }),
   };

   render() {
      return (
         <div style={{ background: this.context.themeContext.theme === 'light' ? '#fff' : '#333', color: this.context.themeContext.theme === 'light' ? '#333' : '#fff' }}>
            <p>Current Theme: {this.context.themeContext.theme}</p>
            <button onClick={this.context.themeContext.toggleTheme}>Toggle Theme</button>
         </div>
      );
   }
}

// Create the main App component
class ThemeApp extends Component {
   render() {
      return (
         <ThemeProvider>
            <ThemedComponent />
         </ThemeProvider>
      );
   }
}

export default ThemeApp;
輸出
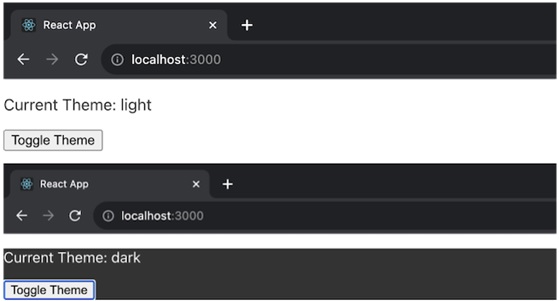
在上面的示例中,ThemeProvider 元件使用 getChildContext() 提供一個主題上下文,預設主題為“light”,並提供一個切換主題的函式。ThemedComponent 然後使用此上下文顯示有關當前主題的資訊和一個切換按鈕。ThemeApp 元件在 ThemeProvider 的上下文中渲染 ThemedComponent。
示例 3
讓我們再建立一個使用 getChildContext() 在 React 應用中管理使用者身份驗證的示例 -
import React, { Component } from 'react';
import PropTypes from 'prop-types';

// Create a context for user authentication
const AuthContext = React.createContext({
   isAuthenticated: false,
   login: () => {},
   logout: () => {},
});

// Create a component for providing authentication context
class AuthProvider extends Component {
   static childContextTypes = {
      authContext: PropTypes.shape({
         isAuthenticated: PropTypes.bool,
         login: PropTypes.func,
         logout: PropTypes.func,
      }),
   };

   // Set initial state
   state = {
      isAuthenticated: false,
   };

   // Define a function to handle user login
   login = () => {
      this.setState({
         isAuthenticated: true,
      });
   };

   // Define a function to handle user logout
   logout = () => {
      this.setState({
         isAuthenticated: false,
      });
   };

   // Provide the authentication context through getChildContext()
   getChildContext() {
      return {
         authContext: {
            isAuthenticated: this.state.isAuthenticated,
            login: this.login,
            logout: this.logout,
         },
      };
   }

   render() {
      // Render the child components
      return this.props.children;
   }
}

// Create a component that consumes the authentication context
class AuthComponent extends Component {
   // Define context types
   static contextTypes = {
      authContext: PropTypes.shape({
         isAuthenticated: PropTypes.bool,
         login: PropTypes.func,
         logout: PropTypes.func,
      }),
   };

   render() {
      return (
         <div>
            <p>User is {this.context.authContext.isAuthenticated ? 'authenticated' : 'not authenticated'}</p>
            {this.context.authContext.isAuthenticated ? (
               <button onClick={this.context.authContext.logout}>Logout</button>
            ) : (
               <button onClick={this.context.authContext.login}>Login</button>
            )}
         </div>
      );
   }
}

// Create the main App component
class App extends Component {
   render() {
      return (
         <AuthProvider>
            <AuthComponent />
         </AuthProvider>
      );
   }
}

export default App;
輸出

在上面的應用程式中,AuthProvider 元件使用 getChildContext() 提供一個身份驗證上下文,其預設值為 isAuthenticated 設定為 false。它還具有管理登入和登出操作的功能。AuthComponent 使用此上下文來確定使用者是否已認證,並提供登入和登出按鈕。
侷限性
從 React 16.3 開始,getChildContext() 函式已棄用,建議使用新的 Context API 來代替。
總結
getChildContext() 函式可用於在 React 元件中提供上下文,建議開發人員採用新的 Context API 以提高可讀性和未來的相容性。