- ReactJS 教程
- ReactJS - 首頁
- ReactJS - 簡介
- ReactJS - 路線圖
- ReactJS - 安裝
- ReactJS - 特性
- ReactJS - 優點與缺點
- ReactJS - 架構
- ReactJS - 建立 React 應用
- ReactJS - JSX
- ReactJS - 元件
- ReactJS - 巢狀元件
- ReactJS - 使用新建立的元件
- ReactJS - 元件集合
- ReactJS - 樣式
- ReactJS - 屬性 (props)
- ReactJS - 使用屬性建立元件
- ReactJS - props 驗證
- ReactJS - 建構函式
- ReactJS - 元件生命週期
- ReactJS - 事件管理
- ReactJS - 建立一個事件感知元件
- ReactJS - 在 Expense Manager 應用中引入事件
- ReactJS - 狀態管理
- ReactJS - 狀態管理 API
- ReactJS - 無狀態元件
- ReactJS - 使用 React Hooks 進行狀態管理
- ReactJS - 使用 React Hooks 進行元件生命週期管理
- ReactJS - 佈局元件
- ReactJS - 分頁
- ReactJS - Material UI
- ReactJS - Http 客戶端程式設計
- ReactJS - 表單程式設計
- ReactJS - 受控元件
- ReactJS - 非受控元件
- ReactJS - Formik
- ReactJS - 條件渲染
- ReactJS - 列表
- ReactJS - Keys
- ReactJS - 路由
- ReactJS - Redux
- ReactJS - 動畫
- ReactJS - Bootstrap
- ReactJS - Map
- ReactJS - 表格
- ReactJS - 使用 Flux 管理狀態
- ReactJS - 測試
- ReactJS - CLI 命令
- ReactJS - 構建和部署
- ReactJS - 示例
- Hooks
- ReactJS - Hooks 簡介
- ReactJS - 使用 useState
- ReactJS - 使用 useEffect
- ReactJS - 使用 useContext
- ReactJS - 使用 useRef
- ReactJS - 使用 useReducer
- ReactJS - 使用 useCallback
- ReactJS - 使用 useMemo
- ReactJS - 自定義 Hooks
- ReactJS 高階
- ReactJS - 可訪問性
- ReactJS - 程式碼分割
- ReactJS - Context
- ReactJS - 錯誤邊界
- ReactJS - 轉發 Refs
- ReactJS - Fragments
- ReactJS - 高階元件
- ReactJS - 整合其他庫
- ReactJS - 效能最佳化
- ReactJS - Profiler API
- ReactJS - Portals
- ReactJS - 無需 ES6 ECMAScript 的 React
- ReactJS - 無需 JSX 的 React
- ReactJS - 調和
- ReactJS - Refs 和 DOM
- ReactJS - Render Props
- ReactJS - 靜態型別檢查
- ReactJS - Strict Mode
- ReactJS - Web Components
- 其他概念
- ReactJS - 日期選擇器
- ReactJS - Helmet
- ReactJS - 內聯樣式
- ReactJS - PropTypes
- ReactJS - BrowserRouter
- ReactJS - DOM
- ReactJS - 輪播圖
- ReactJS - 圖示
- ReactJS - 表單元件
- ReactJS - 參考 API
- ReactJS 有用資源
- ReactJS - 快速指南
- ReactJS - 有用資源
- ReactJS - 討論
ReactJS - 整合其他庫
儘管 React 提供了建立完整 Web 應用所需的所有功能,但由於遺留系統是用其他庫編寫的,或者需要從其他框架遷移等原因,整合其他庫仍然是必要的。React 可以與其他庫共存,並提供必要的架構來與其他系統一起使用。
本章將介紹如何將 React 元件與其他庫(如 jQuery、Backbone 等)一起使用。
基於 createRoot 的整合
React 使用 ReactDOMClient 模組中的 createRoot() 方法將自身附加到主 HTML 文件。除了附加的元素外,createRoot() 不會干擾 HTML 文件。開發人員可以利用此特性在一個文件中混合使用多個庫。
讓我們看看如何透過將 React 應用附加到單獨的元素中,在一個文件中整合 jQuery 和 React 元件。
首先,建立一個新的 React 應用,並使用以下命令啟動它。
create-react-app myapp
cd myapp
npm start
接下來,在 component 資料夾下(src/components/Hello.js)建立一個 React 元件 Hello。
import React from "react";
class Hello extends React.Component {
   constructor(props) {
      super(props)
   }
   render() {
      return (
         <div>Hello, {this.props.name}</div>
      );
   }
}
export default Hello;
接下來,開啟 index.html (public/index.html) 並新增一個新的容器 (jquery-root),如下所示:
<!DOCTYPE html>
<html lang="en">
   <head>
      <meta charset="utf-8" />
      <link rel="icon" href="%PUBLIC_URL%/favicon.ico" />
      <meta name="viewport" content="width=device-width, initial-scale=1" />
      <meta name="theme-color" content="#000000" />
      <meta name="description" content="Web site created using create-react-app" />
      <link rel="apple-touch-icon" href="%PUBLIC_URL%/logo192.png" />
      <link rel="manifest" href="%PUBLIC_URL%/manifest.json" />

      <script src="https://code.jquery.com/jquery-3.6.1.slim.min.js"></script>
      <title>React App</title>
   </head>
   <body>
      <noscript>You need to enable JavaScript to run this app.</noscript>
      <div style="padding: 10px;">
         <div id="root"></div>
         <div id="jquery-root"></div>
      </div>
      <script>
         $(document).ready(function() {
            $("#jquery-root").text("Hello, from jQuery")
         })
      </script>
   </body>
</html>
這裡:
jQuery 庫透過 CDN 連結
它像傳統方式一樣透過 $(document).ready 方法初始化
並用於使用 jQuery 選擇器 (#jquery-root) 和 text 方法追加訊息
接下來,開啟 index.js (src/index.js) 並將我們的 Hello 元件附加到根容器,如下所示:
import React from 'react';
import ReactDOM from 'react-dom/client';
import './index.css';
import Hello from './Components/Hello';
import reportWebVitals from './reportWebVitals';
const root = ReactDOM.createRoot(document.getElementById('root'));
root.render(
   <React.StrictMode>
      <Hello name="from React" />
   </React.StrictMode>
);
reportWebVitals();
這裡:
React 應用使用 createRoot() 方法附加。
將 Hello 元件渲染到 HTML 文件中的根元素。
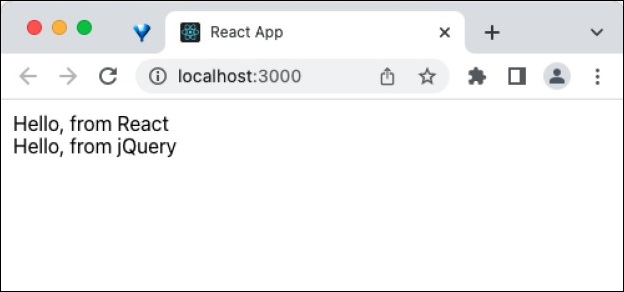
最後,在瀏覽器中開啟應用並檢查結果。React 和 jQuery 庫都會發出 hello 訊息,如下所示:
基於 Ref 的整合
一般來說,React 不知道其他庫所做的任何 DOM 操作。因此,要將 React 與其他庫一起使用,React 不應該進行任何 DOM 操作,而應該將所有更改轉發給其他庫。
眾所周知,React 提供了一個稱為 Ref 的逃生艙,用於在不影響/受狀態更改影響的情況下操作 DOM 元素。開發人員可以利用這些特性來建立其他庫的包裝 React 元件,並在 React 應用中使用它。在 React 元件中使用其他庫的標準步驟如下:
建立一個 React 元件並渲染一個空的 div
render() {
   return <div />
}
按照如下所示將 ref 附加到渲染的 div:
render() {
   return <div ref={el => this.el = el} />
}
在 componentDidMount() 生命週期事件中使用附加的 ref 操作 dom 元素,如下所示:
componentDidMount() {
   this.$el = $(this.el);
   this.$el.somePlugin(); // create dom
   // call this.$el.pluginAPI() as necessary
}
在 componentWillUnmount() 生命週期事件中使用附加的 ref 銷燬 dom 元素,如下所示:
componentWillUnmount() {
   this.$el.somePlugin('destroy'); // destroy dom
   // this.$el.destroyAPI() to remove the element from the dom
}
在下一節中,我們將運用這些技術將 jQuery 外掛整合到應用中。
JQuery slick 外掛整合
讓我們嘗試將 slick jQuery 外掛 (https://github.com/kenwheeler/slick) 整合到 React 元件中。
首先,建立一個新的 React 應用,並使用以下命令啟動它。
create-react-app myapp
cd myapp
npm start
接下來,安裝 slick jQuery 外掛。
npm install jquery slick-carousel --save
接下來,將 slick 外掛包中的 slick 資料夾(css 和 assets)複製到應用的 public 資料夾。slider 資料夾的內容如下所示:
.
├── ajax-loader.gif
├── config.rb
├── fonts
│   ├── slick.eot
│   ├── slick.svg
│   ├── slick.ttf
│   └── slick.woff
├── slick-theme.css
├── slick-theme.less
├── slick-theme.scss
├── slick.css
├── slick.js
├── slick.less
├── slick.min.js
└── slick.scss
接下來,建立一個簡單的元件 ReactSlick (src/Components/ReactSlick.js),如下所示:
import React from "react";
import $ from 'jquery';
import slick from 'slick-carousel';
class ReactSlick extends React.Component {
   componentDidMount() {
      this.$el = $(this.el);
      this.$el.slick();
   }
   componentWillUnmount() {
      this.$el.slick('destroy');
   }
   render() {
      return (
         <div>
            <div ref={el => this.el = el}>
               {this.props.children}
            </div>
         </div>
      );
   }
}
export default ReactSlick;
這裡:
渲染一個帶有來自 props 子元素的 div
將 ref 附加到 div 元素
在 componentDidMount() 生命週期事件中使用 ref 將外掛附加到元素
在 componentWillUnmount() 生命週期事件中使用 ref 銷燬附加到元素的外掛
接下來,開啟 App 元件 (src/App.js) 並使用 ReactSlick 元件更新內容,如下所示:
import ReactSlick from './Components/ReactSlick';
function App() {
   return (
      <ReactSlick>
         <div className="box"><h1>1</h1></div>
         <div className="box"><h1>2</h1></div>
         <div className="box"><h1>3</h1></div>
         <div className="box"><h1>4</h1></div>
      </ReactSlick>
   );
}
export default App;
這裡:
渲染 ReactSlick 元件
使用帶有數字 (1,2,3 和 4) 的四個 div 作為滑塊
接下來,開啟 App.css (src/App.css) 並刪除所有 CSS 類。然後,開啟 index.html (public/index.html) 並新增必要的樣式,如下所示:
<!DOCTYPE html>
<html lang="en">
   <head>
      <meta charset="utf-8" />
      <link rel="icon" href="%PUBLIC_URL%/favicon.ico" />
      <meta name="viewport" content="width=device-width, initial-scale=1" />
      <meta name="theme-color" content="#000000" />
      <meta
      name="description"
      content="Web site created using create-react-app"
      />
      <link rel="apple-touch-icon" href="%PUBLIC_URL%/logo192.png" />
      <link rel="manifest" href="%PUBLIC_URL%/manifest.json" />
      <link rel="stylesheet" type="text/css" href="slick/slick.css"/>
      <link rel="stylesheet" type="text/css" href="slick/slick-theme.css"/>
      <style>
         #root {
            margin: auto;
            padding-left: 25px;
            padding-top: 25px;
            width: 300px;
            color: gray;
            font-family:Cambria, Cochin, Georgia, Times, 'Times New Roman', serif;
            padding-left : 25px;
            text-align: center;
         }
         .box {
            background-color: skyblue;
            text-align: center;
            color: white
         }
      </style>
      <title>React App</title>
   </head>
   <body>
      <noscript>You need to enable JavaScript to run this app.</noscript>
      <div style="background-color: white; margin: 2px;">
         <div id="root"></div>
      </div>
   </body>
</html>
這裡我們有:
更新根元件的樣式
更新滑塊的樣式 (.box)
包含 slick 外掛特定的樣式 (slick/slick.css 和 slick/slick-theme.css)
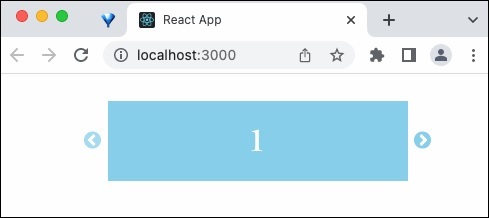
最後,在瀏覽器中開啟應用。jQuery slick 滑塊將透過 React 元件渲染,如下所示:
總結
React 提供了多種方法來在一個專案中使用 React 和其他庫。每種整合方法都簡單有效。開發人員應該避免使用其他庫,除非在不可避免的情況下,例如遺留應用、遷移應用等。