- ReactJS 教程
- ReactJS - 首頁
- ReactJS - 簡介
- ReactJS - 路線圖
- ReactJS - 安裝
- ReactJS - 特性
- ReactJS - 優點與缺點
- ReactJS - 架構
- ReactJS - 建立 React 應用
- ReactJS - JSX
- ReactJS - 元件
- ReactJS - 巢狀元件
- ReactJS - 使用新建立的元件
- ReactJS - 元件集合
- ReactJS - 樣式
- ReactJS - 屬性 (props)
- ReactJS - 使用屬性建立元件
- ReactJS - props 驗證
- ReactJS - 建構函式
- ReactJS - 元件生命週期
- ReactJS - 事件管理
- ReactJS - 建立一個事件感知元件
- ReactJS - 在 Expense Manager 應用中引入事件
- ReactJS - 狀態管理
- ReactJS - 狀態管理 API
- ReactJS - 無狀態元件
- ReactJS - 使用 React Hooks 進行狀態管理
- ReactJS - 使用 React Hooks 進行元件生命週期管理
- ReactJS - 佈局元件
- ReactJS - 分頁
- ReactJS - Material UI
- ReactJS - Http 客戶端程式設計
- ReactJS - 表單程式設計
- ReactJS - 受控元件
- ReactJS - 非受控元件
- ReactJS - Formik
- ReactJS - 條件渲染
- ReactJS - 列表
- ReactJS - Keys
- ReactJS - 路由
- ReactJS - Redux
- ReactJS - 動畫
- ReactJS - Bootstrap
- ReactJS - Map
- ReactJS - 表格
- ReactJS - 使用 Flux 管理狀態
- ReactJS - 測試
- ReactJS - CLI 命令
- ReactJS - 構建和部署
- ReactJS - 示例
- Hooks
- ReactJS - Hooks 簡介
- ReactJS - 使用 useState
- ReactJS - 使用 useEffect
- ReactJS - 使用 useContext
- ReactJS - 使用 useRef
- ReactJS - 使用 useReducer
- ReactJS - 使用 useCallback
- ReactJS - 使用 useMemo
- ReactJS - 自定義 Hooks
- ReactJS 高階
- ReactJS - 可訪問性
- ReactJS - 程式碼分割
- ReactJS - Context
- ReactJS - 錯誤邊界
- ReactJS - 轉發 Refs
- ReactJS - 片段
- ReactJS - 高階元件
- ReactJS - 與其他庫整合
- ReactJS - 最佳化效能
- ReactJS - Profiler API
- ReactJS - Portals
- ReactJS - 無 ES6/ECMAScript 的 React
- ReactJS - 無 JSX 的 React
- ReactJS - 調和
- ReactJS - Refs 和 DOM
- ReactJS - 渲染 Props
- ReactJS - 靜態型別檢查
- ReactJS - Strict Mode
- ReactJS - Web Components
- 其他概念
- ReactJS - 日期選擇器
- ReactJS - Helmet
- ReactJS - 內聯樣式
- ReactJS - PropTypes
- ReactJS - BrowserRouter
- ReactJS - DOM
- ReactJS - 輪播圖
- ReactJS - 圖示
- ReactJS - 表單元件
- ReactJS - 參考 API
- ReactJS 有用資源
- ReactJS - 快速指南
- ReactJS - 有用資源
- ReactJS - 討論
ReactJS - HTTP 客戶端程式設計
HTTP 客戶端程式設計使應用程式能夠透過 JavaScript 連線並從 HTTP 伺服器獲取資料。它減少了客戶端和伺服器之間的資料傳輸,因為它只獲取所需的資料而不是整個設計,從而提高了網路速度。它改善了使用者體驗,併成為每個現代 Web 應用程式不可或缺的功能。
如今,許多伺服器端應用程式透過 REST API(HTTP 協議上的功能)公開其功能,並允許任何客戶端應用程式使用這些功能。
React 本身沒有提供自己的 HTTP 程式設計 API,但它支援瀏覽器的內建 fetch() API 以及 axios 等第三方客戶端庫來進行客戶端程式設計。在本章中,讓我們學習如何在 React 應用程式中進行 HTTP 程式設計。開發人員應該具備 HTTP 程式設計的基本知識才能理解本章內容。
費用 REST API 伺服器
進行 HTTP 程式設計的先決條件是對 HTTP 協議和 REST API 技術的基本瞭解。HTTP 程式設計涉及伺服器和客戶端兩個部分。React 提供了建立客戶端應用程式的支援。Express 是一款流行的 Web 框架,它提供了建立伺服器端應用程式的支援。
讓我們首先使用 Express 框架建立一個費用 REST API 伺服器,然後使用瀏覽器的內建 fetch API 從我們的 ExpenseManager 應用程式訪問它。
開啟命令提示符並建立一個新資料夾 express-rest-api。
cd /go/to/workspace
mkdir apiserver
cd apiserver
使用以下命令初始化一個新的 Node 應用程式:
npm init
npm init 將提示我們輸入基本專案詳細資訊。讓我們為專案名稱輸入 apiserver,併為入口點輸入 server.js。將其他配置保留為預設選項。
This utility will walk you through creating a package.json file.
It only covers the most common items, and tries to guess sensible defaults.

See `npm help json` for definitive documentation on these fields and exactly what they do.

Use `npm install <pkg>` afterwards to install a package and
save it as a dependency in the package.json file.

Press ^C at any time to quit.
package name: (apiserver)
version: (1.0.0)
description: Rest api for Expense Application
entry point: (index.js) server.js
test command:
git repository:
keywords:
author:
license: (ISC)
About to write to \path\to\workspace\expense-rest-api\package.json:
{
   "name": "expense-rest-api",
   "version": "1.0.0",
   "description": "Rest api for Expense Application",
   "main": "server.js",
   "scripts": {
      "test": "echo \"Error: no test specified\" && exit 1"
   },
   "author": "",
   "license": "ISC"
}
Is this OK? (yes) yes
接下來,使用以下命令安裝 express、nedb & cors 模組:
npm install express nedb cors
express 用於建立伺服器端應用程式。
nedb 是一個用於儲存費用資料的資料儲存。
cors 是 express 框架的一箇中間件,用於配置客戶端訪問詳細資訊。
接下來,讓我們建立一個檔案 data.csv 並用初始費用資料填充它以進行測試。該檔案結構為每行包含一個費用條目。
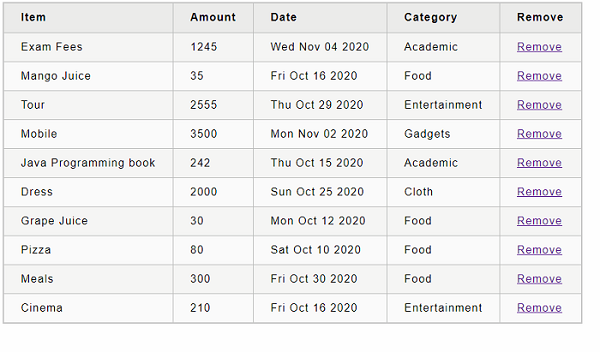
Pizza,80,2020-10-10,Food
Grape Juice,30,2020-10-12,Food
Cinema,210,2020-10-16,Entertainment
Java Programming book,242,2020-10-15,Academic
Mango Juice,35,2020-10-16,Food
Dress,2000,2020-10-25,Cloth
Tour,2555,2020-10-29,Entertainment
Meals,300,2020-10-30,Food
Mobile,3500,2020-11-02,Gadgets
Exam Fees,1245,2020-11-04,Academic
接下來,建立一個檔案 expensedb.js 幷包含載入初始費用資料到資料儲存的程式碼。該程式碼檢查資料儲存中是否存在初始資料,並且僅在儲存中沒有資料時才載入。
var store = require("nedb")
var fs = require('fs');
var expenses = new store({ filename: "expense.db", autoload: true })
expenses.find({}, function (err, docs) {
   if (docs.length == 0) {
      loadExpenses();
   }
})
function loadExpenses() {
   readCsv("data.csv", function (data) {
      console.log(data);

      data.forEach(function (rec, idx) {
         item = {}
         item.name = rec[0];
         item.amount = parseFloat(rec[1]);
         item.spend_date = new Date(rec[2]);
         item.category = rec[3];

         expenses.insert(item, function (err, doc) {
            console.log('Inserted', doc.item_name, 'with ID', doc._id);
         })
      })
   })
}
function readCsv(file, callback) {
   fs.readFile(file, 'utf-8', function (err, data) {
      if (err) throw err;
      var lines = data.split('\r\n');
      var result = lines.map(function (line) {
         return line.split(',');
      });
      callback(result);
   });
}
module.exports = expenses
接下來,建立一個檔案 server.js 幷包含列出、新增、更新和刪除費用條目的實際程式碼。
var express = require("express")
var cors = require('cors')
var expenseStore = require("./expensedb.js")
var app = express()
app.use(cors());
var bodyParser = require("body-parser");
app.use(bodyParser.urlencoded({ extended: false }));
app.use(bodyParser.json());
var HTTP_PORT = 8000
app.listen(HTTP_PORT, () => {
   console.log("Server running on port %PORT%".replace("%PORT%", HTTP_PORT))
});
app.get("/", (req, res, next) => {
   res.json({ "message": "Ok" })
});
app.get("/api/expenses", (req, res, next) => {
   expenseStore.find({}, function (err, docs) {
      res.json(docs);
   });
});
app.get("/api/expense/:id", (req, res, next) => {
   var id = req.params.id;
   expenseStore.find({ _id: id }, function (err, docs) {
      res.json(docs);
   })
});
app.post("/api/expense/", (req, res, next) => {
   var errors = []
   if (!req.body.item) {
      errors.push("No item specified");
   }
   var data = {
      name: req.body.name,
      amount: req.body.amount,
      category: req.body.category,
      spend_date: req.body.spend_date,
   }
   expenseStore.insert(data, function (err, docs) {
      return res.json(docs);
   });
})
app.put("/api/expense/:id", (req, res, next) => {
   var id = req.params.id;
   var errors = []
   if (!req.body.item) {
      errors.push("No item specified");
   }
   var data = {
      _id: id,
      name: req.body.name,
      amount: req.body.amount,
      category: req.body.category,
      spend_date: req.body.spend_date,
   }
   expenseStore.update( { _id: id }, data, function (err, docs) {
      return res.json(data);
   });
})
app.delete("/api/expense/:id", (req, res, next) => {
   var id = req.params.id;
   expenseStore.remove({ _id: id }, function (err, numDeleted) {
      res.json({ "message": "deleted" })
   });
})
app.use(function (req, res) {
   res.status(404);
});
現在,是時候執行應用程式了。
npm run start
接下來,開啟瀏覽器並在位址列中輸入 https://:8000/。
{
   "message": "Ok"
}
它確認我們的應用程式執行良好。
最後,將 URL 更改為 https://:8000/api/expense 並按 Enter 鍵。瀏覽器將以 JSON 格式顯示初始費用條目。
[
   ...
   {
      "name": "Pizza",
      "amount": 80,
      "spend_date": "2020-10-10T00:00:00.000Z",
      "category": "Food",
      "_id": "5H8rK8lLGJPVZ3gD"
   },
   ...
]
讓我們在下一節中透過 fetch() API 在我們的費用管理器應用程式中使用我們新建立的費用伺服器。
fetch() API
讓我們建立一個新應用程式來展示 React 中的客戶端程式設計。
首先,使用 Create React App 或 Rollup 捆綁器建立一個新的 React 應用程式 react-http-app,方法是按照 建立 React 應用程式 一章中的說明進行操作。
接下來,在您喜歡的編輯器中開啟應用程式。
接下來,在應用程式的根目錄下建立 src 資料夾。
接下來,在 src 資料夾下建立 components 資料夾。
接下來,在 src/components 資料夾下建立一個檔案 ExpenseEntryItemList.css 幷包含通用表格樣式。
html {
   font-family: sans-serif;
}
table {
   border-collapse: collapse;
   border: 2px solid rgb(200,200,200);
   letter-spacing: 1px;
   font-size: 0.8rem;
}
td, th {
   border: 1px solid rgb(190,190,190);
   padding: 10px 20px;
}
th {
   background-color: rgb(235,235,235);
}
td, th {
   text-align: left;
}
tr:nth-child(even) td {
   background-color: rgb(250,250,250);
}
tr:nth-child(odd) td {
   background-color: rgb(245,245,245);
}
caption {
   padding: 10px;
}
tr.highlight td {
    background-color: #a6a8bd;
}
接下來,在 src/components 資料夾下建立一個檔案 ExpenseEntryItemList.js 並開始編輯。
接下來,匯入 React 庫。
import React from 'react';
接下來,建立一個類 ExpenseEntryItemList 並使用 props 呼叫建構函式。
class ExpenseEntryItemList extends React.Component {
   constructor(props) {
      super(props);
   }
}
接下來,在建構函式中用空列表初始化狀態。
this.state = {
   isLoaded: false,
   items: []
}
接下來,建立一個方法 setItems 來格式化從遠端伺服器接收到的專案,然後將其設定為元件的狀態。
setItems(remoteItems) {
   var items = [];
   remoteItems.forEach((item) => {
      let newItem = {
         id: item._id,
         name: item.name,
         amount: item.amount,
         spendDate: item.spend_date,
         category: item.category
      }
      items.push(newItem)
   });
   this.setState({
      isLoaded: true,
      items: items
   });
}
接下來,新增一個方法 fetchRemoteItems 從伺服器獲取專案。
fetchRemoteItems() {
   fetch("https://:8000/api/expenses")
      .then(res => res.json())
      .then(
         (result) => {
            this.setItems(result);
         },
         (error) => {
            this.setState({
               isLoaded: false,
               error
            });
         }
      )
}
這裡:
fetch API 用於從遠端伺服器獲取專案。
setItems 用於格式化並將專案儲存在狀態中。
接下來,新增一個方法 deleteRemoteItem 從遠端伺服器刪除專案。
deleteRemoteItem(id) {
   fetch('https://:8000/api/expense/' + id, { method: 'DELETE' })
      .then(res => res.json())
      .then(
         () => {
            this.fetchRemoteItems()
         }
      )
}
這裡:
fetch API 用於從遠端伺服器刪除和獲取專案。
setItems 再次用於格式化並將專案儲存在狀態中。
接下來,呼叫 componentDidMount 生命週期 API 以在元件掛載階段將專案載入到元件中。
componentDidMount() {
   this.fetchRemoteItems();
}
接下來,編寫一個事件處理程式以從列表中刪除專案。
handleDelete = (id, e) => {
   e.preventDefault();
   console.log(id);

   this.deleteRemoteItem(id);
}
接下來,編寫 render 方法。
render() {
   let lists = [];
   if (this.state.isLoaded) {
      lists = this.state.items.map((item) =>
         <tr key={item.id} onMouseEnter={this.handleMouseEnter} onMouseLeave={this.handleMouseLeave}>
            <td>{item.name}</td>
            <td>{item.amount}</td>
            <td>{new Date(item.spendDate).toDateString()}</td>
            <td>{item.category}</td>
            <td><a href="#" onClick={(e) => this.handleDelete(item.id, e)}>Remove</a></td>
         </tr>
      );
   }
   return (
      <div>
         <table onMouseOver={this.handleMouseOver}>
            <thead>
               <tr>
                  <th>Item</th>
                  <th>Amount</th>
                  <th>Date</th>
                  <th>Category</th>
                  <th>Remove</th>
               </tr>
            </thead>
            <tbody>
               {lists}
            </tbody>
         </table>
      </div>
   );
}
最後,匯出元件。
export default ExpenseEntryItemList;
接下來,在 src 資料夾下建立一個檔案 index.js 並使用 ExpenseEntryItemList 元件。
import React from 'react';
import ReactDOM from 'react-dom';
import ExpenseEntryItemList from './components/ExpenseEntryItemList';

ReactDOM.render(
   <React.StrictMode>
         <ExpenseEntryItemList />
   </React.StrictMode>,
   document.getElementById('root')
);
最後,在根資料夾下建立一個 public 資料夾並建立 index.html 檔案。
<!DOCTYPE html>
<html lang="en">
   <head>
      <meta charset="utf-8">
      <title>React App</title>
   </head>
   <body>
      <div id="root"></div>
      <script type="text/JavaScript" src="./index.js"></script>
   </body>
</html>
接下來,開啟一個新的終端視窗並啟動我們的伺服器應用程式。
cd /go/to/server/application
npm start
接下來,使用 npm 命令提供客戶端應用程式。
npm start
接下來,開啟瀏覽器並在位址列中輸入 https://:3000 並按 Enter 鍵。
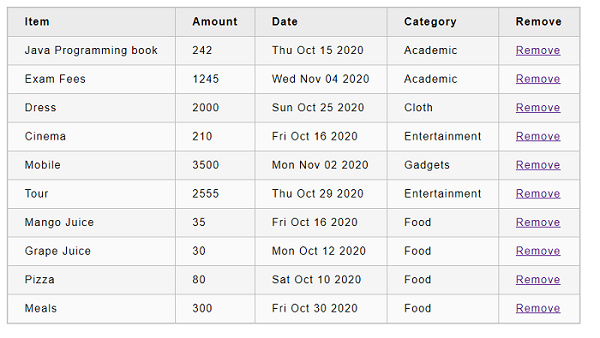
嘗試透過點選刪除連結來刪除專案。