- ReactJS 教程
- ReactJS - 首頁
- ReactJS - 簡介
- ReactJS - 路線圖
- ReactJS - 安裝
- ReactJS - 特性
- ReactJS - 優點與缺點
- ReactJS - 架構
- ReactJS - 建立 React 應用
- ReactJS - JSX
- ReactJS - 元件
- ReactJS - 巢狀元件
- ReactJS - 使用新建立的元件
- ReactJS - 元件集合
- ReactJS - 樣式
- ReactJS - 屬性 (props)
- ReactJS - 使用屬性建立元件
- ReactJS - Props 驗證
- ReactJS - 建構函式
- ReactJS - 元件生命週期
- ReactJS - 事件管理
- ReactJS - 建立一個事件感知元件
- ReactJS - 在 Expense Manager 應用中引入事件
- ReactJS - 狀態管理
- ReactJS - 狀態管理 API
- ReactJS - 無狀態元件
- ReactJS - 使用 React Hooks 進行狀態管理
- ReactJS - 使用 React Hooks 進行元件生命週期管理
- ReactJS - 佈局元件
- ReactJS - 分頁
- ReactJS - Material UI
- ReactJS - Http 客戶端程式設計
- ReactJS - 表單程式設計
- ReactJS - 受控元件
- ReactJS - 非受控元件
- ReactJS - Formik
- ReactJS - 條件渲染
- ReactJS - 列表
- ReactJS - Keys
- ReactJS - 路由
- ReactJS - Redux
- ReactJS - 動畫
- ReactJS - Bootstrap
- ReactJS - 地圖
- ReactJS - 表格
- ReactJS - 使用 Flux 管理狀態
- ReactJS - 測試
- ReactJS - CLI 命令
- ReactJS - 構建和部署
- ReactJS - 示例
- Hooks
- ReactJS - Hooks 簡介
- ReactJS - 使用 useState
- ReactJS - 使用 useEffect
- ReactJS - 使用 useContext
- ReactJS - 使用 useRef
- ReactJS - 使用 useReducer
- ReactJS - 使用 useCallback
- ReactJS - 使用 useMemo
- ReactJS - 自定義 Hooks
- ReactJS 高階
- ReactJS - 可訪問性
- ReactJS - 程式碼分割
- ReactJS - 上下文
- ReactJS - 錯誤邊界
- ReactJS - 轉發 Refs
- ReactJS - 片段
- ReactJS - 高階元件
- ReactJS - 整合其他庫
- ReactJS - 最佳化效能
- ReactJS - Profiler API
- ReactJS - 埠
- ReactJS - 無 ES6 ECMAScript 的 React
- ReactJS - 無 JSX 的 React
- ReactJS - 調和
- ReactJS - Refs 和 DOM
- ReactJS - 渲染 Props
- ReactJS - 靜態型別檢查
- ReactJS - 嚴格模式
- ReactJS - Web Components
- 其他概念
- ReactJS - 日期選擇器
- ReactJS - Helmet
- ReactJS - 內聯樣式
- ReactJS - PropTypes
- ReactJS - BrowserRouter
- ReactJS - DOM
- ReactJS - 走馬燈
- ReactJS - 圖示
- ReactJS - 表單元件
- ReactJS - 參考 API
- ReactJS 有用資源
- ReactJS - 快速指南
- ReactJS - 有用資源
- ReactJS - 討論
ReactJS - Props 驗證
程式中一個耗時的過程是查詢錯誤的根本原因。在 React 中,props 被廣泛使用。元件的 props 將具有不同的來源。一些元件將具有靜態 props,而一些元件將具有來自其直接父元件的動態 props。錯誤的一個來源是 props 的值與開發人員設計的 props 型別不匹配。這種不匹配會產生許多錯誤。React 提供了許多選項來解決此問題,其中一項功能就是 PropTypes 及其驗證。
在本節中,我們將學習什麼是 PropTypes 以及如何使用它來建立無錯誤的 React 應用。
PropTypes
React 社群提供了一個特殊的包 prop-types 來解決屬性型別不匹配問題。prop-types 允許透過元件內部的自定義設定 (propTypes) 指定元件屬性的型別。例如,可以使用 PropTypes.number 選項指定數字型別的屬性,如下所示。
Sum.propTypes = {
   num1: PropTypes.number,
   num2: PropTypes.number
}
一旦指定了屬性的型別,React 就會在應用程式的開發階段發出警告。
讓我們在我們的應用程式中包含 propTypes 並看看它如何幫助捕獲屬性型別不匹配問題。
首先,建立一個新的 React 應用程式並使用以下命令啟動它。
create-react-app myapp
cd myapp
npm start
接下來,使用節點包管理器 (npm) 安裝 prop-types 包,如下所示 -
npm i prop-types --save
接下來,開啟 App.css (src/App.css) 並刪除所有 CSS 類。然後,建立一個簡單的元件 Sum (src/Components/Sum.js),如下所示 -
import React from 'react'
import PropTypes from 'prop-types'
class Sum extends React.Component {
   render() {
      return <p>The sum of {this.props.num1} and {this.props.num2}
      is {parseInt(this.props.num1) + parseInt(this.props.num2)}</p>
   }
}
Sum.propTypes = {
   num1: PropTypes.number,
   num2: PropTypes.number
}
export default Sum
這裡,
元件的目的是找到給定 props (num1 和 num2) 的總和值並在前端顯示它。
使用 propTypes 將 num1 和 num2 的資料型別設定為數字 (PropTypes.number)。
接下來,開啟 App 元件 (src/App.js),匯入 bootstrap css 並渲染日期選擇器,如下所示 -
import './App.css'
import Sum from './Components/Sum'
function App() {
   return (
      <div className="container">
         <div style={{ padding: "10px" }}>
            <div>
               <Sum num1="10" num2="John" />
            </div>
         </div>
      </div>
   );
}
export default App;
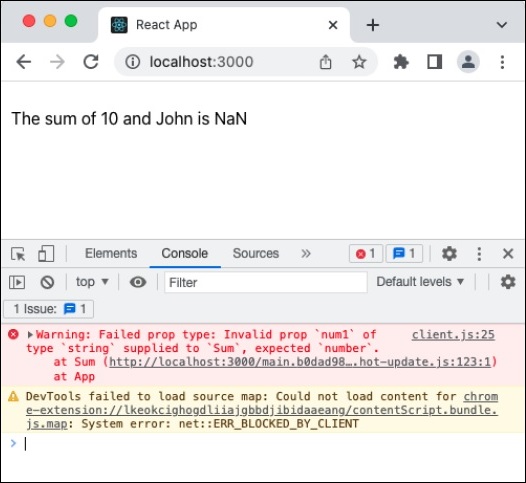
這裡,我們使用 10 和 John 作為 props 渲染了 Sum 元件
最後,在您喜歡的瀏覽器中開啟應用程式,並透過開發者工具開啟 JavaScript 控制檯。JavaScript 會發出警告,表明提供了意外的型別,如下所示。
propTypes 僅在開發階段有效,以消除由於額外檢查 props 型別而導致的應用程式效能下降。這不會影響生產/即時環境中應用程式的效能。
可用驗證器
prop-types 提供了大量現成的驗證器。它們如下 -
PropTypes.array
PropTypes.bigint
PropTypes.bool
PropTypes.func
PropTypes.number
PropTypes.object
PropTypes.string
PropTypes.symbol
PropTypes.node - 任何可以渲染的內容
PropTypes.element - React 元件
PropTypes.elementType - React 元件的型別
PropTypes.instanceOf() - 指定類的例項
propTypes.oneOf(['Value1', 'valueN']) - Value 和 ValueN 之一
PropTypes.oneOfType([]) - 例如,PropTypes.oneOfType([PropTypes.number, PropTypes.bigint])
PropTypes.arrayOf() - 例如,PropTypes.arrayOf(PropTypes.number)
PropTypes.objectOf() - 例如,PropTypes.objectOf(PropTypes.number)
PropTypes.func.isRequired
propTypes.element.isRequired
PropTypes.any.isRequired
自定義驗證器
還可以建立自定義驗證器並將其用於驗證屬性的值。假設元件具有一個 email 屬性,並且其值應為有效的電子郵件地址。然後,可以編寫一個 validate 函式並將其附加到 email 屬性,如下所示 -
Sum.propTypes = {
   num1: PropTypes.number,
   num2: PropTypes.number,
   email: function(myProps, myPropName, myComponentName) {
      if (!/^[^\s@]+@[^\s@]+\.[^\s@]+$/.test(myProps[myPropName])) {
         return new Error(
            'Invalid prop value `' + myProps[myPropName] + '` supplied to' +
            ' `' + myComponentName + '/' + myPropName + '`. Validation failed.'
         );
      }
   }
}
這裡,
/^[^\s@]+@[^\s@]+\.[^\s@]+$/ 是一個簡單的正則表示式電子郵件模式。
myProps 表示所有屬性。
myPropName 表示正在驗證的當前屬性。
myComponentName 表示正在驗證的元件的名稱。
類似地,可以使用以下函式簽名為陣列和物件屬性建立和使用自定義驗證器 -
PropTypes.arrayOf(function(propValue, key, componentName, location, propFullName) { ... })
這裡,
propValue 表示陣列/物件值。
key 表示當前專案的鍵。
componentName 表示元件的名稱。
propFullName 表示正在驗證的屬性的名稱。
總結
Props 型別是開發人員編寫無錯誤軟體的良好工具之一。它肯定會幫助開發人員更快、更安全地編寫程式碼。