- ReactJS 教程
- ReactJS - 首頁
- ReactJS - 簡介
- ReactJS - 路線圖
- ReactJS - 安裝
- ReactJS - 特性
- ReactJS - 優點與缺點
- ReactJS - 架構
- ReactJS - 建立 React 應用
- ReactJS - JSX
- ReactJS - 元件
- ReactJS - 巢狀元件
- ReactJS - 使用新建立的元件
- ReactJS - 元件集合
- ReactJS - 樣式
- ReactJS - 屬性 (props)
- ReactJS - 使用屬性建立元件
- ReactJS - props 校驗
- ReactJS - 建構函式
- ReactJS - 元件生命週期
- ReactJS - 事件管理
- ReactJS - 建立一個事件感知元件
- ReactJS - 在 Expense Manager 應用中引入事件
- ReactJS - 狀態管理
- ReactJS - 狀態管理 API
- ReactJS - 無狀態元件
- ReactJS - 使用 React Hooks 進行狀態管理
- ReactJS - 使用 React Hooks 的元件生命週期
- ReactJS - 佈局元件
- ReactJS - 分頁
- ReactJS - Material UI
- ReactJS - Http 客戶端程式設計
- ReactJS - 表單程式設計
- ReactJS - 受控元件
- ReactJS - 非受控元件
- ReactJS - Formik
- ReactJS - 條件渲染
- ReactJS - 列表
- ReactJS - Keys
- ReactJS - 路由
- ReactJS - Redux
- ReactJS - 動畫
- ReactJS - Bootstrap
- ReactJS - Map
- ReactJS - 表格
- ReactJS - 使用 Flux 管理狀態
- ReactJS - 測試
- ReactJS - CLI 命令
- ReactJS - 構建和部署
- ReactJS - 示例
- Hooks
- ReactJS - Hooks 簡介
- ReactJS - 使用 useState
- ReactJS - 使用 useEffect
- ReactJS - 使用 useContext
- ReactJS - 使用 useRef
- ReactJS - 使用 useReducer
- ReactJS - 使用 useCallback
- ReactJS - 使用 useMemo
- ReactJS - 自定義 Hooks
- ReactJS 高階
- ReactJS - 可訪問性
- ReactJS - 程式碼分割
- ReactJS - Context
- ReactJS - 錯誤邊界
- ReactJS - 轉發 Refs
- ReactJS - Fragments
- ReactJS - 高階元件
- ReactJS - 與其他庫整合
- ReactJS - 效能最佳化
- ReactJS - Profiler API
- ReactJS - Portals
- ReactJS - 無 ES6 ECMAScript 的 React
- ReactJS - 無 JSX 的 React
- ReactJS - 調和
- ReactJS - Refs 和 DOM
- ReactJS - Render Props
- ReactJS - 靜態型別檢查
- ReactJS - Strict Mode
- ReactJS - Web Components
- 其他概念
- ReactJS - 日期選擇器
- ReactJS - Helmet
- ReactJS - 內聯樣式
- ReactJS - PropTypes
- ReactJS - BrowserRouter
- ReactJS - DOM
- ReactJS - 輪播圖
- ReactJS - 圖示
- ReactJS - 表單元件
- ReactJS - 參考 API
- ReactJS 有用資源
- ReactJS - 快速指南
- ReactJS - 有用資源
- ReactJS - 討論
ReactJS - 環境搭建
本章將向您展示如何設定一個成功的 React 開發環境。請注意,這其中涉及許多步驟,但這將有助於加快以後的開發過程。我們需要NodeJS,如果您尚未安裝它,請查看下錶中的連結。
| 序號 | 軟體及說明 |
|---|---|
| 1 | NodeJS 和 NPM NodeJS 是 ReactJS 開發所需的平臺。檢視我們的 NodeJS 環境搭建。 |
成功安裝 NodeJS 後,我們可以使用 npm 在其上開始安裝 React。
您可以透過兩種方式安裝 ReactJS:
使用 webpack 和 babel。
使用 create-react-app 命令。
使用 webpack 和 babel 安裝 ReactJS
Webpack 是一個模組打包器(管理和載入獨立模組)。它接收依賴模組並將它們編譯成單個(檔案)包。您可以在使用命令列開發應用程式時使用此包,或者透過使用 webpack.config 檔案對其進行配置。
Babel 是一個 JavaScript 編譯器和轉譯器。它用於將一種原始碼轉換為另一種。使用它,您將能夠在程式碼中使用新的 ES6 功能,babel 將其轉換為普通的 ES5,可以在所有瀏覽器上執行。
步驟 1 - 建立根資料夾
C:\Users\username\Desktop>mkdir reactApp
C:\Users\username\Desktop>cd reactApp
使用 mkdir 命令在桌面上建立一個名為 reactApp 的資料夾來安裝所有必需的檔案。
C:\Users\username\Desktop\reactApp>npm init
要建立任何模組,都需要生成 package.json 檔案。因此,建立資料夾後,我們需要建立一個 package.json 檔案。為此,您需要從命令提示符執行 npm init 命令。
C:\Users\username\Desktop\reactApp>npm init -y
Wrote to C:\reactApp\package.json:
{
   "name": "reactApp",
   "version": "1.0.0",
   "description": "",
   "main": "index.js",
   "scripts": {
      "test": "echo \"Error: no test specified\" && exit 1"
   },
   "keywords": [],
   "author": "",
   "license": "ISC"
}
此命令會詢問有關模組的資訊,例如包名稱、描述、作者等,您可以使用 –y 選項跳過這些資訊。
步驟 2 - 安裝 React 和 react-dom
C:\Users\Tutorialspoint\Desktop\reactApp>npm install react --save
C:\Users\Tutorialspoint\Desktop\reactApp>npm install react-dom --save
由於我們的主要任務是安裝 ReactJS,因此分別使用 npm 的 install react 和 react-dom 命令安裝它及其 dom 包。您可以使用 --save 選項將我們安裝的包新增到 package.json 檔案中。
C:\Users\username\Desktop\reactApp>npm install react react-dom --save
或者,您可以使用單個命令安裝所有這些包:
步驟 3 - 安裝 webpack
C:\Users\username\Desktop\reactApp>npm install webpack --save
C:\Users\username\Desktop\reactApp>npm install webpack-dev-server --save
C:\Users\username\Desktop\reactApp>npm install webpack-cli --save
由於我們的主要任務是安裝 ReactJS,因此分別使用 npm 的 install react 和 react-dom 命令安裝它及其 dom 包。您可以使用 --save 選項將我們安裝的包新增到 package.json 檔案中。
C:\Users\username\Desktop\reactApp>npm install webpack webpack-dev-server webpack-cli --save
由於我們使用 webpack 生成捆綁器,因此需要安裝 webpack、webpack-dev-server 和 webpack-cli。
步驟 4 - 安裝 babel
C:\Users\username\Desktop\reactApp>npm install babel-core --save-dev
C:\Users\username\Desktop\reactApp>npm install babel-loader --save-dev
C:\Users\username\Desktop\reactApp>npm install babel-preset-env --save-dev
C:\Users\username\Desktop\reactApp>npm install babel-preset-react --save-dev
C:\Users\username\Desktop\reactApp>npm install html-webpack-plugin --save-dev
由於我們的主要任務是安裝 ReactJS,因此分別使用 npm 的 install react 和 react-dom 命令安裝它及其 dom 包。您可以使用 --save 選項將我們安裝的包新增到 package.json 檔案中。
C:\Users\username\Desktop\reactApp>npm install babel-core babel-loader babel-preset-env
   babel-preset-react html-webpack-plugin --save-dev
安裝 babel 及其外掛 babel-core、babel-loader、babel-preset-env、babel-preset-react 和 html-webpack-plugin
步驟 5 - 建立檔案
C:\Users\username\Desktop\reactApp>type nul > index.html
C:\Users\username\Desktop\reactApp>type nul > App.js
C:\Users\username\Desktop\reactApp>type nul > main.js
C:\Users\username\Desktop\reactApp>type nul > webpack.config.js
C:\Users\username\Desktop\reactApp>type nul > .babelrc
要完成安裝,我們需要建立某些檔案,即 index.html、App.js、main.js、webpack.config.js 和 .babelrc。您可以手動建立這些檔案,也可以使用 命令提示符。
步驟 6 - 設定編譯器、伺服器和載入器
開啟 webpack-config.js 檔案並新增以下程式碼。我們將 webpack 入口點設定為 main.js。輸出路徑是捆綁的應用程式將被提供服務的位置。我們還將開發伺服器設定為 8001 埠。您可以選擇任何您想要的埠。
const path = require('path');
const HtmlWebpackPlugin = require('html-webpack-plugin');

module.exports = {
   entry: './main.js',
   output: {
      path: path.join(__dirname, '/bundle'),
      filename: 'index_bundle.js'
   },
   devServer: {
      inline: true,
      port: 8001
   },
   module: {
      rules: [
         {
            test: /\.jsx?$/,
            exclude: /node_modules/,
            loader: 'babel-loader',
            query: {
               presets: ['es2015', 'react']
            }
         }
      ]
   },
   plugins:[
      new HtmlWebpackPlugin({
         template: './index.html'
      })
   ]
}
webpack.config.js
"start": "webpack-dev-server --mode development --open --hot",
"build": "webpack --mode production"
開啟 package.json 並刪除 "scripts" 物件內的 "test" "echo \"Error: no test specified\" && exit 1"。我們刪除此行是因為在本教程中我們不會進行任何測試。讓我們新增 start 和 build 命令。
步驟 7 - index.html
<!DOCTYPE html>
<html lang = "en">
   <head>
      <meta charset = "UTF-8">
      <title>React App</title>
   </head>
   <body>
      <div id = "app"></div>
      <script src = 'index_bundle.js'></script>
   </body>
</html>
這只是普通的 HTML。我們將 div id = "app" 設定為我們應用程式的根元素,並新增 index_bundle.js 指令碼,這是我們的捆綁應用程式檔案。
步驟 8 - App.jsx 和 main.js
這是第一個 React 元件。我們將在後續章節中深入解釋 React 元件。此元件將渲染 Hello World。
import React, { Component } from 'react';
class App extends Component{
   render(){
      return(
         <div>
            <h1>Hello World</h1>
         </div>
      );
   }
}
export default App;
App.js
我們需要匯入此元件並將其渲染到我們的根 App 元素,以便我們可以在瀏覽器中看到它。
import React from 'react';
import ReactDOM from 'react-dom';
import App from './App.js';

ReactDOM.render(<App />, document.getElementById('app'));
main.js
注意 - 每當您想使用某些內容時,您需要先匯入它。如果您想使元件在應用程式的其他部分可用,則需要在建立後匯出它,並在您想要使用它的檔案中匯入它。
{
   "presets":["env", "react"]
}
建立一個名為 .babelrc 的檔案,並將以下內容複製到其中。
步驟 9 - 執行伺服器
C:\Users\username\Desktop\reactApp>npm start
設定已完成,我們可以透過執行以下命令啟動伺服器。
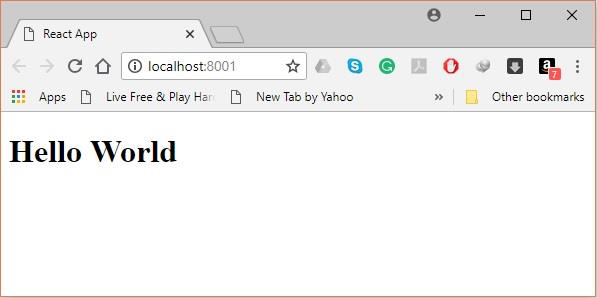
它將顯示我們需要在瀏覽器中開啟的埠。在本例中,它是 https://:8001/。開啟它後,我們將看到以下輸出。
步驟 10 - 生成包
C:\Users\Tutorialspoint\Desktop\reactApp>npm run build
最後,要生成包,您需要在命令提示符中執行 build 命令:
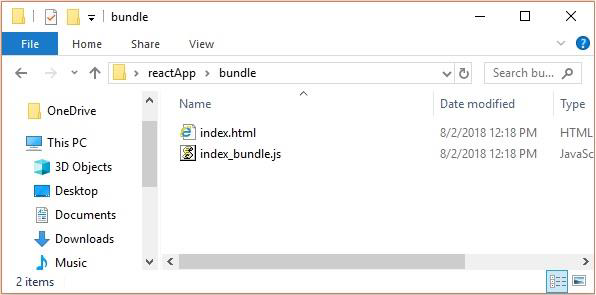
這將在當前資料夾中生成包,如下所示。
使用 create-react-app 命令
您可以透過安裝 create-react-app 來更簡單地安裝 ReactJS,而不是使用 webpack 和 babel。
步驟 1 - 安裝 create-react-app
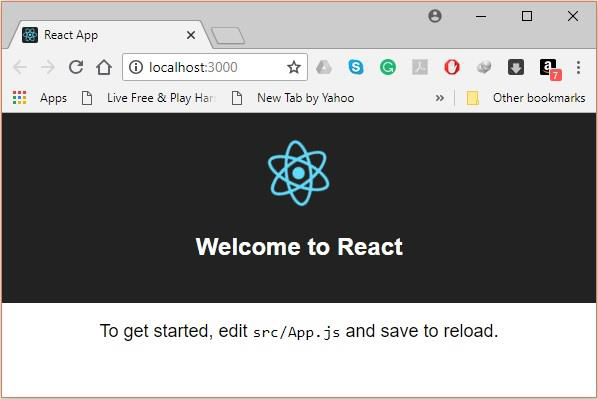
C:\Users\Tutorialspoint>cd C:\Users\Tutorialspoint\Desktop\
C:\Users\Tutorialspoint\Desktop>npx create-react-app my-app
瀏覽桌面,使用如下所示的命令提示符安裝 Create React App:
這將在桌面上建立一個名為 my-app 的資料夾,並在其中安裝所有必需的檔案。
步驟 2 - 刪除所有原始檔
C:\Users\Tutorialspoint\Desktop>cd my-app/src
C:\Users\Tutorialspoint\Desktop\my-app\src>del *
C:\Users\Tutorialspoint\Desktop\my-app\src\*, Are you sure (Y/N)? y
瀏覽生成的 my-app 資料夾中的 src 資料夾,並刪除其中的所有檔案,如下所示:
步驟 3 - 新增檔案
C:\Users\Tutorialspoint\Desktop\my-app\src>type nul > index.css
C:\Users\Tutorialspoint\Desktop\my-app\src>type nul > index.js
在 src 資料夾中新增名為 index.css 和 index.js 的檔案:
import React from 'react';
import ReactDOM from 'react-dom';
import './index.css';
在 index.js 檔案中新增以下程式碼
步驟 4 - 執行專案
npm start