- ReactJS 教程
- ReactJS - 首頁
- ReactJS - 簡介
- ReactJS - 路線圖
- ReactJS - 安裝
- ReactJS - 特性
- ReactJS - 優點與缺點
- ReactJS - 架構
- ReactJS - 建立 React 應用
- ReactJS - JSX
- ReactJS - 元件
- ReactJS - 巢狀元件
- ReactJS - 使用新建立的元件
- ReactJS - 元件集合
- ReactJS - 樣式
- ReactJS - 屬性 (props)
- ReactJS - 使用屬性建立元件
- ReactJS - props 驗證
- ReactJS - 建構函式
- ReactJS - 元件生命週期
- ReactJS - 事件管理
- ReactJS - 建立一個事件感知元件
- ReactJS - 在 Expense Manager 應用中引入事件
- ReactJS - 狀態管理
- ReactJS - 狀態管理 API
- ReactJS - 無狀態元件
- ReactJS - 使用 React Hooks 進行狀態管理
- ReactJS - 使用 React Hooks 進行元件生命週期管理
- ReactJS - 佈局元件
- ReactJS - 分頁
- ReactJS - Material UI
- ReactJS - Http 客戶端程式設計
- ReactJS - 表單程式設計
- ReactJS - 受控元件
- ReactJS - 非受控元件
- ReactJS - Formik
- ReactJS - 條件渲染
- ReactJS - 列表
- ReactJS - Keys
- ReactJS - 路由
- ReactJS - Redux
- ReactJS - 動畫
- ReactJS - Bootstrap
- ReactJS - Map
- ReactJS - 表格
- ReactJS - 使用 Flux 管理狀態
- ReactJS - 測試
- ReactJS - CLI 命令
- ReactJS - 構建和部署
- ReactJS - 示例
- Hooks
- ReactJS - Hooks 簡介
- ReactJS - 使用 useState
- ReactJS - 使用 useEffect
- ReactJS - 使用 useContext
- ReactJS - 使用 useRef
- ReactJS - 使用 useReducer
- ReactJS - 使用 useCallback
- ReactJS - 使用 useMemo
- ReactJS - 自定義 Hooks
- ReactJS 高階
- ReactJS - 可訪問性
- ReactJS - 程式碼分割
- ReactJS - Context
- ReactJS - 錯誤邊界
- ReactJS - 轉發 Refs
- ReactJS - 片段
- ReactJS - 高階元件
- ReactJS - 與其他庫整合
- ReactJS - 效能最佳化
- ReactJS - Profiler API
- ReactJS - Portals
- ReactJS - 無 ES6 ECMAScript 的 React
- ReactJS - 無 JSX 的 React
- ReactJS - 調和
- ReactJS - Refs 和 DOM
- ReactJS - Render Props
- ReactJS - 靜態型別檢查
- ReactJS - Strict Mode
- ReactJS - Web Components
- 其他概念
- ReactJS - 日期選擇器
- ReactJS - Helmet
- ReactJS - 內聯樣式
- ReactJS - PropTypes
- ReactJS - BrowserRouter
- ReactJS - DOM
- ReactJS - 走馬燈
- ReactJS - 圖示
- ReactJS - 表單元件
- ReactJS - 參考 API
- ReactJS 有用資源
- ReactJS - 快速指南
- ReactJS - 有用資源
- ReactJS - 討論
ReactJS - componentDidUpdate() 方法
如今,React 已經成為建立動態和互動式使用者介面的流行庫。React 的一個基本特性是生命週期方法,它允許開發人員控制組件在其生命週期中的行為。因此,我們將重點關注 `componentDidUpdate` 生命週期方法。
什麼是 componentDidUpdate?
componentDidUpdate 是一個 React 函式,當我們的元件使用新資料重新渲染時呼叫。假設我們的元件中任何內容都發生了變化,並且我們想要響應這些變化。它類似於更新後的通知。
重要的是要知道,在元件第一次建立時不會呼叫 componentDidUpdate。只有在第一次渲染後,當我們元件中的某些內容發生更改時(例如接收新資料或 props),才會呼叫它。
語法
componentDidUpdate(prevProps, prevState)
引數
prevProps − 這是更新前元件屬性的快照。可以把它看作是元件更改前的樣子記錄。我們可以將它與當前 props 進行比較,以檢視發生了哪些更改。
prevState − 這是更改前元件狀態的快照,類似於 prevProps。它類似於在元件更改之前記錄元件的狀態。
返回值
componentDidUpdate 方法不返回任何內容。
為什麼要使用 componentDidUpdate?
當我們需要更改網頁文字、處理網路請求或根據更新後的資料調整元件狀態時,此方法很有幫助。
例如,我們正在建立一個聊天應用。因此,當用戶切換到不同的聊天室或 URL 更改時,我們將必須執行一些操作,例如斷開與當前聊天的連線並連線到新的聊天。在這種情況下,`componentDidUpdate` 是正確的選擇。
示例
示例 - 計數器應用
現在我們將使用 `componentDidUpdate` 函式。在這個例子中,我們將建立一個計數器應用,允許使用者增加或減少計數器的值。我們將使用 `componentDidUpdate` 來檢視計數器值是否已更改,然後如果已更改則顯示訊息。
import React, { Component } from "react";

class App extends Component {
   constructor(props) {
      super(props);
      this.state = {
         counter: 0,
         message: ""
      };
   }
   componentDidMount() {
      this.updateMessage();
   }
   componentDidUpdate(prevProps, prevState) {
      if (this.state.counter !== prevState.counter) {
         this.updateMessage();
      }
   }
   updateMessage() {
      if (this.state.counter % 2 === 0) {
         this.setState({
            message: "Counter is even!"
         });
      } else {
         this.setState({
            message: "Counter is not even."
         });
      }
   }
      incrementCounter = () => {
         this.setState((prevState) => ({
            counter: prevState.counter + 1
         }));
      };

      decrementCounter = () => {
      this.setState((prevState) => ({
         counter: prevState.counter - 1
      }));
   };

   render() {
      return (
         <div>
            <h1>Counter Example</h1>
            <p>Counter: {this.state.counter}</p>
            <button onClick={this.incrementCounter}>Increment</button>
            <button onClick={this.decrementCounter}>Decrement</button>
            <p>{this.state.message}</p>
         </div>
      );
   }
}

export default App;
輸出

當我們執行應用程式時,我們將看到兩個按鈕,一個用於遞增,一個用於遞減。當我們點選遞增或遞減按鈕來增加或減少計數器時,訊息會根據計數器是偶數還是奇數而變化。這展示瞭如何使用 `componentDidUpdate` 來響應元件狀態的變化並採取必要的措施。
示例 - 顯示更新的資料
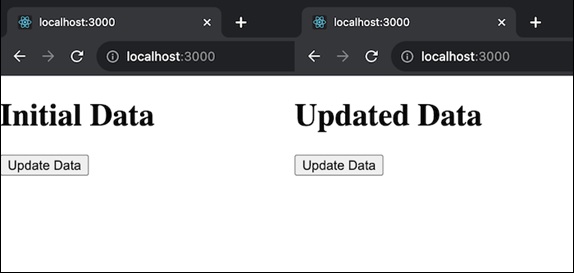
此應用顯示瞭如何使用 `componentDidUpdate` 來響應元件狀態的變化,特別是當資料更新時。因此,我們將初始化一個初始資料狀態。然後在網頁上顯示資料。我們還將提供一個按鈕來更新資料。因此,當資料更新時,它會向控制檯記錄一條訊息。
import React, { Component } from 'react';

class App extends Component {
   constructor(props) {
      super(props);
      this.state = {
         data: 'Initial Data',
      };
   }
   componentDidUpdate(prevProps, prevState) {
      if (prevState.data !== this.state.data) {
         console.log('Data updated:', this.state.data);
      }
   }
   updateData = () => {
      this.setState({ data: 'Updated Data' });
   };
   render() {
      return (
         <div>
            <h1>{this.state.data}</h1>
            <button onClick={this.updateData}>Update Data</button>
         </div>
      );
   }
}

export default App;
輸出

示例 - 動態標題應用
此應用顯示瞭如何使用 `componentDidUpdate` 來根據元件狀態的變化動態更新文件的標題。因此,我們將首先初始化一個初始頁面標題狀態。然後,我們將在網頁上顯示頁面標題。然後,我們將提供一個按鈕來更改標題。當標題更新時,它會動態更改文件標題,並且此更改會記錄到控制檯。
import React, { Component } from 'react';

class App extends Component {
   constructor(props) {
      super(props);
      this.state = {
         pageTitle: 'Initial Title',
      };
   }
   componentDidUpdate(prevProps, prevState) {
      if (prevState.pageTitle !== this.state.pageTitle) {
         document.title = this.state.pageTitle;
      }
   }
   updateTitle = () => {
      this.setState({ pageTitle: 'New Title' });
   };
   render() {
      return (
         <div>
            <h1>{this.state.pageTitle}</h1>
            <button onClick={this.updateTitle}>Change Title</button>
         </div>
      );
   }
}

export default App;
輸出

注意
如果我們想要阻止呼叫 `componentDidUpdate`,可以使用 `shouldComponentUpdate` 函式並返回 false。如果我們需要控制何時發生更新,這將非常有用。
確保避免建立無限迴圈。我們應該在 `componentDidUpdate` 中使用條件來確定我們是否真的需要在更新後執行任何操作。如果我們避免這樣做,我們的元件可能會無限期地繼續更新。
如果可能,避免在 `componentDidUpdate` 中使用 `setState`。它可能會導致額外的渲染,這在某些情況下會影響效能。
總結
componentDidUpdate 是一個在我們的元件更新後呼叫的 React 函式。它就像一條訊息,顯示我們的元件中某些內容已更改,我們可以對該更改做出反應。我們可以透過將先前的資料(props 和狀態)與當前資料進行比較來選擇下一步要執行的操作。