- Windows 10 開發教程
- Windows 10 - 家庭版
- Windows 10 - 簡介
- Windows 10 – UWP
- Windows 10 – 第一個應用
- Windows 10 - 應用商店
- Windows 10 - XAML 控制元件
- Windows 10 - 資料繫結
- Windows 10 - XAML 效能
- Windows 10 - 自適應設計
- Windows 10 - 自適應UI
- Windows 10 - 自適應程式碼
- Windows 10 - 檔案管理
- Windows 10 - SQLite 資料庫
- Windows 10 – 通訊
- Windows 10 - 應用本地化
- Windows 10 - 應用生命週期
- Windows 10 - 後臺執行
- Windows 10 - 應用服務
- Windows 10 - Web 平臺
- Windows 10 - 連線體驗
- Windows 10 - 導航
- Windows 10 - 網路
- Windows 10 - 雲服務
- Windows 10 - 動態磁貼
- Windows 10 - 共享契約
- Windows 10 - 移植到 Windows
- Windows 10 有用資源
- Windows 10 - 快速指南
- Windows 10 - 有用資源
- Windows 10 - 討論
Windows 10 開發 - 服務
本章將學習 UWP 應用如何幫助或提供服務給其他通用 Windows 平臺 (UWP) 應用。實際上,本章是對後臺執行章節的擴充套件,是其一個特例。
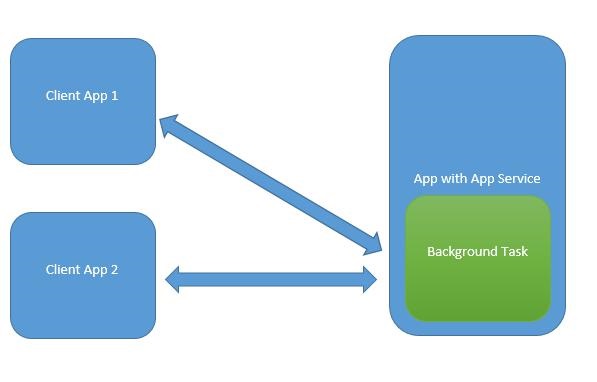
在 Windows 10 中,應用服務是一種允許應用向其他應用提供服務的方式或機制。
應用服務以後臺任務的形式執行。
前臺應用可以呼叫另一個應用中的應用服務來執行後臺任務。
應用服務類似於 Web 服務,但應用服務用於 Windows 10 裝置。
通用 Windows 平臺 (UWP) 應用可以透過多種方式與其他 UWP 應用互動:
- 使用 LaunchUriAsync 的 URI 關聯
- 使用 LaunchFileAsync 的檔案關聯
- 使用 LaunchUriForResultsAsync 啟動以獲取結果
- 應用服務
前三種方式用於兩個應用都處於前臺的情況,而應用服務則用於後臺任務,在這種情況下,客戶端應用必須處於前臺並可用以使用應用服務。
應用服務在提供非視覺化服務的應用中非常有用,例如條形碼掃描器,其中前臺應用將拍攝影像並將這些位元組傳送到應用服務以識別條形碼。
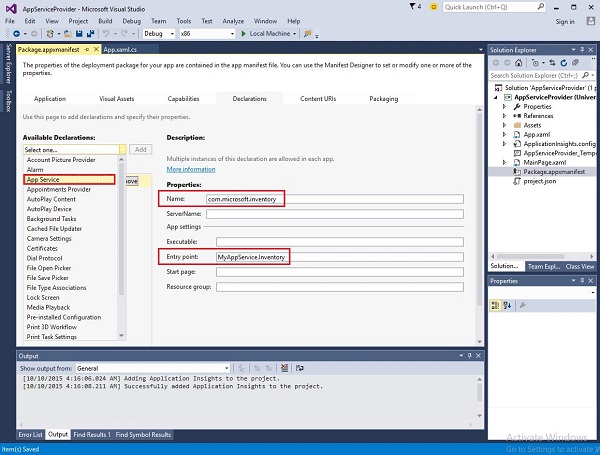
為了理解所有這些概念,讓我們在 Microsoft Visual Studio 2015 中建立一個名為AppServiceProvider 的新的 UWP 專案。
現在在Package.appmanifest 檔案中,新增以下資訊。
要建立一個可以被前臺應用程式呼叫的應用服務,讓我們向解決方案新增一個新的Windows 執行時元件專案,命名為MyAppService,因為應用服務是作為後臺任務實現的。
在AppServiceProvider 專案中新增對MyAppService 專案的引用。
現在從MyAppService 專案中刪除class1.cs 檔案,並新增一個具有清單名稱的新類,該類將實現IBackgroundTask 介面。
IBackgroundTask 介面只有一個方法“Run”,需要為後臺任務實現該方法。
public sealed class Inventory : IBackgroundTask {
   public void Run(IBackgroundTaskInstance taskInstance) {

   }
}
建立後臺任務時,將呼叫Run() 方法,當 Run 方法完成時,後臺任務將終止。為了使後臺任務保持活動狀態以服務請求,程式碼會獲取一個延遲物件。
應用服務的程式碼位於OnRequestedReceived() 中。在此示例中,庫存項的索引傳遞給服務,以檢索指定庫存項的名稱和價格。
private async void OnRequestReceived(AppServiceConnection sender,
   AppServiceRequestReceivedEventArgs args) {
      // Get a deferral because we use an awaitable API below to respond to the message
}
以下是 C# 中 Inventory 類的完整實現。
using System;
using System.Collections.Generic;
using System.Linq;
using System.Text;
using System.Threading.Tasks;

using Windows.ApplicationModel.AppService;
using Windows.ApplicationModel.Background;
using Windows.Foundation.Collections;

namespace MyAppService{
   public sealed class Inventory : IBackgroundTask {

      private BackgroundTaskDeferral backgroundTaskDeferral;
      private AppServiceConnection appServiceconnection;

      private String[] inventoryItems = new string[] { "Robot vacuum", "Chair" };
      private double[] inventoryPrices = new double[] { 129.99, 88.99 };

      public void Run(IBackgroundTaskInstance taskInstance) {
         this.backgroundTaskDeferral = taskInstance.GetDeferral();
         taskInstance.Canceled += OnTaskCanceled;
         var details = taskInstance.TriggerDetails as AppServiceTriggerDetails;

         appServiceconnection = details.AppServiceConnection;
         appServiceconnection.RequestReceived += OnRequestReceived;
      }

      private async void OnRequestReceived(AppServiceConnection sender,
         AppServiceRequestReceivedEventArgs args) {

            var messageDeferral = args.GetDeferral();
            ValueSet message = args.Request.Message;
            ValueSet returnData = new ValueSet();

            string command = message["Command"] as string;
            int? inventoryIndex = message["ID"] as int?;
            if (inventoryIndex.HasValue &&

            inventoryIndex.Value >= 0 &&
            inventoryIndex.Value < inventoryItems.GetLength(0)) {

               switch (command) {

                  case "Price": {
                     returnData.Add("Result", inventoryPrices[inventoryIndex.Value]);
                     returnData.Add("Status", "OK");
                     break;
                  }

                  case "Item": {
                     returnData.Add("Result", inventoryItems[inventoryIndex.Value]);
                     returnData.Add("Status", "OK");
                     break;
                  }

                  default: {
                     returnData.Add("Status", "Fail: unknown command");
                     break;
                  }
               } else {
                  returnData.Add("Status", "Fail: Index out of range");
               }
            }
            await args.Request.SendResponseAsync(returnData);
            messageDeferral.Complete();
      }

      private void OnTaskCanceled(IBackgroundTaskInstance sender,
         BackgroundTaskCancellationReason reason){
            if (this.backgroundTaskDeferral != null) {
               // Complete the service deferral.
               this.backgroundTaskDeferral.Complete();
            }
      }
   }
}
讓我們透過新增一個新的空白 UWP 專案ClientApp 來建立一個客戶端應用,並新增一個按鈕、一個文字框和兩個文字塊,如下所示 XAML 檔案。
<Page
   x:Class = "ClientApp.MainPage"
   xmlns = "http://schemas.microsoft.com/winfx/2006/xaml/presentation"
   xmlns:x = "http://schemas.microsoft.com/winfx/2006/xaml"
   xmlns:local = "using:ClientApp"
   xmlns:d = "http://schemas.microsoft.com/expression/blend/2008"
   xmlns:mc = "http://schemas.openxmlformats.org/markup-compatibility/2006"
   mc:Ignorable = "d">

   <Grid Background = "{ThemeResource ApplicationPageBackgroundThemeBrush}">
      <TextBlock HorizontalAlignment = "Left" Text = "Enter Item No."
         Margin = "52,40,0,0" TextWrapping = "Wrap"
         VerticalAlignment = "Top" Height = "32" Width = "268"/>

      <Button x:Name = "button" Content = "Get Info" HorizontalAlignment = "Left"
         Margin = "255,96,0,0" VerticalAlignment = "Top" Click = "button_Click"/>

      <TextBox x:Name = "textBox" HorizontalAlignment = "Left" Margin = "52,96,0,0"
         TextWrapping = "Wrap" VerticalAlignment = "Top" Width = "168"/>

      <TextBlock x:Name = "textBlock" HorizontalAlignment = "Left"
         Margin = "52,190,0,0" TextWrapping = "Wrap"
         VerticalAlignment = "Top" Height = "32" Width = "268"/>
   </Grid>

</Page>
以下是請求應用服務的按鈕單擊事件實現。
using System;

using Windows.ApplicationModel.AppService;
using Windows.Foundation.Collections;

using Windows.UI.Xaml;
using Windows.UI.Xaml.Controls;

// The Blank Page item template is documented at
   http://go.microsoft.com/fwlink/?LinkId=402352&clcid=0x409

namespace ClientApp {

   /// <summary>
      /// An empty page that can be used on its own or navigated to within a Frame.
   /// </summary>

   public sealed partial class MainPage : Page {

      private AppServiceConnection inventoryService;

      public MainPage() {
         this.InitializeComponent();
      }

      private async void button_Click(object sender, RoutedEventArgs e){

         // Add the connection.
         if (this.inventoryService == null) {

            this.inventoryService = new AppServiceConnection();
            this.inventoryService.AppServiceName = "com.microsoft.inventory";
            this.inventoryService.PackageFamilyName =
               "bb1a8478-8005-46869923-e525ceaa26fc_4sz2ag3dcq60a";

            var status = await this.inventoryService.OpenAsync();

            if (status != AppServiceConnectionStatus.Success) {
               button.Content = "Failed to connect";
               return;
            }
         }

         // Call the service.
         int idx = int.Parse(textBox.Text);
         var message = new ValueSet();

         message.Add("Command", "Item");
         message.Add("ID", idx);

         AppServiceResponse response = await
            this.inventoryService.SendMessageAsync(message);
         string result = "";

         if (response.Status == AppServiceResponseStatus.Success) {
            // Get the data  that the service sent  to us.
            if (response.Message["Status"] as string == "OK") {
               result = response.Message["Result"] as string;
            }
         }

         message.Clear();
         message.Add("Command", "Price");
         message.Add("ID", idx);

         response = await this.inventoryService.SendMessageAsync(message);

         if (response.Status == AppServiceResponseStatus.Success){
            // Get the data that the service sent to us.
            if (response.Message["Status"] as string == "OK") {
               result += " : Price = " + "$"+ response.Message["Result"] as string;
            }
         }

         textBlock.Text = result;
      }
   }
}
要執行此應用程式,您需要在解決方案資源管理器中將ClientApp 專案設定為啟動專案,然後從生成>部署解決方案部署此解決方案。
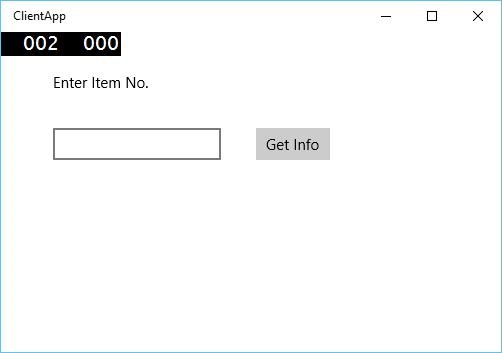
編譯並執行上述程式碼後,您將看到以下視窗。在應用服務中,我們只添加了兩個專案的資料。因此,您可以輸入 0 或 1 來獲取這些專案的資料。
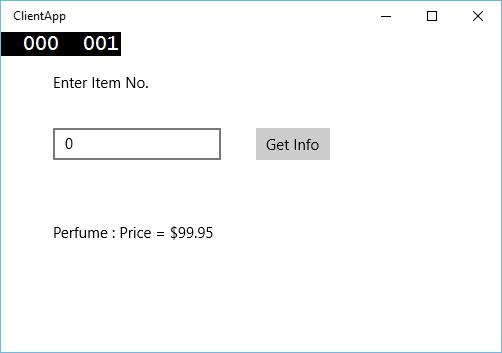
當您輸入 0 並單擊按鈕時,它將執行應用服務作為後臺任務,並在文字塊上顯示專案資訊。