- Java 數字影像處理
- 數字影像處理 - 首頁
- 數字影像處理 - 簡介
- 數字影像處理 - Java BufferedImage 類
- 數字影像處理 - 圖片下載與上傳
- 數字影像處理 - 圖片畫素
- 數字影像處理 - 灰度轉換
- 數字影像處理 - 增強影像對比度
- 數字影像處理 - 增強影像亮度
- 數字影像處理 - 增強影像銳度
- 數字影像處理 - 影像壓縮技術
- 數字影像處理 - 新增影像邊框
- 數字影像處理 - 影像金字塔
- 數字影像處理 - 基本閾值化
- 數字影像處理 - 影像形狀轉換
- 數字影像處理 - 高斯濾波器
- 數字影像處理 - 方框濾波器
- 數字影像處理 - 腐蝕與膨脹
- 數字影像處理 - 水印
- 數字影像處理 - 卷積理解
- 數字影像處理 - Prewitt 運算元
- 數字影像處理 - Sobel 運算元
- 數字影像處理 - Kirsch 運算元
- 數字影像處理 - Robinson 運算元
- 數字影像處理 - Laplacian 運算元
- 數字影像處理 - 加權平均濾波器
- 數字影像處理 - 建立縮放效果
- 數字影像處理 - 開源庫
- 數字影像處理 - OpenCV 簡介
- 數字影像處理 - OpenCV 灰度轉換
- 數字影像處理 - 顏色空間轉換
- 數字影像處理 有用資源
- 數字影像處理 - 快速指南
- 數字影像處理 - 有用資源
- 數字影像處理 - 討論
Java 數字影像處理 - 應用方框濾波器
我們應用方框濾波器來模糊影像。方框濾波器的尺寸可以是 3x3、5x5、9x9 等。
我們使用OpenCV 函式filter2D 將方框濾波器應用於影像。它可以在Imgproc 包中找到。其語法如下:
filter2D(src, dst, depth , kernel, anchor, delta, BORDER_DEFAULT );
函式引數描述如下:
| 序號 | 引數及說明 |
|---|---|
| 1 |
src 源影像。 |
| 2 |
dst 目標影像。 |
| 3 |
depth dst 的深度。負值(例如 -1)表示深度與源影像相同。 |
| 4 |
kernel 掃描影像的核心。 |
| 5 |
anchor 錨點相對於其核心的位置。預設情況下,Point(-1, -1) 表示中心。 |
| 6 |
delta 在卷積期間新增到每個畫素的值。預設值為 0。 |
| 7 |
BORDER_DEFAULT 我們使用預設值。 |
除了 filter2D() 方法外,Imgproc 類還提供了其他方法。簡要描述如下:
| 序號 | 方法及說明 |
|---|---|
| 1 |
cvtColor(Mat src, Mat dst, int code, int dstCn) 將影像從一種顏色空間轉換為另一種顏色空間。 |
| 2 |
dilate(Mat src, Mat dst, Mat kernel) 使用特定的結構元素膨脹影像。 |
| 3 |
equalizeHist(Mat src, Mat dst) 均衡灰度影像的直方圖。 |
| 4 |
filter2D(Mat src, Mat dst, int depth, Mat kernel, Point anchor, double delta) 用核心對影像進行卷積。 |
| 5 |
GaussianBlur(Mat src, Mat dst, Size ksize, double sigmaX) 使用高斯濾波器模糊影像。 |
| 6 |
integral(Mat src, Mat sum) 計算影像的積分。 |
示例
以下示例演示瞭如何使用 Imgproc 類將方框濾波器應用於灰度影像。
import org.opencv.core.Core;
import org.opencv.core.CvType;
import org.opencv.core.Mat;

import org.opencv.highgui.Highgui;
import org.opencv.imgproc.Imgproc;

public class convolution {
   public static void main( String[] args ) {

      try {
         int kernelSize = 9;
         System.loadLibrary( Core.NATIVE_LIBRARY_NAME );

         Mat source = Highgui.imread("grayscale.jpg",  Highgui.CV_LOAD_IMAGE_GRAYSCALE);
         Mat destination = new Mat(source.rows(),source.cols(),source.type());
         Mat kernel = Mat.ones(kernelSize,kernelSize, CvType.CV_32F);

         for(int i=0; i<kernel.rows(); i++) {
            for(int j=0; j<kernel.cols(); j++) {

               double[] m = kernel.get(i, j);

               for(int k =0; k<m.length; k++) {
                  m[k] = m[k]/(kernelSize * kernelSize);
               }
               kernel.put(i,j, m);
            }
         }

         Imgproc.filter2D(source, destination, -1, kernel);
         Highgui.imwrite("output.jpg", destination);

      } catch (Exception e) {
         System.out.println("Error: " + e.getMessage());
      }
   }
}
輸出
執行給定程式碼後,將看到以下輸出:
原始影像
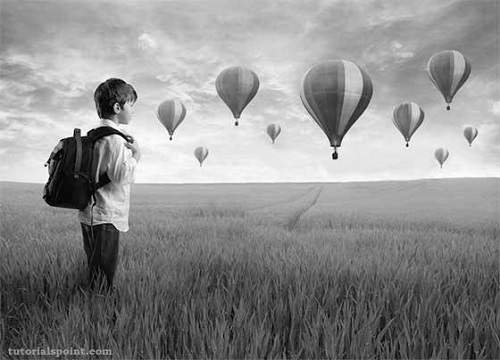
在這個例子中,我們用下面的濾波器(核心)對我們的影像進行卷積。隨著濾波器尺寸的增加,此濾波器會導致影像模糊。
這張原始影像已經與大小為 5 的方框濾波器進行了卷積,如下所示:
大小為 5 的方框濾波器
| 1/25 | 1/25 | 1/25 | 1/25 | 1/25 |
| 1/25 | 1/25 | 1/25 | 1/25 | 1/25 |
| 1/25 | 1/25 | 1/25 | 1/25 | 1/25 |
| 1/25 | 1/25 | 1/25 | 1/25 | 1/25 |
| 1/25 | 1/25 | 1/25 | 1/25 | 1/25 |
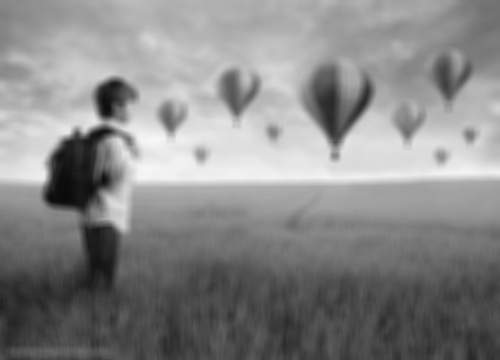
卷積後的影像(使用大小為 5 的方框濾波器)

卷積後的影像(使用大小為 9 的方框濾波器)