- Python基礎
- Python - 首頁
- Python - 概述
- Python - 歷史
- Python - 特性
- Python vs C++
- Python - Hello World程式
- Python - 應用領域
- Python - 直譯器
- Python - 環境設定
- Python - 虛擬環境
- Python - 基本語法
- Python - 變數
- Python - 資料型別
- Python - 型別轉換
- Python - Unicode系統
- Python - 字面量
- Python - 運算子
- Python - 算術運算子
- Python - 比較運算子
- Python - 賦值運算子
- Python - 邏輯運算子
- Python - 位運算子
- Python - 成員運算子
- Python - 身份運算子
- Python - 運算子優先順序
- Python - 註釋
- Python - 使用者輸入
- Python - 數字
- Python - 布林值
- Python控制語句
- Python - 控制流
- Python - 決策
- Python - if語句
- Python - if else
- Python - 巢狀if
- Python - match-case語句
- Python - 迴圈
- Python - for迴圈
- Python - for-else迴圈
- Python - while迴圈
- Python - break語句
- Python - continue語句
- Python - pass語句
- Python - 巢狀迴圈
- Python函式與模組
- Python - 函式
- Python - 預設引數
- Python - 關鍵字引數
- Python - 僅關鍵字引數
- Python - 位置引數
- Python - 僅位置引數
- Python - 可變引數
- Python - 變數作用域
- Python - 函式註解
- Python - 模組
- Python - 內建函式
- Python字串
- Python - 字串
- Python - 字串切片
- Python - 修改字串
- Python - 字串連線
- Python - 字串格式化
- Python - 跳脫字元
- Python - 字串方法
- Python - 字串練習
- Python列表
- Python - 列表
- Python - 訪問列表元素
- Python - 修改列表元素
- Python - 新增列表元素
- Python - 刪除列表元素
- Python - 遍歷列表
- Python - 列表推導式
- Python - 排序列表
- Python - 複製列表
- Python - 合併列表
- Python - 列表方法
- Python - 列表練習
- Python元組
- Python - 元組
- Python - 訪問元組元素
- Python - 更新元組
- Python - 解包元組
- Python - 遍歷元組
- Python - 合併元組
- Python - 元組方法
- Python - 元組練習
- Python集合
- Python - 集合
- Python - 訪問集合元素
- Python - 新增集合元素
- Python - 刪除集合元素
- Python - 遍歷集合
- Python - 合併集合
- Python - 複製集合
- Python - 集合運算子
- Python - 集合方法
- Python - 集合練習
- Python字典
- Python - 字典
- Python - 訪問字典元素
- Python - 修改字典元素
- Python - 新增字典元素
- Python - 刪除字典元素
- Python - 字典檢視物件
- Python - 遍歷字典
- Python - 複製字典
- Python - 巢狀字典
- Python - 字典方法
- Python - 字典練習
- Python陣列
- Python - 陣列
- Python - 訪問陣列元素
- Python - 新增陣列元素
- Python - 刪除陣列元素
- Python - 遍歷陣列
- Python - 複製陣列
- Python - 反轉陣列
- Python - 排序陣列
- Python - 合併陣列
- Python - 陣列方法
- Python - 陣列練習
- Python檔案處理
- Python - 檔案處理
- Python - 寫入檔案
- Python - 讀取檔案
- Python - 重新命名和刪除檔案
- Python - 目錄
- Python - 檔案方法
- Python - OS檔案/目錄方法
- Python - OS路徑方法
- 面向物件程式設計
- Python - OOPs概念
- Python - 類與物件
- Python - 類屬性
- Python - 類方法
- Python - 靜態方法
- Python - 建構函式
- Python - 訪問修飾符
- Python - 繼承
- Python - 多型
- Python - 方法重寫
- Python - 方法過載
- Python - 動態繫結
- Python - 動態型別
- Python - 抽象
- Python - 封裝
- Python - 介面
- Python - 包
- Python - 內部類
- Python - 匿名類和物件
- Python - 單例類
- Python - 包裝類
- Python - 列舉
- Python - 反射
- Python錯誤與異常
- Python - 語法錯誤
- Python - 異常
- Python - try-except塊
- Python - try-finally塊
- Python - 丟擲異常
- Python - 異常鏈
- Python - 巢狀try塊
- Python - 使用者自定義異常
- Python - 日誌記錄
- Python - 斷言
- Python - 內建異常
- Python多執行緒
- Python - 多執行緒
- Python - 執行緒生命週期
- Python - 建立執行緒
- Python - 啟動執行緒
- Python - 連線執行緒
- Python - 執行緒命名
- Python - 執行緒排程
- Python - 執行緒池
- Python - 主執行緒
- Python - 執行緒優先順序
- Python - 守護執行緒
- Python - 執行緒同步
- Python同步
- Python - 執行緒間通訊
- Python - 執行緒死鎖
- Python - 中斷執行緒
- Python網路程式設計
- Python - 網路程式設計
- Python - 套接字程式設計
- Python - URL處理
- Python - 泛型
- Python庫
- NumPy教程
- Pandas教程
- SciPy教程
- Matplotlib教程
- Django教程
- OpenCV教程
- Python雜項
- Python - 日期與時間
- Python - 數學
- Python - 迭代器
- Python - 生成器
- Python - 閉包
- Python - 裝飾器
- Python - 遞迴
- Python - 正則表示式
- Python - PIP
- Python - 資料庫訪問
- Python - 弱引用
- Python - 序列化
- Python - 模板
- Python - 輸出格式化
- Python - 效能測量
- Python - 資料壓縮
- Python - CGI程式設計
- Python - XML處理
- Python - GUI程式設計
- Python - 命令列引數
- Python - 文件字串
- Python - JSON
- Python - 傳送郵件
- Python - 擴充套件
- Python - 工具/實用程式
- Python - GUIs
- Python高階概念
- Python - 抽象基類
- Python - 自定義異常
- Python - 高階函式
- Python - 物件內部
- Python - 記憶體管理
- Python - 元類
- Python - 使用元類進行超程式設計
- Python - 模擬和存根
- Python - 猴子補丁
- Python - 訊號處理
- Python - 型別提示
- Python - 自動化教程
- Python - Humanize包
- Python - 上下文管理器
- Python - 協程
- Python - 描述符
- Python - 診斷和修復記憶體洩漏
- Python - 不可變資料結構
- Python有用資源
- Python - 問答
- Python - 線上測驗
- Python - 快速指南
- Python - 參考
- Python - 速查表
- Python - 專案
- Python - 有用資源
- Python - 討論
- Python編譯器
- NumPy編譯器
- Matplotlib編譯器
- SciPy編譯器
使用Python建立螢幕錄製器
使用此螢幕錄製器程式碼,可以錄製計算機桌面,然後使用Python語言將錄製內容儲存為影片。此工具使用不同的庫,例如用於捕獲螢幕的**pyautogui**,用於寫入和顯示影片的**cv2**以及用於影像處理的**numpy**。最終結果是一個原始影片檔案,以每秒60幀的幀率記錄10秒的即時螢幕活動。
所需庫
- **PyAutoGUI** − 此庫用於擷取螢幕截圖。
- **OpenCV (cv2)** − OpenCV(開放計算機視覺庫)用於處理影像和寫入影片檔案。
- **NumPy** − NumPy用於將影像資料處理為陣列。
安裝庫
要安裝這些庫,請使用PIP執行以下命令:
pip install pyautogui opencv-python-headless numpy
建立螢幕錄製器的步驟
步驟1:匯入庫
第一步是匯入所需的庫。使用以下程式碼語句匯入庫:
import pyautogui
import cv2
import numpy as np
步驟2:設定螢幕解析度並定義影片屬性
使用以下程式碼語句設定螢幕解析度並定義影片屬性:
screen_resolution = (1920, 1080)
video_codec = cv2.VideoWriter_fourcc(*"XVID")
output_filename = "ScreenCapture.avi"
frame_rate = 60.0
num_frames = int(frame_rate * 10)  # Capturing for 10 seconds
步驟3:初始化影片寫入器
使用以下程式碼語句**初始化影片寫入器**:
video_writer = cv2.VideoWriter(output_filename, video_codec, frame_rate, screen_resolution)
步驟4:建立顯示視窗
使用以下程式碼語句建立顯示視窗:
cv2.namedWindow("Screen Capture", cv2.WINDOW_NORMAL)
cv2.resizeWindow("Screen Capture", 480, 270)
步驟5:開始捕獲幀
使用迴圈捕獲幀,使用以下程式碼語句:
for _ in range(num_frames):
   screenshot = pyautogui.screenshot()
   frame_array = np.array(screenshot)
   frame_rgb = cv2.cvtColor(frame_array, cv2.COLOR_BGR2RGB)
   video_writer.write(frame_rgb)
   cv2.imshow("Screen Capture", frame_rgb)

   if cv2.waitKey(1) == ord('q'):
      break
步驟6:釋放資源並關閉視窗
使用以下程式碼釋放資源並關閉視窗:
video_writer.release()
cv2.destroyAllWindows()
建立螢幕錄製器的Python程式碼
import pyautogui
import cv2
import numpy as np

# Set the screen resolution
screen_resolution = (1920, 1080)

# Define the video codec
video_codec = cv2.VideoWriter_fourcc(*"XVID")

# Name the output video file
output_filename = "ScreenCapture.avi"

# Set the frames per second (fps)
frame_rate = 60.0

# Set the number of frames to capture
num_frames = int(frame_rate * 10)  # Capturing for 10 seconds

# Initialize the VideoWriter object
video_writer = cv2.VideoWriter(output_filename, video_codec, frame_rate, screen_resolution)

# Create a window named 'Screen Capture'
cv2.namedWindow("Screen Capture", cv2.WINDOW_NORMAL)

# Adjust the window size
cv2.resizeWindow("Screen Capture", 480, 270)

# Start capturing the screen
for _ in range(num_frames):
   # Capture the screen using PyAutoGUI
   screenshot = pyautogui.screenshot()

   # Convert the captured image to a numpy array
   frame_array = np.array(screenshot)

   # Convert the color from BGR to RGB
   frame_rgb = cv2.cvtColor(frame_array, cv2.COLOR_BGR2RGB)

   # Write the frame to the video file
   video_writer.write(frame_rgb)

   # Display the captured frame in the window
   cv2.imshow("Screen Capture", frame_rgb)

   # Stop the recording if the 'q' key is pressed
   if cv2.waitKey(1) == ord('q'):
      break

# Release the video writer object
video_writer.release()

# Close all OpenCV windows
cv2.destroyAllWindows()
輸出
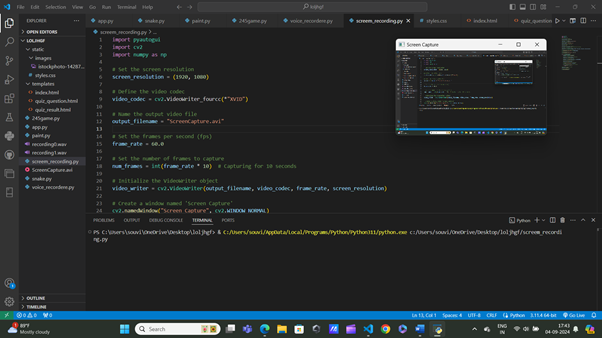
執行程式後,您將看到即時捕獲框

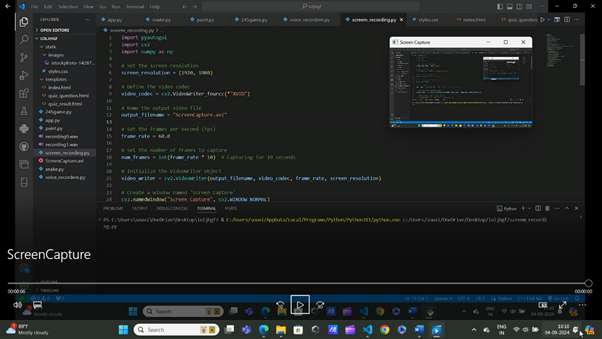
關閉選項卡後,您將看到AVI檔案已自動儲存:

現在檢查您的檔案,使用您的影片播放器開啟它,例如Windows Films & TV應用程式:

此程式碼的輸出是一個名為ScreenCapture.avi的影片檔案,它以每秒60幀的幀率捕獲10秒的螢幕活動。您可以使用任何支援AVI格式的影片播放器觀看此檔案。
程式碼解釋
1. 捕獲螢幕
從本質上講,指令碼最重要的任務是寫入螢幕內容。這是透過在不同時間點擷取螢幕截圖來完成的,這些截圖包含正在考慮的應用程式。
2. 擷取螢幕截圖
**pyautogui**庫用於捕獲給定網站的螢幕截圖。使用**PyAutoGUI**捕獲整個螢幕或其特定部分非常簡單。
3. 指定幀率
螢幕截圖以指定的幀率捕獲,這是儲存在變數frame_rate中的值。在本例中,它設定為每秒60幀(fps)。這有助於使影片沒有抖動,並使運動平滑。
4. 將螢幕截圖儲存為影片
如前所述,螢幕截圖不是單獨儲存的,而是以影片檔案的形式儲存。這是使用cv2庫(OpenCV)實現的,該庫具有影片寫入和處理功能。
5. 處理影片寫入和顯示
然後使用cv2建立一個影片檔案,通常稱為VideoWriter物件,用於將每個螢幕截圖作為幀新增到影片中。它還控制在捕獲過程中影片在視窗中的顯示方式。
6. 使用NumPy處理影像資料
OpenCV無法讀取**PyAutoGUI**捕獲的螢幕截圖,因此需要使用**numpy**庫將捕獲的格式轉換為**OpenCV**可接受的格式。這種轉換對於影像資料至關重要,以便不同的庫可以共享它們。
7. 程式化錄製和視覺化
透過指令碼,可以實現自動錄製螢幕活動而無需手動錄製。PyAutoGUI、NumPy、OpenCV等庫使捕獲螢幕並生成影片變得更容易和自動化。
8. 指令碼結構
指令碼使用迴圈在設定的時間段內(例如10秒)連續擷取螢幕截圖,然後使用影片轉換工具將截圖轉換為所需格式,並寫入影片檔案。
9. 捕獲期間顯示
指令碼還提供了一個視窗,用於在指令碼執行過程中顯示正在捕獲的畫面。這允許使用者即時檢視正在錄製的內容。
10. 最終影片輸出
錄製完成後,指令碼將所有捕獲的幀儲存到指定的影片檔案中,從而生成一段連續的螢幕活動影片。