- Python 基礎
- Python - 首頁
- Python - 概述
- Python - 歷史
- Python - 特性
- Python 與 C++
- Python - Hello World 程式
- Python - 應用領域
- Python - 直譯器
- Python - 環境搭建
- Python - 虛擬環境
- Python - 基本語法
- Python - 變數
- Python - 資料型別
- Python - 型別轉換
- Python - Unicode 系統
- Python - 字面量
- Python - 運算子
- Python - 算術運算子
- Python - 比較運算子
- Python - 賦值運算子
- Python - 邏輯運算子
- Python - 位運算子
- Python - 成員運算子
- Python - 身份運算子
- Python - 運算子優先順序
- Python - 註釋
- Python - 使用者輸入
- Python - 數字
- Python - 布林值
- Python 控制語句
- Python - 控制流
- Python - 決策
- Python - if 語句
- Python - if else
- Python - 巢狀 if
- Python - Match-Case 語句
- Python - 迴圈
- Python - for 迴圈
- Python - for-else 迴圈
- Python - while 迴圈
- Python - break 語句
- Python - continue 語句
- Python - pass 語句
- Python - 巢狀迴圈
- Python 函式和模組
- Python - 函式
- Python - 預設引數
- Python - 關鍵字引數
- Python - 僅關鍵字引數
- Python - 位置引數
- Python - 僅位置引數
- Python - 可變引數
- Python - 變數作用域
- Python - 函式註解
- Python - 模組
- Python - 內建函式
- Python 字串
- Python - 字串
- Python - 字串切片
- Python - 修改字串
- Python - 字串連線
- Python - 字串格式化
- Python - 跳脫字元
- Python - 字串方法
- Python - 字串練習
- Python 列表
- Python - 列表
- Python - 訪問列表元素
- Python - 修改列表元素
- Python - 新增列表元素
- Python - 刪除列表元素
- Python - 遍歷列表
- Python - 列表推導式
- Python - 排序列表
- Python - 複製列表
- Python - 合併列表
- Python - 列表方法
- Python - 列表練習
- Python 元組
- Python - 元組
- Python - 訪問元組元素
- Python - 更新元組
- Python - 解包元組
- Python - 遍歷元組
- Python - 合併元組
- Python - 元組方法
- Python - 元組練習
- Python 集合
- Python - 集合
- Python - 訪問集合元素
- Python - 新增集合元素
- Python - 刪除集合元素
- Python - 遍歷集合
- Python - 合併集合
- Python - 複製集合
- Python - 集合運算子
- Python - 集合方法
- Python - 集合練習
- Python 字典
- Python - 字典
- Python - 訪問字典元素
- Python - 修改字典元素
- Python - 新增字典元素
- Python - 刪除字典元素
- Python - 字典檢視物件
- Python - 遍歷字典
- Python - 複製字典
- Python - 巢狀字典
- Python - 字典方法
- Python - 字典練習
- Python 陣列
- Python - 陣列
- Python - 訪問陣列元素
- Python - 新增陣列元素
- Python - 刪除陣列元素
- Python - 遍歷陣列
- Python - 複製陣列
- Python - 反轉陣列
- Python - 排序陣列
- Python - 合併陣列
- Python - 陣列方法
- Python - 陣列練習
- Python 檔案處理
- Python - 檔案處理
- Python - 寫入檔案
- Python - 讀取檔案
- Python - 重新命名和刪除檔案
- Python - 目錄
- Python - 檔案方法
- Python - OS 檔案/目錄方法
- Python - OS 路徑方法
- 面向物件程式設計
- Python - OOPs 概念
- Python - 類和物件
- Python - 類屬性
- Python - 類方法
- Python - 靜態方法
- Python - 建構函式
- Python - 訪問修飾符
- Python - 繼承
- Python - 多型
- Python - 方法重寫
- Python - 方法過載
- Python - 動態繫結
- Python - 動態型別
- Python - 抽象
- Python - 封裝
- Python - 介面
- Python - 包
- Python - 內部類
- Python - 匿名類和物件
- Python - 單例類
- Python - 包裝類
- Python - 列舉
- Python - 反射
- Python 錯誤和異常
- Python - 語法錯誤
- Python - 異常
- Python - try-except 塊
- Python - try-finally 塊
- Python - 丟擲異常
- Python - 異常鏈
- Python - 巢狀 try 塊
- Python - 使用者自定義異常
- Python - 日誌記錄
- Python - 斷言
- Python - 內建異常
- Python 多執行緒
- Python - 多執行緒
- Python - 執行緒生命週期
- Python - 建立執行緒
- Python - 啟動執行緒
- Python - 加入執行緒
- Python - 執行緒命名
- Python - 執行緒排程
- Python - 執行緒池
- Python - 主執行緒
- Python - 執行緒優先順序
- Python - 守護執行緒
- Python - 執行緒同步
- Python 同步
- Python - 執行緒間通訊
- Python - 執行緒死鎖
- Python - 中斷執行緒
- Python 網路程式設計
- Python - 網路程式設計
- Python - Socket 程式設計
- Python - URL 處理
- Python - 泛型
- Python 庫
- NumPy 教程
- Pandas 教程
- SciPy 教程
- Matplotlib 教程
- Django 教程
- OpenCV 教程
- Python 雜項
- Python - 日期和時間
- Python - 數學
- Python - 迭代器
- Python - 生成器
- Python - 閉包
- Python - 裝飾器
- Python - 遞迴
- Python - 正則表示式
- Python - PIP
- Python - 資料庫訪問
- Python - 弱引用
- Python - 序列化
- Python - 模板
- Python - 輸出格式化
- Python - 效能測量
- Python - 資料壓縮
- Python - CGI 程式設計
- Python - XML 處理
- Python - GUI 程式設計
- Python - 命令列引數
- Python - 文件字串
- Python - JSON
- Python - 傳送電子郵件
- Python - 擴充套件
- Python - 工具/實用程式
- Python - GUIs
- Python 高階概念
- Python - 抽象基類
- Python - 自定義異常
- Python - 高階函式
- Python - 物件內部
- Python - 記憶體管理
- Python - 元類
- Python - 使用元類進行超程式設計
- Python - 模擬和存根
- Python - Monkey Patching
- Python - 訊號處理
- Python - 型別提示
- Python - 自動化教程
- Python - Humanize 包
- Python - 上下文管理器
- Python - 協程
- Python - 描述符
- Python - 診斷和修復記憶體洩漏
- Python - 不可變資料結構
- Python 有用資源
- Python - 問答
- Python - 線上測驗
- Python - 快速指南
- Python - 參考
- Python - 速查表
- Python - 專案
- Python - 有用資源
- Python - 討論
- Python 編譯器
- NumPy 編譯器
- Matplotlib 編譯器
- SciPy 編譯器
Python - 傳送電子郵件
在 Python 中傳送電子郵件
可以使用多個庫在 Python 中傳送電子郵件,但最常用的庫是smtplib和email。
Python 中的“smtplib”模組定義了一個 SMTP 客戶端會話物件,可用於將郵件傳送到任何具有 SMTP 或 ESMTP 監聽器守護程式的網際網路計算機。“email”包是一個用於管理電子郵件訊息的庫,包括 MIME 和其他基於 RFC 2822 的訊息文件。
在網際網路上傳遞和處理電子郵件的應用程式稱為“郵件伺服器”。簡單郵件傳輸協議 (SMTP) 是一種協議,用於處理傳送電子郵件和在郵件伺服器之間路由電子郵件。它是電子郵件傳輸的網際網路標準。
Python smtplib.SMTP() 函式
Python smtplib.SMTP() 函式用於建立一個 SMTP 客戶端會話物件,該物件建立與 SMTP 伺服器的連線。此連線允許您透過伺服器傳送電子郵件。
設定 SMTP 伺服器
在傳送電子郵件之前,需要設定 SMTP 伺服器。常見的 SMTP 伺服器包括 Gmail、Yahoo 或其他郵件服務提供商提供的伺服器。
建立 SMTP 物件
要傳送電子郵件,需要使用以下函式獲取 SMTP 類的物件:
import smtplib

smtpObj = smtplib.SMTP( [host [, port [, local_hostname]]] )
以下是引數的詳細資訊:
host - 這是執行您的 SMTP 伺服器的主機。您可以指定主機的 IP 地址或域名,例如tutorialspoint.com。這是一個可選引數。
port - 如果您提供主機引數,則需要指定 SMTP 伺服器正在偵聽的埠。通常此埠為 25。
local_hostname - 如果您的 SMTP 伺服器在本地計算機上執行,則可以只指定 localhost 作為選項。
示例
以下指令碼連線到埠 25 上“smtp.example.com”處的 SMTP 伺服器,可選地標識和保護連線,登入(如果需要),傳送電子郵件,然後退出會話:
import smtplib

# Create an SMTP object and establish a connection to the SMTP server
smtpObj = smtplib.SMTP('smtp.example.com', 25)

# Identify yourself to an ESMTP server using EHLO
smtpObj.ehlo()

# Secure the SMTP connection
smtpObj.starttls()

# Login to the server (if required)
smtpObj.login('username', 'password')

# Send an email
from_address = 'your_email@example.com'
to_address = 'recipient@example.com'
message = """\
Subject: Test Email

This is a test email message.
"""

smtpObj.sendmail(from_address, to_address, message)

# Quit the SMTP session
smtpObj.quit()
Python smtpd 模組
Python smtpd 模組用於建立和管理簡單的郵件傳輸協議 (SMTP) 伺服器。此模組允許您設定一個 SMTP 伺服器,該伺服器可以接收和處理傳入的電子郵件訊息,這對於測試和除錯應用程式中的電子郵件功能非常有用。
設定 SMTP 除錯伺服器
smtpd 模組預裝在 Python 中,幷包含一個本地 SMTP 除錯伺服器。此伺服器用於測試電子郵件功能,而無需實際將電子郵件傳送到指定的地址;而是將電子郵件內容列印到控制檯。
執行此本地伺服器無需處理訊息加密或使用憑據登入到電子郵件伺服器。
啟動 SMTP 除錯伺服器
您可以在命令提示符或終端中使用以下命令啟動本地 SMTP 除錯伺服器:
python -m smtpd -c DebuggingServer -n localhost:1025
示例
以下示例演示瞭如何使用 smtplib 功能和本地 SMTP 除錯伺服器傳送虛擬電子郵件:
import smtplib

def prompt(prompt):
   return input(prompt).strip()

fromaddr = prompt("From: ")
toaddrs = prompt("To: ").split()
print("Enter message, end with ^D (Unix) or ^Z (Windows):")

# Add the From: and To: headers at the start!
msg = ("From: %s\r\nTo: %s\r\n\r\n"
   % (fromaddr, ", ".join(toaddrs)))
while True:
   try:
      line = input()
   except EOFError:
      break
   if not line:
      break
   msg = msg + line

print("Message length is", len(msg))
server = smtplib.SMTP('localhost', 1025)
server.set_debuglevel(1)
server.sendmail(fromaddr, toaddrs, msg)
server.quit()
在此示例中:
From - 您輸入發件人的電子郵件地址 (fromaddr)。
To - 您輸入收件人的電子郵件地址 (toaddrs),可以由空格分隔多個地址。
Message - 您輸入訊息內容,以 ^D(Unix)或 ^Z(Windows)結尾。
“smtplib”的 sendmail() 方法使用指定的發件人、收件人(s) 和訊息內容將電子郵件傳送到在“localhost”埠“1025”上執行的本地 SMTP 除錯伺服器。
輸出
執行程式時,控制檯輸出程式和 SMTP 伺服器之間的通訊。同時,執行 SMTPD 伺服器的終端顯示傳入的訊息內容,幫助您除錯和驗證電子郵件傳送過程。
python example.py
From: abc@xyz.com
To: xyz@abc.com
Enter message, end with ^D (Unix) or ^Z (Windows):
Hello World
^Z
控制檯反映以下日誌:
From: abc@xyz.com
reply: retcode (250); Msg: b'OK'
send: 'rcpt TO:<xyz@abc.com>\r\n'
reply: b'250 OK\r\n'
reply: retcode (250); Msg: b'OK'
send: 'data\r\n'
reply: b'354 End data with <CR><LF>.<CR><LF>\r\n'
reply: retcode (354); Msg: b'End data with <CR><LF>.<CR><LF>'
data: (354, b'End data with <CR><LF>.<CR><LF>')
send: b'From: abc@xyz.com\r\nTo: xyz@abc.com\r\n\r\nHello
World\r\n.\r\n'
reply: b'250 OK\r\n'
reply: retcode (250); Msg: b'OK'
data: (250, b'OK')
send: 'quit\r\n'
reply: b'221 Bye\r\n'
reply: retcode (221); Msg: b'Bye'
執行 SMTPD 伺服器的終端顯示此輸出:
---------- MESSAGE FOLLOWS ----------
b'From: abc@xyz.com'
b'To: xyz@abc.com'
b'X-Peer: ::1'
b''
b'Hello World'
------------ END MESSAGE ------------
使用 Python 傳送 HTML 電子郵件
要使用 Python 傳送 HTML 郵件,可以使用 **smtplib** 庫連線到 SMTP 伺服器,並使用 **email.mime** 模組適當地構建和格式化郵件內容。
構建 HTML 郵件訊息
傳送 HTML 郵件時,需要指定某些標頭並相應地構建郵件內容,以確保收件人的郵件客戶端將其識別並呈現為 HTML。
示例
以下是使用 Python 傳送 HTML 內容作為電子郵件的示例:
import smtplib
from email.mime.multipart import MIMEMultipart
from email.mime.text import MIMEText

# Email content
sender = 'from@fromdomain.com'
receivers = ['to@todomain.com']

# Create message container - the correct MIME type is multipart/alternative.
msg = MIMEMultipart('alternative')
msg['From'] = 'From Person <from@fromdomain.com>'
msg['To'] = 'To Person <to@todomain.com>'
msg['Subject'] = 'SMTP HTML e-mail test'

# HTML message content
html = """\
<html>
  <head></head>
  <body>
    <p>This is an e-mail message to be sent in <b>HTML format</b></p>
    <p><b>This is HTML message.</b></p>
    <h1>This is headline.</h1>
  </body>
</html>
"""

# Attach HTML content to the email
part2 = MIMEText(html, 'html')
msg.attach(part2)

# Connect to SMTP server and send email
try:
   smtpObj = smtplib.SMTP('localhost')
   smtpObj.sendmail(sender, receivers, msg.as_string())
   print("Successfully sent email")
except smtplib.SMTPException as e:
   print(f"Error: unable to send email. Error message: {str(e)}")
傳送電子郵件附件
要在 Python 中傳送電子郵件附件,可以使用 **smtplib** 庫連線到 SMTP 伺服器,並使用 **email.mime** 模組構建和格式化電子郵件內容,包括附件。
構建包含附件的電子郵件
傳送包含附件的電子郵件時,需要使用 MIME(多用途網際網路郵件擴充套件)正確格式化電子郵件。這涉及將 **Content-Type** 標頭設定為 **multipart/mixed**,以表示電子郵件同時包含文字和附件。電子郵件的每個部分(文字和附件)都由邊界分隔。
示例
以下示例傳送一封電子郵件,其中包含 **`/tmp/test.txt`** 檔案作為附件:
import smtplib
import base64

filename = "/tmp/test.txt"

# Read a file and encode it into base64 format
fo = open(filename, "rb")
filecontent = fo.read()
encodedcontent = base64.b64encode(filecontent)  # base64

sender = 'webmaster@tutorialpoint.com'
reciever = 'amrood.admin@gmail.com'

marker = "AUNIQUEMARKER"

body ="""
This is a test email to send an attachment.
"""
# Define the main headers.
part1 = """From: From Person <me@fromdomain.net>
To: To Person <amrood.admin@gmail.com>
Subject: Sending Attachment
MIME-Version: 1.0
Content-Type: multipart/mixed; boundary=%s
--%s
""" % (marker, marker)

# Define the message action
part2 = """Content-Type: text/plain
Content-Transfer-Encoding:8bit

%s
--%s
""" % (body,marker)

# Define the attachment section
part3 = """Content-Type: multipart/mixed; name=\"%s\"
Content-Transfer-Encoding:base64
Content-Disposition: attachment; filename=%s

%s
--%s--
""" %(filename, filename, encodedcontent, marker)
message = part1 + part2 + part3

try:
   smtpObj = smtplib.SMTP('localhost')
   smtpObj.sendmail(sender, reciever, message)
   print "Successfully sent email"
except Exception:
   print "Error: unable to send email"
使用 Gmail 的 SMTP 伺服器傳送電子郵件
要在 Python 中使用 Gmail 的 SMTP 伺服器傳送電子郵件,需要連線到埠“587”上使用“TLS”加密的 **smtp.gmail.com**,使用你的 Gmail 憑據進行身份驗證,使用 Python 的 smtplib 和 email.mime 庫構建電子郵件訊息,並使用 sendmail() 方法傳送。最後,使用 quit() 關閉 SMTP 連線。
示例
以下是一個演示如何使用 Gmail 的 SMTP 伺服器傳送電子郵件的示例指令碼:
import smtplib

# Email content
content = "Hello World"

# Set up SMTP connection to Gmail's SMTP server
mail = smtplib.SMTP('smtp.gmail.com', 587)
# Identify yourself to the SMTP server
mail.ehlo()
# Start TLS encryption for the connection
mail.starttls()

# Gmail account credentials
sender = 'your_email@gmail.com'
password = 'your_password'

# Login to Gmail's SMTP server
mail.login(sender, password)

# Email details
recipient = 'recipient_email@example.com'
subject = 'Test Email'

# Construct email message with headers
header = f'To: {recipient}\nFrom: {sender}\nSubject: {subject}\n'
content = header + content

# Send email
mail.sendmail(sender, recipient, content)

# Close SMTP connection
mail.quit()
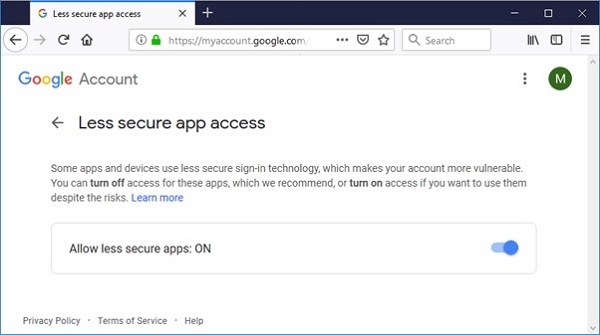
在執行上述指令碼之前,必須配置發件人的 Gmail 帳戶以允許訪問“安全性較低的應用”。請訪問以下連結。
https://myaccount.google.com/lesssecureapps 將顯示的切換按鈕設定為 ON。
如果一切順利,請執行上述指令碼。郵件應傳送到收件人的收件箱。