- Python 基礎
- Python - 首頁
- Python - 概述
- Python - 歷史
- Python - 特性
- Python vs C++
- Python - Hello World 程式
- Python - 應用領域
- Python - 直譯器
- Python - 環境搭建
- Python - 虛擬環境
- Python - 基本語法
- Python - 變數
- Python - 資料型別
- Python - 型別轉換
- Python - Unicode 系統
- Python - 字面量
- Python - 運算子
- Python - 算術運算子
- Python - 比較運算子
- Python - 賦值運算子
- Python - 邏輯運算子
- Python - 位運算子
- Python - 成員運算子
- Python - 身份運算子
- Python - 運算子優先順序
- Python - 註釋
- Python - 使用者輸入
- Python - 數字
- Python - 布林值
- Python 控制語句
- Python - 控制流
- Python - 決策
- Python - if 語句
- Python - if else
- Python - 巢狀 if
- Python - Match-Case 語句
- Python - 迴圈
- Python - for 迴圈
- Python - for-else 迴圈
- Python - while 迴圈
- Python - break 語句
- Python - continue 語句
- Python - pass 語句
- Python - 巢狀迴圈
- Python 函式 & 模組
- Python - 函式
- Python - 預設引數
- Python - 關鍵字引數
- Python - 僅限關鍵字引數
- Python - 位置引數
- Python - 僅限位置引數
- Python - 可變引數
- Python - 變數作用域
- Python - 函式註解
- Python - 模組
- Python - 內建函式
- Python 字串
- Python - 字串
- Python - 字串切片
- Python - 修改字串
- Python - 字串連線
- Python - 字串格式化
- Python - 跳脫字元
- Python - 字串方法
- Python - 字串練習
- Python 列表
- Python - 列表
- Python - 訪問列表元素
- Python - 修改列表元素
- Python - 新增列表元素
- Python - 刪除列表元素
- Python - 遍歷列表
- Python - 列表推導式
- Python - 排序列表
- Python - 複製列表
- Python - 合併列表
- Python - 列表方法
- Python - 列表練習
- Python 元組
- Python - 元組
- Python - 訪問元組元素
- Python - 更新元組
- Python - 解包元組
- Python - 遍歷元組
- Python - 合併元組
- Python - 元組方法
- Python - 元組練習
- Python 集合
- Python - 集合
- Python - 訪問集合元素
- Python - 新增集合元素
- Python - 刪除集合元素
- Python - 遍歷集合
- Python - 合併集合
- Python - 複製集合
- Python - 集合運算子
- Python - 集合方法
- Python - 集合練習
- Python 字典
- Python - 字典
- Python - 訪問字典元素
- Python - 修改字典元素
- Python - 新增字典元素
- Python - 刪除字典元素
- Python - 字典檢視物件
- Python - 遍歷字典
- Python - 複製字典
- Python - 巢狀字典
- Python - 字典方法
- Python - 字典練習
- Python 陣列
- Python - 陣列
- Python - 訪問陣列元素
- Python - 新增陣列元素
- Python - 刪除陣列元素
- Python - 遍歷陣列
- Python - 複製陣列
- Python - 反轉陣列
- Python - 排序陣列
- Python - 合併陣列
- Python - 陣列方法
- Python - 陣列練習
- Python 檔案處理
- Python - 檔案處理
- Python - 寫入檔案
- Python - 讀取檔案
- Python - 重新命名和刪除檔案
- Python - 目錄
- Python - 檔案方法
- Python - OS 檔案/目錄方法
- Python - OS 路徑方法
- 面向物件程式設計
- Python - OOP 概念
- Python - 類 & 物件
- Python - 類屬性
- Python - 類方法
- Python - 靜態方法
- Python - 建構函式
- Python - 訪問修飾符
- Python - 繼承
- Python - 多型
- Python - 方法重寫
- Python - 方法過載
- Python - 動態繫結
- Python - 動態型別
- Python - 抽象
- Python - 封裝
- Python - 介面
- Python - 包
- Python - 內部類
- Python - 匿名類和物件
- Python - 單例類
- Python - 包裝類
- Python - 列舉
- Python - 反射
- Python 錯誤 & 異常
- Python - 語法錯誤
- Python - 異常
- Python - try-except 塊
- Python - try-finally 塊
- Python - 丟擲異常
- Python - 異常鏈
- Python - 巢狀 try 塊
- Python - 使用者自定義異常
- Python - 日誌記錄
- Python - 斷言
- Python - 內建異常
- Python 多執行緒
- Python - 多執行緒
- Python - 執行緒生命週期
- Python - 建立執行緒
- Python - 啟動執行緒
- Python - 連線執行緒
- Python - 執行緒命名
- Python - 執行緒排程
- Python - 執行緒池
- Python - 主執行緒
- Python - 執行緒優先順序
- Python - 守護執行緒
- Python - 執行緒同步
- Python 同步
- Python - 執行緒間通訊
- Python - 執行緒死鎖
- Python - 中斷執行緒
- Python 網路程式設計
- Python - 網路程式設計
- Python - 套接字程式設計
- Python - URL 處理
- Python - 泛型
- Python 庫
- NumPy 教程
- Pandas 教程
- SciPy 教程
- Matplotlib 教程
- Django 教程
- OpenCV 教程
- Python 其他
- Python - 日期 & 時間
- Python - 數學
- Python - 迭代器
- Python - 生成器
- Python - 閉包
- Python - 裝飾器
- Python - 遞迴
- Python - 正則表示式
- Python - PIP
- Python - 資料庫訪問
- Python - 弱引用
- Python - 序列化
- Python - 模板
- Python - 輸出格式化
- Python - 效能測量
- Python - 資料壓縮
- Python - CGI 程式設計
- Python - XML 處理
- Python - GUI 程式設計
- Python - 命令列引數
- Python - 文件字串
- Python - JSON
- Python - 傳送郵件
- Python - 擴充套件
- Python - 工具/實用程式
- Python - GUIs
- Python 高階概念
- Python - 抽象基類
- Python - 自定義異常
- Python - 高階函式
- Python - 物件內部
- Python - 記憶體管理
- Python - 元類
- Python - 使用元類進行超程式設計
- Python - 模擬和存根
- Python - 猴子補丁
- Python - 訊號處理
- Python - 型別提示
- Python - 自動化教程
- Python - Humanize 包
- Python - 上下文管理器
- Python - 協程
- Python - 描述符
- Python - 診斷和修復記憶體洩漏
- Python - 不可變資料結構
- Python 有用資源
- Python - 問答
- Python - 線上測驗
- Python - 快速指南
- Python - 參考
- Python - 速查表
- Python - 專案
- Python - 有用資源
- Python - 討論
- Python 編譯器
- NumPy 編譯器
- Matplotlib 編譯器
- SciPy 編譯器
Python - 套接字程式設計
Python 套接字程式設計
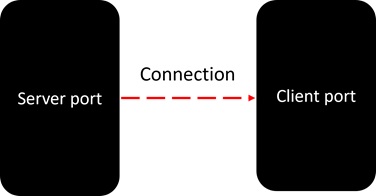
**套接字程式設計**是一種技術,透過它可以在網路中連線的兩個節點之間進行通訊,其中伺服器節點監聽來自客戶端節點的傳入請求。
在 Python 中,**socket** 模組用於套接字程式設計。標準庫中的 **socket** 模組包含在硬體級別進行伺服器和客戶端之間通訊所需的功能。
此模組提供對 BSD 套接字介面的訪問。它適用於所有作業系統,例如 Linux、Windows、MacOS。
什麼是套接字?
套接字是雙向通訊通道的端點。套接字可以在一個程序內、同一臺機器上的程序之間或不同大陸上的程序之間進行通訊。
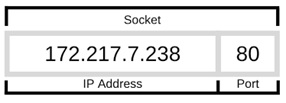
套接字由 IP 地址和埠號的組合標識。它應該在兩端正確配置才能開始通訊。
套接字可以在許多不同的通道型別上實現:Unix 域套接字、TCP、UDP 等。套接字型檔提供用於處理常用傳輸的特定類,以及用於處理其餘傳輸的通用介面。
術語套接字程式設計意味著以程式設計方式設定套接字以能夠傳送和接收資料。
有兩種型別的通訊協議:
面向連線的協議
無連線協議
TCP(傳輸控制協議)是一種面向連線的協議。伺服器以資料包的形式傳輸資料,接收方按傳輸順序組裝資料。由於通訊兩端的套接字需要在開始之前設定,因此這種方法更加可靠。
UDP(使用者資料報協議)是非連線的。這種方法不可靠,因為套接字不需要建立任何連線和終止過程來傳輸資料。
Python socket 模組
**socket** 模組用於建立和管理網路中連線節點的套接字程式設計。**socket** 模組提供一個 **socket** 類。你需要使用 **socket.socket()** 建構函式建立一個套接字。
**socket** 類的一個物件表示主機名和埠號對。
語法
以下是 socket.socket() 建構函式的語法:
socket.socket (socket_family, socket_type, protocol=0)
引數
family − 預設情況下為 AF_INET。其他值 - AF_INET6(八組四個十六進位制數字)、AF_UNIX、AF_CAN(控制器區域網)或 AF_RDS(可靠資料報套接字)。
socket_type − 應為 SOCK_STREAM(預設值)、SOCK_DGRAM、SOCK_RAW 或其他 SOCK_ 常量之一。
protocol − 數字通常為零,可以省略。
返回型別
此方法返回一個套接字物件。
獲得套接字物件後,可以使用所需的方法建立客戶端或伺服器程式。
伺服器套接字方法
在伺服器上例項化的套接字稱為伺服器套接字。伺服器上的套接字物件可以使用以下方法:
bind() 方法 − 此方法將套接字繫結到指定的 IP 地址和埠號。
listen() 方法 − 此方法啟動伺服器並進入監聽迴圈,查詢來自客戶端的連線請求。
accept() 方法 − 當伺服器攔截連線請求時,此方法接受請求並使用其地址識別客戶端套接字。
要在伺服器上建立套接字,請使用以下程式碼片段:
import socket
server = socket.socket()
server.bind(('localhost',12345))
server.listen()
client, addr = server.accept()
print ("connection request from: " + str(addr))
預設情況下,伺服器繫結到本地機器的 IP 地址“localhost”,並在任意空閒埠號上監聽。
客戶端套接字方法
在客戶端也設定類似的套接字。它主要向在其 IP 地址和埠號上監聽的伺服器套接字傳送連線請求。
connect() 方法
此方法將一個包含兩個專案的元組物件作為引數。這兩個專案是伺服器的 IP 地址和埠號。
obj=socket.socket()
obj.connect((host,port))
伺服器接受連線後,兩個套接字物件都可以傳送和/或接收資料。
send() 方法
伺服器使用它攔截的地址向客戶端傳送資料。
client.send(bytes)
客戶端套接字向它已建立連線的套接字傳送資料。
sendall() 方法
類似於 send()。但是,與 send() 不同的是,此方法會繼續從位元組中傳送資料,直到所有資料傳送完畢或發生錯誤為止。成功時不返回任何值。
sendto() 方法
此方法僅用於 UDP 協議。
recv() 方法
此方法用於檢索傳送到客戶端的資料。對於伺服器,它使用已接受請求的遠端套接字。
client.recv(bytes)
recvfrom() 方法
此方法用於 UDP 協議。
Python - 套接字伺服器
要編寫 Internet 伺服器,我們使用 socket 模組中提供的 socket 函式來建立一個套接字物件。然後使用套接字物件呼叫其他函式來設定套接字伺服器。
現在呼叫 **bind(hostname, port)** 函式為給定主機上的服務指定埠。
接下來,呼叫返回物件的 accept 方法。此方法等待客戶端連線到您指定的埠,然後返回一個連線物件,該物件表示與該客戶端的連線。
伺服器套接字示例
import socket
host = "127.0.0.1"
port = 5001
server = socket.socket()
server.bind((host,port))
server.listen()
conn, addr = server.accept()
print ("Connection from: " + str(addr))
while True:
   data = conn.recv(1024).decode()
   if not data:
      break
   data = str(data).upper()
   print (" from client: " + str(data))
   data = input("type message: ")
   conn.send(data.encode())
conn.close()
Python - 套接字客戶端
讓我們編寫一個非常簡單的客戶端程式,該程式開啟到給定埠 5001 和給定本地主機的連線。使用 Python 的 socket 模組函式建立套接字客戶端非常簡單。
**socket.connect(hosname, port)** 在埠上的主機名開啟一個 TCP 連線。開啟套接字後,您可以像任何 IO 物件一樣從中讀取資料。完成後,請記住關閉它,就像關閉檔案一樣。
客戶端套接字示例
以下程式碼是一個非常簡單的客戶端,它連線到給定的主機和埠,從套接字讀取任何可用資料,然後在輸入“q”時退出。
import socket
host = '127.0.0.1'
port = 5001
obj = socket.socket()
obj.connect((host,port))
message = input("type message: ")
while message != 'q':
   obj.send(message.encode())
   data = obj.recv(1024).decode()
   print ('Received from server: ' + data)
   message = input("type message: ")
obj.close()
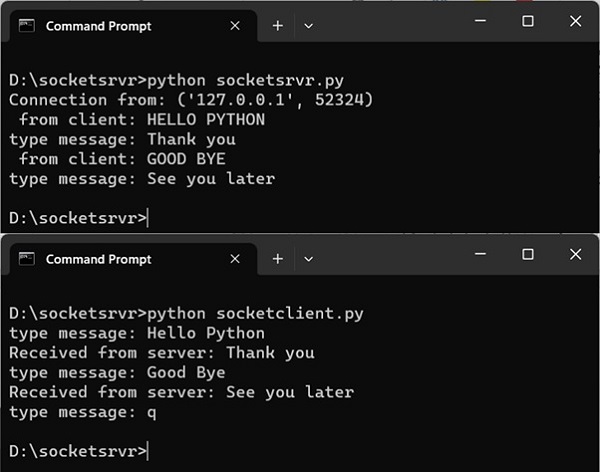
首先執行伺服器程式碼。它開始監聽。
然後啟動客戶端程式碼。它傳送請求。
請求已接受。已識別客戶端地址
輸入一些文字並按 Enter 鍵。
接收到的資料已列印。將資料傳送到客戶端。
已收到來自伺服器的資料。
輸入“q”時迴圈終止。
伺服器-客戶端互動如下所示:
我們已使用本地機器上的 socket 模組實現了客戶端-伺服器通訊。要將伺服器和客戶端程式碼放在網路上的兩臺不同的機器上,我們需要找到伺服器機器的 IP 地址。
在 Windows 上,您可以透過執行 ipconfig 命令來查詢 IP 地址。ifconfig 命令是 Ubuntu 上的等效命令。
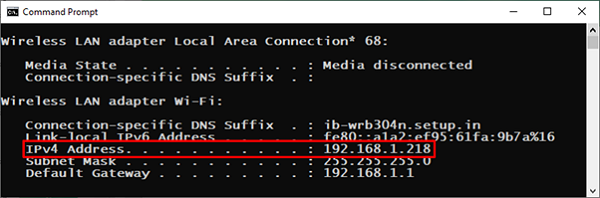
使用 IPv4 地址值更改伺服器和客戶端程式碼中的主機字串,然後像以前一樣執行它們。
使用 Socket 模組進行 Python 檔案傳輸
以下程式演示如何使用套接字通訊將檔案從伺服器傳輸到客戶端。
伺服器程式碼
建立連線的程式碼與以前相同。接受連線請求後,伺服器上的檔案以二進位制模式開啟以進行讀取,並且位元組被連續讀取併發送到客戶端流,直到到達檔案結尾。
import socket
host = "127.0.0.1"
port = 5001
server = socket.socket()
server.bind((host, port))
server.listen()
conn, addr = server.accept()
data = conn.recv(1024).decode()
filename='test.txt'
f = open(filename,'rb')
while True:
   l = f.read(1024)
   if not l:
      break
   conn.send(l)
   print('Sent ',repr(l))
f.close()
print('File transferred')
conn.close()
客戶端程式碼
在客戶端,一個新檔案以 **wb** 模式開啟。從伺服器接收到的資料流被寫入檔案。隨著流的結束,輸出檔案被關閉。客戶端機器上將建立一個新檔案。
import socket

s = socket.socket()
host = "127.0.0.1"
port = 5001

s.connect((host, port))
s.send("Hello server!".encode())

with open('recv.txt', 'wb') as f:
   while True:
      print('receiving data...')
      data = s.recv(1024)
      if not data:
         break
      f.write(data)

f.close()
print('Successfully received')
s.close()
print('connection closed')
Python socketserver 模組
Python 標準庫中的 socketserver 模組是一個框架,用於簡化編寫網路伺服器的任務。模組中包含以下類,它們表示同步伺服器:
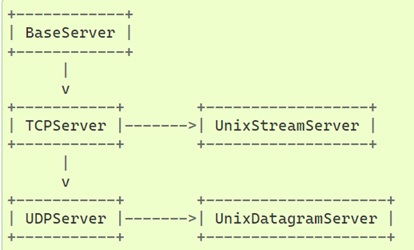
這些類與相應的 RequestHandler 類一起工作以實現服務。BaseServer 是模組中所有 Server 物件的超類。
**TCPServer** 類使用網際網路 TCP 協議,在客戶端和伺服器之間提供連續的資料流。建構函式自動嘗試呼叫 server_bind() 和 server_activate()。其他引數傳遞給 BaseServer 基類。
您還必須建立一個 **StreamRequestHandler** 類的子類。它提供 self.rfile 和 self.wfile 屬性來讀取或寫入以獲取請求資料或將資料返回給客戶端。
**UDPServer** 和 **DatagramRequestHandler** − 這些類用於 UDP 協議。
**DatagramRequestHandler** 和 **UnixDatagramServer** − 這些類使用 Unix 域套接字;它們在非 Unix 平臺上不可用。
伺服器程式碼
您必須編寫一個 RequestHandler 類。它為每個與伺服器的連線例項化一次,並且必須重寫 handle() 方法以實現與客戶端的通訊。
import socketserver
class MyTCPHandler(socketserver.BaseRequestHandler):
   def handle(self):
      self.data = self.request.recv(1024).strip()
      host,port=self.client_address
      print("{}:{} wrote:".format(host,port))
      print(self.data.decode())
      msg=input("enter text .. ")
      self.request.sendall(msg.encode())
在伺服器分配的埠號上,TCPServer 類的物件呼叫 forever() 方法將伺服器置於監聽模式,並接受來自客戶端的傳入請求。
if __name__ == "__main__":
   HOST, PORT = "localhost", 9999
   with socketserver.TCPServer((HOST, PORT), MyTCPHandler) as server:
      server.serve_forever()
客戶端程式碼
使用 socketserver 時,客戶端程式碼與套接字客戶端應用程式大致相同。
import socket
import sys

HOST, PORT = "localhost", 9999

while True:
   with socket.socket(socket.AF_INET, socket.SOCK_STREAM) as sock:
      # Connect to server and send data
      sock.connect((HOST, PORT))
      data = input("enter text .. .")
      sock.sendall(bytes(data + "\n", "utf-8"))

      # Receive data from the server and shut down
      received = str(sock.recv(1024), "utf-8")
      print("Sent: {}".format(data))
      print("Received: {}".format(received))
在一個命令提示符終端中執行伺服器程式碼。為客戶端例項開啟多個終端。您可以模擬伺服器和多個客戶端之間的併發通訊。
| 伺服器 | 客戶端-1 | 客戶端-2 |
|---|---|---|
|
D:\socketsrvr>python myserver.py 127.0.0.1:54518 wrote from client-1 enter text .. hello 127.0.0.1:54522 wrote how are you enter text .. fine 127.0.0.1:54523 wrote from client-2 enter text .. hi client-2 127.0.0.1:54526 wrote good bye enter text .. bye bye 127.0.0.1:54530 wrote thanks enter text .. bye client-2 |
D:\socketsrvr>python myclient.py enter text .. . from client-1 Sent from client-1 Received: hello enter text .. . how are you Sent how are you Received: fine enter text .. . good bye Sent: good bye Received: bye bye enter text .. . |
D:\socketsrvr>python myclient.py enter text .. . from client-2 Sent from client-2 Received: hi client-2 enter text .. . thanks Sent: thanks Received bye client-2 enter text .. . |