- Python 基礎
- Python - 首頁
- Python - 概述
- Python - 歷史
- Python - 特性
- Python 與 C++
- Python - Hello World 程式
- Python - 應用領域
- Python - 直譯器
- Python - 環境搭建
- Python - 虛擬環境
- Python - 基本語法
- Python - 變數
- Python - 資料型別
- Python - 型別轉換
- Python - Unicode 系統
- Python - 字面量
- Python - 運算子
- Python - 算術運算子
- Python - 比較運算子
- Python - 賦值運算子
- Python - 邏輯運算子
- Python - 位運算子
- Python - 成員運算子
- Python - 身份運算子
- Python - 運算子優先順序
- Python - 註釋
- Python - 使用者輸入
- Python - 數字
- Python - 布林值
- Python 控制語句
- Python - 控制流
- Python - 決策
- Python - If 語句
- Python - If else
- Python - 巢狀 If
- Python - Match-Case 語句
- Python - 迴圈
- Python - for 迴圈
- Python - for-else 迴圈
- Python - While 迴圈
- Python - break 語句
- Python - continue 語句
- Python - pass 語句
- Python - 巢狀迴圈
- Python 函式 & 模組
- Python - 函式
- Python - 預設引數
- Python - 關鍵字引數
- Python - 僅限關鍵字引數
- Python - 位置引數
- Python - 僅限位置引數
- Python - 可變引數
- Python - 變數作用域
- Python - 函式註解
- Python - 模組
- Python - 內建函式
- Python 字串
- Python - 字串
- Python - 字串切片
- Python - 修改字串
- Python - 字串連線
- Python - 字串格式化
- Python - 跳脫字元
- Python - 字串方法
- Python - 字串練習
- Python 列表
- Python - 列表
- Python - 訪問列表元素
- Python - 修改列表元素
- Python - 新增列表元素
- Python - 刪除列表元素
- Python - 迴圈遍歷列表
- Python - 列表推導式
- Python - 排序列表
- Python - 複製列表
- Python - 合併列表
- Python - 列表方法
- Python - 列表練習
- Python 元組
- Python - 元組
- Python - 訪問元組元素
- Python - 更新元組
- Python - 解包元組
- Python - 迴圈遍歷元組
- Python - 合併元組
- Python - 元組方法
- Python - 元組練習
- Python 集合
- Python - 集合
- Python - 訪問集合元素
- Python - 新增集合元素
- Python - 刪除集合元素
- Python - 迴圈遍歷集合
- Python - 合併集合
- Python - 複製集合
- Python - 集合運算子
- Python - 集合方法
- Python - 集合練習
- Python 字典
- Python - 字典
- Python - 訪問字典元素
- Python - 修改字典元素
- Python - 新增字典元素
- Python - 刪除字典元素
- Python - 字典檢視物件
- Python - 迴圈遍歷字典
- Python - 複製字典
- Python - 巢狀字典
- Python - 字典方法
- Python - 字典練習
- Python 陣列
- Python - 陣列
- Python - 訪問陣列元素
- Python - 新增陣列元素
- Python - 刪除陣列元素
- Python - 迴圈遍歷陣列
- Python - 複製陣列
- Python - 反轉陣列
- Python - 排序陣列
- Python - 合併陣列
- Python - 陣列方法
- Python - 陣列練習
- Python 檔案處理
- Python - 檔案處理
- Python - 寫入檔案
- Python - 讀取檔案
- Python - 重新命名和刪除檔案
- Python - 目錄
- Python - 檔案方法
- Python - OS 檔案/目錄方法
- Python - OS 路徑方法
- 面向物件程式設計
- Python - OOPs 概念
- Python - 類 & 物件
- Python - 類屬性
- Python - 類方法
- Python - 靜態方法
- Python - 建構函式
- Python - 訪問修飾符
- Python - 繼承
- Python - 多型
- Python - 方法重寫
- Python - 方法過載
- Python - 動態繫結
- Python - 動態型別
- Python - 抽象
- Python - 封裝
- Python - 介面
- Python - 包
- Python - 內部類
- Python - 匿名類和物件
- Python - 單例類
- Python - 包裝器類
- Python - 列舉
- Python - 反射
- Python 錯誤 & 異常
- Python - 語法錯誤
- Python - 異常
- Python - try-except 程式碼塊
- Python - try-finally 程式碼塊
- Python - 丟擲異常
- Python - 異常鏈
- Python - 巢狀 try 程式碼塊
- Python - 使用者自定義異常
- Python - 日誌記錄
- Python - 斷言
- Python - 內建異常
- Python 多執行緒
- Python - 多執行緒
- Python - 執行緒生命週期
- Python - 建立執行緒
- Python - 啟動執行緒
- Python - 執行緒連線
- Python - 執行緒命名
- Python - 執行緒排程
- Python - 執行緒池
- Python - 主執行緒
- Python - 執行緒優先順序
- Python - 守護執行緒
- Python - 執行緒同步
- Python 同步
- Python - 執行緒間通訊
- Python - 執行緒死鎖
- Python - 中斷執行緒
- Python 網路程式設計
- Python - 網路程式設計
- Python - Socket 程式設計
- Python - URL 處理
- Python - 泛型
- Python 庫
- NumPy 教程
- Pandas 教程
- SciPy 教程
- Matplotlib 教程
- Django 教程
- OpenCV 教程
- Python 雜項
- Python - 日期 & 時間
- Python - 數學
- Python - 迭代器
- Python - 生成器
- Python - 閉包
- Python - 裝飾器
- Python - 遞迴
- Python - 正則表示式
- Python - PIP
- Python - 資料庫訪問
- Python - 弱引用
- Python - 序列化
- Python - 模板
- Python - 輸出格式化
- Python - 效能測量
- Python - 資料壓縮
- Python - CGI 程式設計
- Python - XML 處理
- Python - GUI 程式設計
- Python - 命令列引數
- Python - 文件字串
- Python - JSON
- Python - 傳送郵件
- Python - 擴充套件
- Python - 工具/實用程式
- Python - GUI
- Python 高階概念
- Python - 抽象基類
- Python - 自定義異常
- Python - 高階函式
- Python - 物件內部
- Python - 記憶體管理
- Python - 元類
- Python - 使用元類進行超程式設計
- Python - 模擬和存根
- Python - 猴子補丁
- Python - 訊號處理
- Python - 型別提示
- Python - 自動化教程
- Python - Humanize 包
- Python - 上下文管理器
- Python - 協程
- Python - 描述符
- Python - 診斷和修復記憶體洩漏
- Python - 不可變資料結構
- Python 有用資源
- Python - 問答
- Python - 線上測驗
- Python - 快速指南
- Python - 參考
- Python - 速查表
- Python - 專案
- Python - 有用資源
- Python - 討論
- Python 編譯器
- NumPy 編譯器
- Matplotlib 編譯器
- SciPy 編譯器
Python - CGI 程式設計
通用閘道器介面(CGI)是一套標準,定義了 Web 伺服器和自定義指令碼之間如何交換資訊。CGI 規範目前由 NCSA 維護。
什麼是 CGI?
通用閘道器介面(CGI)是外部閘道器程式與資訊伺服器(如 HTTP 伺服器)互動的標準。
當前版本為 CGI/1.1,CGI/1.2 正在開發中。
網頁瀏覽
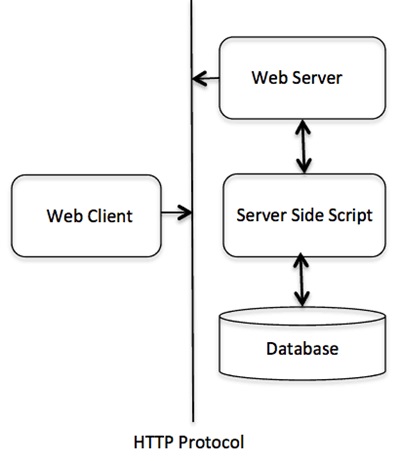
為了理解 CGI 的概念,讓我們看看當我們點選超連結以瀏覽特定網頁或 URL 時會發生什麼。
您的瀏覽器聯絡 HTTP Web 伺服器並請求 URL,即檔名。
Web 伺服器解析 URL 並查詢檔名。如果找到該檔案,則將其傳送回瀏覽器,否則傳送錯誤訊息,指示您請求了錯誤的檔案。
Web 瀏覽器接收 Web 伺服器的響應,並顯示接收到的檔案或錯誤訊息。
但是,可以設定 HTTP 伺服器,以便每當請求某個目錄中的檔案時,都不會將該檔案傳送回;而是將其作為程式執行,並且該程式輸出的內容將傳送回以供瀏覽器顯示。此功能稱為通用閘道器介面或 CGI,程式稱為 CGI 指令碼。這些 CGI 程式可以是 Python 指令碼、PERL 指令碼、Shell 指令碼、C 或 C++ 程式等。
CGI 架構圖
Web 伺服器支援和配置
在繼續進行 CGI 程式設計之前,請確保您的 Web 伺服器支援 CGI 並且已配置為處理 CGI 程式。所有要由 HTTP 伺服器執行的 CGI 程式都儲存在預配置的目錄中。此目錄稱為 CGI 目錄,按照慣例,其名稱為 /var/www/cgi-bin。按照慣例,CGI 檔案的副檔名為 .cgi,但您也可以將檔案保留為 python 副檔名 .py。
預設情況下,Linux 伺服器配置為僅執行 /var/www 中 cgi-bin 目錄中的指令碼。如果您想指定其他目錄來執行 CGI 指令碼,請在 httpd.conf 檔案中註釋以下行:-
<Directory "/var/www/cgi-bin">
   AllowOverride None
   Options ExecCGI
   Order allow,deny
   Allow from all
</Directory>

<Directory "/var/www/cgi-bin">
Options All
</Directory>
還應為 apache 伺服器新增以下行,以將 .py 檔案視為 cgi 指令碼。
AddHandler cgi-script .py
這裡,我們假設您已經成功啟動並運行了 Web 伺服器,並且能夠執行任何其他 CGI 程式,例如 Perl 或 Shell 等。
第一個 CGI 程式
這是一個簡單的連結,它連結到一個名為 hello.py 的 CGI 指令碼。此檔案儲存在 /var/www/cgi-bin 目錄中,其內容如下。在執行 CGI 程式之前,請確保使用chmod 755 hello.py UNIX 命令更改檔案的模式,以使檔案可執行。
print ("Content-type:text/html\r\n\r\n")
print ('<html>')
print ('<head>')
print ('<title>Hello Word - First CGI Program</title>')
print ('</head>')
print ('<body>')
print ('<h2>Hello Word! This is my first CGI program</h2>')
print ('</body>')
print ('</html>')
注意 - 指令碼中的第一行必須是 Python 可執行檔案的路徑。在 Python 程式中它顯示為註釋,但它被稱為 Shebang 行。
在 Linux 中,它應該是 #!/usr/bin/python3。
在 Windows 中,它應該是 #!c:/python311/python.exd。
在瀏覽器中輸入以下 URL -
https:///cgi-bin/hello.py
Hello Word! This is my first CGI program
這個 hello.py 指令碼是一個簡單的 Python 指令碼,它將其輸出寫入 STDOUT 檔案,即螢幕。還有一個重要的額外功能可用,即要列印的第一行Content-type:text/html\r\n\r\n。此行傳送回瀏覽器,它指定要在瀏覽器螢幕上顯示的內容型別。
到目前為止,您必須已經瞭解了 CGI 的基本概念,並且可以使用 Python 編寫許多複雜的 CGI 程式。此指令碼還可以與任何其他外部系統互動以交換資訊,例如 RDBMS。
HTTP 頭
Content-type:text/html\r\n\r\n 行是 HTTP 頭的一部分,傳送到瀏覽器以理解內容。所有 HTTP 頭將採用以下形式 -
HTTP Field Name: Field Content

For Example
Content-type: text/html\r\n\r\n
還有一些其他重要的 HTTP 頭,您將在 CGI 程式設計中經常使用。
| 序號 | 頭 & 描述 |
|---|---|
| 1 | Content-type 定義返回檔案的格式的 MIME 字串。例如 Content-type:text/html |
| 2 | Expires: 日期 資訊變得無效的日期。瀏覽器使用它來確定何時需要重新整理頁面。有效的日期字串格式為 01 Jan 1998 12:00:00 GMT。 |
| 3 | Location: URL 代替請求的 URL 返回的 URL。您可以使用此欄位將請求重定向到任何檔案。 |
| 4 | Last-modified: 日期 資源上次修改的日期。 |
| 5 | Content-length: N 返回的資料的長度(以位元組為單位)。瀏覽器使用此值來報告檔案的估計下載時間。 |
| 6 | Set-Cookie: 字串 設定透過字串傳遞的 cookie |
CGI 環境變數
所有 CGI 程式都可以訪問以下環境變數。這些變數在編寫任何 CGI 程式時都起著重要的作用。
| 序號 | 變數名 & 描述 |
|---|---|
| 1 | CONTENT_TYPE 內容的資料型別。當客戶端向伺服器傳送附加內容時使用。例如,檔案上傳。 |
| 2 | CONTENT_LENGTH 查詢資訊的長度。僅對 POST 請求可用。 |
| 3 | HTTP_COOKIE 以鍵 & 值對的形式返回設定的 cookie。 |
| 4 | HTTP_USER_AGENT User-Agent 請求頭欄位包含有關發出請求的使用者代理的資訊。它是 Web 瀏覽器的名稱。 |
| 5 | PATH_INFO CGI 指令碼的路徑。 |
| 6 | QUERY_STRING 使用 GET 方法請求傳送的 URL 編碼資訊。 |
| 7 | REMOTE_ADDR 發出請求的遠端主機的 IP 地址。這對於記錄或身份驗證很有用。 |
| 8 | REMOTE_HOST 發出請求的主機的完全限定域名。如果此資訊不可用,則可以使用 REMOTE_ADDR 獲取 IR 地址。 |
| 9 | REQUEST_METHOD 用於發出請求的方法。最常見的方法是 GET 和 POST。 |
| 10 | SCRIPT_FILENAME CGI 指令碼的完整路徑。 |
| 11 | SCRIPT_NAME CGI 指令碼的名稱。 |
| 12 | SERVER_NAME 伺服器的主機名或 IP 地址 |
| 13 | SERVER_SOFTWARE 伺服器正在執行的軟體的名稱和版本。 |
這是一個列出所有 CGI 變數的小型 CGI 程式。單擊此連結檢視結果 獲取環境
import os

print ("Content-type: text/html\r\n\r\n");
print ("<font size=+1>Environment</font><\br>");
for param in os.environ.keys():
   print ("<b>%20s</b>: %s<\br>" % (param, os.environ[param]))
GET 和 POST 方法
您肯定遇到過許多需要將某些資訊從瀏覽器傳遞到 Web 伺服器,最終傳遞到 CGI 程式的情況。最常見的是,瀏覽器使用兩種方法將此資訊傳遞到 Web 伺服器。這些方法是 GET 方法和 POST 方法。
使用 GET 方法傳遞資訊
GET 方法傳送附加到頁面請求的編碼使用者資訊。頁面和編碼資訊由 ? 字元分隔,如下所示 -
http://www.test.com/cgi-bin/hello.py?key1=value1&key2=value2
GET 方法是將資訊從瀏覽器傳遞到 Web 伺服器的預設方法,它會生成一個長字串,該字串顯示在瀏覽器的 Location: 框中。
如果要向伺服器傳遞密碼或其他敏感資訊,切勿使用 GET 方法。
GET 方法有大小限制:請求字串中只能傳送 1024 個字元。
GET 方法使用 QUERY_STRING 頭髮送資訊,並且可以透過 QUERY_STRING 環境變數在 CGI 程式中訪問。
您可以透過簡單地連線鍵值對以及任何 URL 來傳遞資訊,或者可以使用 HTML <FORM> 標記使用 GET 方法傳遞資訊。
簡單的 URL 示例:GET 方法
這是一個簡單的 URL,它使用 GET 方法將兩個值傳遞給 hello_get.py 程式。
/cgi-bin/hello_get.py?first_name=Malhar&last_name=Lathkar
下面是hello_get.py指令碼,用於處理 Web 瀏覽器給出的輸入。我們將使用 cgi 模組,它使訪問傳遞的資訊變得非常容易 -
# Import modules for CGI handling
import cgi, cgitb

# Create instance of FieldStorage
form = cgi.FieldStorage()

# Get data from fields
first_name = form.getvalue('first_name')
last_name = form.getvalue('last_name')

print ("Content-type:text/html")
print()
print ("<html>")
print ('<head>')
print ("<title>Hello - Second CGI Program</title>")
print ('</head>')
print ('<body>')
print ("<h2>Hello %s %s</h2>" % (first_name, last_name))
print ('</body>')
print ('</html>')
這將生成以下結果 -
Hello Malhar Lathkar
簡單的表單示例:GET 方法
此示例使用 HTML 表單和提交按鈕傳遞兩個值。我們使用相同的 CGI 指令碼 hello_get.py 來處理此輸入。
<form action = "/cgi-bin/hello_get.py" method = "get">
   First Name: <input type = "text" name = "first_name">  <br />

   Last Name: <input type = "text" name = "last_name" />
   <input type = "submit" value = "Submit" />
</form>
以下是上述表單的實際輸出,您輸入名字和姓氏,然後單擊提交按鈕檢視結果。
使用 POST 方法傳遞資訊
將資訊傳遞到 CGI 程式的一種通常更可靠的方法是 POST 方法。此方法以與 GET 方法完全相同的方式打包資訊,但它不是在 URL 中 ? 後面作為文字字串傳送,而是作為單獨的訊息傳送。此訊息以標準輸入的形式進入 CGI 指令碼。
下面是相同的 hello_get.py 指令碼,它處理 GET 和 POST 方法。
# Import modules for CGI handling
import cgi, cgitb

# Create instance of FieldStorage
form = cgi.FieldStorage()

# Get data from fields
first_name = form.getvalue('first_name')
last_name  = form.getvalue('last_name')

print "Content-type:text/html\r\n\r\n"
print "<html>"
print "<head>"
print "<title>Hello - Second CGI Program</title>"
print "</head>"
print "<body>"
print "<h2>Hello %s %s</h2>" % (first_name, last_name)
print "</body>"
print "</html>"
讓我們再次採用與上面相同的示例,它使用 HTML 表單和提交按鈕傳遞兩個值。我們使用相同的 CGI 指令碼 hello_get.py 來處理此輸入。
<form action = "/cgi-bin/hello_get.py" method = "post">
First Name: <input type = "text" name = "first_name"><br />
Last Name: <input type = "text" name = "last_name" />

<input type = "submit" value = "Submit" />
</form>
以下是上述表單的實際輸出。您輸入名字和姓氏,然後單擊提交按鈕檢視結果。
將複選框資料傳遞到 CGI 程式
當需要選擇多個選項時使用複選框。
以下是一個帶有兩個複選框的表單的 HTML 程式碼示例 -
<form action = "/cgi-bin/checkbox.cgi" method = "POST" target = "_blank">
   <input type = "checkbox" name = "maths" value = "on" /> Maths
   <input type = "checkbox" name = "physics" value = "on" /> Physics
   <input type = "submit" value = "Select Subject" />
</form>
此程式碼的結果是以下表單 -
以下是 checkbox.cgi 指令碼,用於處理 Web 瀏覽器為複選框按鈕提供的輸入。
# Import modules for CGI handling
import cgi, cgitb

# Create instance of FieldStorage
form = cgi.FieldStorage()

# Get data from fields
if form.getvalue('maths'):
   math_flag = "ON"
else:
   math_flag = "OFF"

if form.getvalue('physics'):
   physics_flag = "ON"
else:
   physics_flag = "OFF"

print "Content-type:text/html\r\n\r\n"
print "<html>"
print "<head>"
print "<title>Checkbox - Third CGI Program</title>"
print "</head>"
print "<body>"
print "<h2> CheckBox Maths is : %s</h2>" % math_flag
print "<h2> CheckBox Physics is : %s</h2>" % physics_flag
print "</body>"
print "</html>"
將單選按鈕資料傳遞到 CGI 程式
當只需要選擇一個選項時使用單選按鈕。
以下是一個帶有兩個單選按鈕的表單的 HTML 程式碼示例 -
<form action = "/cgi-bin/radiobutton.py" method = "post" target = "_blank">
   <input type = "radio" name = "subject" value = "maths" /> Maths
   <input type = "radio" name = "subject" value = "physics" /> Physics
   <input type = "submit" value = "Select Subject" />
</form>
此程式碼的結果是以下表單 -
以下是 radiobutton.py 指令碼,用於處理 Web 瀏覽器為單選按鈕提供的輸入 -
# Import modules for CGI handling
import cgi, cgitb

# Create instance of FieldStorage
form = cgi.FieldStorage()

# Get data from fields
if form.getvalue('subject'):
   subject = form.getvalue('subject')
else:
   subject = "Not set"

print "Content-type:text/html\r\n\r\n"
print "<html>"
print "<head>"
print "<title>Radio - Fourth CGI Program</title>"
print "</head>"
print "<body>"
print "<h2> Selected Subject is %s</h2>" % subject
print "</body>"
print "</html>"
將文字區域資料傳遞到 CGI 程式
當必須將多行文字傳遞到 CGI 程式時使用 TEXTAREA 元素。
以下是一個帶有 TEXTAREA 框的表單的 HTML 程式碼示例 -
<form action = "/cgi-bin/textarea.py" method = "post" target = "_blank">
   <textarea name = "textcontent" cols = "40" rows = "4">
      Type your text here...
   </textarea>
   <input type = "submit" value = "Submit" />
</form>
此程式碼的結果是以下表單 -
以下是 textarea.cgi 指令碼,用於處理 Web 瀏覽器提供的輸入 -
# Import modules for CGI handling
import cgi, cgitb

# Create instance of FieldStorage
form = cgi.FieldStorage()

# Get data from fields
if form.getvalue('textcontent'):
   text_content = form.getvalue('textcontent')
else:
   text_content = "Not entered"

print "Content-type:text/html\r\n\r\n"
print "<html>"
print "<head>";
print "<title>Text Area - Fifth CGI Program</title>"
print "</head>"
print "<body>"
print "<h2> Entered Text Content is %s</h2>" % text_content
print "</body>"
將下拉框資料傳遞到 CGI 程式
當我們有很多選項可用但僅選擇一兩個選項時使用下拉框。
以下是一個帶有一個下拉框的表單的 HTML 程式碼示例 -
<form action = "/cgi-bin/dropdown.py" method = "post" target = "_blank">
   <select name = "dropdown">
      <option value = "Maths" selected>Maths</option>
      <option value = "Physics">Physics</option>
   </select>
   <input type = "submit" value = "Submit"/>
</form>
此程式碼的結果是以下表單 -
以下是 dropdown.py 指令碼,用於處理 Web 瀏覽器提供的輸入。
# Import modules for CGI handling
import cgi, cgitb

# Create instance of FieldStorage
form = cgi.FieldStorage()

# Get data from fields
if form.getvalue('dropdown'):
   subject = form.getvalue('dropdown')
else:
   subject = "Not entered"

print "Content-type:text/html\r\n\r\n"
print "<html>"
print "<head>"
print "<title>Dropdown Box - Sixth CGI Program</title>"
print "</head>"
print "<body>"
print "<h2> Selected Subject is %s</h2>" % subject
print "</body>"
print "</html>"
在 CGI 中使用 Cookie
HTTP 協議是一種無狀態協議。對於商業網站,需要在不同頁面之間維護會話資訊。例如,一個使用者註冊在完成多個頁面後結束。如何在所有網頁中維護使用者的會話資訊?
在許多情況下,使用 cookie 是記住和跟蹤偏好、購買、佣金以及其他改善訪客體驗或網站統計資訊所需資訊的最高效方法。
它是如何工作的?
您的伺服器以 cookie 的形式向訪客的瀏覽器傳送一些資料。瀏覽器可能會接受 cookie。如果接受,它將作為純文字記錄儲存在訪客的硬碟驅動器上。現在,當訪客到達您網站上的另一個頁面時,cookie 可用於檢索。檢索後,您的伺服器就知道/記住儲存的內容。
Cookie 是 5 個可變長度欄位的純文字資料記錄 -
Expires - Cookie 將過期的日期。如果為空,則 cookie 將在訪客退出瀏覽器時過期。
Domain - 您網站的域名。
Path - 設定 cookie 的目錄或網頁的路徑。如果要從任何目錄或頁面檢索 cookie,則可以為空。
Secure - 如果此欄位包含單詞“secure”,則只能使用安全伺服器檢索 cookie。如果此欄位為空,則不存在此類限制。
Name = Value - Cookie 以鍵值對的形式設定和檢索。
設定 Cookie
向瀏覽器傳送 cookie 非常容易。這些 cookie 與 HTTP 頭一起傳送,在 Content-type 欄位之前。假設您要將 UserID 和 Password 設定為 cookie。設定 cookie 的方法如下 -
print "Set-Cookie:UserID = XYZ;\r\n"
print "Set-Cookie:Password = XYZ123;\r\n"
print "Set-Cookie:Expires = Tuesday, 31-Dec-2007 23:12:40 GMT;\r\n"
print "Set-Cookie:Domain = www.tutorialspoint.com;\r\n"
print "Set-Cookie:Path = /perl;\n"
print "Content-type:text/html\r\n\r\n"
...........Rest of the HTML Content....
從這個例子中,您必須已經瞭解瞭如何設定 cookie。我們使用Set-Cookie HTTP 頭來設定 cookie。
可以選擇設定 cookie 屬性,如 Expires、Domain 和 Path。值得注意的是,cookie 在傳送魔術行"Content-type:text/html\r\n\r\n之前設定。
檢索 Cookie
檢索所有設定的 cookie 非常容易。Cookie 儲存在 CGI 環境變數 HTTP_COOKIE 中,它們將具有以下形式 -
key1 = value1;key2 = value2;key3 = value3....
以下是如何檢索 cookie 的示例。
# Import modules for CGI handling
from os import environ
import cgi, cgitb

if environ.has_key('HTTP_COOKIE'):
   for cookie in map(strip, split(environ['HTTP_COOKIE'], ';')):
      (key, value ) = split(cookie, '=');
      if key == "UserID":
         user_id = value

      if key == "Password":
         password = value

print "User ID  = %s" % user_id
print "Password = %s" % password
這將為上述指令碼設定的 cookie 生成以下結果 -
User ID = XYZ
Password = XYZ123
檔案上傳示例
要上傳檔案,HTML 表單必須將 enctype 屬性設定為multipart/form-data。帶有檔案型別的 input 標記會建立一個“瀏覽”按鈕。
<html>
   <body>
      <form enctype = "multipart/form-data" action = "save_file.py" method = "post">
      <p>File: <input type = "file" name = "filename" /></p>
      <p><input type = "submit" value = "Upload" /></p>
      </form>
   </body>
</html>
此程式碼的結果是以下表單 -
以上示例已有意停用,以避免人們在我們的伺服器上上傳檔案,但您可以在您的伺服器上嘗試以上程式碼。
以下是save_file.py指令碼,用於處理檔案上傳 -
import cgi, os
import cgitb; cgitb.enable()

form = cgi.FieldStorage()

# Get filename here.
fileitem = form['filename']

# Test if the file was uploaded
if fileitem.filename:
   # strip leading path from file name to avoid
   # directory traversal attacks
   fn = os.path.basename(fileitem.filename)
   open('/tmp/' + fn, 'wb').write(fileitem.file.read())

   message = 'The file "' + fn + '" was uploaded successfully'

else:
   message = 'No file was uploaded'

print """\
Content-Type: text/html\n
<html>
   <body>
      <p>%s</p>
   </body>
</html>
""" % (message,)
如果您在 Unix/Linux 上執行上述指令碼,則需要注意替換檔案分隔符,如下所示,否則在您的 Windows 機器上,上述 open() 語句應該可以正常工作。
fn = os.path.basename(fileitem.filename.replace("\\", "/" ))
如何彈出一個“檔案下載”對話方塊?
有時,您希望提供一個選項,使用者可以單擊連結,它會彈出一個“檔案下載”對話方塊給使用者,而不是顯示實際內容。這非常簡單,可以透過 HTTP 頭實現。此 HTTP 頭與上一節中提到的頭不同。
例如,如果您想使FileName檔案可從給定連結下載,則其語法如下 -
# HTTP Header
print "Content-Type:application/octet-stream; name = \"FileName\"\r\n";
print "Content-Disposition: attachment; filename = \"FileName\"\r\n\n";

# Actual File Content will go here.
fo = open("foo.txt", "rb")

str = fo.read();
print str

# Close opend file
fo.close()