- Python基礎
- Python - 首頁
- Python - 概述
- Python - 歷史
- Python - 特性
- Python vs C++
- Python - Hello World程式
- Python - 應用領域
- Python - 直譯器
- Python - 環境搭建
- Python - 虛擬環境
- Python - 基本語法
- Python - 變數
- Python - 資料型別
- Python - 型別轉換
- Python - Unicode系統
- Python - 字面量
- Python - 運算子
- Python - 算術運算子
- Python - 比較運算子
- Python - 賦值運算子
- Python - 邏輯運算子
- Python - 位運算子
- Python - 成員運算子
- Python - 身份運算子
- Python - 運算子優先順序
- Python - 註釋
- Python - 使用者輸入
- Python - 數字
- Python - 布林值
- Python 控制語句
- Python - 控制流
- Python - 決策
- Python - if語句
- Python - if else
- Python - 巢狀if
- Python - Match-Case語句
- Python - 迴圈
- Python - for迴圈
- Python - for-else迴圈
- Python - while迴圈
- Python - break語句
- Python - continue語句
- Python - pass語句
- Python - 巢狀迴圈
- Python 函式與模組
- Python - 函式
- Python - 預設引數
- Python - 關鍵字引數
- Python - 只接受關鍵字引數
- Python - 位置引數
- Python - 只接受位置引數
- Python - 可變引數
- Python - 變數作用域
- Python - 函式註解
- Python - 模組
- Python - 內建函式
- Python 字串
- Python - 字串
- Python - 字串切片
- Python - 修改字串
- Python - 字串連線
- Python - 字串格式化
- Python - 跳脫字元
- Python - 字串方法
- Python - 字串練習
- Python 列表
- Python - 列表
- Python - 訪問列表元素
- Python - 修改列表元素
- Python - 新增列表元素
- Python - 刪除列表元素
- Python - 遍歷列表
- Python - 列表推導式
- Python - 排序列表
- Python - 複製列表
- Python - 合併列表
- Python - 列表方法
- Python - 列表練習
- Python 元組
- Python - 元組
- Python - 訪問元組元素
- Python - 更新元組
- Python - 解包元組
- Python - 遍歷元組
- Python - 合併元組
- Python - 元組方法
- Python - 元組練習
- Python 集合
- Python - 集合
- Python - 訪問集合元素
- Python - 新增集合元素
- Python - 刪除集合元素
- Python - 遍歷集合
- Python - 合併集合
- Python - 複製集合
- Python - 集合運算子
- Python - 集合方法
- Python - 集合練習
- Python 字典
- Python - 字典
- Python - 訪問字典元素
- Python - 修改字典元素
- Python - 新增字典元素
- Python - 刪除字典元素
- Python - 字典檢視物件
- Python - 遍歷字典
- Python - 複製字典
- Python - 巢狀字典
- Python - 字典方法
- Python - 字典練習
- Python 陣列
- Python - 陣列
- Python - 訪問陣列元素
- Python - 新增陣列元素
- Python - 刪除陣列元素
- Python - 遍歷陣列
- Python - 複製陣列
- Python - 反轉陣列
- Python - 排序陣列
- Python - 合併陣列
- Python - 陣列方法
- Python - 陣列練習
- Python 檔案處理
- Python - 檔案處理
- Python - 寫入檔案
- Python - 讀取檔案
- Python - 重新命名和刪除檔案
- Python - 目錄
- Python - 檔案方法
- Python - OS檔案/目錄方法
- Python - OS路徑方法
- 面向物件程式設計
- Python - OOPs概念
- Python - 類與物件
- Python - 類屬性
- Python - 類方法
- Python - 靜態方法
- Python - 建構函式
- Python - 訪問修飾符
- Python - 繼承
- Python - 多型
- Python - 方法重寫
- Python - 方法過載
- Python - 動態繫結
- Python - 動態型別
- Python - 抽象
- Python - 封裝
- Python - 介面
- Python - 包
- Python - 內部類
- Python - 匿名類和物件
- Python - 單例類
- Python - 包裝類
- Python - 列舉
- Python - 反射
- Python 錯誤與異常
- Python - 語法錯誤
- Python - 異常
- Python - try-except塊
- Python - try-finally塊
- Python - 丟擲異常
- Python - 異常鏈
- Python - 巢狀try塊
- Python - 使用者自定義異常
- Python - 日誌記錄
- Python - 斷言
- Python - 內建異常
- Python 多執行緒
- Python - 多執行緒
- Python - 執行緒生命週期
- Python - 建立執行緒
- Python - 啟動執行緒
- Python - 連線執行緒
- Python - 執行緒命名
- Python - 執行緒排程
- Python - 執行緒池
- Python - 主執行緒
- Python - 執行緒優先順序
- Python - 守護執行緒
- Python - 同步執行緒
- Python 同步
- Python - 執行緒間通訊
- Python - 執行緒死鎖
- Python - 中斷執行緒
- Python 網路程式設計
- Python - 網路程式設計
- Python - 套接字程式設計
- Python - URL處理
- Python - 泛型
- Python 庫
- NumPy 教程
- Pandas 教程
- SciPy 教程
- Matplotlib 教程
- Django 教程
- OpenCV 教程
- Python 雜項
- Python - 日期與時間
- Python - 數學
- Python - 迭代器
- Python - 生成器
- Python - 閉包
- Python - 裝飾器
- Python - 遞迴
- Python - 正則表示式
- Python - PIP
- Python - 資料庫訪問
- Python - 弱引用
- Python - 序列化
- Python - 模板
- Python - 輸出格式化
- Python - 效能測量
- Python - 資料壓縮
- Python - CGI程式設計
- Python - XML處理
- Python - GUI程式設計
- Python - 命令列引數
- Python - 文件字串
- Python - JSON
- Python - 傳送郵件
- Python - 擴充套件
- Python - 工具/實用程式
- Python - GUIs
- Python 高階概念
- Python - 抽象基類
- Python - 自定義異常
- Python - 高階函式
- Python - 物件內部
- Python - 記憶體管理
- Python - 元類
- Python - 使用元類進行超程式設計
- Python - 模擬和存根
- Python - 猴子補丁
- Python - 訊號處理
- Python - 型別提示
- Python - 自動化教程
- Python - Humanize包
- Python - 上下文管理器
- Python - 協程
- Python - 描述符
- Python - 診斷和修復記憶體洩漏
- Python - 不可變資料結構
- Python 有用資源
- Python - 問答
- Python - 線上測驗
- Python - 快速指南
- Python - 參考
- Python - 速查表
- Python - 專案
- Python - 有用資源
- Python - 討論
- Python 編譯器
- NumPy 編譯器
- Matplotlib 編譯器
- SciPy 編譯器
使用Flask構建基於Web的計算器
在這裡,我們將學習使用Python和Flask建立基於Web的計算器的分步過程。Flask易於安裝且使用簡單,非常適合小型到中型專案。對於在使用Python進行Web開發領域的新手來說,本教程是一個極好的入門方式。
我們還將回顧構建計算器介面所需的最小HTML、CSS和JavaScript知識,該介面允許進行簡單的計算。
安裝
首先,在我們繼續編碼之前,我們需要確保已經安裝了Python和Flask。如果你尚未安裝Flask,可以透過pip(Python的包安裝程式)輕鬆安裝。
步驟1:安裝Python
首先,您必須在您的機器上安裝Python。您可以從官方Python網站下載。
另請閱讀:Python環境搭建
步驟2:安裝Flask
開啟命令提示符或終端,並執行以下命令:
pip install flask
使用Flask構建基於Web的計算器
我們將首先建立一個簡單的Flask應用程式,然後設計計算器的HTML介面並使用CSS進行樣式設定。
步驟1:建立Flask應用程式 (app.py)
此檔案將儲存我們Flask應用程式的主要邏輯。
app.py 程式碼
from flask import Flask, render_template, request
app = Flask(__name__)
@app.route("/", methods=["GET", "POST"])
def index():
   result = ''
   if request.method == "POST":
      try:
         expression = request.form["display"]
         # Evaluate the expression safely using eval
         result = eval(expression)
      except Exception as e:
         result = "Error"
   return render_template("index.html", result=result)

if __name__ == "__main__":
   app.run(debug=True)
程式碼解釋
讓我們首先匯入必要的模組,包括:Flask、RenderTemplate和Request。
**index()**函式處理兩種HTTP方法協議,包括GET和POST。當用戶提交表單(POST請求)時,該函式嘗試計算使用者輸入的表示式並返回該值。
如果在計算過程中出現任何問題(例如,輸入錯誤),則返回“錯誤”。
最後,我們將計算結果與index.HTML模板一起呈現。
步驟2:建立HTML模板 (index.html)
在你的專案資料夾內建立一個名為“templates”的目錄。在“templates”目錄中,建立一個名為“index.html”的檔案。
<!DOCTYPE html>
<html lang="en">
<head>
<meta charset="UTF-8">
<meta name="viewport" content="width=device-width, initial-scale=1.0">
<title>Flask Calculator</title>
<link rel="stylesheet" href="{{ url_for('static', filename='style.css') }}">
</head>
<body>
<div class="calculator">
   <h1>Flask Calculator</h1>
   <form method="POST">
      <input type="text" name="display" id="display" value="{{ result }}" readonly>

      <div class="buttons">
         <button type="button" class="btn" onclick="appendToDisplay('1')">1</button>
         <button type="button" class="btn" onclick="appendToDisplay('2')">2</button>
         <button type="button" class="btn" onclick="appendToDisplay('3')">3</button>
         <button type="button" class="btn operator" onclick="appendToDisplay('+')">+</button>

         <button type="button" class="btn" onclick="appendToDisplay('4')">4</button>
         <button type="button" class="btn" onclick="appendToDisplay('5')">5</button>
         <button type="button" class="btn" onclick="appendToDisplay('6')">6</button>
         <button type="button" class="btn operator" onclick="appendToDisplay('-')">-</button>

         <button type="button" class="btn" onclick="appendToDisplay('7')">7</button>
         <button type="button" class="btn" onclick="appendToDisplay('8')">8</button>
         <button type="button" class="btn" onclick="appendToDisplay('9')">9</button>
         <button type="button" class="btn operator" onclick="appendToDisplay('*')">×</button>

         <button type="button" class="btn" onclick="appendToDisplay('0')">0</button>
         <button type="button" class="btn" onclick="clearDisplay()">C</button>
         <button type="submit" class="btn operator">=</button>
         <button type="button" class="btn operator" onclick="appendToDisplay('/')">÷</button>
      </div>
   </form>
</div>

<script>
   function appendToDisplay(value) {
      const display = document.getElementById('display');
      display.value += value;
   }

   function clearDisplay() {
      document.getElementById('display').value = '';
   }
</script>
</body>
</html>
程式碼解釋
index.html 檔案定義了計算器的外觀。在這個程式中,它包含一個輸入欄位用於輸入數值和顯示結果。
它包含數字按鈕和數學運算按鈕(+,-,*,/),以及功能鍵,包括“C”鍵清除結果和“=”鍵顯示結果。
計算器上的按鈕,顯示追加和清除功能,使用 JavaScript 函式來處理按鈕互動以及顯示的更新或清除。
步驟 3:新增樣式 (style.css)
在你的專案資料夾內建立一個名為“static”的目錄。在“static”目錄中,建立一個名為“style.css”的檔案來設定計算器的樣式。
body {
   font-family: Arial, sans-serif;
   background-color: #f0f0f0;
   display: flex;
   justify-content: center;
   align-items: center;
   height: 100vh;
   margin: 0;
}

.calculator {
   width: 100%;
   max-width: 600px;
   background-color: #333;
   padding: 30px;
   border-radius: 15px;
   box-shadow: 0px 0px 15px 0px #000;
   text-align: center;
}

h1 {
   color: #fff;
   margin-bottom: 20px;
   font-size: 36px;
}

#display {
   width: 100%;
   height: 80px;
   font-size: 36px;
   text-align: right;
   padding: 15px;
   margin-bottom: 20px;
   border-radius: 10px;
   border: none;
   background-color: #222;
   color: #fff;
}

.buttons {
   display: grid;
   grid-template-columns: repeat(4, 1fr);
   gap: 15px;
}

.btn {
   width: 100%;
   padding: 30px;
   font-size: 24px;
   border: none;
   border-radius: 10px;
   background-color: #666;
   color: #fff;
   cursor: pointer;
   transition: background-color 0.2s;
}

.btn:hover {
   background-color: #555;
}

.operator {
   background-color: #ff9500;
}

.operator:hover {
   background-color: #e68a00;
}

.btn:active {
   background-color: #444;
}

.operator:active {
   background-color: #cc7a00;
}
步驟 4:執行應用程式
現在我們已經擁有了所有必要的檔案,你可以在你的專案目錄中執行以下命令來執行你的 Flask 應用程式:
python app.py
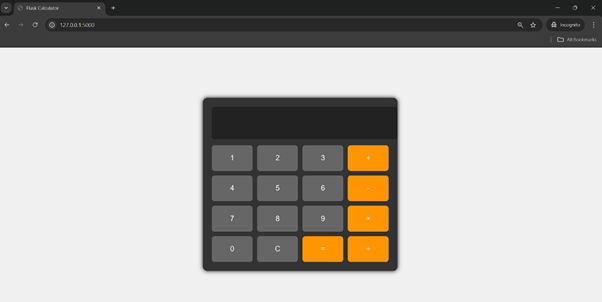
在你的網頁瀏覽器中訪問 http://127.0.0.1:5000/ 來檢視你的基於網頁的計算器。

輸出
現在將 http://127.0.0.1:5000 複製到隱身視窗中貼上。

現在你將看到這個介面。

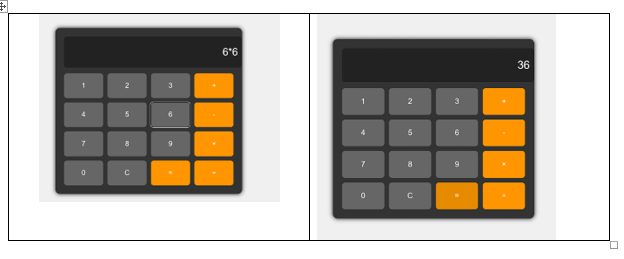
現在你可以使用滑鼠點選進行計算。
