- FastAPI 教程
- FastAPI - 首頁
- FastAPI - 簡介
- FastAPI - Hello World
- FastAPI - OpenAPI
- FastAPI - Uvicorn
- FastAPI - 型別提示
- FastAPI - IDE 支援
- FastAPI - REST 架構
- FastAPI - 路徑引數
- FastAPI - 查詢引數
- FastAPI - 引數驗證
- FastAPI - Pydantic
- FastAPI - 請求體
- FastAPI - 模板
- FastAPI - 靜態檔案
- FastAPI - HTML 表單模板
- FastAPI - 訪問表單資料
- FastAPI - 上傳檔案
- FastAPI - Cookie 引數
- FastAPI - 頭部引數
- FastAPI - 響應模型
- FastAPI - 巢狀模型
- FastAPI - 依賴項
- FastAPI - CORS
- FastAPI - CRUD 操作
- FastAPI - SQL 資料庫
- FastAPI - 使用 MongoDB
- FastAPI - 使用 GraphQL
- FastAPI - Websockets
- FastAPI - FastAPI 事件處理器
- FastAPI - 掛載子應用
- FastAPI - 中介軟體
- FastAPI - 掛載 Flask 應用
- FastAPI - 部署
- FastAPI 有用資源
- FastAPI 快速指南
- FastAPI - 有用資源
- FastAPI - 討論
FastAPI 快速指南
FastAPI - 簡介
FastAPI 是一個現代化的 Python Web 框架,非常高效地構建 API。它基於 Python 自 3.6 版本開始新增的型別提示功能。它是 Python 最快的 Web 框架之一。
由於它基於 Starlette 和 Pydantic 庫的功能,其效能處於最佳水平,與 NodeJS 和 Go 相當。
除了提供高效能外,FastAPI 還提供了顯著的開發速度,減少了程式碼中人為錯誤,易於學習,並且完全可以用於生產環境。
FastAPI 完全相容眾所周知的 API 標準,即 OpenAPI 和 JSON Schema。
FastAPI 由 Sebastian Ramirez 於 2018 年 12 月開發。目前可用的版本為 FastAPI 0.68.0。
FastAPI – 環境設定
要安裝 FastAPI(最好在虛擬環境中),請使用 pip 安裝程式。
pip3 install fastapi
FastAPI 依賴於 Starlette 和 Pydantic 庫,因此它們也會被安裝。
使用 PIP 安裝 Uvicorn
FastAPI 沒有自帶任何內建的伺服器應用程式。要執行 FastAPI 應用程式,您需要一個名為 uvicorn 的 ASGI 伺服器,因此也請使用 pip 安裝程式安裝它。它還會安裝 uvicorn 的依賴項 - asgiref、click、h11 和 typing-extensions
pip3 install uvicorn
安裝這兩個庫後,我們可以檢查到目前為止安裝的所有庫。
pip3 freeze
asgiref==3.4.1
click==8.0.1
colorama==0.4.4
fastapi==0.68.0
h11==0.12.0
importlib-metadata==4.6.4
pydantic==1.8.2
starlette==0.14.2
typing-extensions==3.10.0.0
uvicorn==0.15.0
zipp==3.5.0
FastAPI - Hello World
入門
建立 FastAPI 應用程式的第一步是宣告 FastAPI 類的應用程式物件。
from fastapi import FastAPI
app = FastAPI()
此 app 物件是應用程式與客戶端瀏覽器互動的主要點。uvicorn 伺服器使用此物件來監聽客戶端的請求。
下一步是建立路徑操作。路徑是一個 URL,當客戶端訪問該 URL 時,會呼叫對映到該 URL 的其中一個 HTTP 方法,並執行關聯的函式。我們需要將檢視函式繫結到 URL 和相應的 HTTP 方法。例如,index() 函式對應於具有 ‘get’ 操作的 ‘/’ 路徑。
@app.get("/")
async def root():
   return {"message": "Hello World"}
該函式返回一個 JSON 響應,但是,它也可以返回 dict、list、str、int 等。它還可以返回 Pydantic 模型。
將以下程式碼儲存為 main.py
from fastapi import FastAPI
app = FastAPI()
@app.get("/")
async def index():
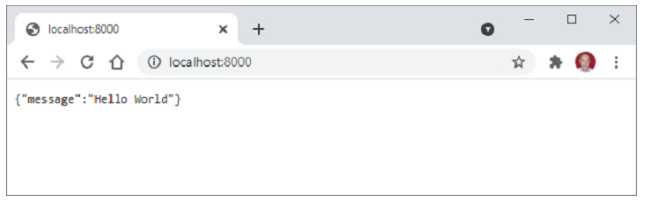
return {"message": "Hello World"}
透過提及例項化 FastAPI 應用程式物件的程式碼檔案來啟動 uvicorn 伺服器。
uvicorn main:app --reload
INFO: Uvicorn running on http://127.0.0.1:8000 (Press CTRL+C to quit)
INFO: Started reloader process [28720]
INFO: Started server process [28722]
INFO: Waiting for application startup.
INFO: Application startup complete.
開啟瀏覽器並訪問 https://:/8000。您將在瀏覽器視窗中看到 JSON 響應。
FastAPI - OpenAPI
在瀏覽器中輸入以下 URL 以自動生成互動式文件。
http://127.0.0.1:8000/docs
FastAPI 使用 Swagger UI 生成此文件。瀏覽器將顯示以下內容 -
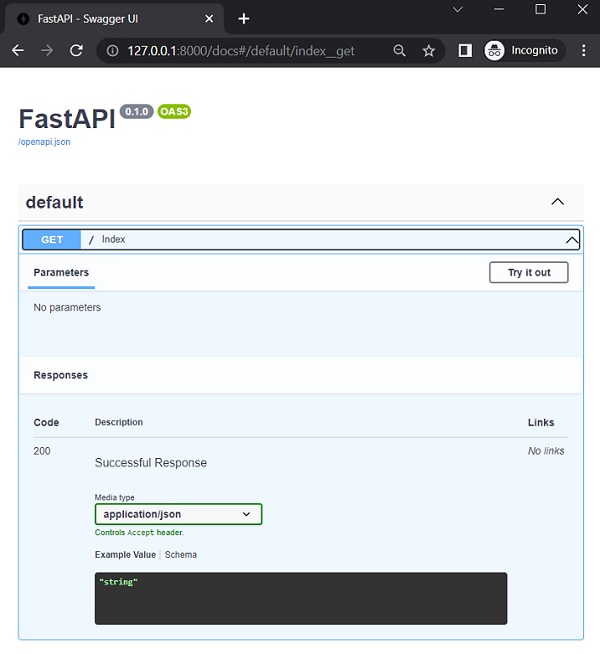
單擊 '試一下' 按鈕,然後單擊隨後出現的 '執行' 按鈕。
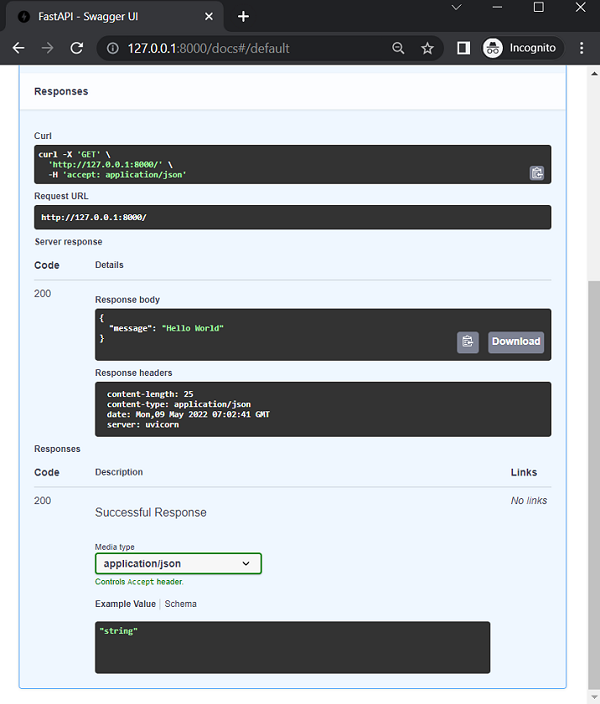
您可以看到內部執行的 Curl 命令、請求 URL、響應頭以及伺服器響應的 JSON 格式。
FastAPI 使用 OpenAPI 規範生成模式。該規範確定如何定義 API 路徑、路徑引數等。OpenAPI 標準定義的 API 模式決定了如何使用 JSON Schema 傳送資料。從瀏覽器訪問 http://127.0.0.1:8000/openapi.json。將顯示如下格式整齊的 JSON 響應 -
{
   "openapi": "3.0.2",
   "info": {
      "title": "FastAPI",
      "version": "0.1.0"
   },
   "paths": {
      "/": {
         "get": {
            "summary": "Index",
            "operationId": "index__get",
            "responses": {
               "200": {
                  "description": "Successful Response",
                  "content": {
                     "application/json": {
                        "schema": {}
                     }
                  }
               }
            }
         }
      }
   }
}
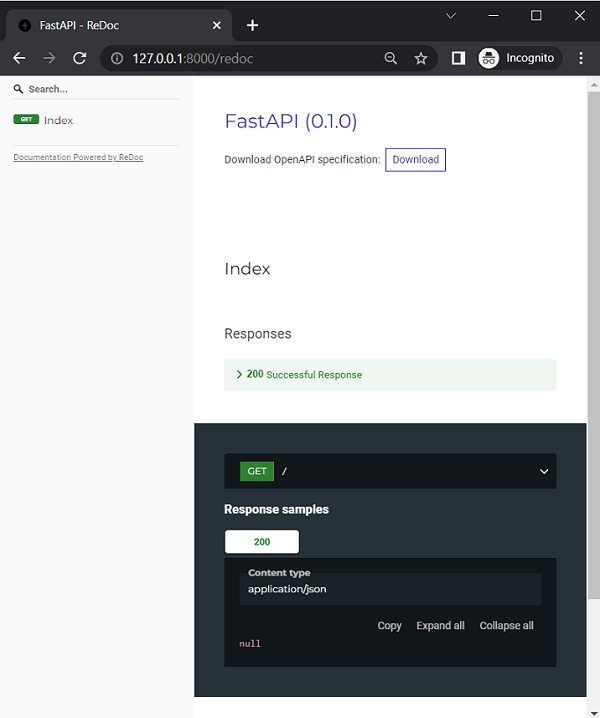
FastAPI 還支援 Redoc 提供的另一種自動文件方法 ( https://github.com/Redocly/redoc)。
在瀏覽器的位址列中輸入 https://:8000/redoc 作為 URL。
FastAPI - Uvicorn
與 Flask 框架不同,FastAPI 不包含任何內建的開發伺服器。因此我們需要 Uvicorn。它實現了 ASGI 標準並且速度極快。ASGI 代表 非同步伺服器閘道器介面。
符合 WSGI(Web 伺服器閘道器介面 - 舊標準)的 Web 伺服器不適合 asyncio 應用程式。實現 ASGI 規範的 Python Web 框架(如 FastAPI)提供高速效能,與使用 Node 和 Go 構建的 Web 應用程式相當。
Uvicorn 使用 uvloop 和 httptools 庫。它還提供對 HTTP/2 和 WebSockets 的支援,而 WSGI 無法處理這些協議。uvloop 類似於內建的 asyncio 事件迴圈。httptools 庫處理 http 協議。
如前所述,安裝 Uvicorn 將以最少的依賴項安裝它。但是,標準安裝還將安裝基於 cython 的依賴項以及其他一些庫。
pip3 install uvicorn(standard)
這樣,將支援 WebSockets 協議。此外,將安裝 PyYAML 以允許您提供 .yaml 檔案。
如前所述,應用程式在 Uvicorn 伺服器上使用以下命令啟動 -
uvicorn main:app –reload
--reload 選項啟用除錯模式,以便 app.py 中的任何更改都會自動反映出來,並且客戶端瀏覽器上的顯示也會自動重新整理。此外,可以使用以下命令列選項 -
| 序號 | 命令和描述 |
|---|---|
| 1 | --host TEXT 將套接字繫結到此主機。[預設值 127.0.0.1] |
| 2 | --port INTEGER 將套接字繫結到此埠。[預設值 8000] |
| 3 | --uds TEXT 繫結到 UNIX 域套接字。 |
| 4 | --fd INTEGER 繫結到來自此檔案描述符的套接字。 |
| 5 | --reload 啟用自動重新載入。 |
| 6 | --reload-dir PATH 顯式設定重新載入目錄,預設為當前工作目錄。 |
| 7 | --reload-include TEXT 在監視時包含檔案。預設情況下包含 '*.py' |
| 8 | -reload-exclude TEXT 在監視檔案時排除。 |
| 9 | --reload-delay FLOAT 前一次檢查和下一次檢查之間的時間延遲,預設為 0.25 |
| 10 | -loop [auto|asyncio|uvloop] 事件迴圈實現。[預設值 auto] |
| 11 | --http [auto|h11|httptools] HTTP 協議實現。[預設值 auto] |
| 12 | --interface auto|asgi|asgi|wsgi 選擇應用程式介面。[預設值 auto] |
| 13 | --env-file PATH 環境配置檔案。 |
| 14 | --log-config PATH 日誌配置檔案。支援的格式 .ini、.json、.yaml。 |
| 15 | --version 顯示 uvicorn 版本並退出。 |
| 16 | --app-dir TEXT 在指定的目錄中查詢 APP,預設為當前目錄 |
| 17 | --help 顯示此訊息並退出。 |
除了從命令列啟動 Uvicorn 伺服器之外,還可以以程式設計方式啟動它。
示例
在 Python 程式碼中,使用上面列出的任何引數呼叫 uvicorn.run() 方法 -
import uvicorn
from fastapi import FastAPI
app = FastAPI()
@app.get("/")
async def index():
   return {"message": "Hello World"}
if __name__ == "__main__":
   uvicorn.run("main:app", host="127.0.0.1", port=8000, reload=True)
現在,按如下方式執行此 app.py 作為 Python 指令碼 -
(fastapienv) C:\fastapienv>python app.py
因此,Uvicorn 伺服器將在除錯模式下啟動。
FastAPI - 型別提示
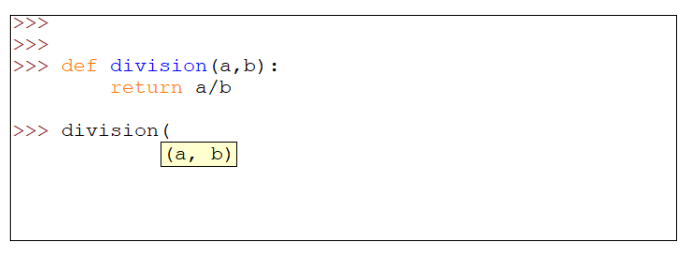
FastAPI 廣泛使用 Python 3.5 及更高版本中提供的 型別提示功能。事實上,Python 以動態型別語言而聞名。它恰好也是 Python 的獨特功能。在 Python 程式碼中,無需宣告變數屬於某種型別,其型別由動態分配給它的瞬時值確定。Python 的直譯器不執行型別檢查,因此容易出現執行時異常。
在以下示例中,定義了一個 division() 函式,它有兩個引數並返回它們的除法結果,假設這些引數將是數字。
>>> def division(a, b):
   return a/b
>>> division(10, 4)
2.5
>>> division(10, 2.5)
4.0
但是,如果傳遞給函式的值之一恰好是非數字,則會導致 TypeError,如下所示 -
>>> division("Python",5)
TypeError: unsupported operand type(s) for /: 'str' and 'int'
即使是像 IDLE 這樣的基本編碼環境也會指示該函式需要兩個引數,但不會指定型別,因為它們尚未宣告。
Python 的新的型別提示功能有助於提示使用者傳遞的引數的預期型別。這是透過在引數之後新增冒號和資料型別來完成的。我們將重新定義 division() 函式,如下所示 -
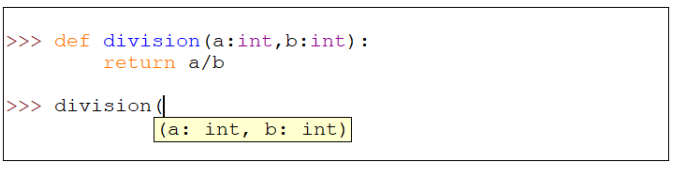
請注意,在呼叫函式時,Python 會提示傳遞的每個引數的預期型別。但是,如果傳遞了不相容的值,這並不能阻止 TypeError 出現。您必須使用靜態型別檢查器(如 MyPy)在執行前檢查相容性。
就像函式定義中的形式引數一樣,可以為函式的返回值提供型別提示。只需在函式定義語句中的冒號符號之前(函式塊開始之後)新增箭頭(->)和型別即可。
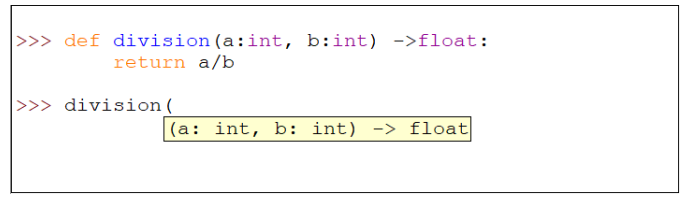
但是,如前所述,如果傳遞給函式的值不相容,或者函式返回的值不相容,Python 會報告 TypeError。可以使用 MyPy 靜態型別檢查器檢測此類錯誤。首先安裝 mypy 包。
pip3 install mypy
將以下程式碼儲存為 typecheck.py
def division(x:int, y:int) -> int:
   return (x//y)
a=division(10,2)
print (a)
b=division(5,2.5)
print (b)
c=division("Hello",10)
print (c)
使用 mypy 檢查此程式碼是否存在型別錯誤。
C:\python37>mypy typechk.py
typechk.py:7: error: Argument 2 to "division" has incompatible
type "float"; expected "int"
typechk.py:10: error: Argument 1 to "division" has
incompatible type "str"; expected "int"
Found 2 errors in 1 file (checked 1 source file)
函式的第二個和第三個呼叫中存在錯誤。在第二個呼叫中,傳遞給 y 的值是 float,而預期的是 int。在第三個呼叫中,傳遞給 x 的值是 str,而預期的是 int。(請注意,// 運算子返回整數除法)
所有標準資料型別都可以用作型別提示。這可以在全域性變數、作為函式引數的變數、函式定義內部等中完成。
x: int = 3
y: float = 3.14
nm: str = 'abc'
married: bool = False
names: list = ['a', 'b', 'c']
marks: tuple = (10, 20, 30)
marklist: dict = {'a': 10, 'b': 20, 'c': 30}
Python 版本 3.5 及更高版本標準庫中的新增功能是 typing 模組。它為相應的標準集合型別定義了特殊型別。typing 模組上的型別是 List、Tuple、Dict 和 Sequence。它還包含 Union 和 Optional 型別。請注意,資料型別的標準名稱全部為小寫,而 typing 模組中的名稱第一個字母為大寫。使用此功能,我們可以要求特定型別的集合。
from typing import List, Tuple, Dict
# following line declares a List object of strings.
# If violated, mypy shows error
cities: List[str] = ['Mumbai', 'Delhi', 'Chennai']
# This is Tuple with three elements respectively
# of str, int and float type)
employee: Tuple[str, int, float] = ('Ravi', 25, 35000)
# Similarly in the following Dict, the object key should be str
# and value should be of int type, failing which
# static type checker throws error
marklist: Dict[str, int] = {'Ravi': 61, 'Anil': 72}
FastAPI - IDE 支援
Python 的型別提示功能在幾乎所有 IDE(整合開發環境),如 PyCharm 和 VS Code 中都得到了最有效的利用,以提供動態自動完成功能。
讓我們看看 VS Code 如何使用型別提示在編寫程式碼時提供自動完成建議。在下面的示例中,定義了一個名為 sayhello 的函式,其中 name 作為引數。該函式透過在 name 引數之間新增空格將“Hello”連線到 name 引數,從而返回一個字串。此外,還需要確保 name 的第一個字母為大寫。
Python 的 str 類具有用於此目的的 capitalize() 方法,但如果在鍵入程式碼時不記得它,則必須在其他地方搜尋它。如果在 name 之後新增一個點,您期望看到屬性列表,但什麼也沒有顯示,因為 Python 不知道 name 變數的執行時型別是什麼。

這裡,型別提示派上用場了。在函式定義中將字串作為名稱的型別包含在內。現在,當您在 name 後按點 (.) 時,會顯示所有字串方法的下拉列表,從中可以選擇所需的方法(在本例中為 capitalize())。

也可以將型別提示與使用者定義的類一起使用。在下面的示例中,定義了一個矩形類,併為__init__()建構函式的引數提供了型別提示。
class rectangle:
   def __init__(self, w:int, h:int) ->None:
      self.width=w
      self.height=h
下面是一個使用上述矩形類物件作為引數的函式。宣告中使用的型別提示是類的名稱。
def area(r:rectangle)->int:
   return r.width*r.height
r1=rectangle(10,20)
print ("area = ", area(r1))
在這種情況下,IDE 編輯器也提供了自動完成支援,提示例項屬性列表。下面是PyCharm編輯器的螢幕截圖。

FastAPI廣泛使用型別提示。此功能隨處可見,例如路徑引數、查詢引數、標頭、主體、依賴項等,以及驗證來自傳入請求的資料。OpenAPI 文件生成也使用型別提示。
FastAPI - REST 架構
表述性狀態轉移(REST) 是一種軟體架構風格。REST 定義了 Web 應用程式的架構應該如何運作。它是一種基於資源的架構,其中 REST 伺服器託管的所有內容(檔案、影像或資料庫表中的行)都是資源,具有多種表示形式。
REST 建議某些架構約束。
統一介面
無狀態性
客戶端-伺服器
可快取性
分層系統
按需程式碼
REST 約束具有以下優勢:
可擴充套件性
簡單性
可修改性
可靠性
可移植性
可見性
REST 使用 HTTP 動詞或方法對資源進行操作。POST、GET、PUT 和 DELETE 方法分別執行 CREATE、READ、UPDATE 和 DELETE 操作。
FastAPI - 路徑引數
現代 Web 框架使用路由或端點作為 URL 的一部分,而不是基於檔案的 URL。這有助於使用者更有效地記住應用程式 URL。在 FastAPI 中,它被稱為路徑。路徑或路由是第一個“/”之後 URL 的一部分。
例如,在以下 URL 中:
https://:8000/hello/TutorialsPoint
路徑或路由將是
/hello/TutorialsPoint
在 FastAPI 中,這樣的路徑字串作為引數傳遞給操作裝飾器。這裡的操作是指瀏覽器用於傳送資料的 HTTP 動詞。這些操作包括 GET、PUT 等。操作裝飾器(例如,@app.get("/"))緊跟一個函式,當訪問指定的 URL 時執行該函式。在下面的示例中:
from fastapi import FastAPI
app = FastAPI()
@app.get("/")
async def index():
   return {"message": "Hello World"}
這裡,("/") 是路徑,get 是操作,@app.get("/") 是路徑操作裝飾器,它下面的 index() 函式稱為路徑操作函式。
任何以下 HTTP 動詞都可以用作操作。
| 序號 | 方法和描述 |
|---|---|
| 1 | GET 以未加密的形式將資料傳送到伺服器。最常用的方法。 |
| 2 | HEAD 與 GET 相同,但沒有響應正文。 |
| 3 | POST 用於將 HTML 表單資料傳送到伺服器。POST 方法接收的資料不會被伺服器快取。 |
| 4 | PUT 用上傳的內容替換目標資源的所有當前表示形式。 |
| 5 | DELETE 刪除 URL 給定的目標資源的所有當前表示形式。 |
函式定義中的async關鍵字告訴 FastAPI 它應該非同步執行,即不阻塞當前執行執行緒。但是,也可以在沒有 async 字首的情況下定義路徑操作函式。
此裝飾函式返回 JSON 響應。雖然它可以返回幾乎任何 Python 物件,但它會自動轉換為 JSON。在本教程的後面,我們將看到這樣的函式如何返回Pydantic模型物件。
URL 的端點或路徑可以有一個或多個可變引數。它們可以透過使用 Python 的字串格式化表示法來接受。在上面的示例 URL https://:8000/hello/TutorialsPoint 中,最後一個值可能會在每個客戶端請求中更改。此可變引數可以在路徑中定義的變數中接受,並傳遞給繫結到操作裝飾器的函式中定義的形式引數。
示例
新增另一個路徑裝飾器,在路由中使用可變引數,並將hello()函式繫結到 name 引數。根據以下內容修改 main.py。
import uvicorn
from fastapi import FastAPI
app = FastAPI()
@app.get("/")
async def index():
   return {"message": "Hello World"}
@app.get("/hello/{name}")
async def hello(name):
   return {"name": name}
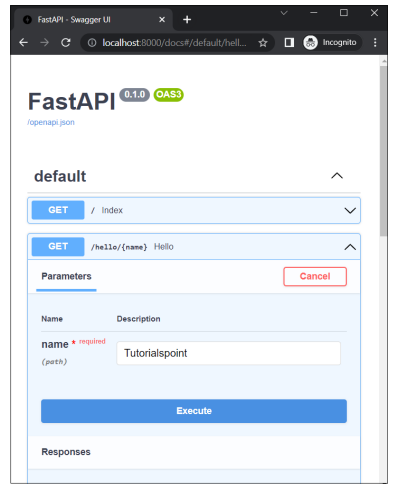
啟動 Uvicorn 伺服器並訪問 https://:8000/hello/Tutorialspoint URL。瀏覽器顯示以下 JSON 響應。
{"name":"Tutorialspoint"}
將可變路徑引數更改為其他內容,例如 https://:8000/hello/Python,以便瀏覽器顯示:
{"name":"Python"}
檢查 OpenAPI 文件
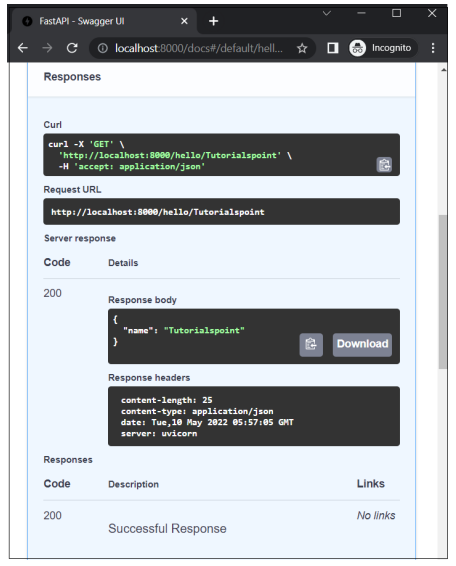
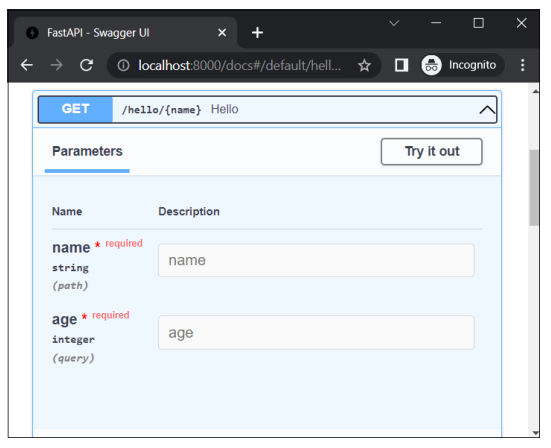
現在,如果我們透過輸入 URL https://:8000/docs 檢查 OpenAPI 文件,它將顯示兩條路由及其各自的檢視函式。單擊 /hello/{name} 按鈕下方的“試用”按鈕,並將 Tutorialspoint 作為 name 引數描述的值,然後單擊“執行”按鈕。
然後它將顯示Curl命令、請求 URL以及伺服器響應的詳細資訊,包括響應正文和響應標頭。
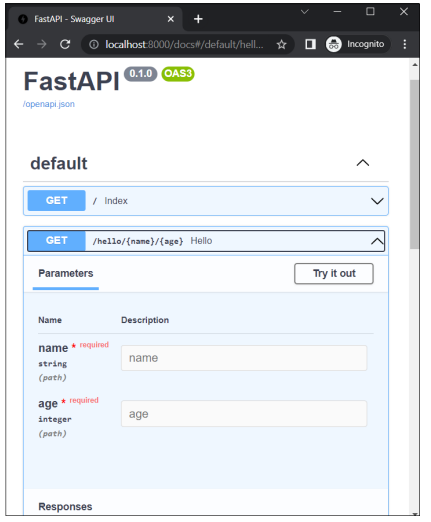
一條路由可以有多個用“/”符號分隔的引數。
from fastapi import FastAPI
app = FastAPI()
@app.get("/hello/{name}/{age}")
async def hello(name,age):
   return {"name": name, "age":age}
在這種情況下,/hello是路由,後面跟著兩個用花括號括起來的引數。如果瀏覽器位址列中給出的 URL 是 https://:8000/hello/Ravi/20,則 Ravi 和 20 的資料將分別分配給變數 name 和 age。瀏覽器顯示以下 JSON 響應:
{"name":"Ravi","age":"20"}
帶型別的路徑引數
您可以對要裝飾的函式的引數使用 Python 的型別提示。在這種情況下,將 name 定義為 str,將 age 定義為 int。
@app.get("/hello/{name}/{age}")
async def hello(name:str,age:int):
   return {"name": name, "age":age}
如果型別不匹配,這將導致瀏覽器在 JSON 響應中顯示 HTTP 錯誤訊息。嘗試輸入 https://:8000/hello/20/Ravi 作為 URL。瀏覽器的響應如下:
{
   "detail": [
      {
         "loc": [
            "path",
            "age"
         ],
      "msg": "value is not a valid integer",
      "type": "type_error.integer"
      }
   ]
}
原因很明顯,因為age是整數,不能接受字串值。這也會反映在 Swagger UI(OpenAPI)文件中。
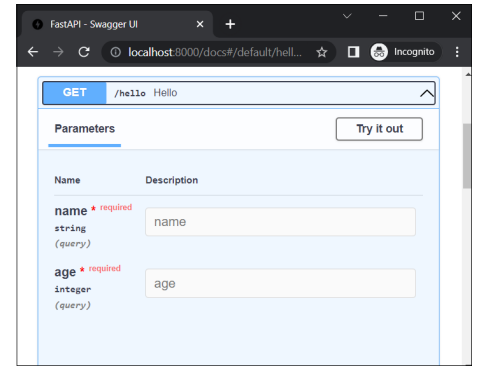
FastAPI - 查詢引數
將請求資料傳遞到伺服器的經典方法是將查詢字串附加到 URL。假設伺服器上的 Python 指令碼 (hello.py) 作為CGI執行,由&符號連線的一系列鍵值對構成查詢字串,透過將問號 (?) 作為分隔符附加到 URL 來附加查詢字串。例如:
https:///cgi-bin/hello.py?name=Ravi&age=20
URL 的尾部(在 (?) 之後)是查詢字串,然後由伺服器端指令碼解析以進行進一步處理。
如前所述,查詢字串是由 & 符號連線的一系列 parameter=value 對。FastAPI 自動將端點中不是路徑引數的部分視為查詢字串,並將其解析成引數及其值。這些引數傳遞給操作裝飾器下面的函式。
示例
from fastapi import FastAPI
app = FastAPI()
@app.get("/hello")
async def hello(name:str,age:int):
   return {"name": name, "age":age}
啟動 Uvicorn 伺服器並在瀏覽器中輸入此 URL:
https://:8000/hello?name=Ravi&age=20
您應該獲得相同的 JSON 響應。但是,檢查表明 FastAPI 檢測到 /hello 端點沒有路徑引數,但有查詢引數。
單擊“試用”按鈕,輸入“Ravi”和“20”作為值,然後按“執行”按鈕。文件頁面現在顯示 Curl 命令、請求 URL 以及 HTTP 響應的主體和標頭。

示例
您可以對要裝飾的函式的引數使用 Python 的型別提示。在這種情況下,將 name 定義為 str,將 age 定義為 int。
from fastapi import FastAPI
app = FastAPI()
@app.get("/hello/{name}")
async def hello(name:str,age:int):
   return {"name": name, "age":age}
嘗試輸入 https://:8000/docs 作為 URL。這將開啟 Swagger UI(OpenAPI)文件。引數“name”是路徑引數,“age”是查詢引數
FastAPI - 引數驗證
可以對 URL 的路徑引數和查詢引數應用驗證條件。為了對路徑引數應用驗證條件,您需要匯入 Path 類。除了引數的預設值外,您還可以為字串引數指定最大長度和最小長度。
from fastapi import FastAPI, Path
app = FastAPI()
@app.get("/hello/{name}")
async def hello(name:str=Path(...,min_length=3,
max_length=10)):
   return {"name": name}
如果瀏覽器 URL 包含長度小於 3 或大於 10 的引數,如 (https://:8000/hello/Tutorialspoint),則會出現相應的錯誤訊息,例如:
{
   "detail": [
      {
         "loc": [
            "path",
            "name"
         ],
         "msg": "ensure this value has at most 10 characters",
         "type": "value_error.any_str.max_length",
         "ctx": {
            "limit_value": 10
         }
      }
   ]
}
OpenAPI 文件也顯示了應用的驗證:

也可以對數字引數應用驗證規則,使用以下運算子:
gt - 大於
ge - 大於或等於
lt - 小於
le - 小於或等於
讓我們修改上面的操作裝飾器,將 age 作為路徑引數包含在內,並應用驗證。
from fastapi import FastAPI, Path
app = FastAPI()
@app.get("/hello/{name}/{age}")
async def hello(*, name: str=Path(...,min_length=3 , max_length=10), age: int = Path(..., ge=1, le=100)):
   return {"name": name, "age":age}
在這種情況下,對引數 name 和 age 都應用了驗證規則。如果輸入的 URL 是 https://:8000/hello/hi/110,則 JSON 響應顯示以下驗證失敗說明:
{
   "detail": [
      {
         "loc": [
            "path",
            "name"
         ],
         "msg": "ensure this value has at least 3 characters",
         "type": "value_error.any_str.min_length",
         "ctx": {
            "limit_value": 3
         }
      },
      {
         "loc": [
            "path",
            "age"
         ],
         "msg": "ensure this value is less than or equal to 100",
         "type": "value_error.number.not_le",
         "ctx": {
            "limit_value": 100
         }
      }
   ]
}
Swagger UI 文件也識別了約束。

查詢引數也可以應用驗證規則。您需要將它們指定為 Query 類建構函式引數的一部分。
讓我們在上面的函式中新增一個名為percent的查詢引數,並應用驗證規則 ge=0(即大於或等於 0)和lt=100(小於或等於 100)
from fastapi import FastAPI, Path, Query
@app.get("/hello/{name}/{age}")
async def hello(*, name: str=Path(...,min_length=3 ,
max_length=10), \
      age: int = Path(..., ge=1, le=100), \
      percent:float=Query(..., ge=0, le=100)):
   return {"name": name, "age":age}
如果輸入的 URL 是 https://:8000/hello/Ravi/20?percent=79,則瀏覽器顯示以下 JSON 響應:
{"name":"Ravi","age":20}
FastAPI 正確地將 percent 識別為應用了驗證條件的查詢引數。它在 OpenAPI 文件中反映如下:

雖然客戶端可以使用 GET 方法將路徑和查詢引數傳送到 API 伺服器,但我們需要應用 POST 方法才能將一些二進位制資料作為 HTTP 請求的一部分發送。此二進位制資料可以是任何 Python 類的物件形式。它構成請求正文。FastAPI 使用 Pydantic 庫來實現此目的。
FastAPI - Pydantic
Pydantic是一個用於資料解析和驗證的 Python 庫。它使用 Python 新版本(3.6 及更高版本)的型別提示機制,並在執行時驗證型別。Pydantic 定義了BaseModel類。它充當建立使用者定義模型的基類。
以下程式碼將 Student 類定義為基於 BaseModel 的模型。
from typing import List
from pydantic import BaseModel
class Student(BaseModel):
   id: int
   name :str
   subjects: List[str] = []
Student類的屬性用型別提示宣告。請注意,subjects 屬性是 typing 模組中定義的 List 型別,並且是內建列表型別。
我們可以使用具有匹配結構的字典填充 Student 類物件,如下所示:
>>> data = {
   'id': 1,
   'name': 'Ravikumar',
   'subjects': ["Eng", "Maths", "Sci"],
}
>>> s1=Student(**data)
>>> print (s1)
id=1 name='Ravikumar' subjects=['Eng', 'Maths', 'Sci']
>>> s1
Student(id=1, name='Ravikumar', subjects=['Eng', 'Maths', 'Sci'])
>>> s1.dict()
{'id': 1, 'name': 'Ravikumar', 'subjects': ['Eng', 'Maths', 'Sci']}
Pydantic將在可能的情況下自動轉換資料型別。例如,即使字典中的 id 鍵被分配了一個數字的字串表示形式(例如“123”),它也會將其強制轉換為整數。但是,在不可能的情況下,將引發異常。
>>> data = {
   'id': [1,2],
   'name': 'Ravikumar',
   'subjects': ["Eng", "Maths", "Sci"],
}
>>> s1=Student(**data)
Traceback (most recent call last):
   File "<pyshell#13>", line 1, in <module>
      s1=Student(**data)
   File "pydantic\main.py", line 406, in
pydantic.main.BaseModel.__init__
pydantic.error_wrappers.ValidationError: 1 validation error
for Student
id
   value is not a valid integer (type=type_error.integer)
Pydantic 還包含一個 Field 類,用於宣告模型屬性的元資料和驗證規則。首先修改 Student 類,以便如下在“name”屬性上應用 Field 型別:
from typing import List
from pydantic import BaseModel, Field
class Student(BaseModel):
   id: int
   name :str = Field(None, title="The description of the item", max_length=10)
   subjects: List[str] = []
按如下所示填充資料。這裡的 name 超過了規定的max_length。Pydantic 按預期丟擲ValidationError。
>>> data = {
   'id': 1,
   'name': 'Ravikumar Sharma',
   'subjects': ["Eng", "Maths", "Sci"],
}
>>> s1=Student(**data)
Traceback (most recent call last):
   File "<pyshell#28>", line 1, in <module>
      s1=Student(**data)
   File "pydantic\main.py", line 406, in
pydantic.main.BaseModel.__init__
pydantic.error_wrappers.ValidationError: 1 validation error for Student
name
   ensure this value has at most 10 characters
   (type=value_error.any_str.max_length; limit_value=10)
Pydantic 模型可以與SQLAlchemy或Peewee等 ORM 模型對映。
FastAPI - 請求體
我們現在將使用 Pydantic 模型物件作為客戶端請求的請求正文。如前所述,我們需要為此使用 POST 操作裝飾器。
import uvicorn
from fastapi import FastAPI
from typing import List
from pydantic import BaseModel, Field
app = FastAPI()
class Student(BaseModel):
   id: int
   name :str = Field(None, title="name of student", max_length=10)
   subjects: List[str] = []
@app.post("/students/")
async def student_data(s1: Student):
   return s1
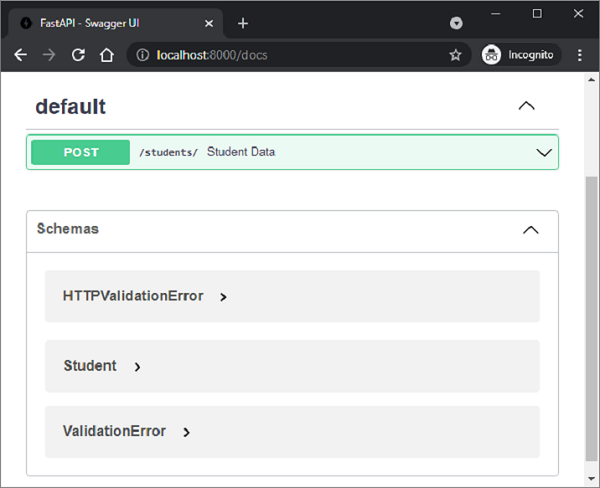
可以看到,student_data() 函式被 @app.post() 裝飾器裝飾,該裝飾器的 URL 端點為 "/students/"。它從客戶端的請求中接收 Student 類的物件作為 Body 引數。要測試此路由,請啟動 Uvicorn 伺服器並在瀏覽器中訪問 https://:8000/docs 開啟 Swagger UI 文件。
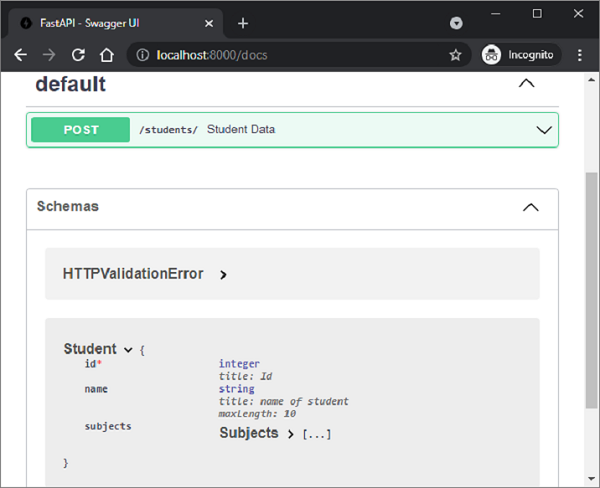
文件標識 "/students/" 路由與 student_data() 函式和 POST 方法相關聯。在 schemas 部分,將列出 Student 模型。
展開其前面的節點以顯示模型的結構。
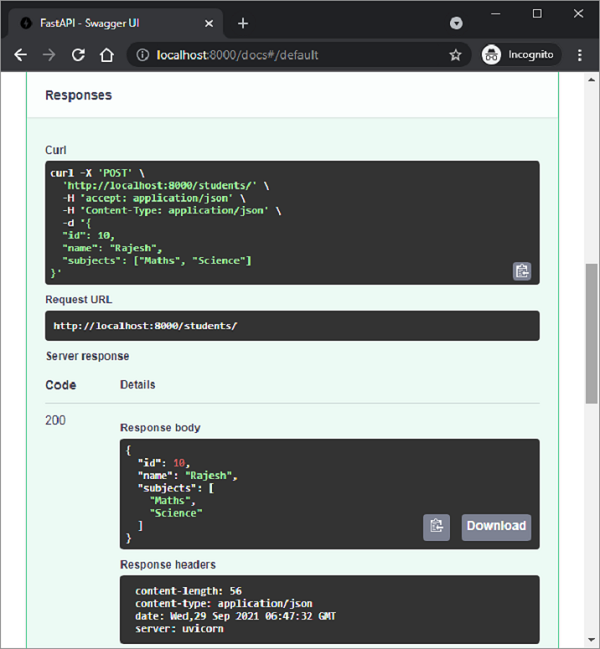
單擊 Try it out 按鈕以在請求正文中填寫測試值。

單擊 Execute 按鈕並獲取伺服器的響應值。
雖然 Pydantic 模型會自動填充請求正文,但也可以使用單個值向其新增屬性。為此,我們需要將 Body 類物件用作要裝飾的操作函式的引數。
首先,我們需要從 fastapi 中匯入 Body 類。如下例所示,在 @app.post() 裝飾器下方的 student_data() 函式定義中宣告 'name' 和 'marks' 為 Body 引數。
import uvicorn
from fastapi import FastAPI, Body
@app.post("/students")
async def student_data(name:str=Body(...),
marks:int=Body(...)):
   return {"name":name,"marks": marks}
如果我們檢查 Swagger UI 文件,我們應該能夠找到此 POST 方法與 student_data() 函式相關聯,並且具有兩個引數的請求正文。

還可以宣告一個操作函式,使其具有路徑和/或查詢引數以及請求正文。讓我們修改 student_data() 函式,使其具有路徑引數 'college'、查詢引數 'age' 和正文引數 Student 模型物件。
@app.post("/students/{college}")
async def student_data(college:str, age:int, student:Student):
   retval={"college":college, "age":age, **student.dict()}
   return retval
該函式將 college 和 age 引數的值與 Student 物件的字典表示形式一起新增,並將其作為響應返回。我們可以如下檢查 API 文件 -
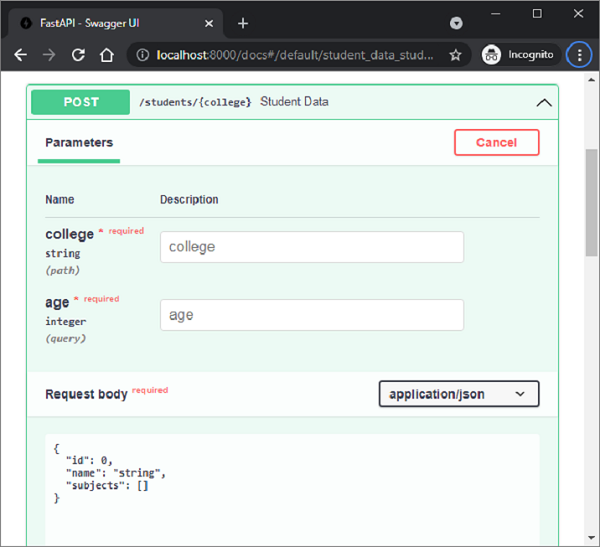
可以看到,college 是路徑引數,age 是查詢引數,Student 模型是請求正文。
FastAPI - 模板
預設情況下,FastAPI 向客戶端呈現 JSON 響應。但是,它可以轉換為 HTML 響應。為此,FastAPI 在 fastapi.responses 模組中定義了 HTMLResponse 類。我們需要將 response_class 作為附加引數新增到操作裝飾器中,並將 HTMLResponse 物件作為其值。
在下面的示例中,@app.get() 裝飾器具有 "/hello/" 端點,並且 HTMLResponse 作為 response_class。在 hello() 函式內部,我們有一個 Hello World 訊息的 HTML 程式碼的字串表示形式。該字串以 HTML 響應的形式返回。
from fastapi.responses import HTMLResponse
from fastapi import FastAPI
app = FastAPI()
@app.get("/hello/")
async def hello():
   ret='''
<html>
<body>
<h2>Hello World!</h2>
</body>
</html>
'''
   return HTMLResponse(content=ret)
檢查 API 文件後,可以發現伺服器的響應正文為 HTML。
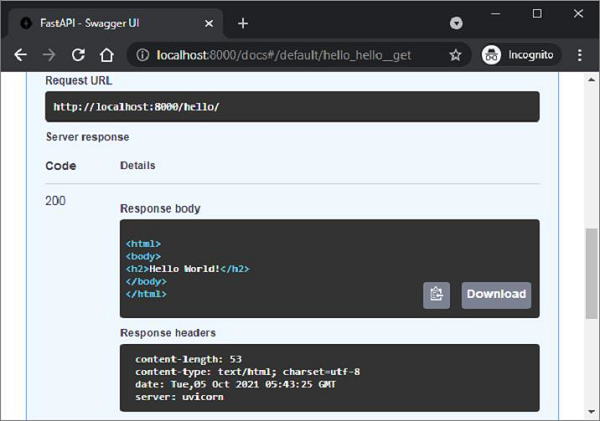
請求 URL (https://:8000/hello/) 也應該在瀏覽器中呈現訊息。但是,呈現原始 HTML 響應非常繁瑣。或者,可以呈現預構建的 HTML 頁面作為模板。為此,我們需要使用 Web 模板庫。
Web 模板庫具有一個模板引擎,該引擎合併一個具有佔位符變數的靜態網頁。來自任何來源(例如資料庫)的資料被合併以動態生成和呈現網頁。FastAPI 沒有任何預打包的模板庫。因此,您可以自由使用任何適合您需求的庫。在本教程中,我們將使用 jinja2,這是一個非常流行的 Web 模板庫。讓我們首先使用 pip 安裝程式安裝它。
pip3 install jinja2
FastAPI 對 Jinja 模板的支援以 jinja2Templates 類的形式出現,該類在 fastapi.templates 模組中定義。
from fastapi.templating import Jinja2Templates
要宣告一個模板物件,應將儲存 html 模板的資料夾作為引數提供。在當前工作目錄中,我們將建立一個 'templates' 目錄。
templates = Jinja2Templates(directory="templates")
一個簡單的網頁 'hello.html' 用於呈現 Hello World 訊息,也放在 'templates' 資料夾中。
<html>
<body>
<h2>Hello World!</h2>
</body>
</html>
我們現在將從此頁面呈現 html 程式碼作為 HTMLResponse。讓我們修改 hello() 函式如下 -
from fastapi.responses import HTMLResponse
from fastapi.templating import Jinja2Templates
from fastapi import FastAPI, Request
app = FastAPI()
templates = Jinja2Templates(directory="templates")
@app.get("/hello/", response_class=HTMLResponse)
async def hello(request: Request):
   return templates.TemplateResponse("hello.html", {"request": request})
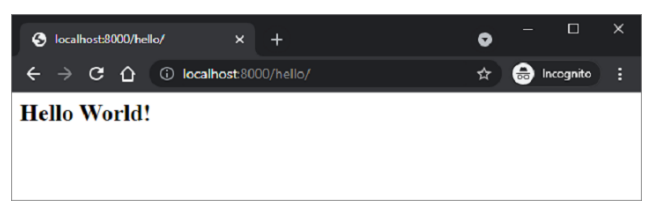
這裡,模板物件的 templateResponse() 方法收集模板程式碼和請求上下文以呈現 http 響應。當我們啟動伺服器並訪問 https://:8000/hello/ URL 時,我們在瀏覽器中看到了 Hello World 訊息,這實際上是 hello.html 的輸出。
如前所述,jinja2 模板允許在 HTML 程式碼中嵌入某些佔位符。jinja2 程式碼元素放在花括號內。一旦瀏覽器的 HTML 解析器遇到此程式碼,模板引擎就會接管並使用 HTTP 響應提供的變數資料填充這些程式碼元素。Jinja2 提供以下程式碼元素 -
{% %} – 語句
{{ }} – 列印到模板輸出的表示式
{# #} − 註釋,不包含在模板輸出中
# # # − 行語句
hello.html 如下修改,透過替換 name 引數來顯示動態訊息。
<html>
<body>
<h2>Hello {{name}} Welcome to FastAPI</h2>
</body>
</html>
操作函式 hello() 也被修改為接受 name 作為路徑引數。TemplateResponse 還應包含 “name”:name 的 JSON 表示形式以及請求上下文。
from fastapi.responses import HTMLResponse
from fastapi.templating import Jinja2Templates
from fastapi import FastAPI, Request
app = FastAPI()
templates = Jinja2Templates(directory="templates")
@app.get("/hello/{name}", response_class=HTMLResponse)
async def hello(request: Request, name:str):
   return templates.TemplateResponse("hello.html", {"request": request, "name":name})
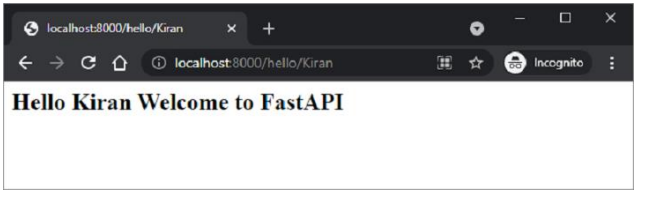
重新啟動伺服器並轉到 https://:8000/hello/Kiran。瀏覽器現在使用此 URL 中的路徑引數填充 jinja2 佔位符。
FastAPI - 靜態檔案
通常需要在模板響應中包含一些資源,即使存在某些動態資料,這些資源也保持不變。此類資源稱為靜態資源。媒體檔案(.png、.jpg 等)、用於執行某些前端程式碼的 JavaScript 檔案或用於格式化 HTML(.CSS 檔案)的樣式表是靜態檔案的示例。
為了處理靜態檔案,您需要一個名為 aiofiles 的庫。
pip3 install aiofiles
接下來,從 fastapi.staticfiles 模組匯入 StaticFiles 類。其物件是 FastAPI 應用程式物件的 mount() 方法的引數之一,用於將當前應用程式資料夾中的 "static" 子資料夾分配給儲存和提供應用程式的所有靜態資源。
app.mount(app.mount("/static", StaticFiles(directory="static"), name="static")
示例
在下面的示例中,FastAPI 徽標將在 hello.html 模板中呈現。因此,首先將“fa-logo.png”檔案放置在 static 資料夾中。現在可以將其用作 HTML 程式碼中 <img> 標記的 src 屬性。
from fastapi import FastAPI, Request
from fastapi.responses import HTMLResponse
from fastapi.templating import Jinja2Templates
from fastapi.staticfiles import StaticFiles
app = FastAPI()
templates = Jinja2Templates(directory="templates")
app.mount("/static", StaticFiles(directory="static"), name="static")
@app.get("/hello/{name}", response_class=HTMLResponse)
async def hello(request: Request, name:str):
   return templates.TemplateResponse("hello.html", {"request": request, "name":name})
\templates\hello.html 的 HTML 程式碼如下 -
<html>
   <body>
      <h2>Hello {{name}} Welcome to FastAPI</h2>
      <img src="{{ url_for('static', path='fa-logo.png') }}" alt="" width="300">
   </body>
</html>
</pre>
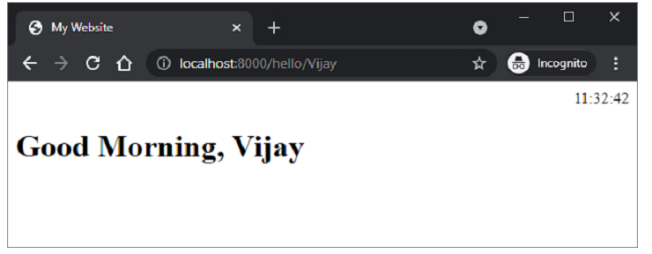
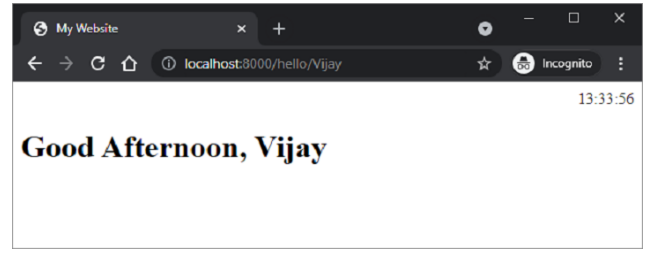
執行 Uvicorn 伺服器並訪問 URL https:///hello/Vijay。徽標將顯示在瀏覽器視窗中,如所示。

示例
這是另一個靜態檔案的示例。JavaScript 程式碼 hello.js 包含 myfunction() 的定義,該定義將在以下 HTML 指令碼(\templates\hello.html)的 onload 事件上執行。
<html>
   <head>
      <title>My Website</title>
      <script src="{{ url_for('static', path='hello.js') }}"></script>
   </head>
   <body onload="myFunction()">
      <div id="time" style="text-align:right; width="100%"></div>
      <h1><div id="ttl">{{ name }}</div></h1>
   </body>
</html>
hello.js 程式碼如下 - (\static\hello.js)
function myFunction() {
   var today = new Date();
   var h = today.getHours();
   var m = today.getMinutes();
   var s = today.getSeconds();
   var msg="";
   if (h<12) {
      msg="Good Morning, ";
   }
   if (h>=12 && h<18) {
      msg="Good Afternoon, ";
   }
   if (h>=18) {
      msg="Good Evening, ";
   }
   var x=document.getElementById('ttl').innerHTML;
   document.getElementById('ttl').innerHTML = msg+x;
   document.getElementById('time').innerHTML = h + ":" + m + ":" + s;
}
該函式檢測當前時間的值,並根據一天中的時間為 msg 變數分配相應的值(早上好、下午好或晚上好)。
儲存 /static/hello.js,修改 \templates\hello.html 並重新啟動伺服器。瀏覽器應顯示當前時間及其下方的相應訊息。
FastAPI - HTML 表單模板
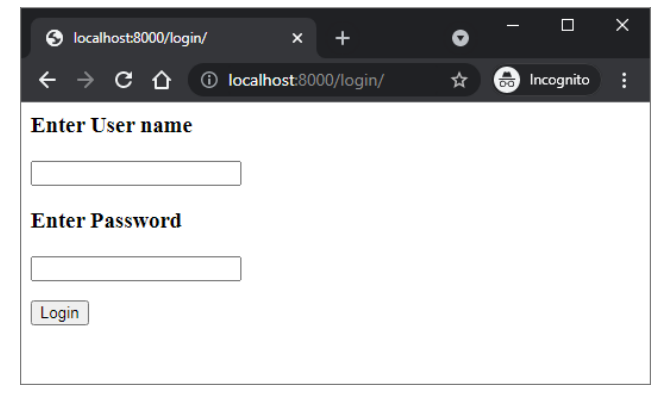
讓我們向我們的應用程式新增另一個路由 "/login",該路由呈現一個具有簡單登入表單的 html 模板。登入頁面的 HTML 程式碼如下 -
<html>
   <body>
      <form action="/submit" method="POST">
         <h3>Enter User name</h3>
         <p><input type='text' name='nm'/></p>
         <h3>Enter Password</h3>
         <p><input type='password' name='pwd'/></p>
         <p><input type='submit' value='Login'/></p>
      </form>
   </body>
</html>
請注意,action 引數設定為 "/submit" 路由,action 設定為 POST。這對於進一步討論非常重要。
在 main.py 檔案中新增 login() 函式,如下所示 -
@app.get("/login/", response_class=HTMLResponse)
async def login(request: Request):
   return templates.TemplateResponse("login.html", {"request": request})
URL https://:8000/login 將呈現登入表單,如下所示 -
FastAPI - 訪問表單資料
現在我們將瞭解如何在 FastAPI 操作函式中訪問 HTML 表單資料。在上面的示例中,/login 路由呈現登入表單。使用者輸入的資料透過 POST 作為請求方法提交到 /submit URL。現在我們必須提供一個檢視函式來處理使用者提交的資料。
FastAPI 具有一個 Form 類來處理透過提交 HTML 表單作為請求接收的資料。但是,您需要安裝 python-multipart 模組。它是 Python 的流式多部分表單解析器。
pip3 install python-multipart
將 Form 類新增到從 FastAPI 匯入的資源中。
from fastapi import Form
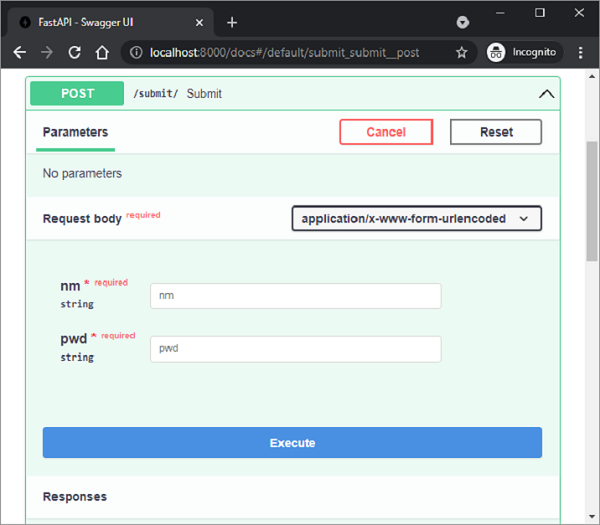
讓我們定義一個由 @app.post() 裝飾的 submit() 函式。為了接收表單資料,宣告兩個 Form 型別的引數,其名稱與表單屬性相同。
@app.post("/submit/")
async def submit(nm: str = Form(...), pwd: str = Form(...)):
   return {"username": nm}
填充文字欄位後,按提交。瀏覽器將重定向到 /submit URL 並呈現 JSON 響應。檢查 /submit 路由的 Swagger API 文件。它正確地將 nm 和 pwd 識別為請求正文引數,並將表單的“媒體型別”識別為 application/x-www-form-urlencoded。
甚至可以使用 HTML 表單資料填充和返回 Pydantic 模型。在以下程式碼中,我們宣告 User 類作為 Pydantic 模型,並將其物件作為伺服器的響應傳送。
from pydantic import BaseModel
class User(BaseModel):
   username:str
   password:str
@app.post("/submit/", response_model=User)
async def submit(nm: str = Form(...), pwd: str = Form(...)):
   return User(username=nm, password=pwd)
FastAPI - 上傳檔案
首先,要將檔案傳送到伺服器,您需要將 HTML 表單的 enctype 用作 multipart/form-data,並將輸入型別用作檔案以呈現按鈕,單擊該按鈕允許您從檔案系統中選擇檔案。
<html>
   <body>
      <form action="https://:8000/uploader" method="POST" enctype="multipart/form-data">
         <input type="file" name="file" />
         <input type="submit"/>
      </form>
   </body>
</html>
請注意,表單的 action 引數設定為端點 https://:8000/uploader,並且方法設定為 POST。
此 HTML 表單將使用以下程式碼作為模板呈現 -
from fastapi import FastAPI, File, UploadFile, Request
import uvicorn
import shutil
from fastapi.responses import HTMLResponse
from fastapi.templating import Jinja2Templates
app = FastAPI()
templates = Jinja2Templates(directory="templates")
@app.get("/upload/", response_class=HTMLResponse)
async def upload(request: Request):
   return templates.TemplateResponse("uploadfile.html", {"request": request})
訪問 https://:8000/upload/。您應該會看到帶有 選擇檔案 按鈕的表單。單擊它以開啟要上傳的檔案。
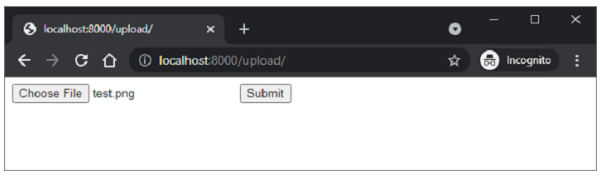
上傳操作由 FastAPI 中的 UploadFile 函式處理。
from fastapi import FastAPI, File, UploadFile
import shutil
@app.post("/uploader/")
async def create_upload_file(file: UploadFile = File(...)):
   with open("destination.png", "wb") as buffer:
      shutil.copyfileobj(file.file, buffer)
   return {"filename": file.filename}
我們將使用 Python 中的 shutil 庫以 destination.png 的名稱將接收到的檔案複製到伺服器位置。
FastAPI - Cookie 引數
cookie 是 HTTP 標頭之一。Web 伺服器向客戶端傳送響應,除了請求的資料外,它還會插入一個或多個 cookie。cookie 是少量資料,儲存在客戶端的機器上。在來自同一客戶端的後續連線請求中,此 cookie 資料也會與 HTTP 請求一起附加。
cookie 用於記錄有關客戶端瀏覽的資訊。在 HTTP 協議的無狀態通訊中,cookie 是檢索有狀態資訊的可靠方法。
在 FastAPI 中,cookie 引數使用 set_cookie() 方法設定在響應物件上。
response.set_cookie(key, value)
示例
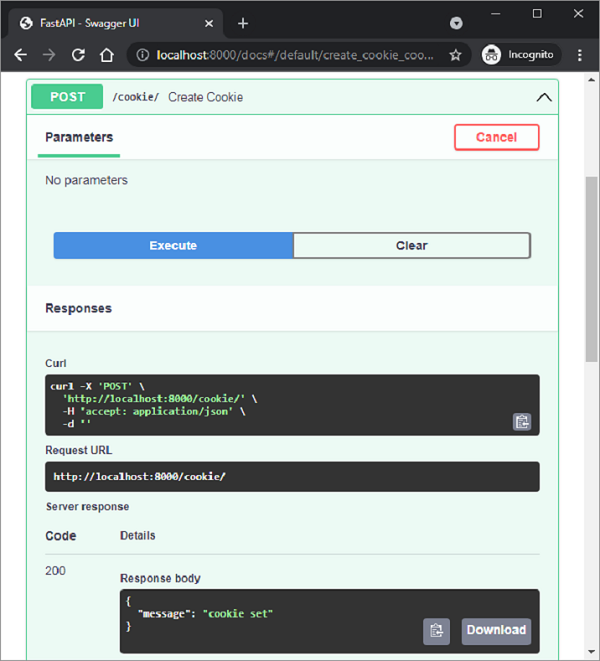
這是一個 set_cookie() 方法的示例。我們有一個名為 content 的 JSON 響應物件。在其上呼叫 set_cookie() 方法以將 cookie 設定為 key="usrname" 和 value="admin" -
from fastapi import FastAPI
from fastapi.responses import JSONResponse
app = FastAPI()
@app.post("/cookie/")
def create_cookie():
   content = {"message": "cookie set"}
   response = JSONResponse(content=content)
   response.set_cookie(key="username", value="admin")
   return response
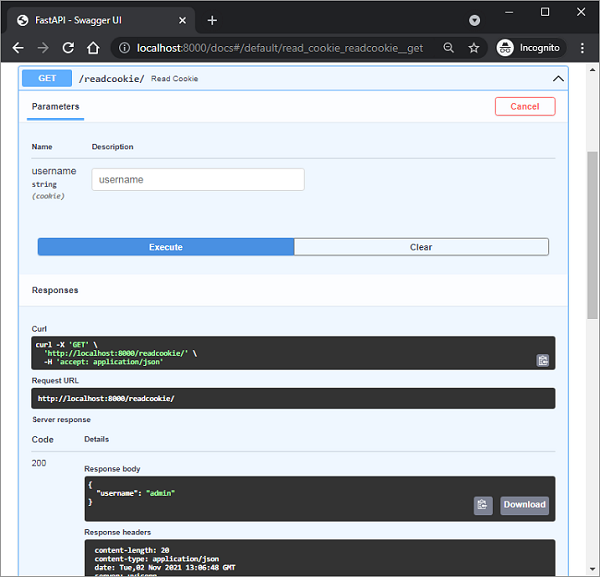
要在後續訪問中讀回 cookie,請在 FastAPI 庫中使用 Cookie 物件。
from fastapi import FastAPI, Cookie
app = FastAPI()
@app.get("/readcookie/")
async def read_cookie(username: str = Cookie(None)):
   return {"username": username}
在 Swagger API 中檢查這兩個端點。這兩個路由是 "/cookies" 和 "/readcookie"。執行繫結到 "/cookies" 的 create_cookie() 函式。響應只是內容,儘管 cookie 已設定。
當執行read_cookie()函式時,cookie會被讀取並作為響應返回。此外,請注意文件將使用者名稱標識為cookie引數。
FastAPI - 頭部引數
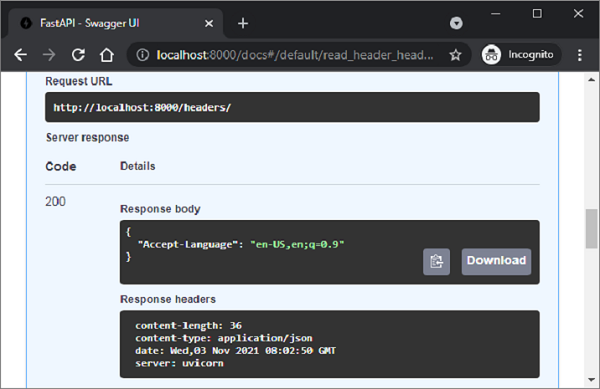
為了讀取客戶端請求中HTTP頭部的值,需要從FastAPI庫匯入Header物件,並在操作函式定義中宣告一個Header型別的引數。引數名稱應與轉換為camel_case的HTTP頭部名稱匹配。
在下面的示例中,需要檢索“accept-language”頭部。由於Python不允許在識別符號名稱中使用“-”(短橫線),因此將其替換為“_”(下劃線)
from typing import Optional
from fastapi import FastAPI, Header
app = FastAPI()
@app.get("/headers/")
async def read_header(accept_language: Optional[str] = Header(None)):
   return {"Accept-Language": accept_language}
如下Swagger文件所示,檢索到的頭部顯示在響應體中。
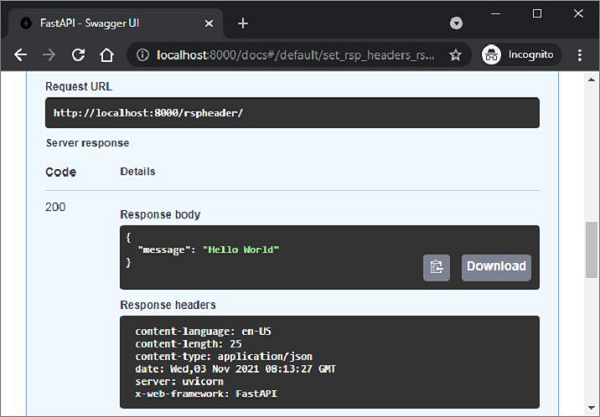
您可以在響應物件中推送自定義和預定義的頭部。操作函式應具有一個Response型別的引數。為了設定自定義頭部,其名稱應以“X”為字首。在以下情況下,添加了一個名為“X-Web-Framework”的自定義頭部和一個預定義的頭部“Content-Language”,以及操作函式的響應。
from fastapi import FastAPI
from fastapi.responses import JSONResponse
app = FastAPI()
@app.get("/rspheader/")
def set_rsp_headers():
   content = {"message": "Hello World"}
   headers = {"X-Web-Framework": "FastAPI", "Content-Language": "en-US"}
   return JSONResponse(content=content, headers=headers)
新新增的頭部將出現在文件的響應頭部部分。
FastAPI - 響應模型
操作函式向客戶端返回一個JSON響應。響應可以是Python基本型別,例如數字、字串、列表或字典等。它也可以是Pydantic模型的形式。為了使函式返回模型物件,操作裝飾器應宣告一個respone_model引數。
藉助response_model,FastAPI將輸出資料轉換為模型類的結構。它驗證資料,並在OpenAPI路徑操作中為響應新增JSON Schema。
response_model引數的重要優勢之一是,我們可以透過從模型中選擇欄位來格式化輸出,並將響應轉換為輸出模型。
示例
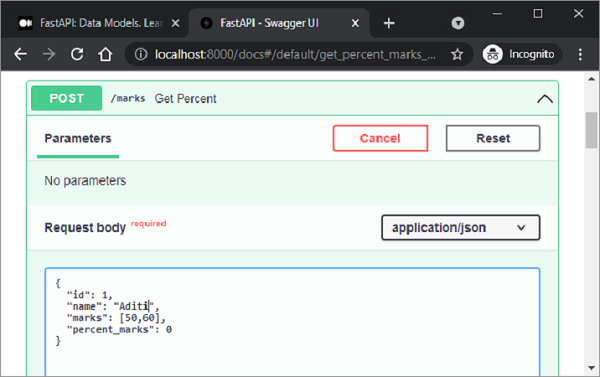
在下面的示例中,POST操作裝飾器以student類(BaseModel的子類)物件的格式接收請求體。由於此類中的一個欄位,即marks(分數列表)在響應中不需要,因此我們定義了另一個名為percent的模型,並將其用作response_model引數。
from typing import List
from fastapi import FastAPI
from pydantic import BaseModel, Field
app = FastAPI()
class student(BaseModel):
   id: int
   name :str = Field(None, title="name of student", max_length=10)
   marks: List[int] = []
   percent_marks: float
class percent(BaseModel):
   id:int
   name :str = Field(None, title="name of student", max_length=10)
   percent_marks: float
@app.post("/marks", response_model=percent)
async def get_percent(s1:student):
   s1.percent_marks=sum(s1.marks)/2
   return s1
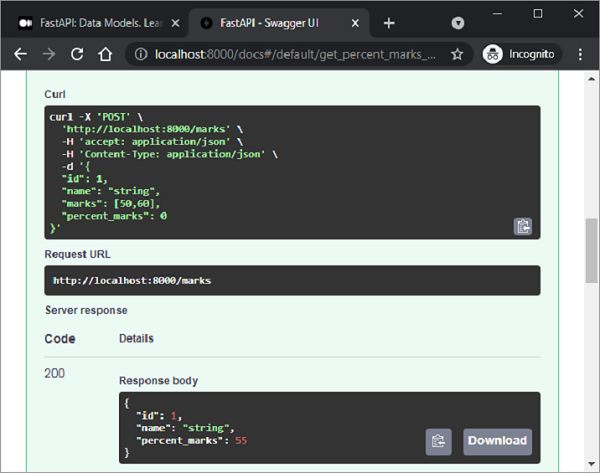
如果我們檢查Swagger文件,它顯示“/marks”路由獲取student類物件作為請求體。使用適當的值填充屬性並執行get_percent()函式。
伺服器響應被轉換為percent類,因為它已被用作response_model。
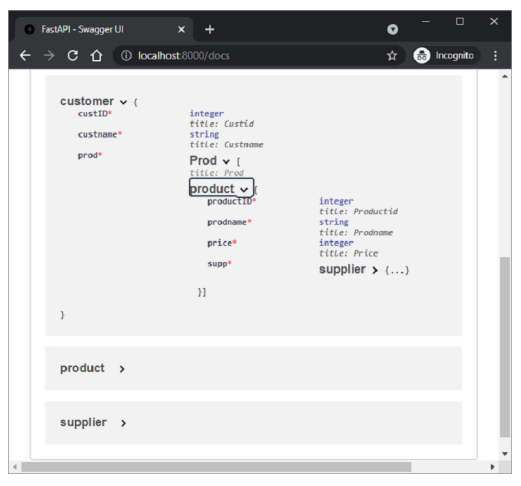
FastAPI - 巢狀模型
Pydantic模型的每個屬性都有一個型別。型別可以是內建的Python型別或模型本身。因此,可以使用特定的屬性名稱、型別和驗證來宣告巢狀的JSON“物件”。
示例
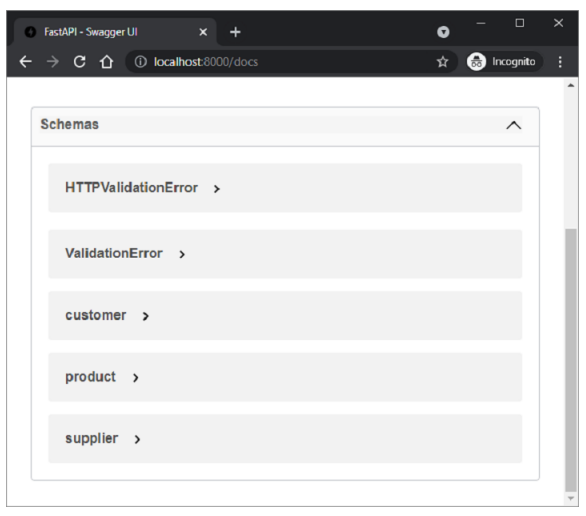
在下面的示例中,我們構造了一個customer模型,其中一個屬性為product模型類。product模型又具有supplier類的屬性。
from typing import Tuple
from fastapi import FastAPI
from pydantic import BaseModel
app = FastAPI()
class supplier(BaseModel):
   supplierID:int
   supplierName:str
class product(BaseModel):
   productID:int
   prodname:str
   price:int
   supp:supplier
class customer(BaseModel):
   custID:int
   custname:str
   prod:Tuple[product]
下面的POST操作裝飾器將customer模型的物件呈現為伺服器響應。
@app.post('/invoice')
async def getInvoice(c1:customer):
   return c1
Swagger UI頁面顯示了三個架構,分別對應於三個BaseModel類。
展開Customer架構以顯示所有節點,如下所示:
"/invoice"路由的示例響應如下:
{
   "custID": 1,
   "custname": "Jay",
   "prod": [
      {
         "productID": 1,
         "prodname": "LAPTOP",
         "price": 40000,
         "supp": {
            "supplierID": 1,
            "supplierName": "Dell"
         }
      }
   ]
}
FastAPI - 依賴項
FastAPI的內建依賴注入系統使得在構建API時更容易整合元件。在程式設計中,依賴注入是指一個物件接收其依賴的其他物件。其他物件稱為依賴項。依賴注入具有以下優點:
重用相同的共享邏輯
共享資料庫連線
執行身份驗證和安全功能
假設一個FastAPI應用程式有兩個操作函式,它們都具有相同的查詢引數id、name和age。
from fastapi import FastAPI
app = FastAPI()
@app.get("/user/")
async def user(id: str, name: str, age: int):
   return {"id": id, "name": name, "age": age}
@app.get("/admin/")
async def admin(id: str, name: str, age: int):
   return {"id": id, "name": name, "age": age}
如果發生任何更改,例如新增/刪除查詢引數,則需要更改兩個路由裝飾器和函式。
FastAPI提供Depends類,其物件在這種情況下用作公共引數。首先從FastAPI匯入Depends並定義一個函式來接收這些引數:
async def dependency(id: str, name: str, age: int):
   return {"id": id, "name": name, "age": age}
現在,我們可以將此函式的返回值用作操作函式中的引數
@app.get("/user/")
async def user(dep: dict = Depends(dependency)):
   return dep
對於每個新請求,FastAPI都會使用相應的引數呼叫依賴函式,返回結果,並將結果分配給您的操作。
您可以使用類來管理依賴項,而不是函式。宣告一個類,其中id、name和age作為屬性。
class dependency:
   def __init__(self, id: str, name: str, age: int):
      self.id = id
      self.name = name
      self.age = age
使用此類作為引數的型別。
@app.get("/user/")
async def user(dep: dependency = Depends(dependency)):
   return dep
@app.get("/admin/")
async def admin(dep: dependency = Depends(dependency)):
   return dep
在這裡,我們在操作函式中使用了依賴注入。它也可以用作操作裝飾器。例如,我們想要檢查查詢引數age的值是否小於21。如果是,則應丟擲異常。因此,我們編寫一個函式來檢查它並將其用作依賴項。
async def validate(dep: dependency = Depends(dependency)):
   if dep.age > 18:
      raise HTTPException(status_code=400, detail="You are not eligible")
@app.get("/user/", dependencies=[Depends(validate)])
async def user():
   return {"message": "You are eligible"}
在FastAPI依賴管理中,您可以使用yield代替return來新增一些額外的步驟。例如,以下函式使用帶yield的資料庫依賴項。
async def get_db():
   db = DBSession()
      try:
         yield db
      finally:
            db.close()
FastAPI - CORS
跨源資源共享(CORS)是指當在一個客戶端瀏覽器上執行的前端應用程式嘗試透過JavaScript程式碼與後端通訊,而後端與前端位於不同的“源”時的情況。此處的源是協議、域名和埠號的組合。因此,https://和https://具有不同的源。
如果具有一個源的URL的瀏覽器傳送請求以執行來自另一個源的JavaScript程式碼,則瀏覽器會發送一個OPTIONS HTTP請求。
如果後端透過傳送適當的頭部授權來自此不同源的通訊,它將允許前端的JavaScript將其請求傳送到後端。為此,後端必須有一個“允許的源”列表。
要顯式指定允許的源,請匯入CORSMiddleware並將源列表新增到應用程式的中件件中。
from fastapi import FastAPI
from fastapi.middleware.cors import CORSMiddleware
app = FastAPI()
origins = [
   "http://192.168.211.:8000",
   "https://",
   "https://:8080",
]
app.add_middleware(
   CORSMiddleware,
   allow_origins=origins,
   allow_credentials=True,
   allow_methods=["*"],
   allow_headers=["*"],
)
@app.get("/")
async def main():
   return {"message": "Hello World"}
FastAPI - CRUD操作
REST架構使用HTTP動詞或方法對資源進行操作。POST、GET、PUT和DELETE方法分別執行CREATE、READ、UPDATE和DELETE操作。
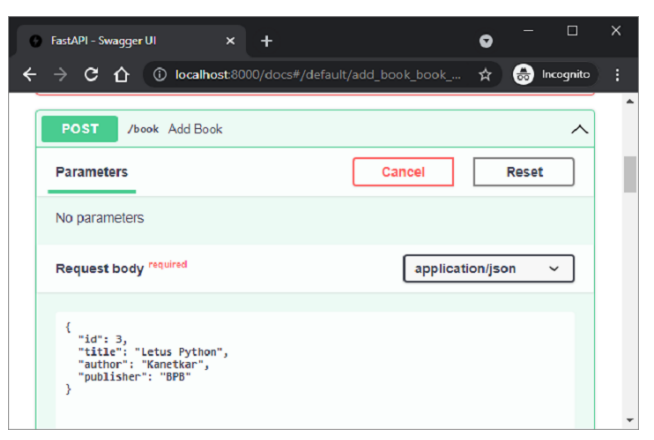
在下面的示例中,我們將使用Python列表作為記憶體資料庫並在其上執行CRUD操作。首先,讓我們設定一個FastAPI應用程式物件並宣告一個名為Book的Pydantic模型。
from fastapi import FastAPI
from pydantic import BaseModel
app = FastAPI()
data = []
class Book(BaseModel):
   id: int
   title: str
   author: str
   publisher: str
使用@app.post()裝飾器填充此模型的物件,並將其追加到書籍列表中(為書籍列表宣告資料)
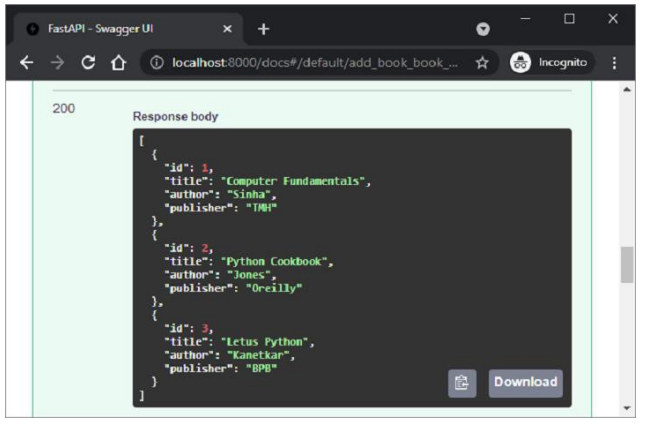
@app.post("/book")
def add_book(book: Book):
   data.append(book.dict())
   return data
在Swagger UI中,執行此操作函式幾次並新增一些資料。
伺服器的JSON響應顯示了迄今為止新增的書籍列表。
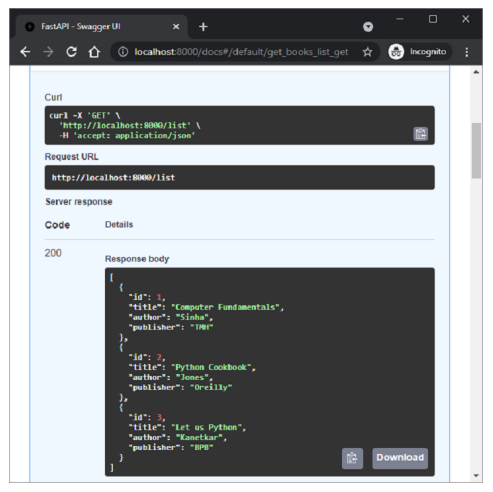
要檢索列表,請定義一個繫結到@app.get()裝飾器的操作函式,如下所示:
@app.get("/list")
def get_books():
   return data
要檢索其id作為路徑引數的書籍,請定義get()操作裝飾器和get_book()函式,如下所示:
@app.get("/book/{id}")
def get_book(id: int):
   id = id - 1
   return data[id]
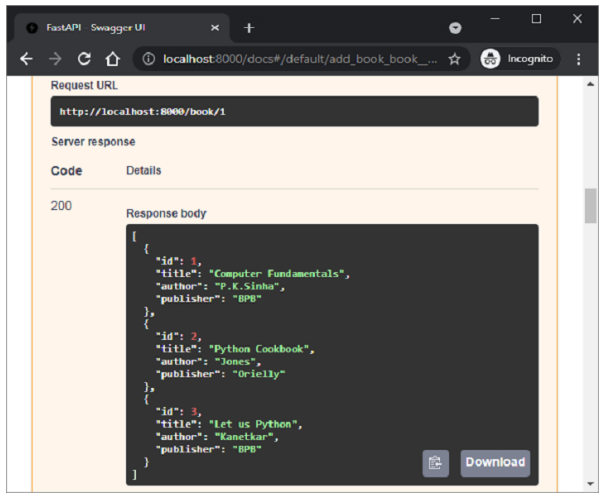
/list路由檢索所有書籍。
另一方面,在“/book/1”路由中使用“id”作為路徑引數。
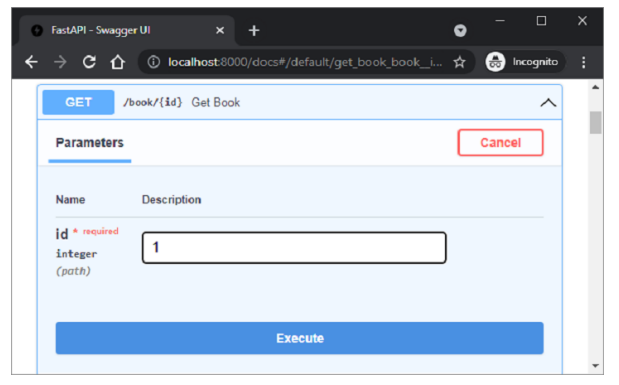
將檢索到“id=1”的書籍,如Swagger UI的伺服器響應中所示

接下來,定義@app.put()裝飾器,該裝飾器修改資料列表中的物件。此裝飾器也為id欄位具有路徑引數。
@app.put("/book/{id}")
def add_book(id: int, book: Book):
   data[id-1] = book
   return data
在swagger UI中檢查此操作函式。給出id=1,並在請求體中將publisher的值更改為BPB。
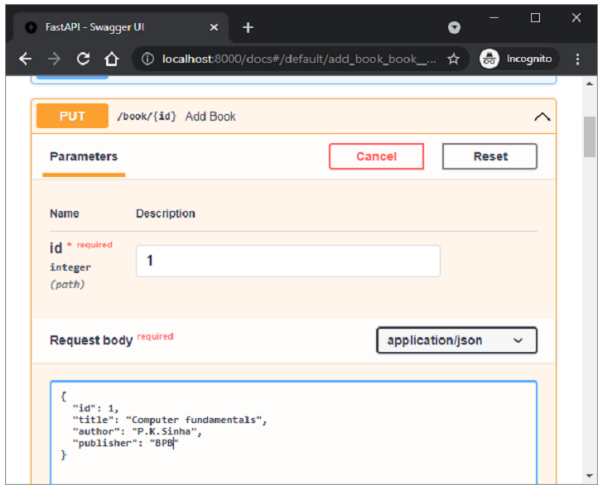
執行後,響應顯示更新了新值的id=1的物件的列表。
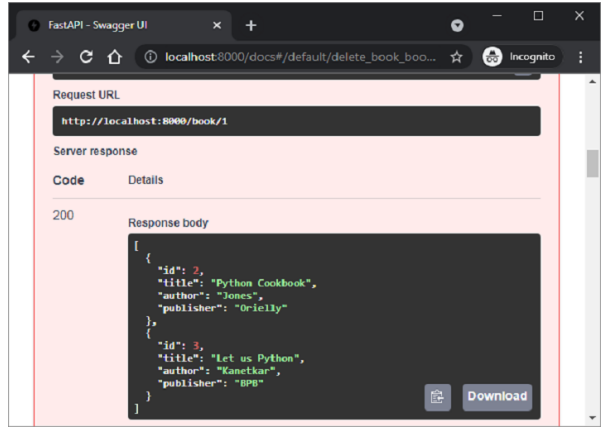
最後,我們定義@app.delete()裝飾器以刪除與路徑引數對應的物件。
@app.delete("/book/{id}")
def delete_book(id: int):
   data.pop(id-1)
   return data
將id=1作為路徑引數並執行函式。
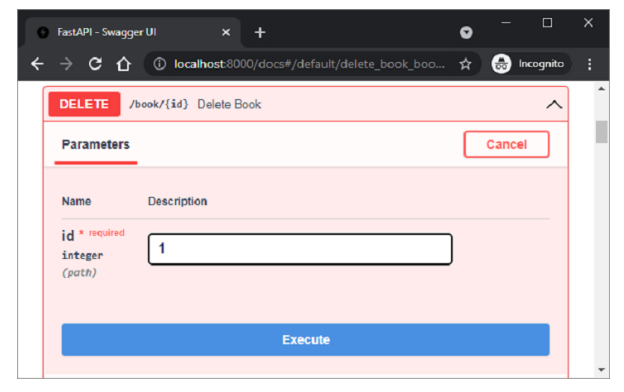
執行後,列表現在僅顯示兩個物件
FastAPI - SQL 資料庫
在上一章中,Python列表已被用作記憶體資料庫,以使用FastAPI執行CRUD操作。相反,我們可以使用任何關係資料庫(例如MySQL、Oracle等)來執行儲存、檢索、更新和刪除操作。
我們不使用符合DB-API的資料庫驅動程式,而是使用SQLAlchemy作為Python程式碼和資料庫之間的介面(我們將使用SQLite資料庫,因為Python對它有內建支援)。SQLAlchemy是一個流行的SQL工具包和物件關係對映器。
物件關係對映是一種程式設計技術,用於在面向物件程式語言中轉換不相容型別系統之間的資料。通常,面嚮物件語言(如Python)中使用的型別系統包含非標量型別。但是,大多數資料庫產品(如Oracle、MySQL等)中的資料型別都是原始型別,例如整數和字串。
在ORM系統中,每個類都對映到底層資料庫中的一個表。ORM可以為您處理這些問題,而您可以專注於系統邏輯的程式設計,而不是自己編寫乏味的資料庫介面程式碼。
為了使用SQLAlchemy,我們需要首先使用PIP安裝程式安裝庫。
pip install sqlalchemy
SQLAlchemy旨在與為特定資料庫構建的DBAPI實現一起使用。它使用方言系統與各種型別的DBAPI實現和資料庫進行通訊。所有方言都需要安裝相應的DBAPI驅動程式。
以下是被包含的方言:
Firebird
Microsoft SQL Server
MySQL
Oracle
PostgreSQL
SQLite
Sybase
由於我們將使用SQLite資料庫,因此我們需要為名為test.db的資料庫建立一個數據庫引擎。從sqlalchemy模組匯入create_engine()函式。
from sqlalchemy import create_engine
from sqlalchemy.dialects.sqlite import *
SQLALCHEMY_DATABASE_URL = "sqlite:///./test.db"
engine = create_engine(SQLALCHEMY_DATABASE_URL, connect_args = {"check_same_thread": False})
為了與資料庫互動,我們需要獲取其控制代碼。會話物件是資料庫的控制代碼。Session類使用sessionmaker()定義,這是一個可配置的會話工廠方法,它繫結到引擎物件。
from sqlalchemy.orm import sessionmaker, Session
session = sessionmaker(autocommit=False, autoflush=False, bind=engine)
接下來,我們需要一個宣告性基類,它在宣告性系統中儲存類的目錄和對映表。
from sqlalchemy.ext.declarative import declarative_base
Base = declarative_base()
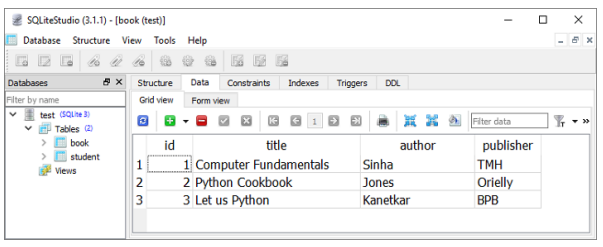
Books(Base的子類)對映到資料庫中的book表。Books類中的屬性對應於目標表中列的資料型別。請注意,id屬性對應於book表中的主鍵。
from sqlalchemy import Column, Integer, String
class Books(Base):
   __tablename__ = 'book'
   id = Column(Integer, primary_key=True, nullable=False)
   title = Column(String(50), unique=True)
   author = Column(String(50))
   publisher = Column(String(50))
   Base.metadata.create_all(bind=engine)
create_all()方法在資料庫中建立相應的表。
現在,我們必須宣告一個與宣告性基子類(上面定義的Books類)對應的Pydantic模型。
from typing import List
from pydantic import BaseModel, constr
class Book(BaseModel):
   id: int
   title: str
   author:str
   publisher: str
   class Config:
      orm_mode = True
請注意,在config類中使用orm_mode=True表示它已對映到SQLAlchemy的ORM類。
其餘程式碼與記憶體CRUD操作類似,區別在於操作函式透過SQLalchemy介面與資料庫互動。下面定義了FastAPI應用程式物件上的POST操作:
from fastapi import FastAPI, Depends
app=FastAPI()
def get_db():
   db = session()
   try:
      yield db
   finally:
   db.close()
@app.post('/add_new', response_model=Book)
def add_book(b1: Book, db: Session = Depends(get_db)):
   bk=Books(id=b1.id, title=b1.title, author=b1.author,
publisher=b1.publisher)
   db.add(bk)
   db.commit()
   db.refresh(bk)
   return Books(**b1.dict())
首先建立資料庫會話。來自POST請求體的資料作為新行新增到book表中。執行add_book()操作函式以將示例資料新增到books表中。要進行驗證,您可以使用SQLiteStudio,這是一個用於SQLite資料庫的GUI工具。
定義了兩個用於GET操作的操作函式,一個用於獲取所有記錄,另一個用於匹配路徑引數的記錄。
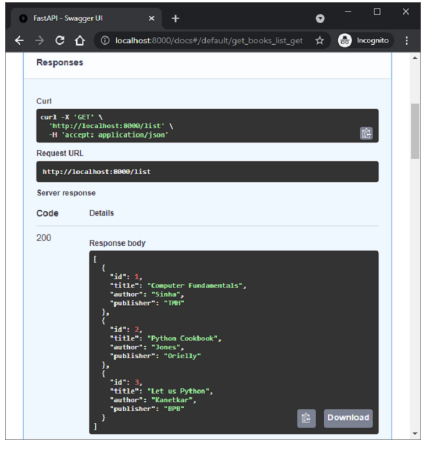
以下是繫結到/list路由的get_books()函式。執行後,其伺服器響應為所有記錄的列表。
@app.get('/list', response_model=List[Book])
def get_books(db: Session = Depends(get_db)):
   recs = db.query(Books).all()
   return recs
/book/{id}路由呼叫get_book()函式,其中id作為路徑引數。SQLAlchemy的查詢返回與給定id對應的物件。
@app.get('/book/{id}', response_model=Book)
def get_book(id:int, db: Session = Depends(get_db)):
   return db.query(Books).filter(Books.id == id).first()
下圖顯示了從Swagger UI執行get_books()函式的結果。
更新和刪除操作由update_book()函式(當訪問/update/{id}路由時執行)和del_book()函式(當在URL中給出路由/delete/{id}時呼叫)執行。
@app.put('/update/{id}', response_model=Book)
def update_book(id:int, book:Book, db: Session = Depends(get_db)):
   b1 = db.query(Books).filter(Books.id == id).first()
   b1.id=book.id
   b1.title=book.title
   b1.author=book.author
   b1.publisher=book.publisher
   db.commit()
   return db.query(Books).filter(Books.id == id).first()
@app.delete('/delete/{id}')
def del_book(id:int, db: Session = Depends(get_db)):
   try:
      db.query(Books).filter(Books.id == id).delete()
      db.commit()
   except Exception as e:
      raise Exception(e)
   return {"delete status": "success"}
如果您打算使用任何其他資料庫來代替SQLite,則只需要相應地更改方言定義。例如,要使用MySQL資料庫和pymysql驅動程式,請將引擎物件的語句更改為以下內容:
engine = create_engine('mysql+pymysql://user:password@localhost/test')
FastAPI - 使用 MongoDB
FastAPI還可以使用NoSQL資料庫(如MongoDB、Cassandra、CouchDB等)作為REST應用程式CRUD操作的後端。在本主題中,我們將瞭解如何在FastAPI應用程式中使用MongoDB。
MongoDB 是一個面向文件的資料庫,其中半結構化的文件以 JSON 等格式儲存。文件可以包含許多不同的鍵值對、鍵陣列對,甚至巢狀文件。它類似於 Python 字典物件,是一組鍵值對。一個或多個這樣的文件儲存在一個集合中。
MongoDB 中的集合相當於關係資料庫中的表。但是,MongoDB(以及所有 NoSQL 資料庫)沒有預定義的模式。文件類似於基於 SQL 的關係資料庫中表中的一行。每個文件可能具有可變數量的鍵值對。因此,MongoDB 是一個無模式資料庫。
要在 FastAPI 中使用 MongoDB,必須在機器上安裝 MongoDB 伺服器。我們還需要安裝 **PyMongo**,這是 MongoDB 的官方 Python 驅動程式。
pip3 install pymongo
在透過 Python 和 FastAPI 程式碼與 MongoDB 資料庫互動之前,請確保 MongoDB 正在執行,方法是發出以下命令(假設 MongoDB 伺服器安裝在 e:\mongodb 資料夾中)。
E:\mongodb\bin>mongod
..
waiting for connections on port 27017
PyMongo 模組中的 **MongoClient** 類的物件是 Python 用於與 MongoDB 伺服器互動的控制代碼。
from pymongo import MongoClient
client=MongoClient()
我們將 Book 定義為 BaseModel 類以填充請求體(與 SQLite 示例中使用的相同)
from pydantic import BaseModel
from typing import List
class Book(BaseModel):
   bookID: int
   title: str
   author:str
   publisher: str
設定 FastAPI 應用程式物件 -
from fastapi import FastAPI, status
app = FastAPI()
POST 操作裝飾器將 **"/add_new"** 作為 URL 路由,並執行 **add_book()** 函式。它將 Book BaseModel 物件解析為字典,並在 test 資料庫的 BOOK_COLLECTION 中新增一個文件。
@app.post("/add_new", status_code=status.HTTP_201_CREATED)
def add_book(b1: Book):
   """Post a new message to the specified channel."""
   with MongoClient() as client:
      book_collection = client[DB][BOOK_COLLECTION]
      result = book_collection.insert_one(b1.dict())
      ack = result.acknowledged
      return {"insertion": ack}
透過訪問 https://:8000/docs 使用 Swagger UI 的 Web 介面新增一些文件。您可以在 MongoDB 的 Compass GUI 前端驗證集合。

要檢索所有書籍的列表,讓我們包含以下獲取操作函式 **- get_books()**。當訪問 **"/books"** URL 路由時,將執行此函式。
@app.get("/books", response_model=List[str])
def get_books():
   """Get all books in list form."""
   with MongoClient() as client:
      book_collection = client[DB][BOOK_COLLECTION]
      booklist = book_collection.distinct("title")
      return booklist
在這種情況下,伺服器響應將是書籍集合中所有標題的列表。
[
   "Computer Fundamentals",
   "Python Cookbook",
   "Let Us Python"
]
以下 GET 裝飾器檢索與給定 ID 作為路徑引數對應的書籍文件 -
@app.get("/books/{id}", response_model=Book)
def get_book(id: int):
   """Get all messages for the specified channel."""
   with MongoClient() as client:
      book_collection = client[DB][BOOK_COLLECTION]
      b1 = book_collection.find_one({"bookID": id})
      return b1
Swagger UI 文件頁面顯示以下介面 -

執行上述函式時,伺服器的 JSON 響應如下 -

FastAPI - 使用 GraphQL
Facebook 於 2012 年開發了 **GraphQL**,這是一種新的 API 標準,旨在最佳化 RESTful API 呼叫。GraphQL 是 API 的資料查詢和操作語言。與 REST 相比,GraphQL 更靈活、更高效、更準確。GraphQL 伺服器僅提供一個端點,並以客戶端所需的確切資料進行響應。
由於 GraphQL 與 ASGI 相容,因此可以輕鬆地將其整合到 FastAPI 應用程式中。GraphQL 有許多 Python 庫。其中一些列在下面 -
Strawberry
Ariadne
Tartiflette
Graphene
FastAPI 的官方文件建議使用 Strawberry 庫,因為它的設計也基於型別註釋(就像 FastAPI 本身一樣)。
為了將 GraphQL 整合到 FastAPI 應用程式中,首先將 Python 類裝飾為 Strawberry 型別。
@strawberry.type
class Book:
   title: str
   author: str
   price: int
接下來,宣告一個包含返回 Book 物件的函式的 **Query** 類。
@strawberry.type
class Query:
   @strawberry.field
   def book(self) -> Book:
   return Book(title="Computer Fundamentals", author="Sinha", price=300)
使用此 Query 類作為引數以獲取 **Strawberry.Schema** 物件
schema = strawberry.Schema(query=Query)
然後宣告 GraphQL 類和 FastAPI 應用程式類的物件。
graphql_app = GraphQL(schema)
app = FastAPI()
最後,將路由新增到 FastAPI 物件並執行伺服器。
app.add_route("/book", graphql_app)
app.add_websocket_route("/book", graphql_app)
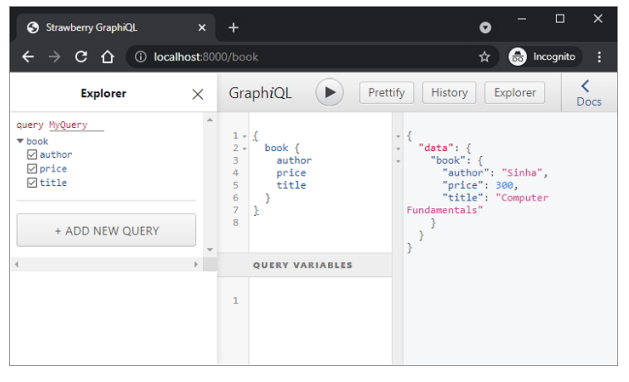
在瀏覽器中訪問 https://:8000/book。將開啟一個瀏覽器內 GraphQL IDE。
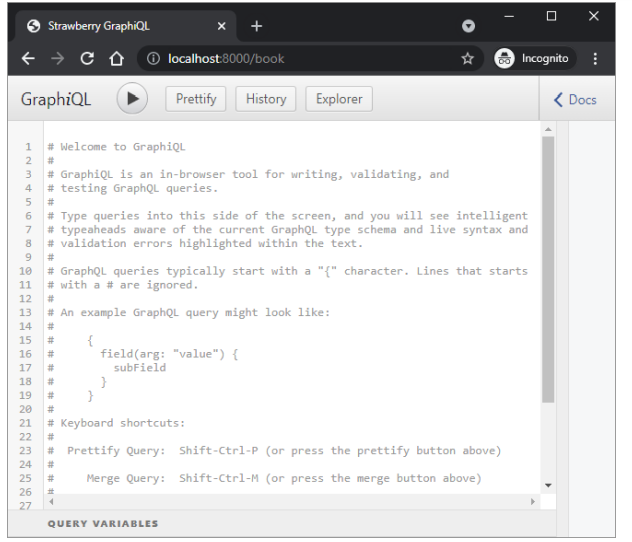
在註釋部分下方,使用 Graphiql IDE 的 Explorer 欄輸入以下查詢。執行查詢以在輸出窗格中顯示結果。
FastAPI - Websockets
**WebSocket** 是客戶端和伺服器之間持久的連線,用於在兩者之間提供雙向、**全雙工**通訊。通訊透過單個 TCP/IP 套接字連線透過 HTTP 進行。可以將其視為 HTTP 的升級,而不是協議本身。
HTTP 的侷限性之一在於它是一種嚴格的半雙工或單向協議。另一方面,使用 WebSockets,我們可以傳送基於訊息的資料,類似於 UDP,但具有 TCP 的可靠性。WebSocket 使用 HTTP 作為初始傳輸機制,但在收到 HTTP 響應後保持 TCP 連線活動。相同的連線物件可用於客戶端和伺服器之間的雙向通訊。因此,可以使用 WebSocket API 構建即時應用程式。
FastAPI 透過 FastAPI 模組中的 WebSocket 類支援 WebSockets。以下示例演示了 FastAPI 應用程式中 WebSocket 的功能。
首先,我們有一個 **index()** 函式,用於呈現模板(socket.html)。它繫結到 "/" 路由。HTML 檔案 socket.html 放在“templates”資料夾中。
main.py
from fastapi import FastAPI, Request
from fastapi.responses import HTMLResponse
from fastapi.templating import Jinja2Templates
templates = Jinja2Templates(directory="templates")
from fastapi.staticfiles import StaticFiles
app = FastAPI()
app.mount("/static", StaticFiles(directory="static"), name="static")
@app.get("/", response_class=HTMLResponse)
async def index(request: Request):
   return templates.TemplateResponse("socket.html", {"request": request})
模板檔案呈現一個文字框和一個按鈕。
socket.html
<!DOCTYPE html>
<html>
   <head>
      <title>Chat</title>
      <script src="{{ url_for('static', path='ws.js') }}"></script>
   </head>
   <body>
      <h1>WebSocket Chat</h1>
      <form action="" onsubmit="sendMessage(event)">
      <input type="text" id="messageText" autocomplete="off"/>
      <button>Send</button>
      </form>
      <ul id='messages'>
      </ul>
   </body>
</html>
在 socket.html 內部,有一個對 JavaScript 函式的呼叫,該函式將在表單提交時執行。因此,要服務 JavaScript,首先安裝“static”資料夾。JavaScript 檔案 ws.js 放在“static”資料夾中。
ws.js
var ws = new WebSocket("ws://:8000/ws");
ws.onmessage = function(event) {
   var messages = document.getElementById('messages')
   var message = document.createElement('li')
   var content = document.createTextNode(event.data)
   message.appendChild(content)
   messages.appendChild(message)
};
function sendMessage(event) {
   var input = document.getElementById("messageText")
   ws.send(input.value)
   input.value = ''
   event.preventDefault()
}
載入 JavaScript 程式碼後,它將在“ws://:8000/ws”處建立一個偵聽 websocket 的 websocket。**sendMessage()** 函式將輸入訊息定向到 WebSocket URL。
此路由在應用程式程式碼中呼叫 **websocket_endpoint()** 函式。傳入的連線請求被接受,傳入的訊息在客戶端瀏覽器上回顯。將以下程式碼新增到 main.py 中。
from fastapi import WebSocket
@app.websocket("/ws")
async def websocket_endpoint(websocket: WebSocket):
   await websocket.accept()
   while True:
      data = await websocket.receive_text()
      await websocket.send_text(f"Message text was: {data}")
儲存 FastAPI 程式碼檔案(main.py)、模板(socket.html)和 JavaScript 檔案(ws.js)。執行 Uvicorn 伺服器並訪問 https://:8000/ 以呈現如下所示的聊天視窗 -
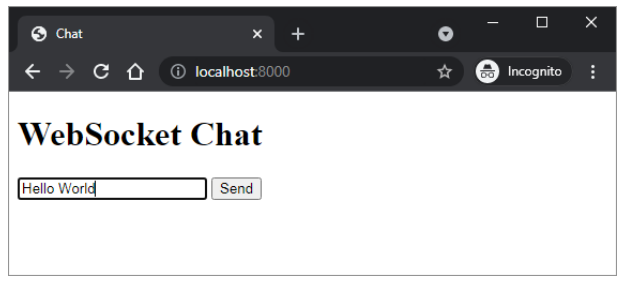
鍵入某些文字並按下發送按鈕。輸入訊息將透過 websocket 重定向到瀏覽器。

FastAPI - FastAPI 事件處理器
事件處理程式是在發生某些識別事件時要執行的函式。在 FastAPI 中,識別了兩個這樣的事件 **- 啟動** 和 **關閉**。FastAPI 的應用程式物件具有 **on_event()** 裝飾器,該裝飾器使用這些事件之一作為引數。當發生相應的事件時,將觸發使用此裝飾器註冊的函式。
啟動事件發生在開發伺服器啟動之前,註冊的函式通常用於執行某些初始化任務,例如與資料庫建立連線等。關閉事件的事件處理程式在應用程式關閉之前立即呼叫。
示例
這是一個啟動和關閉事件處理程式的簡單示例。當應用程式啟動時,啟動時間將在控制檯日誌中回顯。類似地,當透過按下 ctrl+c 停止伺服器時,關閉時間也會顯示。
main.py
from fastapi import FastAPI
import datetime
app = FastAPI()
@app.on_event("startup")
async def startup_event():
   print('Server started :', datetime.datetime.now())
@app.on_event("shutdown")
async def shutdown_event():
   print('server Shutdown :', datetime.datetime.now())
輸出
它將產生以下輸出 -
uvicorn main:app --reload
INFO: Uvicorn running on http://127.0.0.1:8000 (Press CTRL+C to quit)
INFO: Started reloader process [28720]
INFO: Started server process [28722]
INFO: Waiting for application startup.
Server started: 2021-11-23 23:51:45.907691
INFO: Application startup complete.
INFO: Shutting down
INFO: Waiting for application
server Shutdown: 2021-11-23 23:51:50.82955
INFO: Application shutdown com
INFO: Finished server process
FastAPI - 掛載子應用程式
如果您有兩個獨立的 FastAPI 應用程式,則其中一個可以安裝在另一個應用程式之上。安裝的應用程式稱為子應用程式。**app.mount()** 方法在主應用程式的特定路徑中新增另一個完全“獨立”的應用程式。然後,它負責處理該路徑下的所有內容,以及在該子應用程式中宣告的路徑操作。
讓我們首先宣告一個簡單的 FastAPI 應用程式物件,用作頂級應用程式。
from fastapi import FastAPI
app = FastAPI()
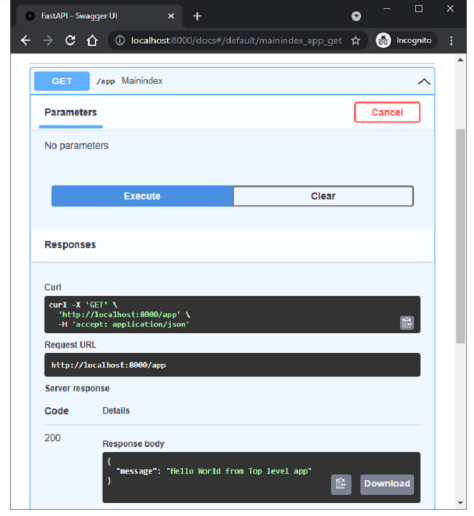
@app.get("/app")
def mainindex():
return {"message": "Hello World from Top level app"}
然後建立另一個應用程式物件 subapp 並新增它自己的路徑操作。
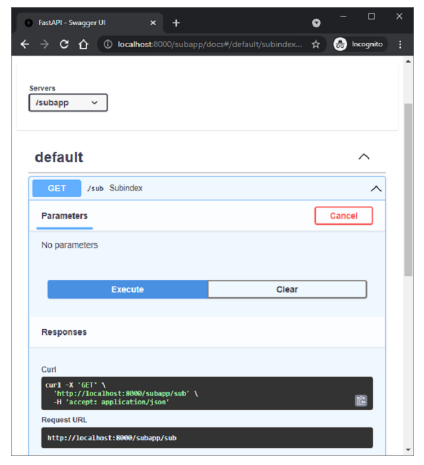
subapp = FastAPI()
@subapp.get("/sub")
def subindex():
   return {"message": "Hello World from sub app"}
使用 mount() 方法將此 subapp 物件安裝到主應用程式上。需要的兩個引數是 URL 路由和子應用程式的名稱。
app.mount("/subapp", subapp)
主應用程式和子應用程式都將擁有自己的文件,可以使用 Swagger UI 進行檢查。
子應用程式的文件位於 https://:8000/subapp/docs
FastAPI - 中介軟體
**中介軟體** 是一個函式,它與每個請求(在由任何特定路徑操作處理之前)以及在返回每個響應之前處理。此函式接收發送到您的應用程式的每個請求。它可以透過執行其中定義的程式碼對請求執行某些處理,然後將請求傳遞給相應的操作函式進行處理。它還可以在返回之前處理操作函式生成的響應。
以下是 FastAPI 庫中提供的一些中介軟體 -
CORSMiddleware
HTTPSRedirectMiddleware
TrustedHostMiddleware
GZipMiddleware
FastAPI 提供 **app.add_middleware()** 函式來處理伺服器錯誤和自定義異常處理程式。除了上述整合的中介軟體之外,還可以定義自定義中介軟體。以下示例定義了 **addmiddleware()** 函式,並透過使用 **@app.middleware()** 裝飾器將其裝飾為中介軟體
該函式有兩個引數,HTTP 請求物件和 **call_next()** 函式,該函式將向其相應的路徑傳送 API 請求並返回響應。
除了中介軟體函式之外,應用程式還有兩個操作函式。
import time
from fastapi import FastAPI, Request
app = FastAPI()
@app.middleware("http")
async def addmiddleware(request: Request, call_next):
   print("Middleware works!")
   response = await call_next(request)
   return response
@app.get("/")
async def index():
   return {"message":"Hello World"}
@app.get("/{name}")
async def hello(name:str):
   return {"message":"Hello "+name}
當應用程式執行時,對於瀏覽器發出的每個請求,中介軟體輸出(中介軟體有效!)將在響應輸出之前出現在控制檯日誌中。
FastAPI - 掛載 Flask 應用程式
可以用 **WSGIMiddleware** 包裝用 Flask 或 Django 框架編寫的 WSGI 應用程式,並將其安裝在 FastAPI 應用程式上以使其符合 ASGI。
首先在當前 FastAPI 環境中安裝 Flask 包。
pip3 install flask
以下程式碼是最小的 Flask 應用程式 -
from flask import Flask
flask_app = Flask(__name__)
@flask_app.route("/")
def index_flask():
   return "Hello World from Flask!"
然後將 app 宣告為 FastAPI 應用程式物件,並定義一個操作函式以呈現 Hello World 訊息。
from fastapi import FastAPI
app = FastAPI()
@app.get("/")
def index():
   return {"message": "Hello World from FastAPI!"}
接下來,使用 mount() 方法將 flask 應用程式作為 FastAPI 主應用程式的子應用程式安裝。
from fastapi.middleware.wsgi import WSGIMiddleware
app.mount("/flask", WSGIMiddleware(flask_app))
執行 Uvicorn 開發伺服器。
uvicorn flaskapp:app –reload
主 FastAPI 應用程式位於 URL https://:8000/ 路由。
{"message":"Hello World from FastAPI!"}
Flask 子應用程式安裝在 URL https://:8000/flask 上。
Hello World from Flask!
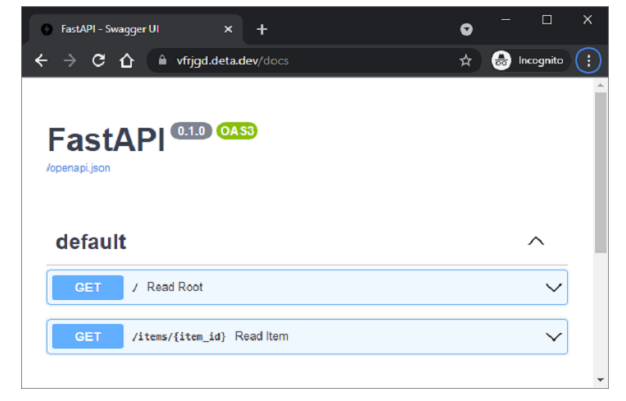
FastAPI - 部署
到目前為止,我們一直在使用本地開發伺服器“Uvicorn”來執行我們的 FastAPI 應用程式。為了使應用程式公開可用,必須將其部署到具有靜態 IP 地址的遠端伺服器上。可以使用免費計劃或基於訂閱的服務將其部署到不同的平臺,例如 Heroku、Google Cloud、nginx 等。
在本章中,我們將使用 **Deta** 雲平臺。它的免費部署服務非常易於使用。
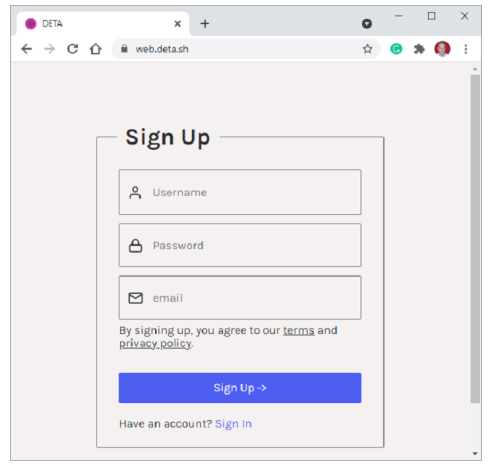
首先,要使用 Deta,我們需要在其網站上建立一個帳戶,並使用您選擇的合適的使用者名稱和密碼。
建立帳戶後,在本地機器上安裝 **Deta CLI**(命令列介面)。為您的應用程式建立一個資料夾(c:\fastapi_deta_app)如果您使用的是 Linux,請在終端中使用以下命令 -
iwr https://get.deta.dev/cli.ps1 -useb | iex
如果您使用的是 Windows,請從 Windows PowerShell 終端執行以下命令 -
PS C:\fastapi_deta_app> iwr https://get.deta.dev/cli.ps1 -useb | iex
Deta was installed successfully to
C:\Users\User\.deta\bin\deta.exe
Run 'deta --help' to get started
使用登入命令並驗證您的使用者名稱和密碼。
PS C:\fastapi_deta_app> deta login
Please, log in from the web page. Waiting...
https://web.deta.sh/cli/60836
Logged in successfully.
在同一個應用程式資料夾中,在 **main.py** 檔案中建立一個最小的 FastAPI 應用程式
# main.py
from fastapi import FastAPI
app = FastAPI()
@app.get("/")
def read_root():
   return {"Hello": "World"}
@app.get("/items/{item_id}")
def read_item(item_id: int):
   return {"item_id": item_id}
現在我們準備部署我們的應用程式。從 PowerShell 終端使用 **deta new** 命令。
PS C:\fastapi_deta_app> deta new
Successfully created a new micro
{
   "name": "fastapi_deta_app",
   "id": "2b236e8f-da6a-409b-8d51-7c3952157d3c",
   "project": "c03xflte",
   "runtime": "python3.9",
   "endpoint": "https://vfrjgd.deta.dev",
   "region": "ap-southeast-1",
   "visor": "enabled",
   "http_auth": "disabled"
}
Adding dependencies...
…..
Installing collected packages: typing-extensions, pydantic, idna, sniffio, anyio, starlette, fastapi
Successfully installed anyio-3.4.0 fastapi-0.70.0 idna-3.3 pydantic-1.8.2 sniffio-1.2.0 starlette-0.16.0 typingextensions-4.0.0
Deta 會將應用程式部署到指定的端點(對於每個應用程式,端點可能都是隨機生成的)。它首先安裝所需的依賴項,就像在本地機器上安裝一樣。部署成功後,開啟瀏覽器並訪問端點鍵前面顯示的 URL。您也可以在 https://vfrigd.deta.dev/docs 找到 Swagger UI 文件。