- 設計模式教程
- 設計模式 - 首頁
- 設計模式 - 概述
- 設計模式 - 工廠模式
- 抽象工廠模式
- 設計模式 - 單例模式
- 設計模式 - 建造者模式
- 設計模式 - 原型模式
- 設計模式 - 介面卡模式
- 設計模式 - 橋接模式
- 設計模式 - 過濾器模式
- 設計模式 - 組合模式
- 設計模式 - 裝飾器模式
- 設計模式 - 外觀模式
- 設計模式 - 享元模式
- 設計模式 - 代理模式
- 責任鏈模式
- 設計模式 - 命令模式
- 設計模式 - 直譯器模式
- 設計模式 - 迭代器模式
- 設計模式 - 中介者模式
- 設計模式 - 備忘錄模式
- 設計模式 - 觀察者模式
- 設計模式 - 狀態模式
- 設計模式 - 空物件模式
- 設計模式 - 策略模式
- 設計模式 - 模板模式
- 設計模式 - 訪問者模式
- 設計模式 - MVC 模式
- 業務代表模式
- 組合實體模式
- 資料訪問物件模式
- 前端控制器模式
- 攔截過濾器模式
- 服務定位器模式
- 傳輸物件模式
- 設計模式資源
- 設計模式 - 問答
- 設計模式 - 快速指南
- 設計模式 - 有用資源
- 設計模式 - 討論
設計模式 - 前端控制器模式
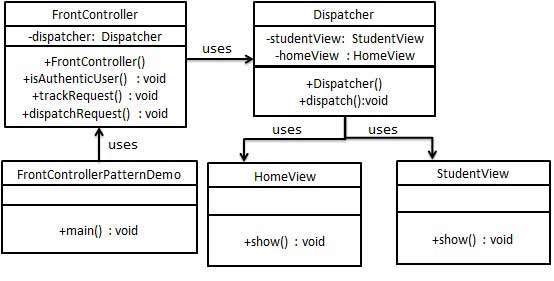
前端控制器設計模式用於提供集中式的請求處理機制,以便所有請求都由單個處理程式處理。此處理程式可以執行身份驗證/授權/日誌記錄或請求跟蹤,然後將請求傳遞給相應的處理程式。以下是這種型別的設計模式的實體。
前端控制器 - 應用程式(基於 Web 或基於桌面)的所有型別請求的單個處理程式。
排程器 - 前端控制器可以使用排程器物件,該物件可以將請求分派到相應的特定處理程式。
檢視 - 檢視是發出請求的物件。
實現
我們將建立一個FrontController和Dispatcher,分別充當前端控制器和排程器。HomeView和StudentView代表各種檢視,請求可以到達前端控制器。
FrontControllerPatternDemo,我們的演示類,將使用FrontController來演示前端控制器設計模式。
步驟 1
建立檢視。
HomeView.java
public class HomeView {
   public void show(){
      System.out.println("Displaying Home Page");
   }
}
StudentView.java
public class StudentView {
   public void show(){
      System.out.println("Displaying Student Page");
   }
}
步驟 2
建立排程器。
Dispatcher.java
public class Dispatcher {
   private StudentView studentView;
   private HomeView homeView;

   public Dispatcher(){
      studentView = new StudentView();
      homeView = new HomeView();
   }

   public void dispatch(String request){
      if(request.equalsIgnoreCase("STUDENT")){
         studentView.show();
      }
      else{
         homeView.show();
      }
   }
}
步驟 3
建立前端控制器
FrontController.java
public class FrontController {

   private Dispatcher dispatcher;

   public FrontController(){
      dispatcher = new Dispatcher();
   }

   private boolean isAuthenticUser(){
      System.out.println("User is authenticated successfully.");
      return true;
   }

   private void trackRequest(String request){
      System.out.println("Page requested: " + request);
   }

   public void dispatchRequest(String request){
      //log each request
      trackRequest(request);

      //authenticate the user
      if(isAuthenticUser()){
         dispatcher.dispatch(request);
      }
   }
}
步驟 4
使用FrontController來演示前端控制器設計模式。
FrontControllerPatternDemo.java
public class FrontControllerPatternDemo {
   public static void main(String[] args) {

      FrontController frontController = new FrontController();
      frontController.dispatchRequest("HOME");
      frontController.dispatchRequest("STUDENT");
   }
}
步驟 5
驗證輸出。
Page requested: HOME
User is authenticated successfully.
Displaying Home Page
Page requested: STUDENT
User is authenticated successfully.
Displaying Student Page
廣告