- Angular 教程
- Angular - 首頁
- Angular - 概述
- Angular - 特性
- Angular - 優點與缺點
- Angular 基礎
- Angular - 環境搭建
- Angular - 第一個應用
- Angular - MVC 架構
- Angular 元件
- Angular - 元件
- Angular - 元件生命週期
- Angular - 檢視封裝
- Angular - 元件互動
- Angular - 元件樣式
- Angular - 巢狀元件
- Angular - 內容投影
- Angular - 動態元件
- Angular - 元素
- Angular 模板
- Angular - 模板
- Angular - 文字插值
- Angular - 模板語句
- Angular - 模板中的變數
- Angular - SVG 作為模板
- Angular 繫結
- Angular - 繫結及其型別
- Angular - 資料繫結
- Angular - 事件繫結
- Angular - 屬性繫結
- Angular - 屬性繫結
- Angular - 類和樣式繫結
- Angular 指令
- Angular - 指令
- Angular - 內建指令
- Angular 管道
- Angular - 管道
- Angular - 使用管道轉換資料
- Angular 依賴注入
- Angular - 依賴注入
- Angular HTTP 客戶端程式設計
- Angular - 服務
- Angular - HTTP 客戶端
- Angular - 請求
- Angular - 響應
- Angular - 獲取
- Angular - PUT
- Angular - DELETE
- Angular - JSON-P
- Angular - 使用 HTTP 進行 CRUD 操作
- Angular 路由
- Angular - 路由
- Angular - 導航
- Angular - Angular Material
- Angular 動畫
- Angular - 動畫
- Angular 表單
- Angular - 表單
- Angular - 表單驗證
- Angular Service Workers & PWA
- Angular - Service Workers & PWA
- Angular 測試
- Angular - 測試概述
- Angular NgModules
- Angular - 模組簡介
- Angular 高階
- Angular - 身份驗證和授權
- Angular - 國際化
- Angular - 可訪問性
- Angular - Web Workers
- Angular - 伺服器端渲染
- Angular - Ivy 編譯器
- Angular - 使用 Bazel 構建
- Angular - 向後相容性
- Angular - 響應式程式設計
- Angular - 在指令和元件之間共享資料
- Angular 工具
- Angular - CLI
- Angular 雜項
- Angular - 第三方控制元件
- Angular - 配置
- Angular - 顯示資料
- Angular - 裝飾器和元資料
- Angular - 基本示例
- Angular - 錯誤處理
- Angular - 測試和構建專案
- Angular - 生命週期鉤子
- Angular - 使用者輸入
- Angular - 新功能?
- Angular 有用資源
- Angular - 快速指南
- Angular - 有用資源
- Angular - 討論
Angular - 服務
如前所述,服務在 Angular 應用程式中提供特定的功能。在給定的 Angular 應用程式中,可能存在一個或多個服務可以使用。類似地,Angular 元件可能依賴於一個或多個服務。
此外,Angular 服務可能依賴於其他服務才能正常工作。依賴項解析是開發任何應用程式中複雜且耗時的活動之一。為了降低複雜性,Angular 提供了依賴注入模式作為其核心概念之一。
讓我們在本節中學習如何在 Angular 應用程式中使用依賴注入。
建立 Angular 服務
Angular 服務是一個普通的 TypeScript 類,具有一個或多個方法(功能)以及@Injectable裝飾器。它使普通的 TypeScript 類能夠在 Angular 應用程式中用作服務。
import { Injectable } from '@angular/core'; @Injectable()
export class DebugService {
   constructor() { }
}
這裡,@Injectable裝飾器將普通的 TypeScript 類轉換為 Angular 服務。
註冊 Angular 服務
要使用依賴注入,每個服務都需要註冊到系統中。Angular 提供了多種註冊服務的方法。它們如下所示:
- ModuleInjector @ 根級別
- ModuleInjector @ 平臺級別
- 使用 providers 元資料的 ElementInjector
- 使用 viewProviders 元資料的 ElementInjector
- NullInjector
ModuleInjector @ 根
ModuleInjector 強制服務只能在特定模組內部使用。@Injectable中提供的ProvidedIn元資料必須用於指定服務可以使用的模組。
該值應引用已註冊的 Angular 模組之一(用@NgModule裝飾)。root是一個特殊選項,它指的是應用程式的根模組。示例程式碼如下:
import { Injectable } from '@angular/core'; @Injectable({
   providedIn: 'root',
})
export class DebugService {
   constructor() { }
}
ModuleInjector @ 平臺
Platform Injector 比ModuleInject高一級,僅在高階和罕見的情況下使用。每個 Angular 應用程式都透過執行PreformBrowserDynamic().bootstrap方法(參見main.js)開始,該方法負責引導 Angular 應用程式的根模組。
PreformBrowserDynamic()方法建立一個由PlatformModule配置的注入器。我們可以使用PlatformModule提供的platformBrowser()方法配置平臺級服務。
NullInjector
NullInjector比平臺級ModuleInjector高一級,並且位於層次結構的頂層。我們無法在NullInjector中註冊任何服務。當在層次結構中的任何位置都找不到所需的 service 時,它會解析並簡單地丟擲錯誤。
使用 providers 的 ElementInjector
ElementInjector 強制服務只能在某些特定元件內部使用。@Component裝飾器中提供的 providers 和ViewProviders元資料用於指定對特定元件可見的服務列表。使用 providers 的示例程式碼如下:
ExpenseEntryListComponent
// import statement
import { DebugService } from '../debug.service';
// component decorator
@Component({
   selector: 'app-expense-entry-list',
   templateUrl: './expense-entry-list.component.html',
   styleUrls: ['./expense-entry-list.component.css'],
   providers: [DebugService] })
這裡,DebugService僅在ExpenseEntryListComponent及其檢視內部可用。要在其他元件中使用 DebugService,只需在必要的元件中使用providers裝飾器即可。
使用 viewProviders 的 ElementInjector
viewProviders類似於provider,不同之處在於它不允許在使用ng-content指令建立的元件內容內部使用服務。
ExpenseEntryListComponent
// import statement
import { DebugService } from '../debug.service';
// component decorator
@Component({
   selector: 'app-expense-entry-list',
   templateUrl: './expense-entry-list.component.html',
   styleUrls: ['./expense-entry-list.component.css'], viewProviders: [DebugService]
})
父元件可以透過其檢視或內容使用子元件。下面給出了一個包含子元件和內容檢視的父元件的示例:
父元件檢視/模板
<div>
   child template in view
   <child></child>
</div>
<ng-content></ng-content>
子元件檢視/模板
<div>
   child template in view
</div>
父元件在模板(另一個元件)中的用法
<parent>
   <!-- child template in content -->
   <child></child>
</parent>
這裡,
- child元件在兩個地方使用。一個在父級的檢視內。另一個在父級內容內。
- 服務將在放置在父級檢視內的子元件中可用。
- 服務將不會在放置在父級內容內的子元件中可用。
解析 Angular 服務
讓我們看看元件如何使用以下流程圖解析服務。
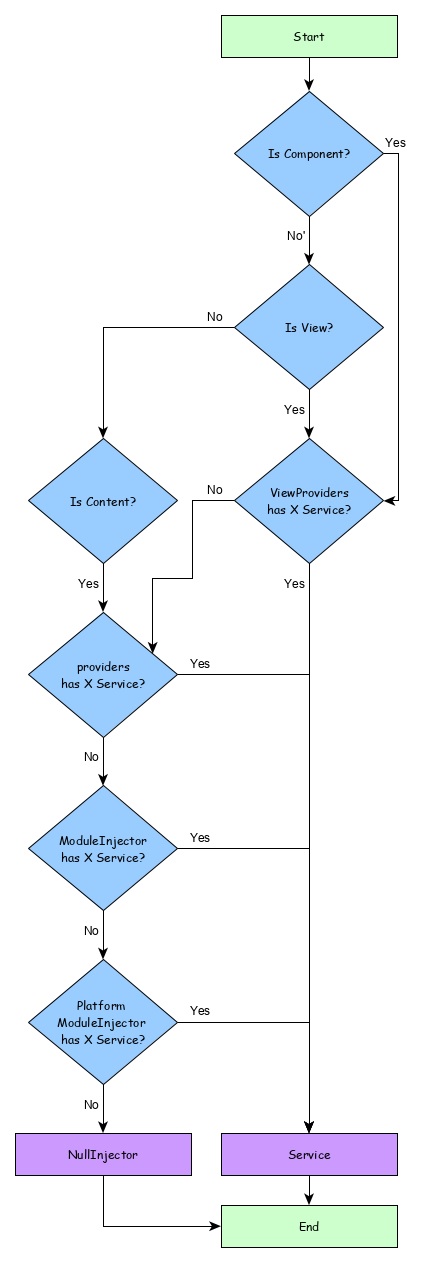
這裡,
- 首先,元件嘗試查詢使用viewProviders元資料註冊的服務。
- 如果未找到,元件嘗試查詢使用providers元資料註冊的服務。
- 如果未找到,元件嘗試查詢使用ModuleInjector註冊的服務
- 如果未找到,元件嘗試查詢使用PlatformInjector註冊的服務
- 如果未找到,元件嘗試查詢使用NullInjector註冊的服務,它始終會丟擲錯誤。
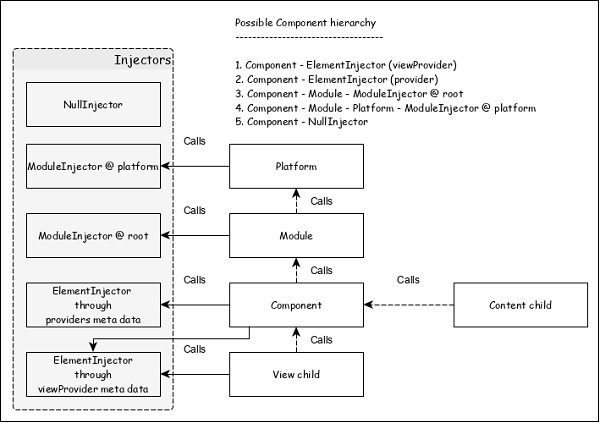
注入器的層次結構以及解析服務的流程如下:
解析修飾符
正如我們在上一節中學到的,服務的解析從元件開始,並在找到服務或到達NUllInjector時停止。這是預設解析,可以使用Resolution Modifier更改它。它們如下:
Self()
Self()在其當前ElementInjector本身中啟動和停止對服務的搜尋。
import { Self } from '@angular/core';
constructor(@Self() public debugService: DebugService) {}
SkipSelf()
SkipSelf()與Self()正好相反。它跳過當前的 ElementInjector,並從其父ElementInjector開始搜尋服務。
import { SkipSelf } from '@angular/core';
constructor(@SkipSelf() public debugService: DebugService) {}
Host()
Host()在其宿主ElementInjector中停止對服務的搜尋。即使服務在更高級別可用,它也會在宿主處停止。
import { Host } from '@angular/core';
constructor(@Host() public debugService: DebugService) {}
Optional()
Optional()在搜尋服務失敗時不會丟擲錯誤。
import { Optional } from '@angular/core';
constructor(@Optional() private debugService?: DebugService) {
   if (this.debugService) {
      this.debugService.info("Debugger initialized");
   }
}
依賴注入提供程式
依賴注入提供程式有兩個用途。首先,它有助於為要註冊的服務設定令牌。該令牌將用於引用和呼叫服務。其次,它有助於根據給定的配置建立服務。
如前所述,最簡單的提供程式如下:
providers: [ DebugService ]
這裡,DebugService既是令牌,也是類,服務物件必須由此類建立。提供程式的實際形式如下:
providers: [ { provides: DebugService, useClass: DebugService }]
這裡,provides是令牌,useClass是建立服務物件的類引用。
Angular 提供了一些其他提供程式,它們如下:
別名類提供程式
提供程式的目的是重用現有的服務。
providers: [ DebugService,
   { provides: AnotherDebugService, userClass: DebugService }]
這裡,只會建立DebugService服務的一個例項。
值提供程式
值提供程式的目的是提供值本身,而不是要求 DI 建立服務物件的例項。它也可以使用現有的物件。唯一的限制是物件必須與引用的服務具有相同的形狀。
export class MyCustomService {
   name = "My Custom Service"
}
[{ provide: MyService, useValue: { name: 'instance of MyCustomService' }]
這裡,DI 提供程式只是返回在useValue選項中設定的例項,而不是建立新的服務物件。
非類依賴項提供程式
它使字串、函式或物件能夠在 Angular DI 中使用。
讓我們看一個簡單的例子。
// Create the injectable token
import { InjectionToken } from '@angular/core';
export const APP_CONFIG = new InjectionToken<AppConfig>('app.config');
// Create value
export const MY_CONFIG: AppConfig = {
   title: 'Dependency Injection'
};
// congfigure providers
providers: [{ provide: APP_CONFIG, useValue: HERO_DI_CONFIG }]
// inject the service
constructor(@Inject(APP_CONFIG) config: AppConfig) {
工廠提供程式
工廠提供程式支援複雜的 service 建立。它將物件的建立委託給外部函式。工廠提供程式還可以選擇為工廠物件設定依賴項。
{ provide: MyService, useFactory: myServiceFactory, deps: [DebugService] };
這裡,myServiceFactory返回MyService的例項。
Angular 服務用法
現在,我們知道了如何建立和註冊 Angular 服務。讓我們看看如何在元件內部使用 Angular 服務。使用 Angular 服務就像將建構函式的引數型別設定為服務提供程式的令牌一樣簡單。
export class ExpenseEntryListComponent implements OnInit {
   title = 'Expense List';
   constructor(private debugService : DebugService) {}
   ngOnInit() {
      this.debugService.info("Angular Application starts");
   }
}
這裡,
ExpenseEntryListComponent建構函式設定了一個型別為 DebugService 的引數。
Angular 依賴注入(DI) 將嘗試查詢應用程式中註冊的任何型別為 DebugService 的服務。如果找到,它將為 ExpenseEntryListComponent 元件設定 DebugService 的例項。如果未找到,它將丟擲錯誤。
新增除錯服務
讓我們新增一個簡單的Debug服務,它將幫助我們在應用程式開發期間列印除錯資訊。
開啟命令提示符並轉到專案根資料夾。
cd /go/to/expense-manager
啟動應用程式。
ng serve
執行以下命令生成一個 Angular 服務,**DebugService**。
ng g service debug
這將建立兩個 TypeScript 檔案(除錯服務及其測試),如下所示:
CREATE src/app/debug.service.spec.ts (328 bytes)
CREATE src/app/debug.service.ts (134 bytes)
讓我們分析一下 **DebugService** 服務的內容。
import { Injectable } from '@angular/core'; @Injectable({
   providedIn: 'root'
})
export class DebugService {
   constructor() { }
}
這裡,
**@Injectable** 裝飾器附加到 DebugService 類,這使得 DebugService 能夠在應用程式的 Angular 元件中使用。
**providedIn** 選項及其值 root 使 DebugService 能夠在應用程式的所有元件中使用。
讓我們新增一個方法 Info,它將訊息列印到瀏覽器控制檯。
info(message : String) : void {
   console.log(message);
}
讓我們在 **ExpenseEntryListComponent** 中初始化服務並使用它來列印訊息。
import { Component, OnInit } from '@angular/core'; import { ExpenseEntry } from '../expense-entry'; import { DebugService } from '../debug.service'; @Component({
   selector: 'app-expense-entry-list',
   templateUrl: './expense-entry-list.component.html', styleUrls: ['./expense-entry-list.component.css']
})
export class ExpenseEntryListComponent implements OnInit {
   title: string;
   expenseEntries: ExpenseEntry[];
   constructor(private debugService: DebugService) { }
   ngOnInit() {
      this.debugService.info("Expense Entry List
      component initialized");
      this.title = "Expense Entry List";
      this.expenseEntries = this.getExpenseEntries();
   }
   // other coding
}
這裡,
DebugService 使用建構函式引數進行初始化。設定型別為 DebugService 的引數(debugService)將觸發依賴注入以建立一個新的 DebugService 物件並將其設定為 ExpenseEntryListComponent 元件。
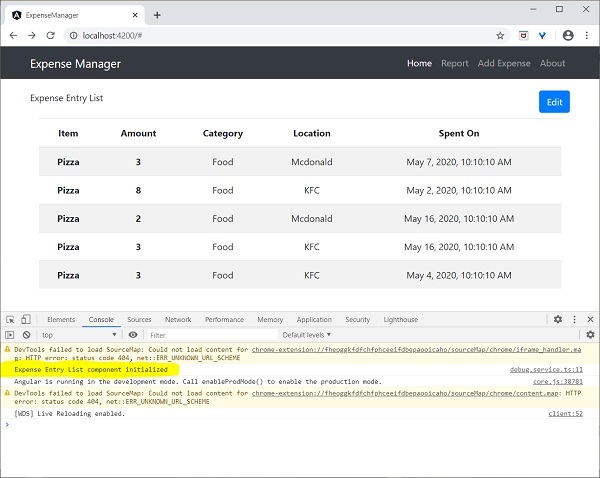
在 ngOnInit 方法中呼叫 DebugService 的 info 方法會在瀏覽器控制檯列印訊息。
可以使用開發者工具檢視結果,它看起來類似於以下所示:
讓我們擴充套件應用程式以瞭解服務的範圍。
讓我們使用以下命令建立一個 **DebugComponent**。
ng generate component debug
CREATE src/app/debug/debug.component.html (20 bytes) CREATE src/app/debug/debug.component.spec.ts (621 bytes)
CREATE src/app/debug/debug.component.ts (265 bytes) CREATE src/app/debug/debug.component.css (0 bytes) UPDATE src/app/app.module.ts (392 bytes)
讓我們從根模組中刪除 DebugService。
// src/app/debug.service.ts
import { Injectable } from '@angular/core'; @Injectable()
export class DebugService {
   constructor() {
   }
   info(message : String) : void {
      console.log(message);
   }
}
在 ExpenseEntryListComponent 元件下注冊 DebugService。
// src/app/expense-entry-list/expense-entry-list.component.ts @Component({
   selector: 'app-expense-entry-list',
   templateUrl: './expense-entry-list.component.html',
   styleUrls: ['./expense-entry-list.component.css']
   providers: [DebugService]
})
這裡,我們使用了 providers 元資料 **(ElementInjector)** 來註冊服務。
開啟 **DebugComponent** (src/app/debug/debug.component.ts) 並匯入 **DebugService**,並在元件的建構函式中設定一個例項。
import { Component, OnInit } from '@angular/core'; import { DebugService } from '../debug.service';
@Component({
   selector: 'app-debug',
   templateUrl: './debug.component.html',
   styleUrls: ['./debug.component.css']
})
export class DebugComponent implements OnInit {
   constructor(private debugService: DebugService) { }
   ngOnInit() {
      this.debugService.info("Debug component gets service from Parent");
   }
}
這裡,我們沒有註冊 **DebugService**。因此,如果用作父元件,DebugService 將不可用。當在父元件內部使用時,如果父元件可以訪問該服務,則該服務可能從父元件獲取。
開啟 **ExpenseEntryListComponent** 模板 (src/app/expense-entry-list/expense-entry-list.component.html) 幷包含一個內容部分,如下所示
// existing content
<app-debug></app-debug>
<ng-content></ng-content>
這裡,我們包含了一個內容部分和 DebugComponent 部分。
讓我們在 **AppComponent** 模板中將除錯元件作為內容包含在 **ExpenseEntryListComponent** 元件內。開啟 **AppComponent** 模板並將 **app-expense-entry-list** 更改為如下所示:
// navigation code
<app-expense-entry-list>
<app-debug></app-debug>
</app-expense-entry-list>
這裡,我們包含了 **DebugComponent** 作為內容。
讓我們檢查應用程式,它將在頁面末尾顯示 **DebugService** 模板,如下所示:
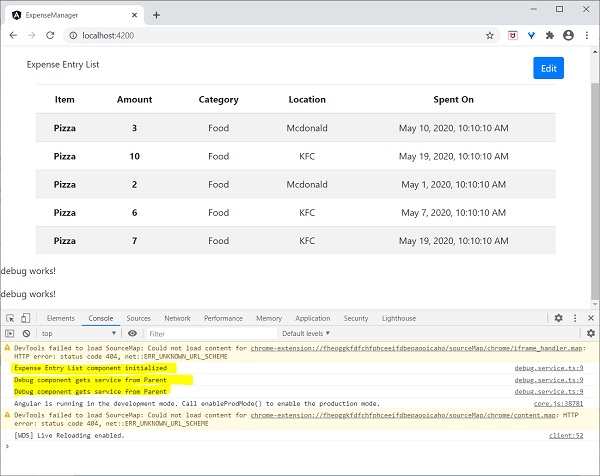
此外,我們還可以在控制檯中看到來自除錯元件的兩個除錯資訊。這表明除錯元件從其父元件獲取服務。
讓我們更改服務在 **ExpenseEntryListComponent** 中的注入方式以及它如何影響服務的範圍。將 providers 注入器更改為 viewProviders 注入。**viewProviders** 不會將服務注入到內容子元素中,因此它應該會失敗。
viewProviders: [DebugService]
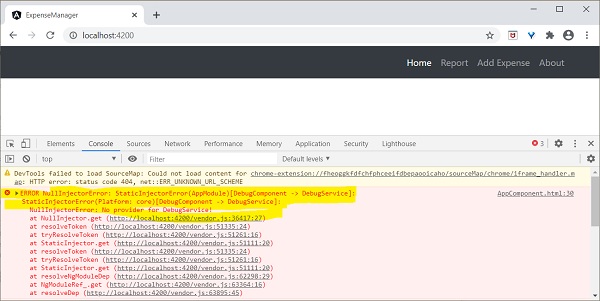
檢查應用程式,您將看到其中一個除錯元件(用作內容子元素)丟擲錯誤,如下所示:
讓我們從模板中刪除除錯元件並恢復應用程式。
開啟 **ExpenseEntryListComponent** 模板 (src/app/expense-entry-list/expense-entry-list.component.html) 並刪除以下內容
<app-debug></app-debug>
<ng-content></ng-content>
開啟 **AppComponent** 模板並將 **app-expense-entry-list** 更改為如下所示:
// navigation code
<app-expense-entry-list>
</app-expense-entry-list>
將 **ExpenseEntryListComponent** 中的 **viewProviders** 設定更改為 **providers**。
providers: [DebugService]
重新執行應用程式並檢查結果。