- Angular 教程
- Angular - 首頁
- Angular - 概述
- Angular - 特性
- Angular - 優點與缺點
- Angular 基礎
- Angular - 環境搭建
- Angular - 第一個應用
- Angular - MVC 架構
- Angular 元件
- Angular - 元件
- Angular - 元件生命週期
- Angular - 檢視封裝
- Angular - 元件互動
- Angular - 元件樣式
- Angular - 巢狀元件
- Angular - 內容投影
- Angular - 動態元件
- Angular - 元素
- Angular 模板
- Angular - 模板
- Angular - 文字插值
- Angular - 模板語句
- Angular - 模板中的變數
- Angular - SVG 作為模板
- Angular 資料繫結
- Angular - 資料繫結及其型別
- Angular - 資料繫結
- Angular - 事件繫結
- Angular - 屬性繫結
- Angular - 屬性繫結
- Angular - 類和樣式繫結
- Angular 指令
- Angular - 指令
- Angular - 內建指令
- Angular 管道
- Angular - 管道
- Angular - 使用管道轉換資料
- Angular 依賴注入
- Angular - 依賴注入
- Angular HTTP 客戶端程式設計
- Angular - 服務
- Angular - HTTP 客戶端
- Angular - 請求
- Angular - 響應
- Angular - GET 請求
- Angular - PUT 請求
- Angular - DELETE 請求
- Angular - JSON-P
- Angular - 使用 HTTP 進行 CRUD 操作
- Angular 路由
- Angular - 路由
- Angular - 導航
- Angular - Angular Material
- Angular 動畫
- Angular - 動畫
- Angular 表單
- Angular - 表單
- Angular - 表單驗證
- Angular Service Workers & PWA
- Angular - Service Workers & PWA
- Angular 測試
- Angular - 測試概述
- Angular NgModules
- Angular - 模組介紹
- Angular 高階
- Angular - 身份驗證和授權
- Angular - 國際化
- Angular - 可訪問性
- Angular - Web Workers
- Angular - 伺服器端渲染
- Angular - Ivy 編譯器
- Angular - 使用 Bazel 構建
- Angular - 向後相容性
- Angular - 響應式程式設計
- Angular - 指令和元件之間的資料共享
- Angular 工具
- Angular - CLI
- Angular 其他
- Angular - 第三方控制元件
- Angular - 配置
- Angular - 顯示資料
- Angular - 裝飾器和元資料
- Angular - 基本示例
- Angular - 錯誤處理
- Angular - 測試和構建專案
- Angular - 生命週期鉤子
- Angular - 使用者輸入
- Angular - 最新動態?
- Angular 有用資源
- Angular - 快速指南
- Angular - 有用資源
- Angular - 討論
Angular - 響應
HTTP 響應
在 HTTP 協議中,響應是伺服器為客戶端請求的特定資源返回的資料。響應將遵循與請求相同的模式。它有一個頭部和一個主體。頭部包含有關響應的元資訊,主體包含實際的響應。
HttpEvent 類
HttpClient 將請求傳送到伺服器並捕獲來自伺服器的響應。然後,它將響應包含在一個物件中,該物件根據請求配置具有以下可能的型別。
- HttpEvent
- HttpSentEvent
- HttpUserEvent
- HttpProgressEvent
- HttpResponseBase
- HttpHeaderResponse
- HttpResponse
實際上,HttpEvent 是所有其他類的並集,如下所示:
type HttpEvent<T> = HttpSentEvent | HttpHeaderResponse | HttpResponse<T> |
   HttpProgressEvent | HttpUserEvent<T>;
讓我們在本節中逐一瞭解 Angular 提供的響應型別。
HttpSentEvent
HttpSentEvent 用於指定請求已傳送到伺服器。當請求多次重試時,它將非常有用。
interface HttpSentEvent {
   type: HttpEventType.Sent
}
HttpUserEvent
HttpUserEvent 用於標識響應的事件是使用者定義的。它將有助於將所有自定義事件分組到一個類別中。它將確保所有攔截器都能正確處理和轉發事件。
interface HttpUserEvent<T> {
   type: HttpEventType.User
}
HttpProgressEvent
HttpProgressEvent 用於標識請求是基於下載還是基於上傳。此外,它還將在下載/上傳功能期間包含當前已載入的位元組。
interface HttpProgressEvent {
   type: HttpEventType.DownloadProgress | HttpEventType.UploadProgress
   loaded: number
   total?: number
}
這裡:
loaded 用於引用已上傳/下載的位元組數
total 用於引用要下載/上傳的總資料量
HttpResponseBase
HttpResponseBase 是 HttpHeaderResponse 和 HttpResponse 的基類。它包含有關響應的基本資訊。
abstract class HttpResponseBase {
   constructor() // have not shown full details for understanding purpose
   headers: HttpHeaders
   status: number
   statusText: string
   url: string | null
   ok: boolean
   type: HttpEventType.Response | HttpEventType.ResponseHeader
}
這裡:
headers - 作為 HttpHeaders 物件的響應頭資訊
status - 用於引用請求的不同狀態的數字
statusText - 用於引用請求的不同狀態的文字
url - 請求的 URL
ok - 請求的成功/失敗
type - 事件的型別(Response 或 ResponseHeader)
HttpHeaderResponse
HttpHeaderResponse 繼承自 HttpResponseBase,幷包含一個克隆響應的選項。該類的目的是包含帶有頭部和狀態資訊的響應,而跳過響應的實際主體。它只有一個 clone() 方法,用於獲取頭部資訊的副本,以便更新頭部資訊。
let response = res.clone(update: { })
這裡:
res 是從伺服器返回的響應物件。
update 是一個物件,其中包含要在響應的頭部中更新的資料。
HttpResponse
HttpResponse 繼承自 HttpResponseBase,幷包含響應的主體和克隆響應的選項。該類的目的是包含帶有主體、頭部和狀態資訊的響應。它只有一個 clone() 方法,用於獲取整個響應的副本,以便更新響應資訊。
可以使用 body 屬性獲取響應的主體,如下所示:
let body = res.body;
這裡:
res 是從伺服器返回的響應物件。
body 是儲存來自伺服器的實際響應的屬性。
克隆響應的方法與 HttpHeaderResponse 類似,如下所示:
let response = res.clone(update: { })
這裡:
res 是從伺服器返回的響應物件。
update 是一個物件,其中包含要在響應的頭部中更新的資料。
工作示例
讓我們建立一個示例 Web 應用程式,將檔案上傳到伺服器。我們將建立一個用於上傳檔案的 api,然後從 Angular 前端應用程式呼叫它。在應用程式開發過程中,我們將學習不同型別的響應。
首先,讓我們建立一個新的 express 應用程式來將檔案上傳到伺服器。
步驟 1:轉到您喜歡的 workspace,如下所示:
cd /go/to/your/favorite/workspace
步驟 2:建立一個新資料夾 expense-rest-api 並進入該資料夾
mkdir upload-rest-api && cd upload-rest-api
步驟 3:使用 npm 命令提供的 init 子命令建立一個新應用程式,如下所示:
npm init
上述命令會提出一些問題,請使用預設答案回答所有問題。
步驟 4:安裝 express 和 cors 包以建立基於節點的 Web 應用程式。
npm install express cors multer --save
這裡:
express 是一個用於建立 Web 應用程式的 Web 框架
cors 是一個用於處理 HTTP 應用程式中 CORS 概念的中介軟體
multer 是另一個用於處理檔案上傳的中介軟體
步驟 5:開啟 index.js 並更新以下程式碼:
var express = require("express")
var cors = require('cors')
const multer = require('multer');

var app = express()
app.use(cors());

var bodyParser = require("body-parser");
app.use(express.urlencoded({ extended: true }));
app.use(express.json());

var HTTP_PORT = 8000
app.listen(HTTP_PORT, () => {
   console.log("Server running on port %PORT%".replace("%PORT%", HTTP_PORT))
});

const storage = multer.diskStorage({
   destination: (req, file, cb) => {
      cb(null, "uploads/")
   },
   filename: (req, file, cb) => {
      cb(null, Date.now() + "-" + file.originalname)
   },
})

const upload = multer({ storage: storage });
app.post('/api/upload', upload.single('photo'), (req, res) => {
   console.log(req.file)
   res.json({ message: 'File uploaded successfully!' });
});
這裡:
透過啟用 cors、multer 和 body 解析器中介軟體來配置一個簡單的 express 應用程式。
建立了一個新的 api /api/upload 來接受檔案並將其儲存在伺服器上的 uploads 資料夾中。
將上傳資料夾配置為 uploads
該 api 將接受名為 photo 的檔案輸入
步驟 6:建立一個用於儲存上傳檔案的目錄。
mkdir uploads
步驟 7:執行應用程式,如下所示:
node index.js
步驟 8:要測試應用程式並確保其正常工作,請使用 postman、curl 或任何其他 HTTP 客戶端工具包。我們可以向 api 端點 https://:8000/api/upload 建立一個新請求,其中 photo 為檔案型別的表單輸入,並將檔案附加到表單輸入。
讓我們建立一個可工作的 Angular 示例,使用 HttpClient 服務類和 HttpRequest 選項從伺服器獲取所有費用專案。
步驟 1:透過執行 ng new 命令建立一個新的 Angular 應用程式,如下所示:
ng new my-upload-app
啟用 Angular 路由和 CSS,如下所示:
? Would you like to add Angular routing? Yes
? Which stylesheet format would you like to use? CSS
步驟 2:透過在模組配置檔案 (app.module.ts) 中匯入 HttpClientModule 來啟用應用程式中的 HTTP 通訊。
import { NgModule } from '@angular/core';
import { BrowserModule } from '@angular/platform-browser';

import { AppRoutingModule } from './app-routing.module';
import { AppComponent } from './app.component';

import { HttpClientModule } from '@angular/common/http';

@NgModule({
   declarations: [
      AppComponent
   ],
   imports: [
      BrowserModule,
      AppRoutingModule,
      HttpClientModule
   ],
   providers: [],
   bootstrap: [AppComponent]
})
export class AppModule { }
這裡:
從 @angular/common/http 模組匯入 HttpClientModule。
將 HttpClientModule 新增到 @NgModule 配置的 imports 部分。
步驟 3:建立一個新元件 Upload 來顯示來自伺服器的費用專案。
ng generate component upload
它將建立如下所示的元件:
CREATE src/app/upload/upload.component.css (0 bytes)
CREATE src/app/upload/upload.component.html (21 bytes)
CREATE src/app/upload/upload.component.spec.ts (559 bytes)
CREATE src/app/upload/upload.component.ts (202 bytes)
UPDATE src/app/app.module.ts (554 bytes)
步驟 4:將我們的新元件包含到 App 根元件的檢視 app.component.html 中,如下所示:
<app-upload></app-upload>

<router-outlet></router-outlet>
步驟 5:透過建構函式將 HttpClient 注入到 Upload 元件中,並從 rxjs 和 Angular 模組匯入必要的類,如下所示:
import { Component } from '@angular/core';
import { HttpClient, HttpEvent, HttpEventType } from '@angular/common/http';
import { Observable, map } from 'rxjs';

@Component({
   selector: 'app-upload',
   templateUrl: './upload.component.html',
   styleUrls: ['./upload.component.css']
})
export class UploadComponent {
   constructor(private http: HttpClient) { }
}
步驟 6:建立一個變數來儲存要上傳的檔案,以及另一個變數來儲存上傳訊息。
file?: File | null = null;
message : String | null = null;
步驟 7:建立一個函式來獲取使用者從表單(待建立)上傳的檔案,並將其儲存在 file 變數中。
onFilechange(event: any) {
   let files = event.target.files
   this.file = files.item(0)
   console.log(this.file)
}
這裡:
event 是儲存上傳事件資訊的事件物件。event.target.files 儲存上傳的文件。
步驟 8:建立一個函式 getEventMessage() 來列印上傳事件資訊。
private getEventMessage(event: HttpEvent, file?: File) {
   let message : String | null = null;
   switch (event.type) {
      case HttpEventType.Sent:
         message = `Uploading file "${file?.name}" of size ${file?.size}.`;
         console.log(message);
         return message;

      case HttpEventType.UploadProgress:
         // Compute and show the % done:
         const percentDone = event.total ? Math.round(100 * event.loaded / event.total) : 0;
         message = `File "${file?.name}" is ${percentDone}% uploaded.`;
         console.log(message);
         return message;

      case HttpEventType.Response:
         message = `File "${file?.name}" was completely uploaded!`;
         console.log(message);
         return message;

      default:
         message = `File "${file?.name}" surprising upload event: ${event.type}.`;
         console.log(message);
         return message;
   }
}
這裡:
switch 語句用於捕獲不同的事件並相應地列印它們
HttpEventType 儲存資訊型別
步驟 9:建立一個函式 upload() 將使用者選擇的檔案上傳到伺服器。
upload() {
   const formData: FormData = new FormData();
   formData.append('photo', this.file as Blob, this.file?.name);
   const myObservable: Observable<HttpEvent<any>> =
      this.http.post<any>('https://:8000/upload', formData, { observe: 'events',
         reportProgress: true });

   myObservable.pipe(
      map(data => { console.log(data); return data; }),).subscribe(
         evt => {
            this.message = this.getEventMessage(evt, this.file as File)
      });
}
這裡:
formData 儲存使用者上傳的檔案。
post() 方法將 formData 中的資料傳送到伺服器。
myObservable 將使用 map 函式列印伺服器返回的資料,並使用 getEventMessage() 函式列印事件資訊
步驟 10:upload 元件 (upload.component.ts) 的完整原始碼如下:
import { Component } from '@angular/core';
import { HttpClient, HttpEvent, HttpEventType } from '@angular/common/http';
import { Observable, map } from 'rxjs';

@Component({
   selector: 'app-upload',
   templateUrl: './upload.component.html',
   styleUrls: ['./upload.component.css']
})
export class UploadComponent {

   file?: File | null = null;
   message : String | null = null;

   constructor(private http: HttpClient) { }

   onFilechange(event: any) {
      let files = event.target.files
      this.file = files.item(0)
      console.log(this.file)
   }

   upload() {
   const formData: FormData = new FormData();
   formData.append('photo', this.file as Blob, this.file?.name);
   const myObservable: Observable<HttpEvent<any>> =
      this.http.post<any>('https://:8000/api/upload',
      formData, { observe: 'events', reportProgress: true });

   console.log('Hi');

   myObservable.pipe(
      map(data => { console.log(data); return data; }),
      ).subscribe(
         evt => {
            this.message = this.getEventMessage(evt, this.file as File)
         });
   }

   private getEventMessage(event: HttpEvent<any>, file?: File) {
      let message : String | null = null;
      switch (event.type) {
         case HttpEventType.Sent:
            message = `Uploading file "${file?.name}" of size ${file?.size}.`;
            console.log(message);
            return message;

         case HttpEventType.UploadProgress:
            // Compute and show the % done:
            const percentDone = event.total ? Math.round(100 * event.loaded / event.total) : 0;
            message = `File "${file?.name}" is ${percentDone}% uploaded.`;
            console.log(message);
            return message;

         case HttpEventType.Response:
            message = `File "${file?.name}" was completely uploaded!`;
            console.log(message);
            return message;

         default:
            message = `File "${file?.name}" surprising upload event: ${event.type}.`;
            console.log(message);
            return message;
      }
   }
}
步驟 11:在元件的模板('upload.component.html')中建立一個上傳表單,併為上傳按鈕的 click 事件設定 upload() 方法。
<div><h3>Uploads</h3></div>
<form enctype="multipart/form-data">
   <label for="formFile" class="form-label">Upload file example</label>
   <input type="file" name="photo" id="file" (change)="this.onFilechange($event)" />

   <div *ngIf="file">
      <section class="file-info">
         File details:
         <ul>
            <li>Name: {{file.name}}</li>
            <li>Type: {{file.type}}</li>
            <li>Size: {{file.size}} bytes</li>
         </ul>
      </section>
      <p *ngIf="message">{{message}}</p>

      <button (click)="this.upload()" type="button">Upload</button>
   </div>
</form>
步驟 12:最後,使用以下命令執行應用程式:
ng serve
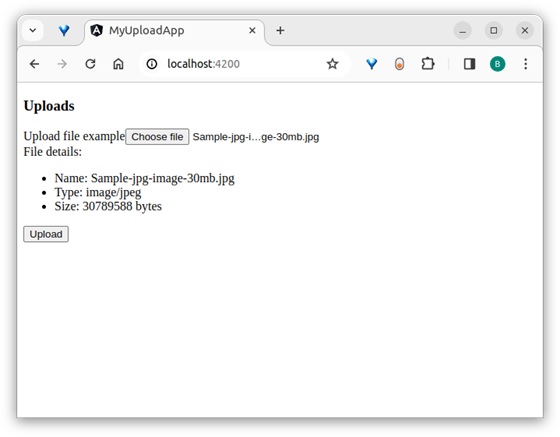
步驟 13:開啟瀏覽器並導航到 https://:4200/ URL 並檢查輸出

這裡,輸出顯示錶單。選擇一個大約 30 MB 的大檔案並嘗試上傳它,如下所示:
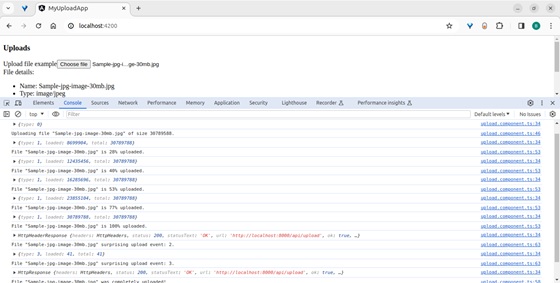

輸出顯示瀏覽器及其控制檯中伺服器返回的所有事件。
結論
Angular 提供了不同的類和型別來正確包含來自伺服器的響應資料。所有類都易於學習、理解和操作響應,然後將其顯示在網站/應用程式中。