- Angular 教程
- Angular - 首頁
- Angular - 概述
- Angular - 功能特性
- Angular - 優點與缺點
- Angular 基礎
- Angular - 環境搭建
- Angular - 第一個應用
- Angular - MVC 架構
- Angular 元件
- Angular - 元件
- Angular - 元件生命週期
- Angular - 檢視封裝
- Angular - 元件互動
- Angular - 元件樣式
- Angular - 巢狀元件
- Angular - 內容投影
- Angular - 動態元件
- Angular - 元素
- Angular 模板
- Angular - 模板
- Angular - 文字插值
- Angular - 模板語句
- Angular - 模板中的變數
- Angular - SVG 作為模板
- Angular 資料繫結
- Angular - 資料繫結及其型別
- Angular - 資料繫結
- Angular - 事件繫結
- Angular - 屬性繫結
- Angular - 屬性繫結
- Angular - 類和樣式繫結
- Angular 指令
- Angular - 指令
- Angular - 內建指令
- Angular 管道
- Angular - 管道
- Angular - 使用管道轉換資料
- Angular 依賴注入
- Angular - 依賴注入
- Angular HTTP 客戶端程式設計
- Angular - 服務
- Angular - HTTP 客戶端
- Angular - 請求
- Angular - 響應
- Angular - GET請求
- Angular - PUT請求
- Angular - DELETE請求
- Angular - JSON-P
- Angular - 使用 HTTP 進行 CRUD 操作
- Angular 路由
- Angular - 路由
- Angular - 導航
- Angular - Angular Material
- Angular 動畫
- Angular - 動畫
- Angular 表單
- Angular - 表單
- Angular - 表單驗證
- Angular Service Workers 和 PWA
- Angular - Service Workers 和 PWA
- Angular 測試
- Angular - 測試概述
- Angular NgModule
- Angular - 模組介紹
- Angular 高階
- Angular - 身份驗證和授權
- Angular - 國際化
- Angular - 可訪問性
- Angular - Web Workers
- Angular - 伺服器端渲染
- Angular - Ivy 編譯器
- Angular - 使用 Bazel 構建
- Angular - 向後相容性
- Angular - 響應式程式設計
- Angular - 指令和元件之間的資料共享
- Angular 工具
- Angular - CLI
- Angular 其他
- Angular - 第三方控制元件
- Angular - 配置
- Angular - 資料顯示
- Angular - 裝飾器和元資料
- Angular - 基本示例
- Angular - 錯誤處理
- Angular - 測試和專案構建
- Angular - 生命週期鉤子
- Angular - 使用者輸入
- Angular - 最新動態?
- Angular 有用資源
- Angular - 快速指南
- Angular - 有用資源
- Angular - 討論
Angular - PUT請求
HttpClient put() 方法
要建立/更新伺服器上的資源,可以使用 HTTP 動詞 put。put 的目的是將資料傳送到伺服器,並根據傳送的資料在伺服器上建立/更新資源。伺服器將處理資料,並在伺服器上建立或更新請求的資源。建立/更新資料後,響應將傳送回客戶端。
Angular HttpClient 提供了一個方法 put(),用於使用 put HTTP 動詞將資料傳送到伺服器。讓我們在本節學習 HttpClient put() 方法。
put() 方法的簽名
put() 方法的簽名如下:
URL 代表要請求的資源的 URI。
body 代表要傳送到伺服器的資料。通常,它將採用 JSON 格式。
options 代表要與資源 URL 一起傳送的選項。
選項
可用的選項如下:
- observe
- responseType
- headers
- params
- context
- reportProgress
- withCredentials
- transferCache
observe
observe 用於指定在伺服器通訊期間要觀察響應的哪一部分。根據 observe 選項,將返回 Observable 的完整響應或部分響應。可能的值為 body、events 和 response。
response 用於將來自 HTTP 請求的完整響應作為 Observable<HttpResponse<R>> 返回,其中 R 基於 requestType 選項(我們將在下一節中檢查)和請求的資料型別 (Expense)。HttpResponse 類的目的是表示來自伺服器的完整 HTTP 響應。
this.http.put<Expense>(<url>, { 'observe': 'response', 'responseType' : 'json' })
這裡:
json 是用於解釋響應體的格式
Expense 是用於格式化響應體並返回 Observable<HttpResponse<Expense>> 的請求型別。
events 用於將響應流中觸發的事件以及相應的響應體作為 Observable<HttpEvent> 返回,其中 R 基於 requestType 選項和請求的資料型別 (Expense)。
this.http.put<Expense>(<url>, { 'observe': 'events', 'responseType' : 'json' })
這裡:
json 是用於解釋響應體的格式
Expense 是用於格式化響應體並返回 Observable<HttpEvent<Expense>> 的請求型別。
body 用於僅將 HTTP 請求的響應的正文內容作為 Observable 返回,其中 R 基於 requestType 選項和請求的資料型別 (Expense)。
this.http.put<Expense>(<url>, { 'observe': 'body', 'responseType' : 'json' })
這裡:
json 是用於解釋響應體的格式
Expense 是用於格式化響應體並作為 Observable<Expense> 返回的請求型別。
responseType
responseType 用於解釋響應體。它可以有四個可能的值,如下所示:
- arraybuffer
- blob
- text
- json
讓我們逐一瞭解這些選項
arraybuffer 用於將響應體解釋為通用的原始二進位制資料緩衝區並返回 `Observable`。它可用於流式傳輸音訊/影片內容。
this.http.put(<url>, { 'observe': 'body', 'responseType' : 'arraybuffer' } )
blob 用於將響應體解釋為二進位制格式並返回 Observable<blob>。它可用於下載大型檔案。
this.http.put(<url>, { 'observe': 'body', 'responseType' : 'blob' })
text 用於將響應體解釋為純文字格式並返回 Observable<String>。它可用於表示基於文字的資料。
this.http.put(<url>, { 'observe': 'body', 'responseType' : 'json' })
json 用於將響應體解釋為 json 格式並返回 Observable<R>,其中 R 是請求的資料型別 (Expense)。它可用於以 json 格式表示結果。透過在方法中指定型別變數 (R),可以將其進一步編碼為任何型別,如下所示:
this.http.put<Expense>(<url>, { 'observe': 'body', 'responseType' : 'json' })
根據 observe 和 responseType,Httpclient 將返回具有不同型別變數的 Observable。讓我們檢查 observe 和 responseType 的一些組合,以更好地理解這個概念。
-
observe => body 和 responseType => json
返回 Observable。R 代表型別變數。
-
observe => response 和 responseType => json
返回 Observable<HttpResponse>。R 代表型別變數並編碼響應體。
-
observe => events 和 responseType => json
返回 Observable<HttpEvent>。R 代表型別變數並編碼響應體。
-
observe => events 和 responseType => arraybuffer
返回 Observable<HttpEvent>。響應體被編碼為 ArrayBuffer。
-
observe => response 和 responseType => blob
返回 Observable<HttpEvent>。響應體被編碼為 ArrayBuffer。
-
observe => response 和 responseType => text
返回 Observable<HttpResponse>。響應體被編碼為 ArrayBuffer。
-
我們可以根據需要組合 observe 和 responseType 來建立更多組合。
headers
headers 用於指定 HTTP 標頭。它可以包含標準 HTTP 標頭作為鍵值對,也可以在 HttpHeaders 類中編碼資料。一個作為鍵值對的示例標頭如下所示:
{ 'Content-type': 'application/json' }
它指定請求內容型別為 json。我們還可以使用 Angular 提供的 HttpHeaders 類來建立 HTTP 標頭。使用 HttpHeaders 的示例標頭資訊如下:
// create header using `HttpHeaders`
const headers = new HttpHeaders()
   .set('content-type', 'application/json')
   .set('Access-Control-Allow-Origin', '*');

this.http.put<Expense>(<url>,
   { 'observe': 'body', 'responseType' : 'json', headers: headers })
params
params 用於以 application/x-www-form-urlencoded 格式表示序列化請求引數。它可以包含引數作為鍵值對,也可以在 HttpParams 類中編碼資料。一個作為鍵值對的示例引數如下所示:
{ 'name': 'john' }
它指定請求引數鍵為 name,其值為 john。我們還可以使用 Angular 提供的 HttpParams 類來建立引數。使用 HttpParams 的示例引數集如下:
// create parameters using `HttpParams`
const params = new HttpParams()
   .set('name', 'john')
   .set('age', 25)
   .set('active', true;

this.http.put<Expense>(<url>,
   { 'observe': 'body', 'responseType' : 'json', params: params })
context
context 用於以型別安全的方式傳送任意鍵值對,並且不會發生鍵衝突。它用作攔截器的資訊來源,充當客戶端和伺服器之間的中介軟體。Angular 提供了一個特殊的類 HttpContext 來編碼上下文資訊。一個示例上下文如下所示:
// create a key using HttpContextToken
export const IS_AUTH_ENABLED = new HttpContextToken<boolean>(() => false);

// set data for the context
let authContext = new HttpContext().set(IS_AUTH_ENABLED, true)

this.http.request<Expense>('GET', <url>,
   { 'observe': 'body', 'responseType' : 'json', context: authContext })
這裡:
HttpContextToken 用於建立鍵及其值型別。
IS_AUTH_ENABLED 是鍵,其型別為布林值
reportProgress
reportProgress 用於指定是否應將請求(通訊)的進度從伺服器傳送回客戶端。它可用於顯示透過 web api 上傳大型檔案的進度。
this.http.put<Expense>(<url>,
   { 'observe': 'events', 'responseType' : 'json', reportProgress: true })
withCredentials
withCredentials 用於指定是否應使用傳出憑據(cookie)傳送請求。它接受布林值。
this.http.put<Expense>(<url>,
   { 'observe': 'body', 'responseType' : 'json', withCredentials: true })
transferCache
transferCache 用於指定是否應快取請求。它接受布林值或 HttpTransferCacheOptions 值。HttpTransferCacheOptions 用於編碼動態邏輯,以根據自定義過濾器函式過濾要快取的請求並覆蓋預設快取行為。
this.http.put<Expense>(<url>,
   { 'observe': 'body', 'responseType' : 'json', transferCache: true })
工作示例
為了進行 HTTP 客戶端-伺服器通訊,我們需要設定一個 web 應用程式,並需要公開一組 web api。可以從客戶端請求 web api。讓我們建立一個示例伺服器應用程式 Expense API App,為支出提供 CRUD REST API(主要是 PUT 請求)。
步驟 1:轉到您喜歡的 workspace,如下所示:
cd /go/to/your/favorite/workspace
步驟 2:建立一個新資料夾 expense-rest-api 並進入該資料夾
mkdir expense-rest-api && cd expense-rest-api
步驟 3:使用 npm 命令提供的 init 子命令建立一個新應用程式,如下所示:
npm init
上述命令將提出一些問題,請使用預設答案回答所有問題。
步驟 4:安裝 express 和 cors 包以建立基於節點的 web 應用程式。
npm install express cors --save
步驟 5:安裝 sqlite 包以將支出儲存在基於 sqlite 的資料庫中
npm install sqlite3 --save
步驟 6:建立一個新檔案 sqlitedb.js,並新增以下程式碼以使用支出表和示例支出條目初始化資料庫。支出表將用於儲存支出專案
var sqlite3 = require('sqlite3').verbose()
const DBSOURCE = "expensedb.sqlite"

let db = new sqlite3.Database(DBSOURCE, (err) => {
   if (err) {
      console.error(err.message)
      throw err
   }else{
      console.log('Connected to the SQLite database.')
      db.run(`CREATE TABLE IF NOT EXISTS expense (
            id INTEGER PRIMARY KEY AUTOINCREMENT,
            item text,
            amount real,
            category text,
            location text,
            spendOn text,
            createdOn text
         )`,
         (err) => {
            if (err) {
               console.log(err);
            }else{
               var insert = 'INSERT INTO expense (item, amount, category, location, spendOn, createdOn) VALUES (?,?,?,?,?,?)'

               db.run(insert, ['Pizza', 10, 'Food', 'KFC', '2020-05-26 10:10', '2020-05-26 10:10'])
               db.run(insert, ['Pizza', 9, 'Food', 'Mcdonald', '2020-05-28 11:10', '2020-05-28 11:10'])
               db.run(insert, ['Pizza', 12, 'Food', 'Mcdonald', '2020-05-29 09:22', '2020-05-29 09:22'])
               db.run(insert, ['Pizza', 15, 'Food', 'KFC', '2020-06-06 16:18', '2020-06-06 16:18'])
               db.run(insert, ['Pizza', 14, 'Food', 'Mcdonald', '2020-06-01 18:14', '2020-05-01 18:14'])
            }
         }
      );
   }
});

module.exports = db
步驟 7:開啟 index.js 並更新以下程式碼:
var express = require("express")
var cors = require('cors')
var db = require("./sqlitedb.js")

var app = express()
app.use(cors());

var bodyParser = require("body-parser");
app.use(express.urlencoded({ extended: true }));
app.use(express.json());

var HTTP_PORT = 8000
app.listen(HTTP_PORT, () => {
   console.log("Server running on port %PORT%".replace("%PORT%", HTTP_PORT))
});

app.get("/", (req, res, next) => {
   res.json({ "message": "Ok" })
});

app.get("/api/expense", (req, res, next) => {
   var sql = "select * from expense"
   var params = []
   db.all(sql, params, (err, rows) => {
      if (err) {
         res.status(400).json({ "error": err.message });
         return;
      }
      res.json(rows)
   });

});

app.get("/api/expense/:id", (req, res, next) => {
   var sql = "select * from expense where id = ?"
   var params = [req.params.id]
   db.get(sql, params, (err, row) => {
      if (err) {
         res.status(400).json({ "error": err.message });
         return;
      }
   res.json(row)
   });
});

app.put("/api/expense/:id", (req, res, next) => {
   if (req.params.id == null) {
      res.status(400).json({ "error": "Resource (Expense) Id is not send." })
      return
   }

   var data = {
      id: req.params.id,
      item: req.body.item,
      amount: req.body.amount,
      category: req.body.category,
      location: req.body.location,
      spendOn: req.body.spendOn
   }

   var sql = 'SELECT count(*) AS cnt FROM expense WHERE id = ?'
   var params = [data.id]
   db.get(sql, params, function (err, result) {
   if (err) {
      res.status(400).json({ "error": err.message })
      return;
   }

   if (result.cnt == 0) {
      var sql = 'INSERT INTO expense (id, item, amount, category, location, spendOn, createdOn) VALUES (?, ?,?,?,?,?,?)'
      var params = [data.id, data.item, data.amount, data.category, data.location, data.spendOn, data.createdOn]
      db.run(sql, params, function (err, result) {
         if (err) {
            res.status(400).json({ "error": err.message })
            return;
         }
         console.log(result)
         res.json(data);
      });
   } else {
      db.run(
         `UPDATE expense SET
            item = ?,

            amount = ?,
            category = ?,
            location = ?,

            spendOn = ?
            WHERE id = ?`,
         [data.item, data.amount, data.category, data.location, data.spendOn, data.id],
         function (err, result) {
            if (err) {
               console.log(err);
               res.status(400).json({ "error": res.message })
               return;
            }
            res.json(data)
         });
      }
   });

})

app.use(function (req, res) {
   res.status(404);
});
這裡,程式碼將建立以下六個 REST API 端點:
/endpoint 返回 OK 訊息以確保應用程式正常工作
/api/expense 端點返回資料庫中可用的所有支出專案
/api/expense/:id 端點根據支出條目 ID 返回支出條目
使用 put 動詞的 /api/expense/:id 端點將根據支出條目 ID 更新支出條目
步驟 8:執行應用程式,如下所示:
node index.js
步驟 9:要測試應用程式並確保其正常工作,請開啟瀏覽器並訪問 https://:8000/。如果應用程式正常工作,則應返回以下訊息。
{
   "message": "Ok"
}
讓我們建立一個有效的 Angular 示例,將資源放入上述伺服器應用程式中,然後使用 HttpClient 服務類從伺服器獲取所有支出專案,包括新資源。
步驟 1:透過執行 ng new 命令建立一個新的 Angular 應用程式,如下所示:
ng new my-http-app
啟用 Angular 路由和 CSS,如下所示:
? Would you like to add Angular routing? Yes
? Which stylesheet format would you like to use? CSS
步驟 2:透過在模組配置檔案 (app.module.ts) 中匯入 HttpClientModule 來啟用應用程式中的 HTTP 通訊。
import { NgModule } from '@angular/core';
import { BrowserModule } from '@angular/platform-browser';

import { AppRoutingModule } from './app-routing.module';
import { AppComponent } from './app.component';

import { HttpClientModule } from '@angular/common/http';

@NgModule({
   declarations: [
      AppComponent
   ],
   imports: [
      BrowserModule,
      AppRoutingModule,
      HttpClientModule
   ],
   providers: [],
   bootstrap: [AppComponent]
})
export class AppModule { }
這裡:
從 `@angular/common/http` 模組匯入 `HttpClientModule`。
將 `HttpClientModule` 新增到 `@NgModule` 配置的 `imports` 部分。
步驟3:建立一個新的介面 `Expense` 來表示我們的支出項。
interface Expense {
   id?: Number,
   item: String,
   amount: Number,
   category: String,
   location: String,
   spendOn: Date
}

export default Expense;
這裡:
`id` 設定為可選屬性。
步驟4:建立一個新的元件 `ListExpenses` 來顯示伺服器上的支出項。
ng generate component ListExpenses
它將建立如下所示的元件:
CREATE src/app/list-expenses/list-expenses.component.css (0 bytes)
CREATE src/app/list-expenses/list-expenses.component.html (28 bytes)
CREATE src/app/list-expenses/list-expenses.component.spec.ts (602 bytes)
CREATE src/app/list-expenses/list-expenses.component.ts (229 bytes)
UPDATE src/app/app.module.ts (581 bytes)
步驟5:將我們的新元件包含到應用程式根元件的檢視 `app.component.html` 中,如下所示:
<app-list-expenses></app-list-expenses>

<router-outlet></router-outlet>
步驟6:透過建構函式將 `HttpClient` 注入到 `ListExpenses` 元件中,如下所示:
import { Component } from '@angular/core';
import { HttpClient } from '@angular/common/http';

@Component({
   selector: 'app-list-expenses',
   templateUrl: './list-expenses.component.html',
   styleUrls: ['./list-expenses.component.css']
})
export class ListExpensesComponent {

   constructor(private http: HttpClient) { }
}
步驟7:實現 `OnInit` 生命週期鉤子,在 `ListExpenses` 元件初始化後向伺服器請求支出。
export class ListExpensesComponent implements OnInit{

   constructor(private http: HttpClient) { }

   ngOnInit(): void {

   }
}
步驟8:建立一個區域性變數 `expenses` 來儲存我們從伺服器獲取的支出。
export class ListExpensesComponent implements OnInit{
   expenses: Expense[] = [];
   constructor(private http: HttpClient) { }
   ngOnInit(): void {

   }
}
步驟9:建立一個區域性變數 `expense` 來儲存在伺服器上建立的新支出。
export class ListExpensesComponent implements OnInit{
   expenses: Expense[] = [];
   newexpense: Expense | null = null;
   constructor(private http: HttpClient) { }
   ngOnInit(): void {

   }
}
步驟10:使用示例資料設定新的支出項,如下所示:
export class ListExpensesComponent implements OnInit {
   expenses: Expense[] = [];
   newexpense: Expense | null = null;
   constructor(private http: HttpClient) { }
   ngOnInit(): void {
      var spend_date = new Date();
      spend_date.setDate(spend_date.getDate() - 1);
      this.newexpense = {
         'item': 'new item ' + Math.floor(Math.random() * 10),
         'amount': Math.floor(Math.random() * 100),
         'category': 'Food',
         'location': 'KFC',
         'spendOn': spend_date
      }
   }
}
這裡:
使用隨機方法設定專案名稱和金額。
將支出日期設定為昨天。
步驟11:透過傳遞 `put` URL 和我們的新支出項來呼叫 `this.http`(`HttpClient` 例項)物件的 `put` 方法,並從伺服器獲取更新後的支出物件。
export class ListExpensesComponent implements OnInit {
   expenses: Expense[] = [];
   newexpense: Expense | null = null;
   constructor(private http: HttpClient) { }
   ngOnInit(): void {
      var spend_date = new Date();
      spend_date.setDate(spend_date.getDate() - 1);
      this.newexpense = {
         'item': 'new item ' + Math.floor(Math.random() * 10),
         'amount': Math.floor(Math.random() * 100),
         'category': 'Food',
         'location': 'KFC',
         'spendOn': spend_date
      }

      this.http.put<Expense>('https://:8000/api/expense/1', this.newexpense,{
         'observe': 'body',
         'responseType': 'json'
      })
      .subscribe( data => {
         this.newexpense = data as Expense;
         console.log(data)
      });
   }
}
步驟12:透過傳遞支出列表 URL 和選項來呼叫 `this.http`(`HttpClient` 例項)物件的 `get` 方法,並從伺服器獲取支出物件。然後,將支出設定到我們的區域性變數 `expenses` 中。
export class ListExpensesComponent implements OnInit {
   expenses: Expense[] = [];
   newexpense: Expense | null = null;
   constructor(private http: HttpClient) { }
   ngOnInit(): void {
      var spend_date = new Date();
      spend_date.setDate(spend_date.getDate() - 1);
      this.newexpense = {
         'item': 'new item ' + Math.floor(Math.random() * 10),
         'amount': Math.floor(Math.random() * 100),
         'category': 'Food',
         'location': 'KFC',
         'spendOn': spend_date
      }
      this.http.put<Expense>('https://:8000/api/expense/1',
      this.newexpense,{
         'observe': 'body',
         'responseType': 'json'
      })
      .subscribe( data => {
         this.newexpense = data as Expense;
         console.log(data)
      });
      this.http.get<Expense[]>('https://:8000/api/expense',{
         'observe': 'body',
         'responseType': 'json'
      })
      .subscribe( data => {
         this.expenses = data as Expense[]
         console.log(this.expenses)
      })
   }
}
這裡:
將 `Expense[]` 設定為伺服器返回的物件的型別。伺服器將在其正文中以 JSON 格式傳送支出物件陣列以及新的支出物件。
訂閱請求(`this.http.get`)物件。然後將訂閱的資料解析為支出物件的陣列,並將其設定為區域性支出變數(`this.expenses`)。
`ListExpensesComponent` 的完整程式碼如下:
import { Component, OnInit } from '@angular/core';
import { HttpClient, HttpRequest, HttpResponse, HttpEvent, HttpParams }
from '@angular/common/http';
import Expense from '../Expense';
@Component({
   selector: 'app-list-expenses',
   templateUrl: './list-expenses.component.html',
   styleUrls: ['./list-expenses.component.css']
})
export class ListExpensesComponent implements OnInit {
   expenses: Expense[] = [];
   newexpense: Expense | null = null;
   constructor(private http: HttpClient) { }
   ngOnInit(): void {
      var spend_date = new Date();
      spend_date.setDate(spend_date.getDate() - 1);
      this.newexpense = {
         'item': 'new item ' + Math.floor(Math.random() * 10),
         'amount': Math.floor(Math.random() * 100),
         'category': 'Food',
         'location': 'KFC',
         'spendOn': spend_date
      }
      this.http.put<Expense>('https://:8000/api/expense/1',
      this.newexpense,{
         'observe': 'body',
         'responseType': 'json'
      })
      .subscribe( data => {
         this.newexpense = data as Expense;
         console.log(data)
      });
      this.http.get<Expense[]>('https://:8000/api/expense',{
         'observe': 'body',
         'responseType': 'json'
      })
      .subscribe( data => {
         this.expenses = data as Expense[]
         console.log(this.expenses)
      })
   }
}
步驟14:接下來,從元件中獲取支出列表物件和新的支出物件,並將其渲染到我們的元件模板頁面(`list-expenses.component.html`)中。
<div>Expense item (id = 1) updated in the server is as follows:</div>
<div>Item: {{newexpense?.item}}</div>
<div>Amount: {{newexpense?.amount}}</div>
<div>Location: {{newexpense?.location}}</div>
<div>Spend On: {{newexpense?.spendOn | date:'short'}}</div>
<div><h3>Expenses</h3></div>
<ul>
   <li *ngFor="let expense of expenses">
      {{expense.item}} @ {{expense.location}} for {{expense.amount}}
      USD on {{expense.spendOn | date:'shortDate' }}
   </li>
</ul>
這裡:
ID 為 1 的支出將在伺服器上更新。
返回的支出將包含來自伺服器的更新後的支出。
步驟15:最後,使用以下命令執行應用程式:
ng serve
步驟16:開啟瀏覽器並導航到 `https://:4200/` URL 並檢查輸出。
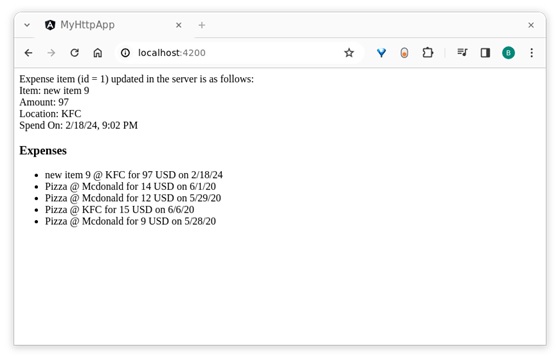
在這裡,輸出顯示我們的支出作為一個專案列表。
結論
Angular 提供了一種簡單的方法,可以透過 `HttpClient` 物件向伺服器傳送資料。`put()` 是用於向伺服器傳送資料的特定方法。我們將在接下來的章節中學習更多 HTTP 方法來針對其他 HTTP 動詞。