- Angular 教程
- Angular - 首頁
- Angular - 概述
- Angular - 功能
- Angular - 優點與缺點
- Angular 基礎
- Angular - 環境搭建
- Angular - 第一個應用
- Angular - MVC 架構
- Angular 元件
- Angular - 元件
- Angular - 元件生命週期
- Angular - 檢視封裝
- Angular - 元件互動
- Angular - 元件樣式
- Angular - 巢狀元件
- Angular - 內容投影
- Angular - 動態元件
- Angular - 元素
- Angular 模板
- Angular - 模板
- Angular - 文字插值
- Angular - 模板語句
- Angular - 模板中的變數
- Angular - SVG 作為模板
- Angular 資料繫結
- Angular - 資料繫結及型別
- Angular - 資料繫結
- Angular - 事件繫結
- Angular - 屬性繫結
- Angular - 屬性繫結
- Angular - 類和樣式繫結
- Angular 指令
- Angular - 指令
- Angular - 內建指令
- Angular 管道
- Angular - 管道
- Angular - 使用管道轉換資料
- Angular 依賴注入
- Angular - 依賴注入
- Angular HTTP 客戶端程式設計
- Angular - 服務
- Angular - HTTP 客戶端
- Angular - 請求
- Angular - 響應
- Angular - GET 請求
- Angular - PUT 請求
- Angular - DELETE 請求
- Angular - JSON-P
- Angular - 使用 HTTP 進行 CRUD 操作
- Angular 路由
- Angular 路由
- Angular - 導航
- Angular - Angular Material
- Angular 動畫
- Angular - 動畫
- Angular 表單
- Angular - 表單
- Angular - 表單驗證
- Angular Service Workers & PWA
- Angular - Service Workers & PWA
- Angular 測試
- Angular - 測試概述
- Angular NgModule
- Angular - 模組介紹
- Angular 高階
- Angular - 身份驗證與授權
- Angular - 國際化
- Angular - 可訪問性
- Angular - Web Workers
- Angular - 伺服器端渲染
- Angular - Ivy 編譯器
- Angular - 使用 Bazel 構建
- Angular - 向後相容性
- Angular - 響應式程式設計
- Angular - 指令和元件之間的資料共享
- Angular 工具
- Angular - CLI
- Angular 其他
- Angular - 第三方控制元件
- Angular - 配置
- Angular - 顯示資料
- Angular - 裝飾器和元資料
- Angular - 基本示例
- Angular - 錯誤處理
- Angular - 測試和專案構建
- Angular - 生命週期鉤子
- Angular - 使用者輸入
- Angular - 最新動態?
- Angular 有用資源
- Angular - 快速指南
- Angular - 有用資源
- Angular - 討論
Angular 路由
導航是web應用中一個重要的方面。即使單頁面應用(SPA)沒有多頁面的概念,它也會從一個檢視(例如支出列表)移動到另一個檢視(例如支出詳情)。提供清晰易懂的導航元素決定了應用的成功。
Angular 提供了廣泛的導航功能,可以適應從簡單場景到複雜場景的需求。定義導航元素及其對應檢視的過程稱為路由。Angular 提供了一個單獨的模組,RouterModule,用於在 Angular 應用中設定導航。本章我們將學習如何在 Angular 應用中進行路由。
配置路由
Angular CLI 完全支援在應用建立過程以及應用執行過程中設定路由。讓我們使用以下命令建立一個啟用路由的新應用:
ng new routing-app --routing
Angular CLI 會生成一個新的模組 AppRoutingModule 用於路由。生成的程式碼如下:
import { NgModule } from '@angular/core';
import { Routes, RouterModule } from '@angular/router';


const routes: Routes = [];

@NgModule({
  imports: [RouterModule.forRoot(routes)],
  exports: [RouterModule]
})
export class AppRoutingModule { }
這裡:
匯入 RouterModule 和 Routes 來自 @angular/router 包。
RouterModule 提供了在應用中配置和執行路由的功能。
Routes 是用於設定導航規則的型別。
routes 是一個區域性變數(Routes 型別),用於配置應用的實際導航規則。
RouterModule.forRoot() 方法將設定在 routes 變數中配置的導航規則。
Angular CLI 將生成的 AppRoutingModule 包含在 AppComponent 中,如下所示:
import { BrowserModule } from '@angular/platform-browser';
import { NgModule } from '@angular/core';

import { AppRoutingModule } from './app-routing.module';
import { AppComponent } from './app.component';

@NgModule({
  declarations: [
    AppComponent
  ],
  imports: [
    BrowserModule,
    AppRoutingModule
  ],
  providers: [],
  bootstrap: [AppComponent]
})
export class AppModule { }
這裡:
AppComponent 使用 imports 元資料匯入AppRoutingModule 模組。
Angular CLI 也提供了在現有應用中設定路由的選項。在現有應用中包含路由的常用命令如下:
ng generate module my-module --routing
這將生成一個啟用了路由功能的新模組。要在現有模組 (AppModule) 中啟用路由功能,我們需要包含額外的選項,如下所示:
ng generate module app-routing --module app --flat
這裡:
–module app 將新建立的路由模組AppRoutingModule 配置到 AppModule 模組中。
讓我們在ExpenseManager 應用中配置路由模組。
開啟命令提示符並轉到專案根資料夾。
cd /go/to/expense-manager
使用以下命令生成路由模組:
ng generate module app-routing --module app --flat
輸出
輸出如下所示:
CREATE src/app/app-routing.module.ts (196 bytes)
UPDATE src/app/app.module.ts (785 bytes)
這裡:
CLI 生成AppRoutingModule,然後將其配置到AppModule中。
建立路由
建立路由簡單易行。建立路由的基本資訊如下:
- 要呼叫的目標元件。
- 訪問目標元件的路徑。
建立簡單路由的程式碼如下:
const routes: Routes = [
  { path: 'about', component: AboutComponent },
];
這裡:
Routes 是 AppRoutingModule 中的變數。
about 是路徑,AboutComponent 是目標/目的地元件。當用戶請求 https://:4200/about URL 時,路徑與 about 規則匹配,然後將呼叫 AboutComponent。
訪問路由
讓我們學習如何在應用中使用已配置的路由。
訪問路由是一個兩步過程。
在根元件模板中包含router-outlet標籤。
<router-outlet></router-outlet>
在需要的地方使用routerLink和routerLinkActive屬性。
<a routerLink="/about" routerLinkActive="active">First Component</a>
這裡:
routerLink 設定使用路徑呼叫的路由。
routerLinkActive 設定在路由啟用時使用的 CSS 類。
有時,我們需要在元件內部而不是模板中訪問路由。然後,我們需要遵循以下步驟:
在相應的元件中注入Router和ActivatedRoute的例項。
import { Router, ActivatedRoute } from '@angular/router';
constructor(private router: Router, private route: ActivatedRoute)
這裡:
Router 提供執行路由操作的功能。
Route 指的是當前啟用的路由。
使用路由器的 navigate 函式。
this.router.navigate(['about']);
這裡:
navigate 函式期望一個包含必要路徑資訊的陣列。
使用相對路徑
路由路徑類似於網頁 URL,它也支援相對路徑。要從另一個元件(例如HomePageComponent)訪問AboutComponent,只需使用與web url或資料夾路徑類似的 .. 符號。
<a routerLink="../about">Relative Route to about component</a>
要在元件中訪問相對路徑:
import { NavigationExtras } from '@angular/router';
this.router.navigate(['about'], { relativeTo: this.route });
這裡:
relativeTo 在NavigationExtras類中可用。
路由順序
路由順序在路由配置中非常重要。如果同一路徑被配置多次,則將呼叫第一個匹配的路徑。如果由於某種原因第一個匹配失敗,則將呼叫第二個匹配。
重定向路由
Angular 路由允許一個路徑重定向到另一個路徑。redirectTo 是設定重定向路徑的選項。示例路由如下:
const routes: Routes = [
   { path: '', redirectTo: '/about' },
];
這裡:
- 如果實際路徑匹配空字串,則redirectTo 將 about 設定為重定向路徑。
萬用字元路由
萬用字元路由將匹配任何路徑。它是使用 ** 建立的,將用於處理應用中不存在的路徑。將萬用字元路由放在配置的末尾,使其在其他路徑不匹配時被呼叫。
示例程式碼如下:
const routes: Routes = [
  { path: 'about', component: AboutComponent },
  { path: '',   redirectTo: '/about', pathMatch: 'full' },
  { path: '**', component: PageNotFoundComponent },  // Wildcard route for a 404 page
];
這裡:
如果呼叫不存在的頁面,則前兩個路由將失敗。但是,最終的萬用字元路由將成功,並將呼叫PageNotFoundComponent。
訪問路由引數
在 Angular 中,我們可以使用引數在路徑中附加額外資訊。可以使用 paramMap 介面在元件中訪問引數。在路由中建立新引數的語法如下:
const routes: Routes = [
  { path: 'about', component: AboutComponent },
  { path: 'item/:id', component: ItemComponent },
  { path: '',   redirectTo: '/about', pathMatch: 'full' },
  { path: '**', component: PageNotFoundComponent },  // Wildcard route for a 404 page
];
這裡,我們在路徑中添加了id。可以使用兩種技術在ItemComponent中訪問id。
- 使用 Observable。
- 使用 snapshot(非 Observable 選項)。
使用 Observable
Angular 提供了一個特殊的介面 paramMap 來訪問路徑的引數。paramMap 具有以下方法:
has(name): 如果路徑(引數列表)中存在指定名稱,則返回 true。
get(name): 返回路徑(引數列表)中指定名稱的值。
getAll(name): 返回路徑中指定名稱的多個值。當有多個值可用時,get() 方法只返回第一個值。
keys: 返回路徑中所有可用的引數。
使用paramMap訪問引數的步驟如下:
匯入paramMap,它位於@angular/router包中。
在ngOnInit()中使用paramMap訪問引數並將其設定為區域性變數。
ngOnInit() {
    this.route.paramMap.subscribe(params => {
        this.id = params.get('id);
    });
}
我們可以使用pipe方法直接在 rest 服務中使用它。
this.item$ = this.route.paramMap.pipe(
    switchMap(params => {
      this.selectedId = Number(params.get('id'));
      return this.service.getItem(this.selectedId);
    })
);
使用 snapshot
snapshot 類似於Observable,不同之處在於它不支援 Observable 並立即獲取引數值。
let id = this.route.snapshot.paramMap.get('id');
巢狀路由
通常,router-outlet 將放置在應用的根元件(AppComponent)中。但是,router-outlet 可以用於任何元件。當 router-outlet 用於根元件以外的元件時,該元件的路由必須配置為父元件的子元件。這稱為巢狀路由。
讓我們考慮一個元件,例如ItemComponent配置了router-outlet,並具有兩個routerLink,如下所示:
<h2>Item Component</h2>
<nav>
   <ul>
      <li><a routerLink="view">View</a></li>
      <li><a routerLink="edit">Edit</a></li>
   </ul>
</nav>
<router-outlet></router-outlet>
ItemComponent 的路由必須配置為巢狀路由,如下所示:
const routes: Routes = [
{
   path: 'item',

   component: ItemComponent,
   children: [
   {
      path: 'view',
      component: ItemViewComponent
   },
   {
   path: 'edit',
   component: ItemEditComponent
   }
   ]
}]
工作示例
讓我們將本章學習的路由概念應用到我們的ExpenseManager應用中。
開啟命令提示符並轉到專案根資料夾。
cd /go/to/expense-manager
如果之前沒有執行,請使用以下命令生成路由模組。
ng generate module app-routing --module app --flat
輸出
輸出如下所示:
CREATE src/app/app-routing.module.ts (196 bytes) UPDATE src/app/app.module.ts (785 bytes)
這裡:
CLI 生成AppRoutingModule,然後將其配置到AppModule中。
更新AppRoutingModule (src/app/app.module.ts),如下所示:
import { NgModule } from '@angular/core';
import { Routes, RouterModule } from '@angular/router'; import { ExpenseEntryComponent } from './expense-entry/expense-entry.component';
import { ExpenseEntryListComponent } from './expense-entry-list/expense-entry-list.component';
const routes: Routes = [
   { path: 'expenses', component: ExpenseEntryListComponent },
   { path: 'expenses/detail/:id', component: ExpenseEntryComponent },
   { path: '', redirectTo: 'expenses', pathMatch: 'full' }];
@NgModule({
   imports: [RouterModule.forRoot(routes)],
   exports: [RouterModule] })
export class AppRoutingModule { }
在這裡,我們為我們的支出列表和支出詳情元件添加了路由。
更新AppComponent模板(src/app/app.component.html)以包含router-outlet和routerLink。
<!-- Navigation -->
<nav class="navbar navbar-expand-lg navbar-dark bg-dark static-top">
<div class="container">
   <a class="navbar-brand" href="#">{{ title }}</a> <button class="navbar-toggler" type="button" data-toggle="collapse" data-target="#navbarResponsive" aria-controls="navbarResponsive" aria-expanded="false" aria-label="Toggle navigation">
      <span class="navbar-toggler-icon"></span>
   </button>
   <div class="collapse navbar-collapse" id="navbarResponsive">
      <ul class="navbar-nav ml-auto">
         <li class="nav-item active">
            <a class="nav-link" href="#">Home
               <span class="sr-only" routerLink="/">(current)</span>
            </a>
         </li>
         <li class="nav-item">
            <a class="nav-link" routerLink="/expenses">Report</a>
         </li>
         <li class="nav-item">
            <a class="nav-link" href="#">Add Expense</a>
         </li>
         <li class="nav-item">
            <a class="nav-link" href="#">About</a>
         </li>
      </ul>
   </div>
</div>
</nav>
<router-outlet></router-outlet>
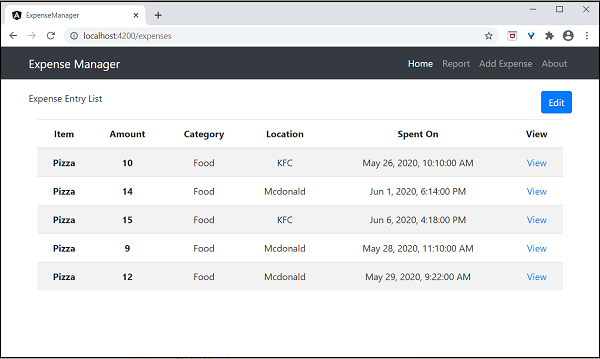
開啟ExpenseEntryListComponent模板(src/app/expense-entry-list/expense-entry-list.component.html)併為每個支出條目包含檢視選項。
<table class="table table-striped">
   <thead>
      <tr>
         <th>Item</th>
         <th>Amount</th>
         <th>Category</th>
         <th>Location</th>
         <th>Spent On</th>
         <th>View</th>
      </tr>
   </thead>
   <tbody>
      <tr *ngFor="let entry of expenseEntries">
         <th scope="row">{{ entry.item }}</th>
         <th>{{ entry.amount }}</th>
         <td>{{ entry.category }}</td>
         <td>{{ entry.location }}</td>
         <td>{{ entry.spendOn | date: 'medium' }}</td>
         <td><a routerLink="../expenses/detail/{{ entry.id }}">View</a></td>
      </tr>
   </tbody>
</table>
在這裡,我們更新了支出列表表並添加了一個新列來顯示檢視選項。
開啟ExpenseEntryComponent (src/app/expense-entry/expense-entry.component.ts)並新增功能以獲取當前選擇的支出條目。這可以透過首先透過paramMap獲取 id,然後使用ExpenseEntryService中的getExpenseEntry()方法來完成。
this.expenseEntry$ = this.route.paramMap.pipe(
   switchMap(params => {
      this.selectedId = Number(params.get('id'));
      return
this.restService.getExpenseEntry(this.selectedId); }));
   this.expenseEntry$.subscribe( (data) => this.expenseEntry = data );
更新 ExpenseEntryComponent 並新增轉到支出列表的選項。
goToList() {
   this.router.navigate(['/expenses']);
}
ExpenseEntryComponent 的完整程式碼如下:
import { Component, OnInit } from '@angular/core'; import { ExpenseEntry } from '../expense-entry'; import { ExpenseEntryService } from '../expense-entry.service';
import { Router, ActivatedRoute } from '@angular/router';
import { Observable } from 'rxjs';
import { switchMap } from 'rxjs/operators';
@Component({
   selector: 'app-expense-entry',
   templateUrl: './expense-entry.component.html',
   styleUrls: ['./expense-entry.component.css']
})
export class ExpenseEntryComponent implements OnInit {
   title: string;
   expenseEntry$ : Observable<ExpenseEntry>;
   expenseEntry: ExpenseEntry = {} as ExpenseEntry;
   selectedId: number;
   constructor(private restService : ExpenseEntryService, private router : Router, private route :
ActivatedRoute ) { }
   ngOnInit() {
      this.title = "Expense Entry";
   this.expenseEntry$ = this.route.paramMap.pipe(
      switchMap(params => {
         this.selectedId = Number(params.get('id'));
         return
this.restService.getExpenseEntry(this.selectedId); }));
   this.expenseEntry$.subscribe( (data) => this.expenseEntry = data );
   }
   goToList() {
      this.router.navigate(['/expenses']);
   }
}
開啟ExpenseEntryComponent (src/app/expense-entry/expense-entry.component.html) 模板,並新增一個新按鈕以導航返回支出列表頁面。
<div class="col-sm" style="text-align: right;">
   <button type="button" class="btn btn-primary" (click)="goToList()">Go to List</button>
   <button type="button" class="btn btn-primary">Edit</button>
</div>
在這裡,我們在編輯按鈕前添加了跳轉到列表按鈕。
使用以下命令執行應用程式:
ng serve
應用程式的最終輸出如下:
點選第一條記錄的檢視選項將導航到詳情頁面,並顯示所選的支出記錄,如下所示:
