- Angular 教程
- Angular - 首頁
- Angular - 概述
- Angular - 特性
- Angular - 優點與缺點
- Angular 基礎
- Angular - 環境搭建
- Angular - 第一個應用
- Angular - MVC 架構
- Angular 元件
- Angular - 元件
- Angular - 元件生命週期
- Angular - 檢視封裝
- Angular - 元件互動
- Angular - 元件樣式
- Angular - 巢狀元件
- Angular - 內容投影
- Angular - 動態元件
- Angular - 元素
- Angular 模板
- Angular - 模板
- Angular - 文字插值
- Angular - 模板語句
- Angular - 模板中的變數
- Angular - SVG 作為模板
- Angular 資料繫結
- Angular - 資料繫結及型別
- Angular - 資料繫結
- Angular - 事件繫結
- Angular - 屬性繫結
- Angular - 屬性繫結
- Angular - 類與樣式繫結
- Angular 指令
- Angular - 指令
- Angular - 內建指令
- Angular 管道
- Angular - 管道
- Angular - 使用管道轉換資料
- Angular 依賴注入
- Angular - 依賴注入
- Angular HTTP 客戶端程式設計
- Angular - 服務
- Angular - HTTP 客戶端
- Angular - 請求
- Angular - 響應
- Angular - GET 請求
- Angular - PUT 請求
- Angular - DELETE 請求
- Angular - JSON-P
- Angular - 使用 HTTP 進行 CRUD 操作
- Angular 路由
- Angular - 路由
- Angular - 導航
- Angular - Angular Material
- Angular 動畫
- Angular - 動畫
- Angular 表單
- Angular - 表單
- Angular - 表單驗證
- Angular Service Workers & PWA
- Angular - Service Workers & PWA
- Angular 測試
- Angular - 測試概述
- Angular NgModule
- Angular - 模組介紹
- Angular 高階
- Angular - 身份驗證與授權
- Angular - 國際化
- Angular - 可訪問性
- Angular - Web Workers
- Angular - 伺服器端渲染
- Angular - Ivy 編譯器
- Angular - 使用 Bazel 構建
- Angular - 向後相容性
- Angular - 響應式程式設計
- Angular - 指令和元件之間共享資料
- Angular 工具
- Angular - CLI
- Angular 其他
- Angular - 第三方控制元件
- Angular - 配置
- Angular - 顯示資料
- Angular - 裝飾器與元資料
- Angular - 基本示例
- Angular - 錯誤處理
- Angular - 測試和專案構建
- Angular - 生命週期鉤子
- Angular - 使用者輸入
- Angular - 最新動態?
- Angular 資源推薦
- Angular - 快速指南
- Angular - 資源推薦
- Angular - 討論
Angular - 指令
Angular 提供了指令的概念,以增強 Web 應用中 HTML 元素/元件的功能。使用指令,我們可以向元素新增任何新功能。它們以 `ng-` 開頭,其中 `ng` 代表 Angular,並使用 `@directive` 裝飾器擴充套件 HTML 標籤。指令使邏輯能夠包含在 Angular 模板中。
指令型別
指令根據其為 HTML 元素/元件提供的功能型別進行分類。指令型別及其用途如下:
元件:元件基本上是一種指令。眾所周知,它們可以在記憶體中生成 HTML 文件片段(DOM 結構),稱為檢視。檢視將同時具有基於設計和事件的動態功能。
屬性指令:屬性指令根據外觀和行為為 HTML 元素/元件(宿主)提供附加功能。例如,附加到屬性指令的選單元件可以在懸停元件時顯示下一級選單。
結構指令:結構指令可以透過新增/刪除元件的 DOM 元素來更改宿主 HTML 元素/元件的整個佈局。
DOM 概述
讓我們簡要了解一下 DOM 模型。DOM 用於定義訪問文件的標準。通常,HTML DOM 模型被構建為物件的樹。它是一個訪問 HTML 元素的標準物件模型。
出於以下原因,我們可以在 Angular 中使用 DOM 模型:
- 我們可以輕鬆地使用 DOM 元素導航文件結構。
- 我們可以輕鬆地新增 HTML 元素。
- 我們可以輕鬆地更新元素及其內容。
結構指令
結構指令透過新增或刪除元素來更改DOM的結構。它用 `*` 符號表示,並帶有三個預定義指令 `NgIf、NgFor` 和 `NgSwitch`。讓我們簡要了解一下它們。
NgIf 指令
NgIf 指令用於根據條件為真或假來顯示或隱藏應用程式中的資料。我們可以將其新增到模板中的任何標籤中。
讓我們在我們的 `directive-app` 應用程式中嘗試 `ngIf` 指令。
在 `test.component.html` 中新增以下標籤。
<p>test works!</p>
<div *ngIf="true">Display data</div>
在你的 `app.component.html` 檔案中新增測試元件,如下所示:
<app-test></app-test>
使用以下命令啟動你的伺服器(如果尚未啟動):
ng serve
現在,執行你的應用程式,你將看到以下響應:
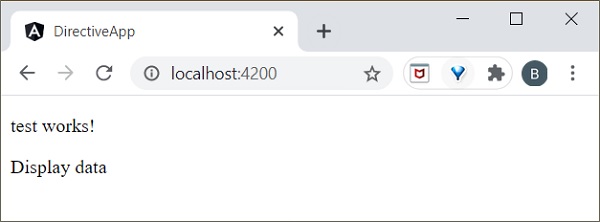
如果將條件設定為 `ngIf="false"`,則內容將被隱藏。
ngIfElse 指令
ngIfElse 與 `ngIf` 類似,只是它還提供了一個在失敗情況下渲染內容的選項。
讓我們透過一個示例來了解 `ngIfElse` 的工作原理。
在 `test.component.ts` 檔案中新增以下程式碼。
export class TestComponent implements OnInit {
   isLogIn : boolean = false;
   isLogOut : boolean = true;
}
在 `test.component.html` 檔案中新增以下程式碼:
<p>ngIfElse example!</p>
<div *ngIf="isLogIn; else isLogOut">
   Hello you are logged in
</div>
<ng-template #isLogOut>
   You're logged out..
</ng-template>
最後,使用以下命令啟動你的應用程式(如果尚未完成):
ng serve
現在,執行你的應用程式,你將看到以下響應:

這裡,
`isLogOut`
值被賦值為 `true`,因此它進入 `else` 塊並渲染 `ng-template`。我們將在本章後面學習 `ng-template`。ngFor 指令
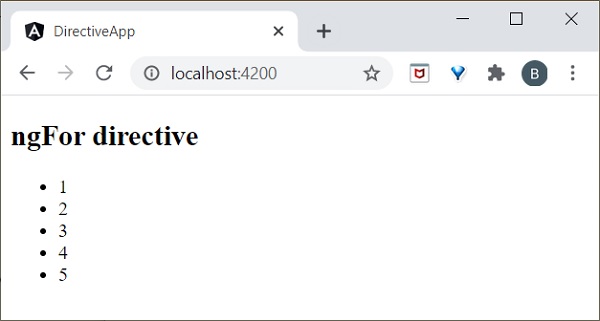
ngFor 用於重複專案列表中的部分元素。
讓我們透過一個示例來了解 ngFor 的工作原理。
在 `test.component.ts` 檔案中新增列表,如下所示:
list = [1,2,3,4,5];
在 `test.component.html` 中新增 `ngFor` 指令,如下所示:
<h2>ngFor directive</h2>
<ul>
   <li *ngFor="let l of list">
      {{l}}
   </li>
</ul>
這裡,`let` 關鍵字建立一個區域性變數,可以在模板中的任何位置引用它。`let l` 建立一個模板區域性變數來獲取列表元素。最後,使用以下命令啟動你的應用程式(如果尚未完成):
ng serve
現在,執行你的應用程式,你將看到以下響應:
trackBy
有時,`ngFor` 在大型列表中的效能較低。例如,當在列表中新增新專案或刪除任何專案時,可能會觸發多個 DOM 操作。為了迭代大型物件集合,我們使用 `trackBy`。
它用於跟蹤何時新增或刪除元素。它由 `trackBy` 方法執行。它有兩個引數:索引和元素。索引用於唯一標識每個元素。下面定義了一個簡單的示例。
讓我們透過一個示例來了解 `trackBy` 與 `ngFor` 的工作原理。
在 `test.component.ts` 檔案中新增以下程式碼。
export class TestComponent {
   studentArr: any[] = [ {
      "id": 1,
      "name": "student1"
   },
   {
      "id": 2,
      "name": "student2"
   },
   {
      "id": 3, "name": "student3"
   },
   {
      "id": 4,
      "name": "student4"
   }
   ];
   trackByData(index:number, studentArr:any): number {
      return studentArr.id;
   }
這裡,
我們建立了,
`trackByData()`
方法以基於 ID 的唯一方式訪問每個學生元素。在 `test.component.html` 檔案中新增以下程式碼,以在 `ngFor` 內定義 `trackBy` 方法。
<ul>
   <li *ngFor="let std of studentArr; trackBy: trackByData">
      {{std.name}}
   </li>
</ul>
最後,使用以下命令啟動你的應用程式(如果尚未完成):
ng serve
現在,執行你的應用程式,你將看到以下響應:

這裡,應用程式將列印學生姓名。現在,應用程式使用學生 ID 而不是物件引用來跟蹤學生物件。因此,DOM 元素不受影響。
NgSwitch 指令
NgSWitch 用於檢查多個條件,並使 DOM 結構保持簡單易懂。
讓我們在我們的 `directive-app` 應用程式中嘗試 `ngSwitch` 指令。
在 `test.component.ts` 檔案中新增以下程式碼。
export class TestComponent implements OnInit {
   logInName = 'admin';
}
在 `test.component.html` 檔案中新增以下程式碼:
<h2>ngSwitch directive</h2>
<ul [ngSwitch]="logInName">
   <li *ngSwitchCase="'user'">
      <p>User is logged in..</p>
   </li>
   <li *ngSwitchCase="'admin'">
      <p>admin is logged in</p>
   </li>
   <li *ngSwitchDefault>
      <p>Please choose login name</p>
   </li>
</ul>
最後,使用以下命令啟動你的應用程式(如果尚未完成):
ng serve
現在,執行你的應用程式,你將看到以下響應:

這裡,我們將 `logInName` 定義為 `admin`。因此,它匹配第二個 SwitchCase 並列印上面與管理員相關的訊息。
屬性指令
屬性指令執行 DOM 元素或元件的外觀或行為。一些示例包括 NgStyle、NgClass 和 NgModel。而 NgModel 是上一章中解釋的雙向屬性資料繫結。
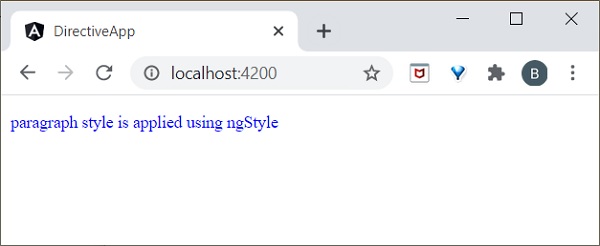
ngStyle
ngStyle 指令用於新增動態樣式。以下示例用於將藍色應用於段落。
讓我們在我們的 `directive-app` 應用程式中嘗試 `ngStyle` 指令。
在 `test.component.html` 檔案中新增以下內容。
<p [ngStyle]="{'color': 'blue', 'font-size': '14px'}">
   paragraph style is applied using ngStyle
</p>
使用以下命令啟動你的應用程式(如果尚未完成):
ng serve
現在,執行你的應用程式,你將看到以下響應:
ngClass
ngClass 用於在 HTML 元素中新增或刪除 CSS 類。
讓我們在我們的 `directive-app` 應用程式中嘗試 `ngClass` 指令。
使用以下命令建立一個 `User` 類:
ng g class User
你將看到以下響應:
CREATE src/app/user.spec.ts (146 bytes)
CREATE src/app/user.ts (22 bytes)
轉到 `src/app/user.ts` 檔案並新增以下程式碼:
export class User {
   userId : number; userName : string;
}
這裡,我們在 `User` 類中建立了兩個屬性 `userId` 和 `userName`。
開啟 `test.component.ts` 檔案並新增以下更改:
import { User } from '../user';
export class TestComponent implements OnInit {
   users: User[] = [
      {
         "userId": 1,
         "userName": 'User1'
      },
      {
         "userId": 2,
         "userName": 'User2'
      },
   ];
}
這裡,我們聲明瞭一個區域性變數 `users` 並用 2 個使用者物件進行初始化。
開啟 `test.component.css` 檔案並新增以下程式碼:
.highlight {
   color: red;
}
開啟你的 `test.component.html` 檔案並新增以下程式碼:
<div class="container">
   <br/>
   <div *ngFor="let user of users" [ngClass]="{
      'highlight':user.userName === 'User1'
   }">
      {{ user.userName }}
   </div>
</div>
這裡,
我們為 `User1` 應用了 `ngClass`,因此它將突出顯示 `User1`。
最後,使用以下命令啟動你的應用程式(如果尚未完成):
ng serve
現在,執行你的應用程式,你將看到以下響應:

自定義指令
Angular 提供了使用使用者定義的指令擴充套件 Angular 指令的選項,這稱為 `自定義指令`。讓我們在本節中學習如何建立自定義指令。
讓我們嘗試在我們的 `directive-app` 應用程式中建立自定義指令。
Angular CLI 提供以下命令來建立自定義指令:
ng generate directive customstyle
執行此命令後,你將看到以下響應:
CREATE src/app/customstyle.directive.spec.ts (244 bytes)
CREATE src/app/customstyle.directive.ts (151 bytes) UPDATE src/app/app.module.ts (1115 bytes)
開啟 `app.module.ts`。指令將透過 `declarations` 元資料在 `AppModule` 中進行配置。
import { CustomstyleDirective } from './customstyle.directive';
@NgModule({
   declarations: [
      AppComponent,
      TestComponent,
      CustomstyleDirective
   ]
})
開啟 `customstyle.directive.ts` 檔案並新增以下程式碼:
import { Directive, ElementRef } from '@angular/core';
@Directive({
   selector: '[appCustomstyle]'
})
export class CustomstyleDirective {
   constructor(el: ElementRef) {
      el.nativeElement.style.fontSize = '24px';
   }
}
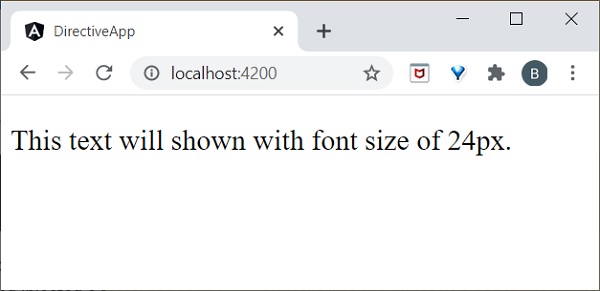
這裡,`constructor` 方法使用 `CustomStyleDirective` 獲取元素作為 `el`。然後,它訪問 `el` 的樣式並使用 CSS 屬性將其字型大小設定為 `24px`。
最後,使用以下命令啟動你的應用程式(如果尚未完成):
ng serve
現在,執行你的應用程式,你將看到以下響應:
ng-template
ng-template 用於建立動態和可重用的模板。它是一個虛擬元素。如果你使用 `ng-template` 編譯程式碼,它會在 DOM 中轉換為註釋。
例如:
讓我們在 `test.component.html` 頁面中新增以下程式碼。
<h3>ng-template</h3>
<ng-template>ng-template tag is a virtual element</ng-template>
如果執行應用程式,它將只打印 `h3` 元素。檢查你的頁面原始碼,模板顯示在註釋部分,因為它是一個虛擬元素,所以它不會渲染任何內容。我們需要將 `ng-template` 與 Angular 指令一起使用。
通常,指令會發出與其關聯的 HTML 標籤。有時,我們不需要標籤,只需要內容。例如,在下面的示例中,將發出 `li`。
<li *ngFor="let item in list">{{ item }}</li>
我們可以使用 `ng-template` 安全地跳過 `li` 標籤。
ng-template 與結構指令
ng-template 應始終用於 `ngIf、ngFor` 或 `ngSwitch` 指令內部以渲染結果。
讓我們假設一個簡單的程式碼。
<ng-template [ngIf]=true>
   <div><h2>ng-template works!</h2></div>
</ng-template>
這裡,如果 `ngIf` 條件為真,它將列印 div 元素內部的資料。類似地,你也可以使用 `ngFor` 和 `ngSwitch` 指令。
NgForOf 指令
ngForOf 也是一個結構指令,用於渲染集合中的專案。以下示例用於顯示 `ng-template` 內的 `ngForOf` 指令。
import { Component, OnInit } from '@angular/core';
@Component({
   selector: 'app-test',
   template: `
   <div>
   <ng-template ngFor let-item [ngForOf]="Fruits" let-i="index">
   <p>{{i}}</p>
   </ng-template>
   </div>`
   ,
   styleUrls: ['./test.component.css']
})
export class TestComponent implements OnInit {
   Fruits = ["mango","apple","orange","grapes"];
   ngOnInit()
   {
   }
}
如果執行應用程式,它將顯示每個元素的索引,如下所示:
0
1
2
3
元件指令
元件指令基於元件。實際上,每個元件都可以用作指令。元件提供 `@Input` 和 `@Output` 裝飾器來發送和接收父元件和子元件之間的資訊。
讓我們嘗試在我們的 `directive-app` 應用程式中使用元件作為指令。
使用以下命令建立一個新的 `ChildComponent`:
ng generate component child
CREATE src/app/child/child.component.html (20 bytes) CREATE src/app/child/child.component.spec.ts (621 bytes)
CREATE src/app/child/child.component.ts (265 bytes) CREATE src/app/child/child.component.css (0 bytes) UPDATE src/app/app.module.ts (466 bytes)
開啟 `child.component.ts` 並新增以下程式碼:
@Input() userName: string;
此處,我們正在為ChildComponent設定一個輸入屬性。
開啟child.component.html並新增以下程式碼:
<p>child works!</p>
<p>Hi {{ userName }}</p>
在這裡,我們使用userName的值來歡迎使用者。
開啟test.component.ts並新增以下程式碼:
name: string = 'Peter';
開啟test.component.html並新增以下程式碼:
<h1>Test component</h1>
<app-child [userName]="name"><app-child>
這裡,我們使用AppComponent作為指令,帶有輸入屬性,在TestComponent內部。
最後,使用以下命令啟動你的應用程式(如果尚未完成):
ng serve
現在,執行你的應用程式,你將看到以下響應:
[](images/directive-app/component_as_directive.PNG)
執行示例
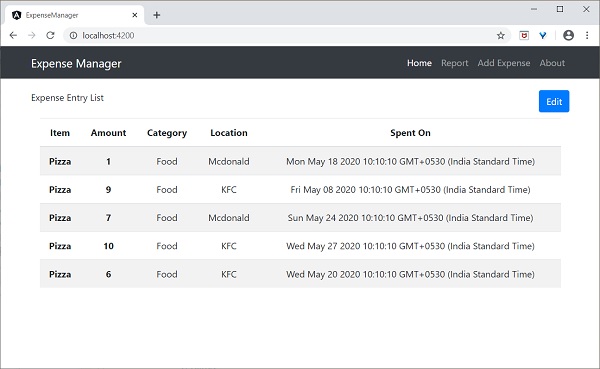
讓我們在ExpenseManager應用程式中新增一個新的元件來列出支出條目。
開啟命令提示符並進入專案根資料夾。
cd /go/to/expense-manager
啟動應用程式。
ng serve
使用以下命令建立一個新的元件,ExpenseEntryListComponent:
ng generate component ExpenseEntryList
輸出
輸出如下:
CREATE src/app/expense-entry-list/expense-entry-list.component.html (33 bytes)
CREATE src/app/expense-entry-list/expense-entry-list.component.spec.ts (700 bytes)
CREATE src/app/expense-entry-list/expense-entry-list.component.ts (315 bytes)
CREATE src/app/expense-entry-list/expense-entry-list.component.css (0 bytes)
UPDATE src/app/app.module.ts (548 bytes)
此命令建立了ExpenseEntryList元件並在AppModule中更新了必要的程式碼。
將ExpenseEntry匯入到ExpenseEntryListComponent元件(src/app/expense-entry-list/expense-entry-list.component)中
import { ExpenseEntry } from '../expense-entry';
新增一個方法getExpenseEntries(),在ExpenseEntryListComponent (src/app/expense-entry-list/expense-entry-list.component)中返回支出條目的列表(模擬項)。
getExpenseEntries() : ExpenseEntry[] {
   let mockExpenseEntries : ExpenseEntry[] = [
      { id: 1,
         item: "Pizza",
         amount: Math.floor((Math.random() * 10) + 1),
         category: "Food",
         location: "Mcdonald",
         spendOn: new Date(2020, 4, Math.floor((Math.random() * 30) + 1), 10, 10, 10),
         createdOn: new Date(2020, 4, Math.floor((Math.random() * 30) + 1), 10, 10, 10) },
      { id: 1,
         item: "Pizza",
         amount: Math.floor((Math.random() * 10) + 1),
         category: "Food",
         location: "KFC",
         spendOn: new Date(2020, 4, Math.floor((Math.random() * 30) + 1), 10, 10, 10),
         createdOn: new Date(2020, 4, Math.floor((Math.random() * 30) + 1), 10, 10, 10) },
      { id: 1,
         item: "Pizza",
         amount: Math.floor((Math.random() * 10) + 1),
         category: "Food",
         location: "KFC",
         spendOn: new Date(2020, 4, Math.floor((Math.random() * 30) + 1), 10, 10, 10),
         createdOn: new Date(2020, 4, Math.floor((Math.random() * 30) + 1), 10, 10, 10)
      },
   ];
   return mockExpenseEntries;
}
宣告一個區域性變數expenseEntries,並載入如下所示的模擬支出條目列表:
title: string;
expenseEntries: ExpenseEntry[];
constructor() { }
ngOnInit() {
   this.title = "Expense Entry List";
   this.expenseEntries = this.getExpenseEntries();
}
開啟模板檔案(src/app/expense-entry-list/expense-entry-list.component.html),並在表格中顯示模擬條目。
<!-- Page Content -->
<div class="container">
   <div class="row">
      <div class="col-lg-12 text-center" style="padding-top: 20px;">
         <div class="container" style="padding-left: 0px; padding-right: 0px;">
            <div class="row">
               <div class="col-sm" style="text-align: left;">
                  {{ title }}
               </div>
               <div class="col-sm" style="text-align: right;">
                  <button type="button" class="btn btn-primary">Edit</button>
               </div>
            </div>
         </div>
         <div class="container box" style="margin-top: 10px;">
            <table class="table table-striped">
               <thead>
                  <tr>
                     <th>Item</th>
                     <th>Amount</th>
                     <th>Category</th>
                     <th>Location</th>
                     <th>Spent On</th>
                  </tr>
               </thead>
               <tbody>
                  <tr *ngFor="let entry of expenseEntries">
                     <th scope="row">{{ entry.item }}</th>
                     <th>{{ entry.amount }}</th>
                     <td>{{ entry.category }}</td>
                     <td>{{ entry.location }}</td>
                     <td>{{ entry.spendOn | date: 'short' }}</td>
                  </tr>
               </tbody>
            </table>
         </div>
      </div>
   </div>
</div>
這裡,
使用了Bootstrap表格。table和table-striped將根據Bootstrap樣式標準設定表格樣式。
使用ngFor迴圈遍歷expenseEntries並生成表格行。
開啟AppComponent模板src/app/app.component.html,包含ExpenseEntryListComponent並刪除ExpenseEntryComponent,如下所示:
...
<app-expense-entry-list></app-expense-entry-list>
最後,應用程式的輸出如下所示。