- Angular 教程
- Angular - 首頁
- Angular - 概述
- Angular - 特性
- Angular - 優點與缺點
- Angular 基礎
- Angular - 環境搭建
- Angular - 第一個應用
- Angular - MVC 架構
- Angular 元件
- Angular - 元件
- Angular - 元件生命週期
- Angular - 檢視封裝
- Angular - 元件互動
- Angular - 元件樣式
- Angular - 巢狀元件
- Angular - 內容投影
- Angular - 動態元件
- Angular - 元素
- Angular 模板
- Angular - 模板
- Angular - 文字插值
- Angular - 模板語句
- Angular - 模板中的變數
- Angular - SVG 作為模板
- Angular 繫結
- Angular - 繫結及其型別
- Angular - 資料繫結
- Angular - 事件繫結
- Angular - 屬性繫結
- Angular - 屬性繫結
- Angular - 類和樣式繫結
- Angular 指令
- Angular - 指令
- Angular - 內建指令
- Angular 管道
- Angular - 管道
- Angular - 使用管道轉換資料
- Angular 依賴注入
- Angular - 依賴注入
- Angular HTTP 客戶端程式設計
- Angular - 服務
- Angular - HTTP 客戶端
- Angular - 請求
- Angular - 響應
- Angular - 獲取
- Angular - PUT
- Angular - DELETE
- Angular - JSON-P
- Angular - 使用 HTTP 進行 CRUD 操作
- Angular 路由
- Angular - 路由
- Angular - 導航
- Angular - Angular Material
- Angular 動畫
- Angular - 動畫
- Angular 表單
- Angular - 表單
- Angular - 表單驗證
- Angular Service Workers & PWA
- Angular - Service Workers & PWA
- Angular 測試
- Angular - 測試概述
- Angular NgModules
- Angular - 模組簡介
- Angular 高階
- Angular - 身份驗證和授權
- Angular - 國際化
- Angular - 可訪問性
- Angular - Web Workers
- Angular - 伺服器端渲染
- Angular - Ivy 編譯器
- Angular - 使用 Bazel 構建
- Angular - 向後相容性
- Angular - 響應式程式設計
- Angular - 指令和元件之間共享資料
- Angular 工具
- Angular - CLI
- Angular 其他
- Angular - 第三方控制元件
- Angular - 配置
- Angular - 顯示資料
- Angular - 裝飾器和元資料
- Angular - 基本示例
- Angular - 錯誤處理
- Angular - 測試和構建專案
- Angular - 生命週期鉤子
- Angular - 使用者輸入
- Angular - 有什麼新變化?
- Angular 有用資源
- Angular - 快速指南
- Angular - 有用資源
- Angular - 討論
Angular - 內建指令
Angular 提供了許多內建指令。內建指令可以分為兩種型別:
- 屬性指令
- 結構指令
一些重要的指令如下:
- NgModel
- NgClass
- NgStyle
- NgNonBindable
- NgIf
- NgFor
- NgSwitch、NgSwitchCase 和 NgSwitchDefault
讓我們在本節學習如何使用內建指令。
NgModel
NgModel 用於為 HTML 表單元素啟用雙向資料繫結。它基於屬性和事件繫結。它由一個單獨的模組 FormsModule 提供。一個簡單的示例,用於對具有 name 屬性的使用者物件進行雙向繫結,如下所示:
<input type="text" [(ngModel)]="user.name" />
每當使用者更改輸入欄位時,更新的使用者姓名將反映到元件中的 user.name 變數。類似地,如果元件的變數 user.name 發生更改,輸入欄位的值也將更新。
讓我們建立一個簡單的登錄檔單來理解 NgModel 指令。我們的登錄檔單將有三個輸入欄位,如下所示,以及一個提交登錄檔單的按鈕。
- 使用者名稱
- 密碼
- 確認密碼
步驟 1:使用 angular CLI 建立一個新的應用程式 my-app,如下所示:
ng new my-app
步驟 2:使用 angular CLI 建立一個新的登錄檔單元件 RegisterForm,如下所示:
ng generate component RegisterForm
步驟 3:開啟登錄檔單元件的模板,並建立一個包含使用者名稱、密碼和確認密碼的使用者。
<div>
   <form method="post">
      <div class="container">
         <label for="username"><b>Username</b></label>
         <input type="text" name="username" required>

         <label for="password"><b>Password</b></label>
         <input type="password" name="password" required>

         <label for="confirm_password"><b>Confirm Password</b></label>
         <input type="password" name="confirm_password" required>

         <button type="submit">Register</button>
      </div>
   </form>
</div>
步驟 4:開啟登錄檔單元件的樣式,並使用 CSS 樣式化表單,如下所示:
.container {
   padding: 15px;
}

input[type=text], input[type=password] {
   width: 100%;
   padding: 10px 20px;
   margin: 10px 0;
   display: inline-block;
   border: 1px solid #ccc;
   box-sizing: border-box;
}

button {
   background-color: blue;
   color: white;
   padding: 15px 20px;
   margin: 10px 0;
   border: none;
   cursor: pointer;
   width: 100%;
}
步驟 5:將我們的登錄檔單元件包含在應用程式模板檔案 app.component.html 中。
<app-register-form />
步驟 6:執行應用程式並測試登錄檔單。
步驟 7:接下來,在應用程式模組檔案 app.module.ts 中匯入 FormsModule。
import { NgModule } from '@angular/core';
import { BrowserModule } from '@angular/platform-browser';
import { FormsModule } from '@angular/forms'

import { AppComponent } from './app.component';
import { RegisterFormComponent } from './register-form/register-form.component';

@NgModule({
   declarations: [
      AppComponent,
      RegisterFormComponent
   ],
   imports: [
      BrowserModule,
      FormsModule
   ],
   providers: [],
   bootstrap: [AppComponent]
})
export class AppModule { }
步驟 8:接下來,讓我們新增一個物件 user,它具有 Username、password 和 confirmPassword 屬性。user 物件最初將為空字串。一旦使用者輸入資料,它將透過 NgModel 指令填充。
user: any = {
   username: '',
   password: '',
   confirmPassword: ''
}
步驟 9:將上述宣告的元件成員變數分配給使用者名稱、密碼和確認密碼輸入的 NgModel 指令,如下所示:
<input type="text" name="username" [(ngModel)]="user.username" required>

<input type="password" name="password" [(ngModel)]="user.password" required>

<input type="password" name="confirm_password" [(ngModel)]="user.confirmPassword" required>
這裡,
ngModel 將值從 user 物件設定為 HTML 輸入元素。它也反向將使用者輸入的值設定到 user 物件。
步驟 10:在元件類中建立一個新的成員方法 showInfo。該方法的目的是收集當前使用者資訊並透過 alert() 方法顯示它。
showInfo(e: Event) {
   e.preventDefault();
   let info: string = '';
   info += 'Username = ' + this.user.username;
   info += '\nPassword = ' + this.user.password;
   info += '\nConfirm password = ' + this.user.confirmPassword;
   alert(info)
}
這裡,
事件物件的 preventDefault() 方法將阻止提交按鈕的預設操作。
alert() 方法將向用戶顯示訊息。
步驟 11:使用事件繫結將 showInfo 方法分配給按鈕的點選事件。
<button type="submit" (click)="showInfo($event)">Register</button>
步驟 12:元件的完整列表如下:
import { Component } from '@angular/core';

@Component({
   selector: 'app-register-form',
   templateUrl: './register-form.component.html',
   styleUrls: ['./register-form.component.css']
})
export class RegisterFormComponent {
   user: any = {
      username: '',
      password: '',
      confirmPassword: ''
   }

   showInfo(e: Event) {
      e.preventDefault();
      let info: string = '';
      info += 'Username = ' + this.user.username;
      info += '\nPassword = ' + this.user.password;
      info += '\nConfirm password = ' + this.user.confirmPassword;
      alert(info)
   }
}
步驟 13:元件模板的完整列表如下:
<div>
   <form method="post">
      <div class="container">
         <label for="username"><b>Username</b></label>
         <input type="text" name="username" [(ngModel)]="user.username" required>

         <label for="password"><b>Password</b></label>
         <input type="password" name="password" [(ngModel)]="user.password" required>

         <label for="confirm_password"><b>Confirm Password</b></label>
         <input type="password" name="confirm_password" [(ngModel)]="user.confirmPassword" required>

         <button type="submit" (click)="showInfo($event)">Register</button>
      </div>
   </form>
</div>
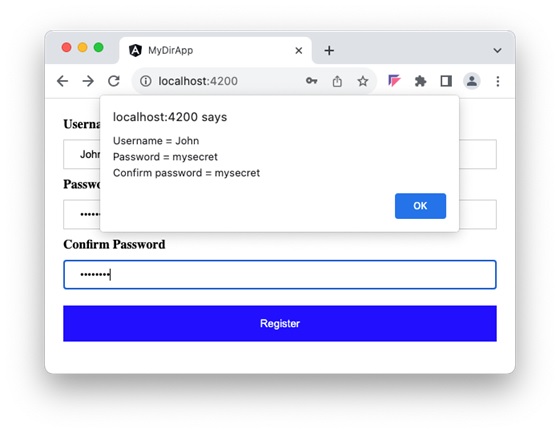
步驟 14:接下來,執行應用程式,填寫表單並單擊註冊按鈕。它將透過 ngModel 繫結收集資訊,並透過 alert 函式顯示它。
NgStyle
NgStyle 用於向宿主 HTML 元素或元件新增或刪除一組 HTML 樣式。
'''html <div NgStyle="stylelist">
這裡,style-list 是 Record<string, string> 型別的物件。所有鍵都表示 CSS 屬性,其對應的值表示其 CSS 值。一個示例物件如下所示:
classlist: Record<string, boolean> = {
   'color': 'red',
   'text-decoration': 'underline',
   'font-size': '12px'
}
讓我們擴充套件我們的登錄檔單元件以支援驗證,並使用 ngStyle 高亮顯示必填欄位。
步驟 1:在元件中新增新的成員變數 inputStyle。
inputStyle: Record<string, string> = {
   'border-color': '#ccc'
}
步驟 2:更新 showInfo() 方法以包含驗證邏輯並更新 inputStyle 物件。
NgClass
NgClass 用於向宿主 HTML 元素或元件新增或刪除一組類。
```html <div NgClass=“classlist”>
這裡,classlist 是 Record<string, boolean> 型別的物件。所有具有真值的鍵都將設定為宿主元素的類。一個示例物件如下所示:
classlist: Record<string, boolean> = {
   'c1': true,
   'c2': false,
   'c3': true
}
NgNonBindable
NgNonBindable 用於阻止對一段文字的 Angular 模板進行處理。只需將文字用具有 ngNonBindable 屬性的 HTML 元素括起來即可。它將按原樣發出接收到的模板,而不會處理模板表示式、模板語句、指令和元件。
```html
<!-- any angular expression / directive / component -->
Hi, angular don't evaluate me and it can have any angular expression such
as {{ 1 + 1 }}, {{ name | uppercase }}. I can have any component as well.
<mycomp input="Hello" />
它用於在 Angular 應用程式本身中展示 Angular 程式碼,而不會受到模板處理的影響。
NgIf
Angular 模板沒有條件邏輯。條件邏輯是使用 NgIf 指令完成的。它根據作為值接受的條件(模板表示式)將宿主 HTML 元素/元件新增到 DOM 佈局或從 DOM 佈局中刪除。
<div *ngIf="canShow">
   <!-- content -->
</div>
如果 canShow 為真,則顯示內部內容。否則,內容不會新增到 DOM 佈局中。
NgFor
Angular 模板也沒有迴圈邏輯。為了彌補迴圈邏輯的缺失,Angular 提供了 NgFor 指令來迴圈遍歷專案陣列並將其顯示為列表、畫廊、行等。
<ul *ngFor="let item of items">
   <li>{{ item }}</li>
</ul>
它將在無序列表中生成 n 個專案,其中 n 表示 items 陣列中可用的專案數。
NgSwitch、NgSwitchCase 和 NgSwitchDefault
Angular 模板也沒有 switch 語句。為了彌補切換邏輯的缺失,Angular 提供了 NgSwitch 及其相關指令來選擇集合(專案)中的任何一個專案。
<div [ngSwitch]="role">
   <div *ngSwitchCase="'admin'">
      Hi, I have access to admin items
   </div>
   <div *ngSwitchCase="'user'">
      Hi, I have access to user items only
   </div>
   <div *ngSwitchDefault>
      Hi, I have access to guest items only. Please login to access more
      items
   </div>
</div>
這裡,將根據使用者的型別顯示任何一個部分。