- Angular 教程
- Angular - 首頁
- Angular - 概述
- Angular - 特性
- Angular - 優點與缺點
- Angular 基礎
- Angular - 環境搭建
- Angular - 第一個應用
- Angular - MVC 架構
- Angular 元件
- Angular - 元件
- Angular - 元件生命週期
- Angular - 檢視封裝
- Angular - 元件互動
- Angular - 元件樣式
- Angular - 巢狀元件
- Angular - 內容投影
- Angular - 動態元件
- Angular - 元素
- Angular 模板
- Angular - 模板
- Angular - 文字插值
- Angular - 模板語句
- Angular - 模板中的變數
- Angular - SVG 作為模板
- Angular 資料繫結
- Angular - 資料繫結及型別
- Angular - 資料繫結
- Angular - 事件繫結
- Angular - 屬性繫結
- Angular - 屬性繫結
- Angular - 類和樣式繫結
- Angular 指令
- Angular - 指令
- Angular - 內建指令
- Angular 管道
- Angular - 管道
- Angular - 使用管道轉換資料
- Angular 依賴注入
- Angular - 依賴注入
- Angular HTTP 客戶端程式設計
- Angular - 服務
- Angular - HTTP 客戶端
- Angular - 請求
- Angular - 響應
- Angular - GET 請求
- Angular - PUT 請求
- Angular - DELETE 請求
- Angular - JSON-P
- Angular - 使用 HTTP 進行 CRUD 操作
- Angular 路由
- Angular - 路由
- Angular - 導航
- Angular - Angular Material
- Angular 動畫
- Angular - 動畫
- Angular 表單
- Angular - 表單
- Angular - 表單驗證
- Angular Service Workers & PWA
- Angular - Service Workers & PWA
- Angular 測試
- Angular - 測試概述
- Angular NgModule
- Angular - 模組介紹
- Angular 高階
- Angular - 身份驗證與授權
- Angular - 國際化
- Angular - 可訪問性
- Angular - Web Workers
- Angular - 伺服器端渲染
- Angular - Ivy 編譯器
- Angular - 使用 Bazel 構建
- Angular - 向後相容性
- Angular - 響應式程式設計
- Angular - 指令和元件之間共享資料
- Angular 工具
- Angular - CLI
- Angular 其他
- Angular - 第三方控制元件
- Angular - 配置
- Angular - 顯示資料
- Angular - 裝飾器和元資料
- Angular - 基本示例
- Angular - 錯誤處理
- Angular - 測試和專案構建
- Angular - 生命週期鉤子
- Angular - 使用者輸入
- Angular - 最新動態?
- Angular 有用資源
- Angular - 快速指南
- Angular - 有用資源
- Angular - 討論
Angular - 元素
Angular 提供了一種簡單有效的方法來建立 Web 元件。Web 元件是原生 HTML 規範中提供的自定義 HTML 元素,用於擴充套件 HTML 文件的功能/標籤。它可以透過 JavaScript 建立,並可在 HTML 文件中使用。JavaScript 具有建立自定義 HTML 元素的特殊方法。
使用 JavaScript 建立自定義 HTML 元素是一個冗長的過程,開發人員需要了解自定義 HTML 元素的內部機制和 Shadow DOM 概念。Angular 透過將 Angular 元件轉換為 Web 元件來簡化此過程,只需對元件類進行最小的更改。
讓我們在本節學習如何建立自定義 HTML 元件。
建立自定義元件的步驟
步驟 1:使用 Angular CLI 建立一個普通的 Angular 應用。
ng new my-app
在此,如果 CLI 詢問是否包含路由模組,請選擇“否”,因為在此場景中我們不需要它。
步驟 2:使用 Angular CLI 建立元件。跳過將元件匯入模組。
ng generate component my-component --skip-import
步驟 3:在 @Component 裝飾器中新增 standalone 屬性,並將其設定為 true。顧名思義,該元件將在構建應用程式時與必要的 Angular 程式碼捆綁在一起,以便該元件可以在任何 HTML 文件中工作,而無需 Angular 引導程式碼。
@Component({
   // ...
   standalone: true,
})
export class MyCustomComponent {
   // ...
}
步驟 4:在 @Component 裝飾器中新增 encapsulation 選項,並將其設定為 ViewEncapsulation.ShadowDom。ShadowDom 選項啟用 HTML 原生 ShadowDom 概念,以保留元件的樣式,而不會洩漏到 HTML 文件的其他部分。
@Component({
   // ...
   encapsulation: ViewEncapsulation.ShadowDom
})
export class MyCustomComponent {
   // ...
}
步驟 5:接下來,根據規範開發元件。
步驟 6:接下來,安裝 Angular 團隊提供的 @angular/elements 模組。@angular/elements 模組提供將 Angular 元件建立為自定義 HTML 元素的選項。
ng add @angular/elements
步驟 7:接下來,開啟 main.ts 並移除所有樣板程式碼。
步驟 8:接下來,從 @angular/platform-browser 匯入 createApplication。createApplication 將引導 Angular 應用程式。
import { createApplication } from '@angular/platform-browser';
步驟 9:接下來,從 @angular/elements 模組匯入 createCustomElement。createCustomElement 將用於從 Angular 元件建立自定義 HTML 元素。
import { createCustomElement } from '@angular/elements';
步驟 10:接下來,使用 createAppliation() 方法建立應用程式,方法是輸入提供程式和回撥方法。回撥方法將用於從 Angular 元件建立自定義 HTML 元素。
createApplication({ providers: [] }).then((appRef) => {
   // ...
});
步驟 11:實現回撥方法,並使用 createCustomElement() 方法建立自定義元素。createCustomElement 接受要轉換的元件和應用程式的注入器。我們可以從 createApplication() 方法返回的應用程式引用中獲取注入器。
createApplication({ providers: [] }).then((appRef) => {
   const myCustomComponent = createCustomElement(
      MyCustomComponent,
      { injector: appRef.injector }
   );
});
步驟 12:接下來,使用 JavaScript 原生方法 customElements.define() 方法註冊建立的自定義元件。
createApplication({ providers: [] }).then((appRef) => {
   const myCustomComponent = createCustomElement(
      MyCustomComponent,
      { injector: appRef.injector }
   );

   customElements.define('my-custom-comp', myCustomComponent);
});
步驟 13:接下來,使用 Angular CLI 的 build 命令構建應用程式。
ng build --configuration=production
步驟 14:構建完成後,輸出檔案位於 dist/my-custom-component 資料夾中。它包含以下檔案(類似檔案)以及 index.html 檔案。
- main.bbeaed7335f8e75c.js
- styles.ef46db3751d8e999.css
- polyfills.b270da5a29e91679.js
- runtime.5f19eeacd93d937b.js
步驟 15:使用新建立的元件更新 index 檔案,並檢查輸出是否正確。如果元件需要更改,請根據需要更新 Angular 元件並重新構建應用程式。
<!doctype html>
<html lang="en" data-critters-container>
<head>
   <meta charset="utf-8">
   <title>MyWebComponent</title>
   <base href="/">
   <meta name="viewport" content="width=device-width, initial-scale=1">
   <link rel="icon" type="image/x-icon" href="favicon.ico">
   <link rel="stylesheet" href="styles.ef46db3751d8e999.css">
</head>
<body>
   <!-- add you custom component -->
   <script src="runtime.5f19eeacd93d937b.js" type="module"></script><script src="polyfills.b270da5a29e91679.js" type="module"></script><script src="main.bbeaed7335f8e75c.js" type="module"></script>
</body>
</html>
工作示例
讓我們建立一個顯示員工資訊的元件(例如 EmpCard),並將其轉換為自定義 HTML 元素。
步驟 1:使用 Angular CLI 建立一個 Angular 應用程式 emp-card-web-component。
$ ng new emp-card-web-component
? Would you like to add Angular routing? No
? Which stylesheet format would you like to use? CSS
CREATE emp-card-web-component/README.md (1073 bytes)
CREATE emp-card-web-component/.editorconfig (274 bytes)
CREATE emp-card-web-component/.gitignore (548 bytes)
CREATE emp-card-web-component/angular.json (2780 bytes)
CREATE emp-card-web-component/package.json (1053 bytes)
CREATE emp-card-web-component/tsconfig.json (901 bytes)
CREATE emp-card-web-component/tsconfig.app.json (263 bytes)
CREATE emp-card-web-component/tsconfig.spec.json (273 bytes)
CREATE emp-card-web-component/.vscode/extensions.json (130 bytes)
CREATE emp-card-web-component/.vscode/launch.json (470 bytes)
CREATE emp-card-web-component/.vscode/tasks.json (938 bytes)
CREATE emp-card-web-component/src/main.ts (214 bytes)
CREATE emp-card-web-component/src/favicon.ico (948 bytes)
CREATE emp-card-web-component/src/index.html (305 bytes)
CREATE emp-card-web-component/src/styles.css (80 bytes)
CREATE emp-card-web-component/src/app/app.module.ts (314 bytes)
CREATE emp-card-web-component/src/app/app.component.css (0 bytes)
CREATE emp-card-web-component/src/app/app.component.html (23083 bytes)
CREATE emp-card-web-component/src/app/app.component.spec.ts (940 bytes)
CREATE emp-card-web-component/src/app/app.component.ts (226 bytes)
CREATE emp-card-web-component/src/assets/.gitkeep (0 bytes)
✔ Packages installed successfully.
    Directory is already under version control. Skipping initialization of git.
 	ng new my-app
在此,如果 CLI 詢問是否包含路由模組,請選擇“否”,因為在此場景中我們不需要它。
步驟 2:使用 Angular CLI 建立員工元件。跳過將元件匯入模組。
$ ng generate component emp-card --skip-import
CREATE src/app/emp-card/emp-card.component.css (0 bytes)
CREATE src/app/emp-card/emp-card.component.html (23 bytes)
CREATE src/app/emp-card/emp-card.component.spec.ts (567 bytes)
CREATE src/app/emp-card/emp-card.component.ts (209 bytes)
步驟 3:在 @Component 裝飾器中新增 standalone 屬性,並將其設定為 true。顧名思義,該元件將在構建應用程式時與必要的 Angular 程式碼捆綁在一起,以便該元件可以在任何 HTML 文件中工作,而無需 Angular 引導程式碼。
@Component({
   // ...
   standalone: true,
})
export class EmpCardComponent {
   // ...
}
步驟 4:在 @Component 裝飾器中新增 encapsulation 選項,並將其設定為 ViewEncapsulation.ShadowDom。ShadowDom 選項啟用 HTML 原生 ShadowDom 概念,以保留元件的樣式,而不會洩漏到 HTML 文件的其他部分。
@Component({
   // ...
   encapsulation: ViewEncapsulation.ShadowDom
})
export class EmpCardComponent {
   // ...
}
步驟 5:接下來,新增兩個輸入屬性 name 和 role,以在 HTML 元素中提供員工的姓名和角色。
export class EmpCardComponent {
   @Input() name: string = '';
   @Input() role: string = '';
}
步驟 6:元件的完整列表如下:
import { Component, Input, ViewEncapsulation } from '@angular/core';

@Component({
   selector: 'app-emp-card',
   templateUrl: './emp-card.component.html',
   styleUrls: ['./emp-card.component.css'],
   standalone: true,
   encapsulation: ViewEncapsulation.ShadowDom
})
export class EmpCardComponent {
   @Input() name: string = '';
   @Input() role: string = '';
}
步驟 7:接下來,開啟元件的模板並新增標記以顯示員工姓名和角色,如下所示:
<div class="card">
   <div class="container">
      <h4><b>{{ name }}</b></h4>
      <p>{{ role }}</p>
   </div>
</div>
步驟 8:接下來,開啟元件的樣式並新增 CSS 以在員工卡片中顯示陰影。
.card {
   box-shadow: 0 4px 8px 0 rgba(0,0,0,0.2);
}

.card:hover {
   box-shadow: 0 8px 16px 0 rgba(0,0,0,0.2);
}

.container {
   padding: 2px 16px;
   max-width: 200px;
}
步驟 9:接下來,安裝 Angular 團隊提供的 @angular/elements 模組。@angular/elements 模組提供將 Angular 元件建立為自定義 HTML 元素的選項。
$ ng add @angular/elements
Using package manager: npm
✔ Found compatible package version: @angular/elements@16.1.7.
✔ Package information loaded.

The package @angular/elements@16.1.7 will be installed and executed.
Would you like to proceed? Yes
✔ Packages successfully installed.
Package "@angular/elements" was found but does not support schematics.
步驟 10:接下來,開啟 main.ts 並移除所有樣板程式碼。
步驟 11:接下來,從 @angular/platform-browser 匯入 createApplication。createApplication 將引導 Angular 應用程式。
import { createApplication } from '@angular/platform-browser';
步驟 12:接下來,從 @angular/elements 模組匯入 createCustomElement。createCustomElement 將用於從 Angular 元件建立自定義 HTML 元素。
import { createCustomElement } from '@angular/elements';
步驟 13:接下來,匯入 EmpCardComponnet 元件,如下所示:
import { EmpCardComponent } from './app/emp-card/emp-card.component'
步驟 14:接下來,使用 createAppliation() 方法建立應用程式,方法是輸入提供程式和回撥方法。回撥方法將用於從 Angular 元件建立自定義 HTML 元素。
createApplication({ providers: [] }).then((appRef) => {
   // ...
});
步驟 15:實現回撥方法,並使用 createCustomElement() 方法建立自定義元素。createCustomElement 接受要轉換的元件和應用程式的注入器。我們可以從 createApplication() 方法返回的應用程式引用中獲取注入器。
createApplication({ providers: [] }).then((appRef) => {
   const empCard = createCustomElement(
      EmpCardComponent,
      { injector: appRef.injector }
   );
});
步驟 16:接下來,使用 JavaScript 原生方法 customElements.define() 方法註冊建立的自定義元件。
createApplication({ providers: [] }).then((appRef) => {
   const empCard = createCustomElement(
      EmpCardComponent,
      { injector: appRef.injector }
   );

   customElements.define('emp-card', empCard);
});
步驟 17:main 檔案 main.ts 的完整列表如下:
import { AppModule } from './app/app.module';

import { createApplication } from '@angular/platform-browser';
import { createCustomElement } from '@angular/elements';
import { EmpCardComponent } from './app/emp-card/emp-card.component'


createApplication({ providers: [] }).then((appRef) => {
   const empCard = createCustomElement(
      EmpCardComponent,
      { injector: appRef.injector }
   );

   customElements.define('emp-card', empCard);
});
步驟 18:接下來,使用 Angular CLI 的 build 命令構建應用程式。
ng build --configuration=production
✔ Browser application bundle generation complete.
✔ Copying assets complete.
✔ Index html generation complete.

Initial Chunk Files           | Names         |  Raw Size | Estimated Transfer Size
main.bbeaed7335f8e75c.js      | main          |  95.37 kB |                28.59 kB
polyfills.b270da5a29e91679.js | polyfills     |  33.04 kB |                10.63 kB
runtime.5f19eeacd93d937b.js   | runtime       | 922 bytes |               526 bytes
styles.ef46db3751d8e999.css   | styles        |   0 bytes |                       -

                              | Initial Total | 129.31 kB |                39.74 kB
步驟 19:構建完成後,輸出檔案位於 dist/emp-card-web-component 資料夾中。它包含以下檔案(類似檔案)以及 index.html 檔案。
- main.bbeaed7335f8e75c.js
- styles.ef46db3751d8e999.css
- polyfills.b270da5a29e91679.js
- runtime.5f19eeacd93d937b.js
步驟 20:使用新建立的元件更新 index 檔案,並檢查輸出是否正確。
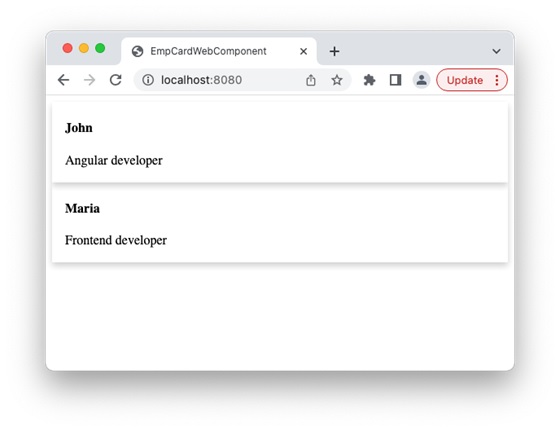
<!doctype html>
<html lang="en" data-critters-container>
<head>
   <meta charset="utf-8">
   <title>EmpCardWebComponent</title>
   <base href="/">
   <meta name="viewport" content="width=device-width, initial-scale=1">
   <link rel="icon" type="image/x-icon" href="favicon.ico">
<link rel="stylesheet" href="styles.ef46db3751d8e999.css"></head>
<body>
   <emp-card name="John" role="Angular developer"></emp-card>
   <emp-card name="Maria" role="Frontend developer"></emp-card>
   <script src="runtime.5f19eeacd93d937b.js" type="module"></script><script src="polyfills.b270da5a29e91679.js" type="module"></script><script src="main.bbeaed7335f8e75c.js" type="module"></script>
</body>
</html>
在這裡,我們添加了兩個不同員工詳細資訊的 emp-card 標籤。
步驟 21:最後,在 dist/emp-card-web-component 資料夾中執行一個 http 伺服器,並在瀏覽器中檢查輸出。
總結
正如我們所學到的,在 Angular 中建立 Web 元件非常容易。我們只需要像開發普通的 Angular 元件一樣開發元件即可。一旦元件的功能開發完畢,我們需要在 main.ts 檔案中新增一些引導程式碼,並構建應用程式以獲得必要的自定義 HTNL 元素作為一堆原生 JavaScript。我們可以在任何網站上使用它,而無需 Angular。