- Angular 教程
- Angular - 首頁
- Angular - 概述
- Angular - 特性
- Angular - 優點與缺點
- Angular 基礎
- Angular - 環境搭建
- Angular - 第一個應用
- Angular - MVC 架構
- Angular 元件
- Angular - 元件
- Angular - 元件生命週期
- Angular - 檢視封裝
- Angular - 元件互動
- Angular - 元件樣式
- Angular - 巢狀元件
- Angular - 內容投影
- Angular - 動態元件
- Angular - 元素
- Angular 模板
- Angular - 模板
- Angular - 文字插值
- Angular - 模板語句
- Angular - 模板中的變數
- Angular - SVG 作為模板
- Angular 繫結
- Angular - 繫結及其型別
- Angular - 資料繫結
- Angular - 事件繫結
- Angular - 屬性繫結
- Angular - 屬性繫結
- Angular - 類和樣式繫結
- Angular 指令
- Angular - 指令
- Angular - 內建指令
- Angular 管道
- Angular - 管道
- Angular - 使用管道轉換資料
- Angular 依賴注入
- Angular - 依賴注入
- Angular HTTP 客戶端程式設計
- Angular - 服務
- Angular - HTTP 客戶端
- Angular - 請求
- Angular - 響應
- Angular - 獲取
- Angular - PUT
- Angular - DELETE
- Angular - JSON-P
- Angular - 使用 HTTP 進行 CRUD 操作
- Angular 路由
- Angular - 路由
- Angular - 導航
- Angular - Angular Material
- Angular 動畫
- Angular - 動畫
- Angular 表單
- Angular - 表單
- Angular - 表單驗證
- Angular Service Workers & PWA
- Angular - Service Workers & PWA
- Angular 測試
- Angular - 測試概述
- Angular NgModules
- Angular - 模組簡介
- Angular 高階
- Angular - 身份驗證與授權
- Angular - 國際化
- Angular - 可訪問性
- Angular - Web Workers
- Angular - 伺服器端渲染
- Angular - Ivy 編譯器
- Angular - 使用 Bazel 構建
- Angular - 向後相容性
- Angular - 響應式程式設計
- Angular - 在指令和元件之間共享資料
- Angular 工具
- Angular - CLI
- Angular 其他
- Angular - 第三方控制元件
- Angular - 配置
- Angular - 顯示資料
- Angular - 裝飾器和元資料
- Angular - 基本示例
- Angular - 錯誤處理
- Angular - 測試和構建專案
- Angular - 生命週期鉤子
- Angular - 使用者輸入
- Angular - 有什麼新變化?
- Angular 有用資源
- Angular - 快速指南
- Angular - 有用資源
- Angular - 討論
Angular - 元件互動
元件之間的互動
在基於元件的架構中,元件之間的互動是一個重要且必要的特性。Angular 應用基本上是由元件組成的。Angular 提供了多種選項來在元件之間傳遞和接收資料。它還允許元件與其層次結構中的其他元件進行高階互動。讓我們在本節中瞭解如何在程式碼中實現元件之間的互動。
元件互動的技術
在元件之間進行通訊的技術列表如下:
父元件向子元件傳遞資料。
父元件從子元件接收資料。
父元件操作子元件。
父元件和子元件使用公共服務進行互動。
讓我們在接下來的章節中學習這些內容。
父元件向子元件傳遞資料
父元件可以透過子元件的屬性向子元件傳遞資料。子元件可以透過 @Input() 裝飾器接收資料。子元件可以在其整個生命週期中(從初始化到銷燬)接收資料。
Angular 的設計使得子元件可以自動攔截來自父元件的資料變化,並在子元件中進行必要的更新。Angular 還提供鉤子來攔截資料變化並編寫自定義處理邏輯。總的來說,子元件有三種選項可以攔截來自父元件的資料。
- 自動攔截
- Setter 攔截
- ngOnChanges 鉤子
讓我們在接下來的章節中詳細瞭解所有技術。
自動攔截
自動攔截簡化了從父元件接收資料。Angular 提供了一個 @Input 裝飾器來接收來自父元件的資料。它會在父元件更新資料時接收資料。配置 Input 裝飾器非常簡單。只需將 input 裝飾器附加到子元件中的一個屬性上,然後透過模板中子元件的屬性傳遞來自父元件的資料。
假設我們想要從父元件傳遞一個計數器到子元件。
步驟 1:在子元件中建立一個屬性 counter,並用 @Input 裝飾它
@Input() counter: number = 0;
這裡:
- @Input() 是裝飾器
- counter 是輸入屬性
- number 是輸入屬性的資料型別,它是可選的
- 0 是 counter 的初始值。如果未提供輸入,則將使用此值。
步驟 2:在父元件中初始化一個變數,例如 counterValue。
counterValue: number = 10
步驟 3:使用子元件屬性 (counter) 從父元件傳遞 counter 輸入。
<app-child-component [counter]="counterValue" />
步驟 4:最後,根據需要在子元件模板中使用 counter 值。
counter: {{counter}}
讓我們建立兩個元件,父元件和子元件,然後嘗試將資料從父元件傳遞到子元件並在子元件中呈現它。
步驟 1:使用 angular CLI 建立一個父元件 InOutSample,如下所示:
$ ng generate component InOutSample
CREATE src/app/in-out-sample/in-out-sample.component.css (0 bytes)
CREATE src/app/in-out-sample/in-out-sample.component.html (28 bytes)
CREATE src/app/in-out-sample/in-out-sample.component.spec.ts (596 bytes)
CREATE src/app/in-out-sample/in-out-sample.component.ts (228 bytes)
UPDATE src/app/app.module.ts (1289 bytes)
步驟 2:在元件中新增一個 counter 變數,如下所示:
import { Component } from '@angular/core';

@Component({
   selector: 'app-in-out-sample',
   templateUrl: './in-out-sample.component.html',
   styleUrls: ['./in-out-sample.component.css']
})
export class InOutSampleComponent {
   counter: number = 10;
}
步驟 3:使用 angular CLI 建立一個新的子元件 InOutChildSample,如下所示:
$ ng generate component InOutChildSample
CREATE src/app/in-out-child-sample/in-out-child-sample.component.css (0 bytes)
CREATE src/app/in-out-child-sample/in-out-child-sample.component.html (34 bytes)
CREATE src/app/in-out-child-sample/in-out-child-sample.component.spec.ts (632 bytes)
CREATE src/app/in-out-child-sample/in-out-child-sample.component.ts (251 bytes)
UPDATE src/app/app.module.ts (1417 bytes)
步驟 4:在子元件中新增一個 counter 屬性,並用 @Input() 裝飾器裝飾它,如下所示:
import { Component, Input } from '@angular/core';

@Component({
   selector: 'app-in-out-child-sample',
   templateUrl: './in-out-child-sample.component.html',
   styleUrls: ['./in-out-child-sample.component.css']
})
export class InOutChildSampleComponent {
   @Input() counter : number = 0;
}
步驟 5:開啟子元件模板 in-out-child-sample.component.html,並使用 counter 屬性,如下所示:
<div>
   <p>Counter: {{counter}}</p>
</div>
步驟 6:開啟父元件模板 in-out-sample.component.html,並呈現子元件以及 counter 屬性,如下所示:
<app-in-out-child-sample [counter]="counter" />
步驟 7:開啟 app 元件的模板,並呈現父元件,如下所示:
<app-in-out-sample />

<router-outlet></router-outlet>
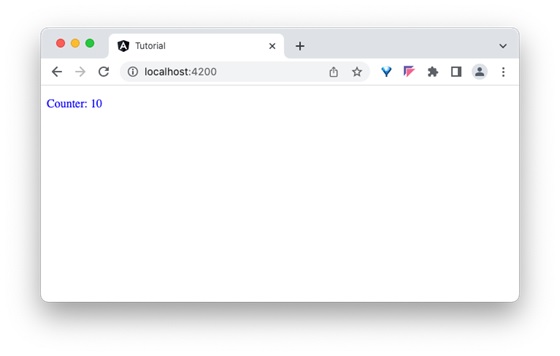
步驟 8:最後,執行應用程式並檢查計數器是否顯示從父元件傳遞的值,如下所示:
讓我們嘗試使用按鈕和點選事件更改父元件中的 counter 變數,然後檢視它是否會影響子元件。
步驟 1:在父元件中新增一個函式來增加 counter 值,如下所示:
inc() {
   this.counter++
}
步驟 2:在父元件的模板中新增一個按鈕,並繫結函式,如下所示:
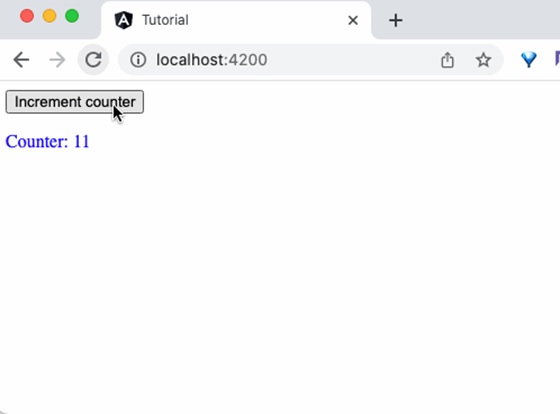
<button (click)="inc()">Increment counter</button>

<app-in-out-child-sample [counter]="counter" />
步驟 3:最後,執行應用程式並檢查父元件中變數的變化是否反映在子元件中。
Setter 攔截
基於 Setter 的攔截只是先前技術的擴充套件。它基本上是為 @Input 裝飾器中使用的屬性使用 getter 和 setter。例如,counter 示例中的 counter 屬性可以擴充套件為支援 getter 和 setter,如下所示:
@Input()
get counter(): number { return this._counter; }
set counter(val: number) {
   this._counter = val || -1;
}
private _counter: number = 0;
這裡,如果未設定 counter,則將其設定為 -1。
讓我們更改 counter 示例 in-out-child-sample.component.ts 以使用 setter 攔截 counter,並在 counter 值超過 25 時將其重置為零。
import { Component, Input } from '@angular/core';

@Component({
   selector: 'app-in-out-child-sample',
   templateUrl: './in-out-child-sample.component.html',
   styleUrls: ['./in-out-child-sample.component.css']
})
export class InOutChildSampleComponent {
   @Input()
   get counter(): number { return this._counter; }
   set counter(val: number) {
      this._counter = val || 0;
      if(val > 25) this._counter = val % 25;
   }
   private _counter: number = 0;
}
執行應用程式,您會看到一旦 counter 達到 25,它將重置為 0。
ngOnChanges 鉤子攔截
正如我們在元件的生命週期及其鉤子方法中學到的那樣,ngOnChanges 是一個鉤子方法,每當 Angular 檢測到其輸入發生變化時,它都會執行。
ngOnChanges 鉤子接受一個 SimpleChanges 型別的物件。SimpleChanges 是一個字典,包含所有發生變化的屬性。我們可以遍歷所有屬性並找到屬性的最新值。遍歷所有已更改屬性的虛擬碼如下:
ngOnChanges(changes: SimpleChanges) {
   for (const key in changes) {
      const prop = changes[key];

      const prevVal = prop.previousValue
      const currentVal = prop.currentValue
      cont isFirstChange = pop.isFirstChange()

      if (prop.isFirstChange()) {
         console.log("The current value is ${prop.currentValue}")
      } else {
         console.log(`${key} changed from ${prop.previousValue} to
         ${prop.currentValue}`);
      }

   }
}
父元件從子元件接收資料
子元件可以透過 @Output 裝飾器將資料傳送到父元件。Output 裝飾器與 Input 裝飾器非常相似,只是輸出實際上是一個事件發射器,它將資料(輸出)與事件一起傳遞。父元件可以在子元件中的事件上訂閱,並在子元件中的資料發生變化時從子元件獲取發射的值。接收來自子元件的資料的步驟如下:
步驟 1:使用 Output 裝飾器在子元件中建立一個事件發射器。
@Output() counterEvent = new EventEmitter<number>();
步驟 2:在子元件中的資料發生變化時發射 counter 事件
this.counterEvent.emit(changedValue)
步驟 3:在父元件中捕獲事件,並從回撥函式中獲取資料。
<parent-component (counterEvent)="get($event)" />
步驟 4:在父元件中對捕獲的值執行任何操作。
讓我們在子元件 InOutChildSample 元件中編寫一個 output 裝飾器,並嘗試從父元件 InOutSample 元件獲取輸出。
步驟 1:在子元件 in-out-child-sample.component.ts 中建立一個輸出事件發射器,如下所示:
@Output() counterEvent = new EventEmitter<number>();
步驟 2:建立一個方法,透過在子元件 In-out-child-sample.component.ts 中發射事件並帶有 counter 資料來傳遞 counter 的值。
passCounterToParent() {
   this.counterEvent.emit(this.counter)
}
步驟 3:子元件的完整列表如下:
import { Component, Input, Output, EventEmitter } from '@angular/core';

@Component({
   selector: 'app-in-out-child-sample',
   templateUrl: './in-out-child-sample.component.html',
   styleUrls: ['./in-out-child-sample.component.css']
})
export class InOutChildSampleComponent {
   @Input() counter : number = 0;
   @Output() counterEvent = new EventEmitter<number>();

   passCounterToParent() {
      this.counterEvent.emit(this.counter)
   }

}
步驟 4:開啟子元件模板 in-out-child-sample.component.html,並新增一個按鈕,以便在使用者單擊按鈕時呼叫 counter 事件
<div>
  <p>Counter: {{counter}}</p>
  <button (click)="passCounterToParent()">Pass Counter to Parent</button>
</div>
這裡:
click 是按鈕點選事件,當它被點選時,它被配置為執行 passCounterToParent() 函式。
步驟5:在父元件中新增一個變數來儲存從子元件透過事件傳遞的輸出資料。
childCounter: number = 0;
步驟6:在父元件中新增一個函式來獲取從子元件透過事件傳遞的輸出資料。
get(val: number) {
   this.childCounter = val;
}
步驟7:父元件的完整程式碼如下所示:
import { Component } from '@angular/core';

@Component({
   selector: 'app-in-out-sample',
   templateUrl: './in-out-sample.component.html',
   styleUrls: ['./in-out-sample.component.css']
})
export class InOutSampleComponent {
   counter: number = 10;
   childCounter: number = 0;
   inc() {
      this.counter++
   }
   get(val: number) {
      this.childCounter = val;
   }
}
步驟8:開啟父元件模板檔案,in-out-sample.component.html,並訂閱子元件的事件 counterEvent,並將 get 方法設定為回撥函式,如下所示:
<button (click)="inc()">Increment counter</button>
<p>Data from child: {{childCounter}}</p>
<app-in-out-child-sample [counter]="counter" (counterEvent)="get($event)" />
這裡:
counterEvent 是來自子元件的事件。
get($event) 是回撥函式。$event 將儲存當前計數器的值。
childContent 是來自子元件的資料。
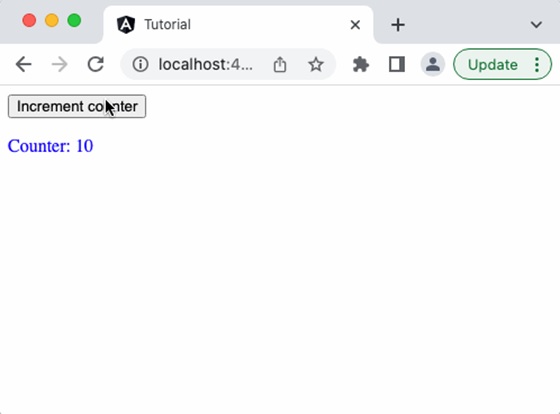
步驟9:最後,執行應用程式,您將看到當單擊子元件中的按鈕時,子元件會將更新後的計數器值傳送到父元件。

父元件操作子元件
父元件可以透過區域性變數和 @ViewChild 裝飾器完全訪問子元件。這兩種技術的關鍵區別在於,在區域性變數的概念中,父元件僅在其模板中訪問子元件。但在 @ViewChild 概念中,父元件也將在其類環境中訪問子元件。這使得父元件也可以在其方法中利用子元件的功能,產生了巨大的差異。
使用區域性變數
讓我們建立兩個元件,ParentCounterComponent 和 ChildCounterComponent,來理解這個概念。ParentCounterComponent 的目的是透過兩個按鈕(增加和減少按鈕)提供計數器功能。增加按鈕將增加計數器,減少按鈕將減少計數器。父元件將從子元件獲取增加和減少功能,而不是自己實現。
步驟1:使用 Angular CLI 建立父元件 ParentCounterComponent,如下所示:
$ ng generate component ParentCounter
CREATE src/app/parent-counter/parent-counter.component.css (0 bytes)
CREATE src/app/parent-counter/parent-counter.component.html (29 bytes)
CREATE src/app/parent-counter/parent-counter.component.spec.ts (609 bytes)
CREATE src/app/parent-counter/parent-counter.component.ts (233 bytes)
UPDATE src/app/app.module.ts (1701 bytes)
步驟2:使用 Angular CLI 建立子元件 ChildCounterComponent,如下所示:
ng generate component ChildCounter
CREATE src/app/child-counter/child-counter.component.css (0 bytes)
CREATE src/app/child-counter/child-counter.component.html (28 bytes)
CREATE src/app/child-counter/child-counter.component.spec.ts (602 bytes)
CREATE src/app/child-counter/child-counter.component.ts (229 bytes)
UPDATE src/app/app.module.ts (1809 bytes)
步驟3:在子元件中宣告一個變數 counter。
counter: number = 0
步驟4:在子元件中實現增加功能。
inc() { this.counter++ }
這裡,inc() 方法只是使用自增運算子增加計數器。
步驟5:在子元件中實現減少功能。
dec() { this.counter-- }
這裡,dec() 方法只是使用自減運算子減少計數器。
步驟6:子元件的完整程式碼如下所示:
import { Component } from '@angular/core';

@Component({
   selector: 'app-child-counter',
   templateUrl: './child-counter.component.html',
   styleUrls: ['./child-counter.component.css']
})
export class ChildCounterComponent {
   counter: number = 0

   inc() { this.counter++ }
   dec() { this.counter-- }
}
步驟7:接下來,開啟父元件的模板檔案 parent-counter.component.html,並新增子元件以及一個 id(#child)來訪問子元件。
<app-child-counter #child></app-child-counter>
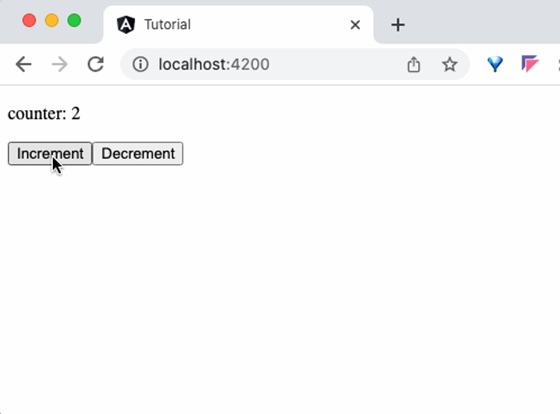
步驟8:接下來,新增兩個按鈕,並將點選事件繫結到透過子識別符號訪問的子元件的 inc() 和 dec() 方法。此外,使用子識別符號顯示計數器的當前值。
<p>counter: {{child.counter}}</p>

<button (click)="child.inc()">Increment</button>
<button (click)="child.dec()">Decrement</button>

<app-child-counter #child></app-child-counter>
步驟9:接下來,將父元件包含在 app 元件的模板中。
<app-parent-counter />
<router-outlet></router-outlet>
步驟10:最後,執行應用程式並檢查計數器是否正常工作。
使用 @ViewChild 裝飾器
讓我們透過建立一個新的元件 VcParentCounterComponent 來擴充套件上面的應用程式,該元件將使用 @ViewChild 概念而不是區域性變數。此方法對子元件沒有任何更改。
步驟1:使用 Angular CLI 建立一個新元件 VcParentCounterComponent,如下所示:
$ ng generate component VcParentCounter
CREATE src/app/vc-parent-counter/vc-parent-counter.component.css (0 bytes)
CREATE src/app/vc-parent-counter/vc-parent-counter.component.html (32 bytes)
CREATE src/app/vc-parent-counter/vc-parent-counter.component.spec.ts (624 bytes)
CREATE src/app/vc-parent-counter/vc-parent-counter.component.ts (244 bytes)
UPDATE src/app/app.module.ts (1931 bytes)
步驟2:從 @angular/core 模組匯入必要的類。
import { Component, ViewChild, AfterViewInit } from '@angular/core';
步驟3:匯入子元件。
import { ChildCounterComponent } from '../child-counter/child-counter.component'
步驟4:實現 AfterViewInit 生命週期鉤子,如下所示。
export class VcParentCounterComponent implements AfterViewInit {
   ngAfterViewInit() {
      // ...
   }
}
步驟5:使用 @ViewChild 訪問子元件,如下所示:
@ViewChild(ChildCounterComponent)
private child! : ChildCounterComponent;
這裡,@ViewChild 裝飾器接受子元件的型別,該型別位於元件的模板中。
步驟6:透過訪問子元件來實現增加和減少功能。
inc() { this.child.inc() }
dec() { this.child.dec() }
這裡,我們使用 this.child 變數來訪問子元件的功能。
步驟7:實現一個計數器功能來檢索當前計數器的值,如下所示:
counter() { return 0; }

ngAfterViewInit() {
   setTimeout(() => this.counter = () => this.child.counter, 0)
}
這裡,我們在 ngAfterViewInit 生命週期鉤子中建立了一個計數器方法。只有在這個生命週期之後,子元件才可用。因此,我們在元件初始化期間建立了一個虛擬計數器方法(需要訪問子元件的計數器值),並在鉤子方法中更新了計數器方法。
步驟8:元件的完整程式碼如下所示:
import { Component, ViewChild, AfterViewInit } from '@angular/core';

import { ChildCounterComponent } from '../child-counter/child-counter.component'

@Component({
   selector: 'app-vc-parent-counter',
   templateUrl: './vc-parent-counter.component.html',
   styleUrls: ['./vc-parent-counter.component.css']
})
export class VcParentCounterComponent implements AfterViewInit {
   @ViewChild(ChildCounterComponent)
   private child! : ChildCounterComponent;

   inc() { this.child.inc() }
   dec() { this.child.dec() }

   counter() { return 0; }

   ngAfterViewInit() {
   setTimeout(() => this.counter = () => this.child.counter, 0)
   }
}
步驟9:接下來,開啟元件的模板檔案 vc-parent-counter-component.html,並新增子元件以及按鈕和方法繫結,如下所示:
<p>counter: {{ counter() }}</p>

<button (click)="inc()">Increment</button>
<button (click)="dec()">Decrement</button>

<app-child-counter></app-child-counter>
這裡,我們沒有包含識別符號,而是使用了父元件的功能而不是子元件的功能(我們在前面的示例中使用區域性變數的概念)。父元件將從子變數獲取所需的功能,該變數是透過 @ViewChild 裝飾器獲取的。
步驟10:接下來,開啟 app 元件的模板並呈現父元件,如下所示:
<app-vc-parent-counter />

<router-outlet></router-outlet>
步驟11:最後,執行應用程式並檢查計數器是否顯示從父元件傳遞的值,如下所示:

父元件和子元件使用公共服務進行互動
服務是 Angular 框架不可分割的一部分。我們可以建立服務來實現特定的功能,然後在任何元件中使用它。服務的最佳用例如下:
- API 呼叫
- 實用程式函式
- 在元件之間共享資料
在本節中,讓我們學習如何使用服務在元件之間共享資料。
透過服務共享資料的常規分步過程如下:
步驟1:在服務中設定任意數量的可觀察變數。
import { Subject } from 'rxjs';

export class MyCounterService {
   private source = new Subject<number>();
   public data$ = this.source.asObservable()
}
這裡:
source 變數使用 Subject 型別建立,Subject 是來自 rxjs 模組的可觀察物件。
呼叫 asObservable 方法來隱藏源序列的身份。
步驟2:在元件中注入所需的服務。
constructor(private myService: MyService) {
}
步驟3:在元件中,訂閱服務中可用的共享資料。
constructor(private myService: MyService) {
   this.myService.data$.subscribe( data => {
      this.data = data;
   })
}
步驟4:使用可觀察物件在服務中實現功能,以便訂閱的元件可以接收更新的資料。
export class MyCounterService {
   update(val: number) { this.data.next(val) }
}
步驟5:像往常一樣在元件及其模板中使用服務資料和方法。當服務資料更新時,Angular 將更新元件。
讓我們透過使用服務實現我們的計數器元件來理解這個概念。
步驟1:使用 Angular CLI 建立一個服務 MyCounterService,如下所示:
$ ng generate service MyCounter
CREATE src/app/my-counter.service.spec.ts (373 bytes)
CREATE src/app/my-counter.service.ts (138 bytes)
步驟2:使用 Angular CLI 建立一個元件 MyCounterServiceComponent,如下所示:
ng generate component MyCounterService
CREATE src/app/my-counter-service/my-counter-service.component.css (0 bytes)
CREATE src/app/my-counter-service/my-counter-service.component.html (33 bytes)
CREATE src/app/my-counter-service/my-counter-service.component.spec.ts (631 bytes)
CREATE src/app/my-counter-service/my-counter-service.component.ts (248 bytes)
UPDATE src/app/app.module.ts (2057 bytes)
步驟3:在服務中建立一個可觀察物件來跟蹤計數器的值,如下所示:
private counterSource = new Subject<number>();
public counter$ = this.counterSource.asObservable()
這裡:
counterSource 是 Subject 型別的變數。Subject 是由 rxjs 庫提供的一個可觀察物件。Subject 可以發射和接收值。
在 counterSource 上呼叫 asObservable 方法來隱藏源序列的身份。
步驟4:實現增加和減少方法,如下所示:
inc(val: number) { this.counterSource.next(val + 1) }
dec(val: number) { this.counterSource.next(val - 1) }
這裡:
counterSource 的 next() 方法用於更新計數器的值。
步驟5:服務 MyCounterService 的完整程式碼如下所示:
import { Injectable } from '@angular/core';
import { Subject } from 'rxjs';

@Injectable({
   providedIn: 'root'
})
export class MyCounterService {
   constructor() { }

   private counterSource = new Subject<number>();
   public counter$ = this.counterSource.asObservable()

   inc(val: number) { this.counterSource.next(val + 1) }
   dec(val: number) { this.counterSource.next(val - 1) }
}
步驟6:透過建構函式在元件中注入服務。
export class MyCounterServiceComponent {
   constructor(private counterService: MyCounterService) {
   }
}
步驟7:透過元件建構函式訂閱服務中可用的可觀察物件,如下所示:
this.counterService.counter$.subscribe( counter => {
   this.counter = counter;
})
這裡,訂閱將在可觀察物件發生更改時更新計數器的值。
步驟8:透過呼叫計數器服務方法來實現增加 (inc()) 和減少 (dec()) 方法,如下所示:
inc() { this.counterService.inc(this.counter) }
dec() { this.counterService.dec(this.counter) }
步驟9:元件 MyCounterServiceComponent 的完整程式碼如下所示:
import { Component } from '@angular/core';
import { MyCounterService } from '../my-counter.service'

@Component({
   selector: 'app-my-counter-service',
   templateUrl: './my-counter-service.component.html',
   styleUrls: ['./my-counter-service.component.css'],
})
export class MyCounterServiceComponent {
   counter: number = 0;

   constructor(private counterService: MyCounterService) {
      this.counterService.counter$.subscribe( counter => {
         this.counter = counter;
      })
   }
   inc() { this.counterService.inc(this.counter) }
   dec() { this.counterService.dec(this.counter) }
}
步驟10:接下來,開啟元件的模板 my-counter-service.component.html 並編寫模板標記以顯示當前計數器的值,然後新增另外兩個按鈕來增加和減少計數器的值。將 inc() 和 dec() 方法分別繫結到增加和減少按鈕的點選事件。
<p>counter: {{counter}}</p>

<button (click)="inc()">Increment</button>
<button (click)="dec()">Decrement</button>
步驟11:接下來,開啟 app 元件的模板並將我們的元件包含在其中,如下所示:
<app-my-counter-service />
<router-outlet></router-outlet>
步驟12:執行應用程式並檢查輸出。
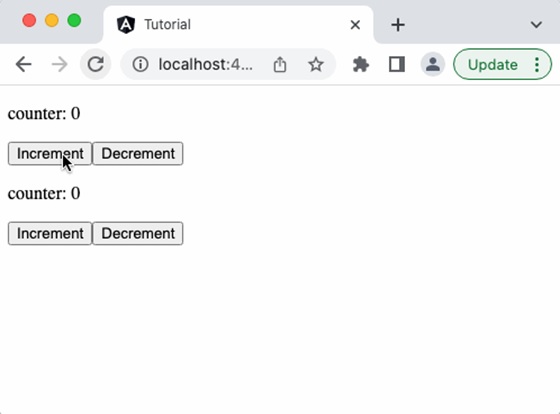
步驟13:接下來,在 app 元件的模板中新增另一個元件,如下所示:
<app-my-counter-service />
<app-my-counter-service />
<router-outlet></router-outlet>
步驟14:執行應用程式,您將看到增加一個元件也會反映在另一個元件中。這是因為它基於同一個服務。
結論
Angular 為元件在其自身內部互動提供了豐富的選項。開發人員可以根據給定的場景選擇合適的方法並獲得所需的輸出。