- Angular 教程
- Angular - 首頁
- Angular - 概述
- Angular - 特性
- Angular - 優點與缺點
- Angular 基礎
- Angular - 環境搭建
- Angular - 第一個應用
- Angular - MVC 架構
- Angular 元件
- Angular - 元件
- Angular - 元件生命週期
- Angular - 檢視封裝
- Angular - 元件互動
- Angular - 元件樣式
- Angular - 巢狀元件
- Angular - 內容投影
- Angular - 動態元件
- Angular - 元素
- Angular 模板
- Angular - 模板
- Angular - 文字插值
- Angular - 模板語句
- Angular - 模板中的變數
- Angular - SVG 作為模板
- Angular 繫結
- Angular - 繫結及其型別
- Angular - 資料繫結
- Angular - 事件繫結
- Angular - 屬性繫結
- Angular - 屬性繫結
- Angular - 類和樣式繫結
- Angular 指令
- Angular - 指令
- Angular - 內建指令
- Angular 管道
- Angular - 管道
- Angular - 使用管道轉換資料
- Angular 依賴注入
- Angular - 依賴注入
- Angular HTTP 客戶端程式設計
- Angular - 服務
- Angular - HTTP 客戶端
- Angular - 請求
- Angular - 響應
- Angular - 獲取
- Angular - PUT
- Angular - DELETE
- Angular - JSON-P
- Angular - 使用 HTTP 進行 CRUD 操作
- Angular 路由
- Angular - 路由
- Angular - 導航
- Angular - Angular Material
- Angular 動畫
- Angular - 動畫
- Angular 表單
- Angular - 表單
- Angular - 表單驗證
- Angular Service Workers & PWA
- Angular - Service Workers & PWA
- Angular 測試
- Angular - 測試概述
- Angular NgModule
- Angular - 模組介紹
- Angular 高階
- Angular - 身份驗證與授權
- Angular - 國際化
- Angular - 可訪問性
- Angular - Web Workers
- Angular - 伺服器端渲染
- Angular - Ivy 編譯器
- Angular - 使用 Bazel 構建
- Angular - 向後相容性
- Angular - 響應式程式設計
- Angular - 指令與元件之間共享資料
- Angular 工具
- Angular - CLI
- Angular 雜項
- Angular - 第三方控制元件
- Angular - 配置
- Angular - 顯示資料
- Angular - 裝飾器和元資料
- Angular - 基本示例
- Angular - 錯誤處理
- Angular - 測試和構建專案
- Angular - 生命週期鉤子
- Angular - 使用者輸入
- Angular - 新特性?
- Angular 有用資源
- Angular - 快速指南
- Angular - 有用資源
- Angular - 討論
Angular - 動態元件
Angular 允許在執行時動態建立元件並在宿主(另一個)元件的特定位置載入。在執行時載入元件為實現高階功能提供了許多機會。例如,橫幅輪播元件可以接受高度定製的橫幅專案,而不是接受符合特定模板的橫幅,這些模板始終是預定義且靜態的。
建立動態元件
讓我們在本節中學習如何在執行時動態建立元件並將其附加到宿主元件。
步驟1:建立一個屬性指令(例如 HelloDirective)。屬性指令的目的是在宿主元件的模板中定位元素(ng-template),動態元件將被注入到該元素中。
import { Directive, ViewContainerRef } from '@angular/core';

@Directive({
   selector: '[appHello]'
})
export class HelloDirective {
}
這裡,
appHello 是用於定位和選擇元素(ng-template)的選擇器。稍後將建立動態元件、初始化它並將其注入到 appHello 元素(ng-template)中。
步驟2:在指令的建構函式中初始化目標元素的檢視元件。
import { Directive, ViewContainerRef } from '@angular/core';

@Directive({
   selector: '[appHello]'
})
export class HelloDirective {
   constructor(public viewContainerRef: ViewContainerRef) { }
}
這裡,
viewContainerRef 是目標元素(ng-template)的檢視容器。它是透過建構函式注入建立的。ViewContainerRef 具有動態建立元件並將其追加到其中的方法。我們將在後面的步驟中學習它。
步驟3:建立一個介面,例如 Hello,以共享我們計劃在執行時動態建立的元件集合的公共屬性。
export interface Hello {
   name: string
}
這裡,
該介面將有助於對元件的共享資訊進行分組。
步驟4:透過實現介面(Hello)建立任意數量的元件。
import { Component, Input } from '@angular/core';
import { Hello } from '../hello'
@Component({
   selector: 'app-my-hello',
   templateUrl: './my-hello.component.html',
   styleUrls: ['./my-hello.component.css']
})
export class MyHelloComponent implements Hello {
   @Input() name : string = 'Everyone';
}
這裡,
MyHelloComponent 實現 Hello 介面
它包含介面屬性,name 作為其輸入之一
my-hello.component.html 將包含元件的檢視
步驟5:接下來,建立宿主元件,例如 MyHostComponent。宿主元件將負責動態建立子元件並將其放置在應用程式的適當位置。
@Component({
   // ...
})
export class MyHostComponent implements OnInit {
}
步驟6:使用步驟 1 中建立的指令(HelloDirective)選擇器 appHello 在元件的模板中設定目標,如下所示:
<ng-template appHello></ng-template>
步驟7:接下來,開始在宿主元件中實現 OnInit 生命週期,如下所示:
@Component({
   // ...
})
export class MyHostComponent implements OnInit {
   ngOnInit() {
      // ...
   }
}
這裡,
ngOnInit 生命週期鉤子將用於建立動態元件並將動態建立的元件追加到指令的檢視元件中
步驟8:使用 @ViewChild 裝飾器和元件中的指令型別(HelloDirective)獲取檢視容器
export class MyHostComponent implements OnInit {
   // ...
   @ViewChild(HelloDirective, {static: true}) helloHost!: HelloDirective;
   // ...
}
這裡,
@ViewChild 將獲取具有 appHello 指令的特定 ng-template 元素並建立其區域性變數。
步驟9:接下來,訪問上一步中建立的目標/宿主元素 (helloHost) 的檢視容器(型別為 ViewContainerRef)
ngOnInit() {
   // ...
   const viewContainerRef = this.helloHost.viewContainerRef;
   viewContainerRef.clear()
   // ...
}
這裡,
從步驟 2 中建立的指令屬性中獲取檢視容器。
clear() 方法用於清除檢視容器的現有內容。
步驟10:接下來,使用 viewContainerRef 物件及其方法建立實現 Hello 介面的任何元件,如下所示:
ngOnInit() {
   // ...
   const compRef = viewContainerRef.createComponent<Hello>(MyHelloComponent);
   // ...
}
這裡,
createComponent() 是 ViewContainerRef 物件的方法,它接受元件的名稱(型別)。它將在執行時建立指定的元件並返回對它的引用。
Hello 是公共介面
MyHelloCompnent 是要動態建立的元件
步驟11:接下來,從引用 (compRef) 物件獲取動態建立的元件的例項並分配輸入 (name),如下所示:
ngOnInit() {
   // ...
   compRef.instance.name = this.name;
}
ngOnInit 鉤子的完整列表如下:
ngOnInit() {
   const viewContainerRef = this.helloHost.viewContainerRef;
   viewContainerRef.clear()

   const compRef = viewContainerRef.createComponent<Hello>(MyHelloComponent);
   compRef.instance.name = this.name;
}
這更像是虛擬碼。我們將在下一節中建立一個即時應用程式。
步驟12:接下來,我們可以將宿主元件用於任何其他元件(在應用程式/根元件的模板中)進行測試,如下所示:
<app-my-host-component name="Angular" />
在實際場景中,我們必須使用邏輯從符合指定介面(Hello)的現有元件列表中找到一個元件。這裡,我們使用了一個靜態元件(MyHelloComponent)來理解。在實際場景中,我們檢查特定條件並從元件列表中載入符合 Hello 介面的相應元件。使用介面不是嚴格必要的,但它將幫助我們更好地理解程式碼並強制執行某些邏輯。
工作示例
讓我們建立一個即時應用程式,以兩種不同的格式(表格和畫廊)顯示員工集合。我們將建立兩個元件,一個用於以表格形式顯示員工,另一個用於以畫廊形式顯示員工。然後,我們將建立一個宿主元件,該元件將根據配置動態載入基於表格的元件或畫廊元件。
讓我們考慮以下員工資訊列表以進行測試。
data = [
   {
      'name': 'John',
      'role': "Manager"
   },
   {
      'name': 'Peter',
      'role': "Marketing Intern"
   },
   {
      'name': 'Mary',
      'role': "Technical Intern"
   },
   {
      'name': 'Jack',
      'role': "Sales Manager"
   },
   {
      'name': 'Jessica',
      'role': "Delivery Head"
   },
]
現在,我們將按照以下步驟建立應用程式。
步驟1:建立一個介面來儲存跨多個動態元件的公共資料
$ ng generate interface DynData
CREATE src/app/dyn-data.ts (29 bytes)
步驟2:建立一個指令,DynSample。指令的目的是在宿主元件模板中定位和選擇檢視容器(動態元件將放置在其中)。
$ ng generate directive DynSample
CREATE src/app/dyn-sample.directive.spec.ts (237 bytes)
CREATE src/app/dyn-sample.directive.ts (147 bytes)
UPDATE src/app/app.module.ts (2142 bytes)
步驟3:建立一個動態元件,DynList。元件的目的是將員工列為畫廊。
$ ng generate component DynList
CREATE src/app/dyn-list/dyn-list.component.css (0 bytes)
CREATE src/app/dyn-list/dyn-list.component.html (23 bytes)
CREATE src/app/dyn-list/dyn-list.component.spec.ts (567 bytes)
CREATE src/app/dyn-list/dyn-list.component.ts (209 bytes)
UPDATE src/app/app.module.ts (2230 bytes)
步驟4:建立一個動態元件,DynTable。元件的目的是以表格格式列出員工。
$ ng generate component DynTable
CREATE src/app/dyn-table/dyn-table.component.css (0 bytes)
CREATE src/app/dyn-table/dyn-table.component.html (24 bytes)
CREATE src/app/dyn-table/dyn-table.component.spec.ts (574 bytes)
CREATE src/app/dyn-table/dyn-table.component.ts (213 bytes)
UPDATE src/app/app.module.ts (2322 bytes)
步驟5:建立一個宿主元件,DynHost。元件的目的是託管 DynList 和 DynTable 中的任何一個元件,具體取決於配置。
$ ng generate component DynHost
CREATE src/app/dyn-host/dyn-host.component.css (0 bytes)
CREATE src/app/dyn-host/dyn-host.component.html (23 bytes)
CREATE src/app/dyn-host/dyn-host.component.spec.ts (567 bytes)
CREATE src/app/dyn-host/dyn-host.component.ts (209 bytes)
UPDATE src/app/app.module.ts (2410 bytes)
步驟6:接下來,開啟 DynSampleDirective 並開始更新程式碼。Angular CLI 生成的程式碼如下:
import { Directive } from '@angular/core';

@Directive({
   selector: '[appDynSample]'
})
export class DynSampleDirective {

   constructor() { }
}
這裡,
屬性指令的目的是在宿主元件的模板中定位元素(ng-template),動態元件將被注入到該元素中。
appDynSample 是用於定位和選擇元素(ng-template)的選擇器。稍後將建立動態元件、初始化它並將其注入到 appHello 元素(ng-template)中。
步驟7:接下來,在指令中初始化檢視元件引用物件(ViewComponentRef),如下所示:
import { Directive, ViewContainerRef } from '@angular/core';

@Directive({
   selector: '[appDynSample]'
})
export class DynSampleDirective {

   constructor(public viewContainerRef: ViewContainerRef) { }

}
這裡,
從 @angular/core 模組匯入 ViewContainerRef
透過建構函式依賴注入初始化 viewContainerRef 物件。viewContainerRef 是宿主元件模板中目標元素(ng-template)的檢視容器。ViewContainerRef 具有動態建立元件並將其追加到其中的方法。我們將在後面的宿主元件中使用它來動態建立 DynListComponent 和 DynTableComponent。
步驟8:接下來,開啟介面 DynData 並新增一個數組屬性 data
export interface DynData {
   data : any[]
}
步驟9:接下來,開啟 DynListComponent 元件並實現 DynData 介面。
import { Component } from '@angular/core';

import { DynData } from '../dyn-data'

@Component({
   selector: 'app-dyn-list',
   templateUrl: './dyn-list.component.html',
   styleUrls: ['./dyn-list.component.css']
})
export class DynListComponent implements DynData {
   data: any[] = []
}
這裡,
匯入 DynData 介面並在類定義中實現它
根據 DynData 介面規範包含 data 屬性
步驟10:接下來,開啟元件的模板並將資料呈現為專案列表
<div class="gallery">
   <div *ngFor="let item of data" class="card">
      <div class="container">
         <h4><b>{{ item.name }}</b></h4>
         <p>{{ item.role }}</p>
      </div>
   </div>
</div>
這裡,
data 儲存具有兩個屬性(名稱和角色)的員工列表
使用 ngFor 將員工顯示為卡片列表
步驟11:接下來,開啟元件的樣式並新增必要的 css,如下所示:
.gallery {
   display: flex;
   flex-wrap: wrap;
   justify-content: left;
   gap: 10px;
}
.card {
   flex-basis: 200px;
   box-shadow: 0 4px 8px 0 rgba(0,0,0,0.2);
}
.card:hover {
   box-shadow: 0 8px 16px 0 rgba(0,0,0,0.2);
}
.container {
   padding: 2px 16px;
   max-width: 200px;
}
這裡,我們使用 CSS 的 flex 功能以畫廊格式顯示員工
步驟12:接下來,開啟 DynTableComponent 元件並實現 DynData 介面。
import { Component } from '@angular/core';

import { DynData } from '../dyn-data'

@Component({
   selector: 'app-dyn-table',
   templateUrl: './dyn-table.component.html',
   styleUrls: ['./dyn-table.component.css']
})
export class DynTableComponent implements DynData {
   data: any[] = []
}
這裡,
匯入 DynData 介面並在類定義中實現它
根據 DynData 介面規範包含 data 屬性
步驟13:接下來,開啟元件的模板並將資料呈現為專案列表
<table class="employees">
   <thead>
      <tr>
         <th>Name</th>
         <th>Role</th>
      </tr>
   </thead>
   <tbody>
      <tr *ngFor="let item of data">
         <td>{{ item.name }}</td>
         <td>{{ item.role }}</td>
      </tr>
   </tbody>
</table>
這裡,
data 儲存具有兩個屬性(名稱和角色)的員工列表
使用 ngFor 將員工呈現為 html 表格中的行
步驟14:接下來,開啟元件的樣式並新增必要的 css,如下所示:
.employees {
   border-collapse: collapse;
   width: 400px;
}
.employees td, .employees th {
   padding: 8px;
}
.employees tbody tr:nth-child(even){background-color: #f2f2f2;}
.employees tbody tr:hover {background-color: #ddd;}
.employees thead th {
   padding-top: 12px;
   padding-bottom: 12px;
   text-align: left;
   background-color: brown;
   color: white;
}
步驟15:接下來,開啟 DynHostComponent 元件的模板幷包含 DynSampleDirective,如下所示:
<ng-templte appDynSample></ng-template>
這裡,我們使用 DynSample 指令顯示了 ng-template。
步驟16:接下來,開啟 DynHostComponent 並匯入必要的類
import { Component, ViewContainerRef, OnInit, ViewChild, Input } from '@angular/core';
步驟17:接下來,匯入介面、列表元件、表格元件和指令
import { DynData } from '../dyn-data'
import { DynSampleDirective } from '../dyn-sample.directive'
import { DynListComponent } from '../dyn-list/dyn-list.component'
import { DynTableComponent } from '../dyn-table/dyn-table.component'
步驟18:在類宣告中實現 OnInit 生命週期鉤子
export class DynHostComponent implements OnInit {
}
步驟19:宣告一個輸入屬性以從使用者獲取格式資訊(表格/列表)。
@Input() format: string = 'list'
步驟20:宣告一個屬性 data 並設定示例資料
private data = [
   {
      'name': 'John',
      'role': "Manager"
   },
   {
      'name': 'Peter',
      'role': "Marketing Intern"
   },
   {
      'name': 'Mary',
      'role': "Technical Intern"
   },
   {
      'name': 'Jack',
      'role': "Sales Manager"
   },
   {
      'name': 'Jessica',
      'role': "Delivery Head"
   },
]
步驟21:宣告宿主屬性並使用 @ViewChild 和指令型別 DynSampleDirective 從模板獲取 ng-template 檢視元件
@ViewChild(DynSampleDirective, {static: true}) host!: DynSampleDirective;
步驟22:在 ngOnInit 生命週期鉤子中執行動態建立元件並將其載入到 ng-template 中的實際實現
ngOnInit() {
   const viewContainerRef = this.host.viewContainerRef;
   viewContainerRef.clear()

   if(this.format == 'table') {
      const compRef = viewContainerRef.createComponent<DynData>(DynTableComponent);
      compRef.instance.data = this.data;
   } else {
      const compRef = viewContainerRef.createComponent<DynData>(DynListComponent);
      compRef.instance.data = this.data;
   }
}
步驟23:宿主元件的完整列表如下:
import { Component, ViewContainerRef, OnInit, ViewChild, Input } from '@angular/core';

import { DynData } from '../dyn-data'
import { DynSampleDirective } from '../dyn-sample.directive'
import { DynListComponent } from '../dyn-list/dyn-list.component'
import { DynTableComponent } from '../dyn-table/dyn-table.component'

@Component({
   selector: 'app-dyn-host',
   templateUrl: './dyn-host.component.html',
   styleUrls: ['./dyn-host.component.css']
})
export class DynHostComponent implements OnInit {
   @Input() format: string = 'table'

   private data = [
   {
      'name': 'John',
      'role': "Manager"
   },
   {
      'name': 'Peter',
      'role': "Marketing Intern"
   },
   {
      'name': 'Mary',
      'role': "Technical Intern"
   },
   {
      'name': 'Jack',
      'role': "Sales Manager"
   },
   {
      'name': 'Jessica',
      'role': "Delivery Head"
   },
   ]

   @ViewChild(DynSampleDirective, {static: true}) host!: DynSampleDirective;

   ngOnInit() {
      const viewContainerRef = this.host.viewContainerRef;
      viewContainerRef.clear()

      if(this.format == 'table') {
         const compRef = viewContainerRef.createComponent<DynData>(DynTableComponent);
         compRef.instance.data = this.data;
      } else {
         const compRef = viewContainerRef.createComponent<DynData>(DynListComponent);
         compRef.instance.data = this.data;
      }
   }
}
步驟24:接下來,開啟 app 元件的模板幷包含宿主元件。
<app-dyn-host format="table" />
這裡,我們指示宿主元件以表格格式呈現員工資料。宿主元件將動態建立 DynTableComponent 並將其注入到宿主元件模板中。
步驟25:接下來,執行應用程式,您將看到員工資料以表格格式顯示,如下所示:

步驟 26:接下來,開啟應用元件的模板,並將格式更改為相簿。
<app-dyn-host format="gallery" />
在這裡,我們指示宿主元件以相簿格式渲染員工資料。宿主元件將動態建立 DynListComponent 並注入到宿主元件模板中。
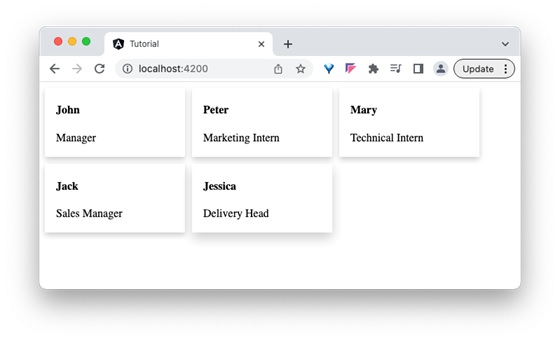
步驟 27:接下來,執行應用程式,您將看到員工資料以如下所示的相簿格式顯示 -
結論
在本節中,我們學習了動態建立元件最重要的和最強大的概念。Angular 通過幾個易於使用的 API 簡化了生成動態元件的過程。它將幫助開發人員專注於應用程式的邏輯,而不是花費時間建立執行時元件。