- WPF 教程
- WPF - 首頁
- WPF - 概述
- WPF - 環境設定
- WPF - Hello World
- WPF - XAML 概述
- WPF - 元素樹
- WPF - 依賴屬性
- WPF - 路由事件
- WPF - 控制元件
- WPF - 佈局
- WPF - 佈局巢狀
- WPF - 輸入
- WPF - 命令列
- WPF - 資料繫結
- WPF - 資源
- WPF - 模板
- WPF - 樣式
- WPF - 觸發器
- WPF - 除錯
- WPF - 自定義控制元件
- WPF - 異常處理
- WPF - 本地化
- WPF - 互動
- WPF - 2D 圖形
- WPF - 3D 圖形
- WPF - 多媒體
- WPF 有用資源
- WPF - 快速指南
- WPF - 有用資源
- WPF - 討論
WPF - 除錯
它是一種系統化的機制,用於識別和修復程式碼中不按預期執行的錯誤或缺陷。除錯子系統緊密耦合的複雜應用程式並非易事,因為修復一個子系統中的錯誤可能會在另一個子系統中產生錯誤。
C#中的除錯
在 WPF 應用程式中,程式設計師處理兩種語言,例如 C# 和 XAML。如果您熟悉任何過程語言(如 C# 或 C/C++)中的除錯,並且還了解斷點的用法,那麼您可以輕鬆除錯應用程式的 C# 部分。
讓我們來看一個簡單的例子來演示如何除錯 C# 程式碼。建立一個名為 WPFDebuggingDemo 的新 WPF 專案。從工具箱中拖動四個標籤、三個文字框和一個按鈕。檢視以下 XAML 程式碼。
<Window x:Class = "WPFDebuggingDemo.Window1"
   xmlns = "http://schemas.microsoft.com/winfx/2006/xaml/presentation"
   xmlns:x = "http://schemas.microsoft.com/winfx/2006/xaml"
   Title = "Window1" Height = "400" Width = "604">

   <Grid>
      <TextBox Height = "23" Margin = "0,44,169,0" Name = "textBox1"
         VerticalAlignment = "Top" HorizontalAlignment = "Right" Width = "120" />

      <TextBox Height = "23" Margin = "0,99,169,0" Name = "textBox2"
         VerticalAlignment = "Top" HorizontalAlignment = "Right" Width = "120" />

      <TextBox HorizontalAlignment = "Right" Margin = "0,153,169,0"
         Name = "textBox3" Width = "120" Height = "23" VerticalAlignment = "Top" />

      <Label Height = "28" Margin = "117,42,0,0" Name = "label1"
         VerticalAlignment = "Top" HorizontalAlignment = "Left" Width = "120">
         Item 1</Label>

      <Label Height = "28" HorizontalAlignment = "Left"
         Margin = "117,99,0,0" Name = "label2" VerticalAlignment = "Top" Width = "120">
         Item 2</Label>

      <Label HorizontalAlignment = "Left" Margin = "117,153,0,181"
         Name = "label3" Width = "120">Item 3</Label>

      <Button Height = "23" HorizontalAlignment = "Right" Margin = "0,0,214,127"
         Name = "button1" VerticalAlignment = "Bottom" Width = "75"
         Click = "button1_Click">Total</Button>

      <Label Height = "28" HorizontalAlignment = "Right"
         Margin = "0,0,169,66" Name = "label4" VerticalAlignment = "Bottom" Width = "120"/>

   </Grid>

</Window>
以下是實現了按鈕單擊事件的 C# 程式碼。
using System;
using System.Collections.Generic;
using System.Linq;
using System.Text;

using System.Windows;
using System.Windows.Controls;
using System.Windows.Data;
using System.Windows.Documents;
using System.Windows.Input;
using System.Windows.Media;
using System.Windows.Media.Imaging;
using System.Windows.Navigation;
using System.Windows.Shapes;

namespace WPFDebuggingDemo {
   /// <summary>
      /// Interaction logic for Window1.xaml
   /// </summary>

   public partial class Window1 : Window {

      public Window1() {
         InitializeComponent();
      }

      private void button1_Click(object sender, RoutedEventArgs e) {

         if (textBox1.Text.Length > 0 && textBox2.Text.Length > 0 && textBox2.Text.Length > 0) {
            double total = Convert.ToDouble(textBox1.Text) +
            Convert.ToDouble(textBox2.Text) + Convert.ToDouble(textBox3.Text);
            label4.Content = total.ToString();
         }
         else {
            MessageBox.Show("Enter the value in all field.");
         }
      }
   }
}
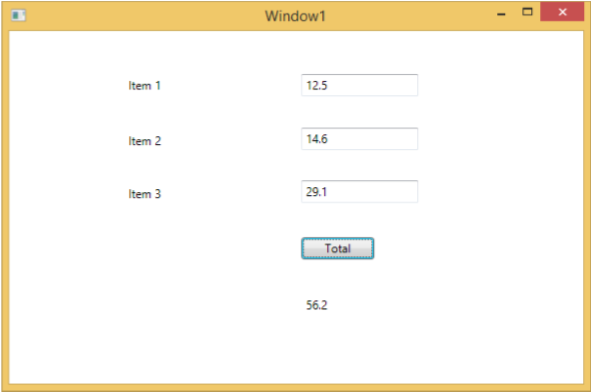
編譯並執行上述程式碼後,它將生成以下視窗。現在在文字框中輸入值,然後按“總計”按鈕。您將獲得所有輸入文字框中值的總和。
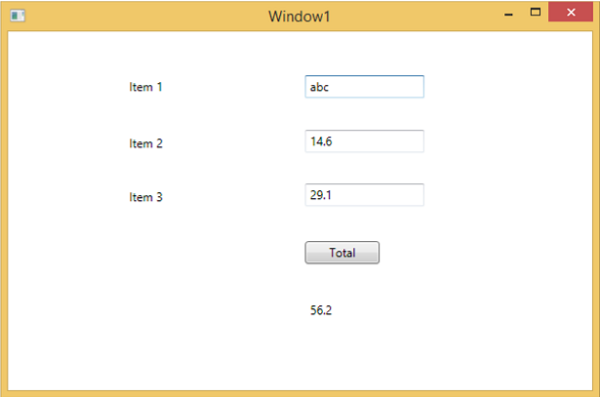
如果您嘗試輸入非數值的值,則上述應用程式將崩潰。要查詢並解決問題(為什麼它會崩潰),您可以在按鈕單擊事件中插入斷點。
讓我們在專案 1 中寫入“abc”,如下所示。
單擊“總計”按鈕後,您將看到程式會在斷點處停止。
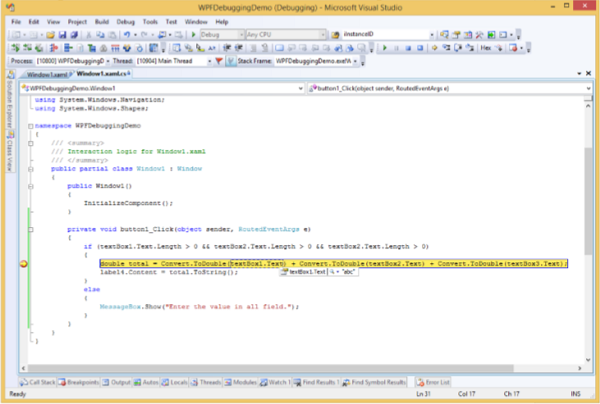
現在將游標移到 textbox1.Text,您將看到程式試圖將 abc 值與其他值相加,這就是程式崩潰的原因。
XAML 中的除錯
如果您期望在 XAML 中進行相同型別的除錯,那麼您會驚訝地發現,目前還無法像除錯其他過程語言程式碼那樣除錯 XAML 程式碼。當您聽到在 XAML 程式碼中進行除錯這個術語時,這意味著嘗試查詢錯誤。
在資料繫結中,您的資料沒有顯示在螢幕上,您不知道為什麼。
或者問題與複雜的佈局有關。
或者對齊問題,或者像 ListBox 和組合框這樣的某些擴充套件模板中的邊距顏色、疊加層等問題。
除錯 XAML 程式通常是為了檢查您的繫結是否有效;如果無效,則檢查錯誤所在。不幸的是,除了 Silverlight 之外,無法在 XAML 繫結中設定斷點,但我們可以使用“輸出”視窗檢查資料繫結錯誤。讓我們來看一下下面的 XAML 程式碼,找出資料繫結中的錯誤。
<Window x:Class = "DataBindingOneWay.MainWindow"
   xmlns = "http://schemas.microsoft.com/winfx/2006/xaml/presentation"
   xmlns:x = "http://schemas.microsoft.com/winfx/2006/xaml"
   Title = "MainWindow" Height = "350" Width = "604">

   <Grid>
      <StackPanel Name = "Display">
         <StackPanel Orientation = "Horizontal" Margin = "50, 50, 0, 0">
            <TextBlock Text = "Name: " Margin = "10" Width = "100"/>
            <TextBlock Margin = "10" Width = "100" Text = "{Binding FirstName}"/>
         </StackPanel>

         <StackPanel Orientation = "Horizontal" Margin = "50,0,50,0">
            <TextBlock Text = "Title: " Margin = "10" Width = "100"/>
            <TextBlock Margin = "10" Width = "100" Text = "{Binding Title}" />
         </StackPanel>

      </StackPanel>
   </Grid>

</Window>
兩個文字塊的 Text 屬性靜態設定為“Name”和“Title”,而其他兩個文字塊的 Text 屬性繫結到“FirstName”和“Title”,但 Employee 類中的類變數是 Name 和 Title,如下所示。
我們故意編寫了一個不正確的變數名,以便了解當沒有顯示所需輸出時,我們可以在哪裡找到這種型別的錯誤。
using System;
using System.Collections.Generic;
using System.Linq;
using System.Text;
using System.Threading.Tasks;

namespace DataBindingOneWay {

   public class Employee {
      public string Name { get; set; }
      public string Title { get; set; }

      public static Employee GetEmployee() {

         var emp = new Employee() {
            Name = "Ali Ahmed", Title = "Developer"
         };

         return emp;
      }
   }
}
以下是 C# 程式碼中 MainWindow 類的實現。
using System;
using System.Windows;
using System.Windows.Controls;

namespace DataBindingOneWay {
   /// <summary>
      /// Interaction logic for MainWindow.xaml
   /// </summary>

   public partial class MainWindow : Window {

      public MainWindow() {
         InitializeComponent();
         DataContext = Employee.GetEmployee();
      }
   }
}
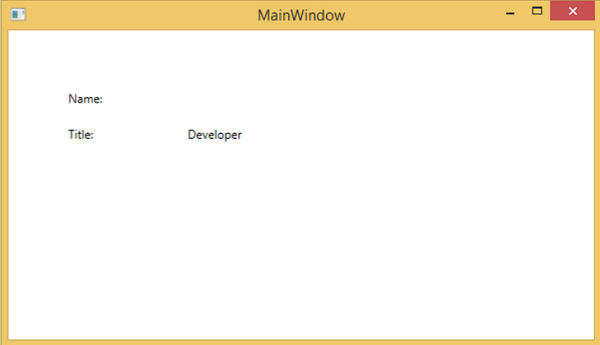
讓我們執行此應用程式,您可以在我們的 MainWindow 中立即看到我們已成功繫結到該 Employee 物件的 Title,但名稱未繫結。
要檢查名稱發生了什麼,讓我們檢視輸出視窗,其中生成了大量日誌。
輕鬆查詢錯誤的方法是搜尋錯誤,您將找到以下錯誤,該錯誤顯示為 “BindingExpression path error: 'FirstName' property not found on 'object' ''Employe”
System.Windows.Data Error: 40 : BindingExpression path error: 'FirstName'
   property not found on 'object' ''Employee' (HashCode=11611730)'.
   BindingExpression:Path = FirstName; DataItem = 'Employee' (HashCode = 11611730);
   target element is 'TextBlock' (Name=''); target property is 'Text' (type 'String')
這清楚地表明 FirstName 不是 Employee 類的成員,因此它有助於修復應用程式中的此類問題。
將 FirstName 更改回 Name 後,您將看到所需的輸出。
XAML 的 UI 除錯工具
隨著 Visual Studio 2015 的推出,為 XAML 引入了 UI 除錯工具,用於檢查執行時的 XAML 程式碼。藉助這些工具,XAML 程式碼以執行的 WPF 應用程式的視覺化樹的形式呈現,以及樹中不同的 UI 元素屬性。要啟用這些工具,請按照以下步驟操作。
- 轉到“工具”選單,然後從“工具”選單中選擇“選項”。
- 它將開啟以下對話方塊。

- 轉到左側“除錯”項下的“常規選項”。
- 選中突出顯示的選項,即“為 XAML 啟用 UI 除錯工具”,然後單擊“確定”按鈕。
現在執行任何 XAML 應用程式或使用以下 XAML 程式碼。
<Window x:Class = "XAMLTestBinding.MainWindow"
   xmlns = "http://schemas.microsoft.com/winfx/2006/xaml/presentation"
   xmlns:x = "http://schemas.microsoft.com/winfx/2006/xaml"
   Title = "MainWindow" Height = "350" Width = "604">

   <StackPanel>
      <ComboBox Name = "comboBox"  Margin = "50" Width = "100">
         <ComboBoxItem Content = "Green" />
         <ComboBoxItem  Content = "Yellow" IsSelected = "True" />
         <ComboBoxItem Content = "Orange" />
      </ComboBox>

      <TextBox  Name = "textBox" Margin = "50" Width = "100" Height = "23"
         VerticalAlignment = "Top" Text  =
         "{Binding ElementName = comboBox, Path = SelectedItem.Content, Mode = TwoWay, UpdateSourceTrigger = PropertyChanged}"
         Background = "{Binding ElementName = comboBox, Path = SelectedItem.Content}">
      </TextBox>

   </StackPanel>

</Window>
執行應用程式時,它將顯示“即時視覺化樹”,其中所有元素都以樹的形式顯示。
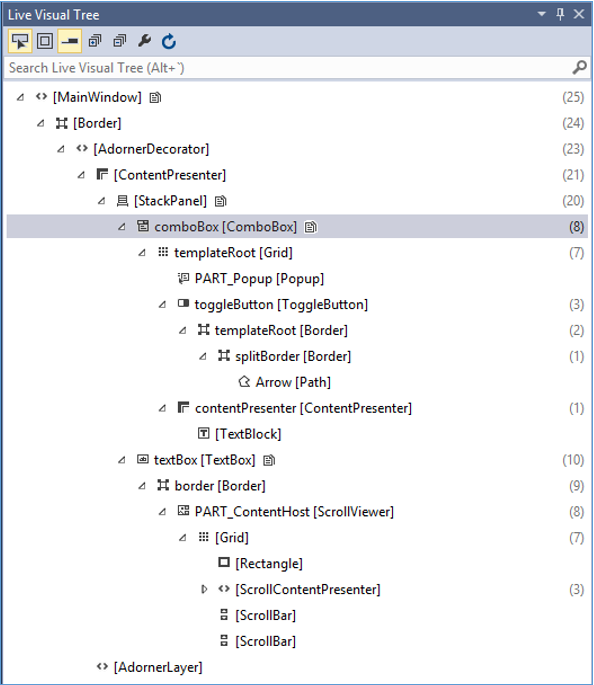
此“即時視覺化樹”顯示完整的佈局結構,以便了解 UI 元素位於何處。但此選項僅在 Visual Studio 2015 中可用。如果您使用的是舊版本的 Visual Studio,則無法使用此工具,但是還有另一個可以與 Visual Studio 整合的工具,例如適用於 Visual Studio 的 XAML Spy。您可以從 xamlspy 下載它