- WPF 教程
- WPF - 主頁
- WPF - 概述
- WPF - 環境設定
- WPF - Hello World
- WPF - XAML 概述
- WPF - 元素樹
- WPF - 依賴屬性
- WPF - 路由事件
- WPF - 控制元件
- WPF - 佈局
- WPF - 佈局巢狀
- WPF - 輸入
- WPF - 命令列
- WPF - 資料繫結
- WPF - 資源
- WPF - 模板
- WPF - 樣式
- WPF - 觸發器
- WPF - 除錯
- WPF - 自定義控制元件
- WPF - 異常處理
- WPF - 本地化
- WPF - 互動
- WPF - 2D 圖形
- WPF - 3D 圖形
- WPF - 多媒體
- WPF 有用資源
- WPF - 快速指南
- WPF - 有用資源
- WPF - 討論
WPF - 3D 圖形
Windows Presentation Foundation (WPF) 提供了一項功能,可以根據您的應用程式要求繪製、轉換和製作 3D 圖形的動畫。它不支援全面的 3D 遊戲開發,但在一定程度上,您可以建立 3D 圖形。
透過組合 2D 和 3D 圖形,您還可以建立豐富多樣的控制元件,提供複雜的資料插圖,或改善應用程式介面的使用者體驗。Viewport3D 元素將 3D 模型置入我們的 WPF 應用程式中。
示例
讓我們透過一個簡單示例來了解如何使用 3D 圖形。
使用名稱 WPF3DGraphics 建立一個新的 WPF 專案。
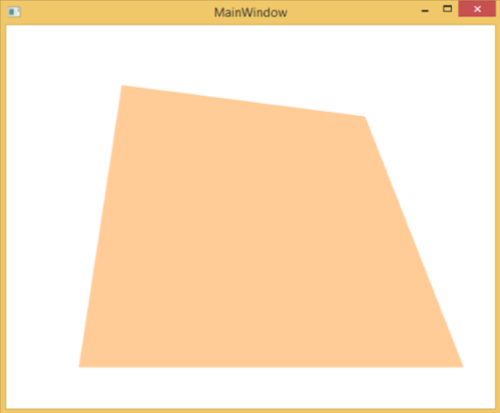
以下 XAML 程式碼展示瞭如何使用 3D 幾何體建立 2D 物件。
<Window x:Class = "WPF3DGraphics.MainWindow"
   xmlns = "http://schemas.microsoft.com/winfx/2006/xaml/presentation"
   xmlns:x = "http://schemas.microsoft.com/winfx/2006/xaml"
   xmlns:mc = "http://schemas.openxmlformats.org/markup-compatibility/2006"
   xmlns:local = "clr-namespace:WPF3DGraphics"
   mc:Ignorable = "d" Title = "MainWindow" Height = "500" Width = "604">

   <Grid>
      <Viewport3D>

         <Viewport3D.Camera>
            <PerspectiveCamera Position = "2,0,10" LookDirection = "0.2,0.4,-1"
               FieldOfView = "65" UpDirection = "0,1,0" />
         </Viewport3D.Camera>

         <ModelVisual3D>
            <ModelVisual3D.Content>
               <Model3DGroup>
                  <AmbientLight Color = "Bisque" />

                  <GeometryModel3D>
                     <GeometryModel3D.Geometry>
                        <MeshGeometry3D Positions = "0,0,0 0,8,0 10,0,0 8,8,0"
                           Normals = "0,0,1 0,0,1 0,0,1 0,0,1" TriangleIndices = "0,2,1 1,2,3"/>
                     </GeometryModel3D.Geometry>

                     <GeometryModel3D.Material>
                        <DiffuseMaterial Brush = "Bisque" />
                     </GeometryModel3D.Material>
                  </GeometryModel3D>

               </Model3DGroup>
            </ModelVisual3D.Content>
         </ModelVisual3D>

      </Viewport3D>
   </Grid>

</Window>
編譯並執行以上程式碼後,它將在 3D 中生成一個 2D 物件。
示例
讓我們來看另一個展示 3D 物件的示例。
使用名稱 WPF3DGraphics1 建立一個新的 WPF 專案
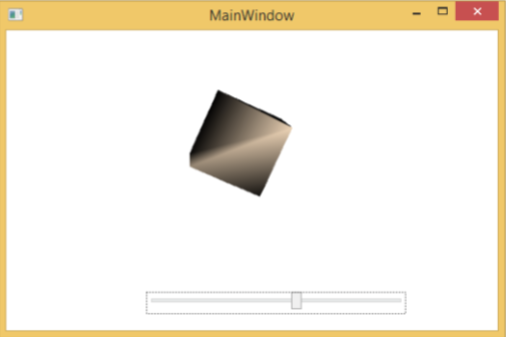
以下 XAML 程式碼建立了一個 3D 物件和一個滑塊。藉助該滑塊,您可以旋轉此 3D 物件。
<Window x:Class = "WPF3DGraphics1.MainWindow"
   xmlns = "http://schemas.microsoft.com/winfx/2006/xaml/presentation"
   xmlns:x = "http://schemas.microsoft.com/winfx/2006/xaml"
   xmlns:d = "http://schemas.microsoft.com/expression/blend/2008"
   xmlns:mc = "http://schemas.openxmlformats.org/markup-compatibility/2006"
   xmlns:local = "clr-namespace:WPF3DGraphics1"
   mc:Ignorable = "d" Title = "MainWindow" Height = "350" Width = "525">

   <Grid>
      <Viewport3D Name="viewport3D1">

         <Viewport3D.Camera>
            <PerspectiveCamera x:Name = "camMain" Position = "6 5 4" LookDirection = "-6 -5 -4">
            </PerspectiveCamera>
         </Viewport3D.Camera>

         <ModelVisual3D>
            <ModelVisual3D.Content>
               <DirectionalLight x:Name = "dirLightMain" Direction = "-1,-1,-1">
               </DirectionalLight>
            </ModelVisual3D.Content>
         </ModelVisual3D>

         <ModelVisual3D x:Name = "MyModel">
            <ModelVisual3D.Content>
               <GeometryModel3D>

                  <GeometryModel3D.Geometry>
                     <MeshGeometry3D x:Name = "meshMain"
                        Positions = "0 0 0  1 0 0  0 1 0  1 1 0  0 0 1  1 0 1  0 1 1  0 1 1"
                        TriangleIndices = "2 3 1  3 1 0  7 1 3  7 5 1  6 5 7  6 4 5  6 2 0
                        2 0 4  2 7 3  2 6 7  0 1 5  0 5 4">
                     </MeshGeometry3D>
                  </GeometryModel3D.Geometry>

                  <GeometryModel3D.Material>
                     <DiffuseMaterial x:Name = "matDiffuseMain">
                        <DiffuseMaterial.Brush>
                           <SolidColorBrush Color = "Bisque"/>
                        </DiffuseMaterial.Brush>
                     </DiffuseMaterial>
                  </GeometryModel3D.Material>

               </GeometryModel3D>
            </ModelVisual3D.Content>

            <ModelVisual3D.Transform>
               <RotateTransform3D>
                  <RotateTransform3D.Rotation>
                     <AxisAngleRotation3D x:Name = "rotate" Axis = "1 2 1"/>
                  </RotateTransform3D.Rotation>
               </RotateTransform3D>
            </ModelVisual3D.Transform>

         </ModelVisual3D>
      </Viewport3D>

      <Slider Height = "23" HorizontalAlignment = "Left"
         Margin = "145,271,0,0" Name = "slider1"
         VerticalAlignment = "Top" Width = "269"
         Maximum = "360"
         Value = "{Binding ElementName = rotate, Path=Angle}" />

   </Grid>

</Window>
執行應用程式後,它將在您的視窗中生成一個 3D 物件和一個滑塊。

滑動該滑塊時,您視窗上的物件也將旋轉。
我們建議您執行上述程式碼並嘗試更多 3D 幾何體。
廣告