- WPF 教程
- WPF - 首頁
- WPF - 概述
- WPF - 環境設定
- WPF - Hello World
- WPF - XAML 概述
- WPF - 元素樹
- WPF - 依賴屬性
- WPF - 路由事件
- WPF - 控制元件
- WPF - 佈局
- WPF - 佈局巢狀
- WPF - 輸入
- WPF - 命令列
- WPF - 資料繫結
- WPF - 資源
- WPF - 模板
- WPF - 樣式
- WPF - 觸發器
- WPF - 除錯
- WPF - 自定義控制元件
- WPF - 異常處理
- WPF - 本地化
- WPF - 互動
- WPF - 二維圖形
- WPF - 3D 圖形
- WPF - 多媒體
- WPF 有用資源
- WPF - 快速指南
- WPF - 有用資源
- WPF - 討論
WPF - 二維圖形
WPF 提供了廣泛的二維圖形,可以根據您的應用程式需求進行增強。WPF 支援繪圖和形狀物件,這些物件用於繪製圖形內容。
形狀和繪圖
Shape 類派生自 FrameworkElement 類,Shape 物件可以在面板和大多數控制元件內使用。
WPF 提供了一些基本的形狀物件,這些物件派生自 Shape 類,例如 Ellipse、Line、Path、Polygon、Polyline 和 Rectangle。
另一方面,繪圖物件不派生自 FrameworkElement 類,並提供更輕量級的實現。
與 Shape 物件相比,繪圖物件更簡單。它們也具有更好的效能特性。
示例
讓我們來看一個簡單的例子,瞭解如何使用不同的形狀物件。
建立一個名為 WPF2DGraphics 的新 WPF 專案。
以下程式碼建立了不同型別的形狀。
<Window x:Class = "WPF2DGraphics.MainWindow"
   xmlns = "http://schemas.microsoft.com/winfx/2006/xaml/presentation"
   xmlns:x = "http://schemas.microsoft.com/winfx/2006/xaml"
   xmlns:d = "http://schemas.microsoft.com/expression/blend/2008"
   xmlns:mc = "http://schemas.openxmlformats.org/markup-compatibility/2006"
   xmlns:local = "clr-namespace:WPF2DGraphics"
   xmlns:PresentationOptions = "http://schemas.microsoft.com/winfx/2006/xaml/present ation/options"
   mc:Ignorable = "PresentationOptions" Title = "MainWindow" Height = "400" Width = "604">

   <StackPanel>
      <Ellipse Width = "100" Height = "60" Name = "sample" Margin = "10">
         <Ellipse.Fill>
            <RadialGradientBrush>
               <GradientStop Offset = "0" Color = "AliceBlue"/>
               <GradientStop Offset = "1" Color = "Gray"/>
               <GradientStop Offset = "2" Color = "Red"/>
            </RadialGradientBrush>
         </Ellipse.Fill>
      </Ellipse>

      <Path Stroke = "Red" StrokeThickness = "5" Data = "M 10,70 L 200,70"
         Height = "42.085" Stretch = "Fill" Margin = "140.598,0,146.581,0" />
      <Path Stroke = "BlueViolet" StrokeThickness = "5" Data = "M 20,100 A 100,56 42 1 0 200,10"
         Height = "81.316" Stretch = "Fill" Margin = "236.325,0,211.396,0" />

      <Path Fill = "LightCoral" Margin = "201.424,0,236.325,0"
         Stretch = "Fill" Height = "124.929">
         <Path.Data>
            <PathGeometry>
               <PathFigure StartPoint = "50,0" IsClosed = "True">
                  <LineSegment Point = "100,50"/>
                  <LineSegment Point = "50,100"/>
                  <LineSegment Point = "0,50"/>
               </PathFigure>
            </PathGeometry>
         </Path.Data>
      </Path>

   </StackPanel>

</Window>
編譯並執行上述程式碼後,它將生成一個橢圓、一條直線、一條弧線和一個多邊形。

示例
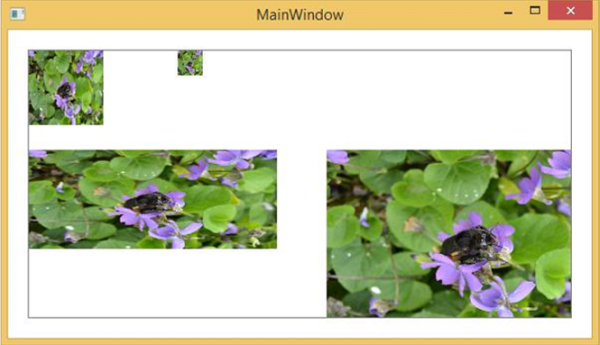
讓我們再看一個示例,該示例演示如何使用繪圖來繪製區域。
建立一個名為 WPF2DGraphics1 的新 WPF 專案。
以下 XAML 程式碼顯示瞭如何使用影像繪製進行不同的繪製。
<Window x:Class = "WPF2DGraphics1.MainWindow"
   xmlns = "http://schemas.microsoft.com/winfx/2006/xaml/presentation"
   xmlns:x = "http://schemas.microsoft.com/winfx/2006/xaml"
   xmlns:d = "http://schemas.microsoft.com/expression/blend/2008"
   xmlns:PresentationOptions = "http://schemas.microsoft.com/winfx/2006/xaml/present ation/options"
   xmlns:mc = "http://schemas.openxmlformats.org/markup-compatibility/2006"
   mc:Ignorable = "PresentationOptions"
   xmlns:local = "clr-namespace:WPF2DGraphics1" Title = "MainWindow" Height = "350" Width = "604">

   <Grid>
      <Border BorderBrush = "Gray" BorderThickness = "1"
         HorizontalAlignment = "Left" VerticalAlignment = "Top"
         Margin = "20">

         <Image Stretch = "None">
            <Image.Source>
               <DrawingImage PresentationOptions:Freeze = "True">

                  <DrawingImage.Drawing>
                     <DrawingGroup>
                        <ImageDrawing Rect = "300,100,300,180" ImageSource = "Images\DSC_0104.JPG"/>
                        <ImageDrawing Rect = "0,100,250,100" ImageSource = "Images\DSC_0104.JPG"/>
                        <ImageDrawing Rect = "150,0,25,25" ImageSource = "Images\DSC_0104.JPG"/>
                        <ImageDrawing Rect = "0,0,75,75" ImageSource = "Images\DSC_0104.JPG"/>
                     </DrawingGroup>
                  </DrawingImage.Drawing>

               </DrawingImage>
            </Image.Source>
         </Image>

      </Border>
   </Grid>

</Window>
執行應用程式後,將生成以下輸出:
建議您執行上述程式碼並嘗試更多 2D 形狀和繪圖。
廣告