
- Selenium 教程
- Selenium - 首頁
- Selenium - 概述
- Selenium - 元件
- Selenium - 自動化測試
- Selenium - 環境設定
- Selenium - 遠端控制
- Selenium IDE 教程
- Selenium - IDE 簡介
- Selenium - 特性
- Selenium - 限制
- Selenium - 安裝
- Selenium - 建立測試
- Selenium - 建立指令碼
- Selenium - 控制流
- Selenium - 儲存變數
- Selenium - 警報和彈出視窗
- Selenium - Selenese 命令
- Selenium - 操作命令
- Selenium - 訪問器命令
- Selenium - 斷言命令
- Selenium - Assert/Verify 方法
- Selenium - 定位策略
- Selenium - 指令碼除錯
- Selenium - 驗證點
- Selenium - 模式匹配
- Selenium - JSON 資料檔案
- Selenium - 瀏覽器執行
- Selenium - 使用者擴充套件
- Selenium - 程式碼匯出
- Selenium - 程式碼輸出
- Selenium - JavaScript 函式
- Selenium - 外掛
- Selenium WebDriver 教程
- Selenium - 簡介
- Selenium WebDriver vs RC
- Selenium - 安裝
- Selenium - 第一個測試指令碼
- Selenium - 驅動程式會話
- Selenium - 瀏覽器選項
- Selenium - Chrome 選項
- Selenium - Edge 選項
- Selenium - Firefox 選項
- Selenium - Safari 選項
- Selenium - 雙擊
- Selenium - 右鍵單擊
- Python 中的 HTML 報告
- 處理編輯框
- Selenium - 單個元素
- Selenium - 多個元素
- Selenium Web 元素
- Selenium - 檔案上傳
- Selenium - 定位器策略
- Selenium - 相對定位器
- Selenium - 查詢器
- Selenium - 查詢所有連結
- Selenium - 使用者互動
- Selenium - WebElement 命令
- Selenium - 瀏覽器互動
- Selenium - 瀏覽器命令
- Selenium - 瀏覽器導航
- Selenium - 警報和彈出視窗
- Selenium - 處理表單
- Selenium - 視窗和標籤頁
- Selenium - 處理連結
- Selenium - 輸入框
- Selenium - 單選按鈕
- Selenium - 複選框
- Selenium - 下拉框
- Selenium - 處理 Iframe
- Selenium - 處理 Cookie
- Selenium - 日期時間選擇器
- Selenium - 動態 Web 表格
- Selenium - Actions 類
- Selenium - Action 類
- Selenium - 鍵盤事件
- Selenium - 鍵上/下
- Selenium - 複製和貼上
- Selenium - 處理特殊鍵
- Selenium - 滑鼠事件
- Selenium - 拖放
- Selenium - 筆事件
- Selenium - 滾動操作
- Selenium - 等待策略
- Selenium - 顯式/隱式等待
- Selenium - 支援功能
- Selenium - 多選
- Selenium - 等待支援
- Selenium - 選擇支援
- Selenium - 顏色支援
- Selenium - ThreadGuard
- Selenium - 錯誤和日誌記錄
- Selenium - 異常處理
- Selenium - 雜項
- Selenium - 處理 Ajax 呼叫
- Selenium - JSON 資料檔案
- Selenium - CSV 資料檔案
- Selenium - Excel 資料檔案
- Selenium - 跨瀏覽器測試
- Selenium - 多瀏覽器測試
- Selenium - 多視窗測試
- Selenium - JavaScript 執行器
- Selenium - 無頭執行
- Selenium - 捕獲螢幕截圖
- Selenium - 捕獲影片
- Selenium - 頁面物件模型
- Selenium - 頁面工廠
- Selenium - 記錄和回放
- Selenium - 框架
- Selenium - 瀏覽上下文
- Selenium - DevTools
- Selenium Grid 教程
- Selenium - 概述
- Selenium - 架構
- Selenium - 元件
- Selenium - 配置
- Selenium - 建立測試指令碼
- Selenium - 測試執行
- Selenium - 端點
- Selenium - 自定義節點
- Selenium 報告工具
- Selenium - 報告工具
- Selenium - TestNG
- Selenium - JUnit
- Selenium - Allure
- Selenium 及其他技術
- Selenium - Java 教程
- Selenium - Python 教程
- Selenium - C# 教程
- Selenium - Javascript 教程
- Selenium - Kotlin 教程
- Selenium - Ruby 教程
- Selenium - Maven 和 Jenkins
- Selenium - 資料庫測試
- Selenium - LogExpert 日誌記錄
- Selenium - Log4j 日誌記錄
- Selenium - Robot Framework
- Selenium - AutoIT
- Selenium - Flash 測試
- Selenium - Apache Ant
- Selenium - Github 教程
- Selenium - SoapUI
- Selenium - Cucumber
- Selenium - IntelliJ
- Selenium - XPath
Selenium 與 Ruby 教程
Selenium 可以與多種語言一起使用,例如 Java、Python、Kotlin、JavaScript、Ruby 等。Selenium 廣泛用於 Web 自動化測試。Selenium 是一款開源且可移植的自動化軟體測試工具,用於測試 Web 應用程式。它能夠跨不同的瀏覽器和作業系統執行。Selenium 不僅僅是一個工具,而是一套工具,幫助測試人員更有效地自動化基於 Web 的應用程式。
從 Selenium 4 版本開始,整個架構完全相容 W3C - 全球資訊網聯盟,這意味著 Selenium 4 遵循 W3C 提供的所有標準和指南。
如何使用 Ruby 設定 Selenium?
步驟 1 - 使用以下連結在本地系統中下載並安裝 Ruby:
https://www.ruby-lang.org/en/downloads/.
透過執行以下命令確認已安裝的 Ruby 版本:
ruby -v
執行的命令輸出將表示系統中安裝的 Ruby 版本。
步驟 2 - 從以下連結下載並安裝 Ruby 程式碼編輯器 RubyMine 以編寫和執行 Selenium 測試:
https://www.jetbrains.com/ruby/download.
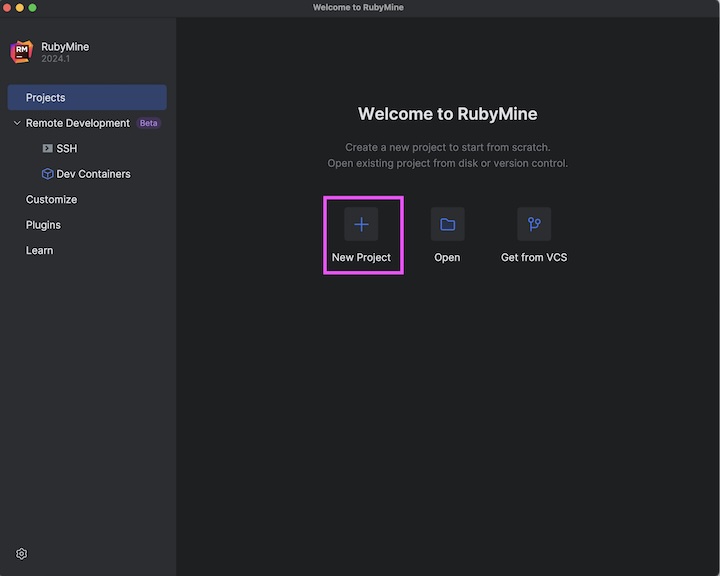
步驟 3 - 啟動 RubyMine 並單擊“新建專案”按鈕。
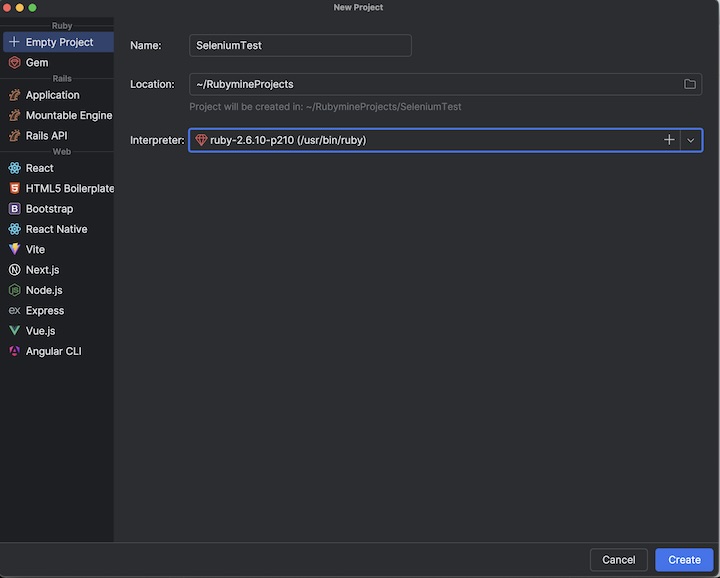
步驟 4 - 輸入專案名稱,例如 SeleniumTest,選擇 Ruby 直譯器,然後單擊“建立”按鈕。
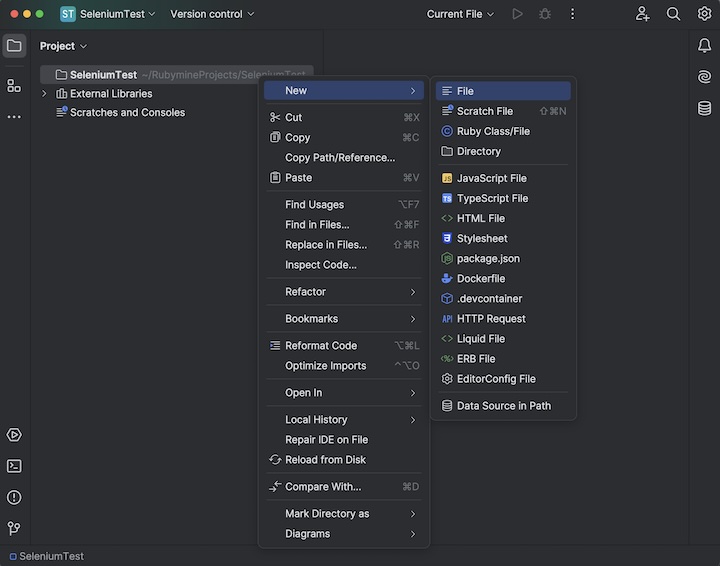
步驟 5 - 右鍵單擊 SeleniumTest 專案,單擊“新建”選項,然後單擊“檔案”選項。
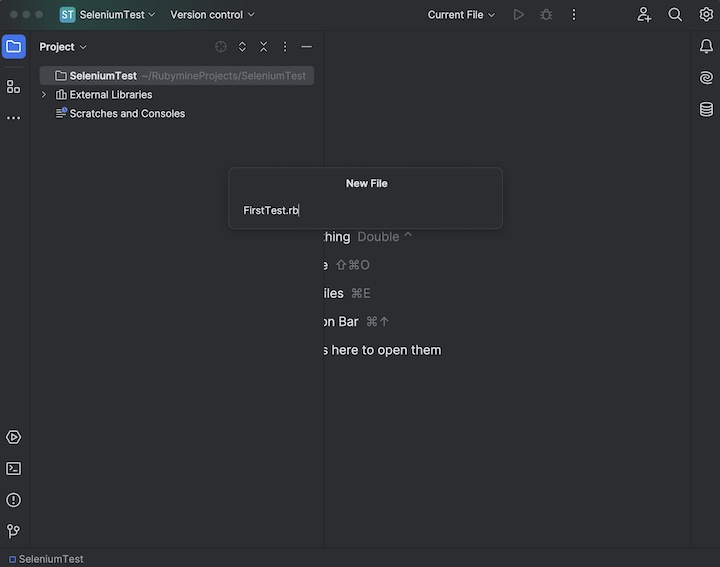
步驟 6 - 在“新建檔案”欄位中輸入檔名,例如 FirstTest.rb,然後按 Enter 鍵。
步驟 7 - 透過在 FirstTest.rb 檔案中新增以下程式碼段確認 Ruby 直譯器是否已正確配置:
puts 'Tutorialspoint'
步驟 8 - 透過右鍵單擊並選擇“執行 FirstTest”選項來執行程式碼。
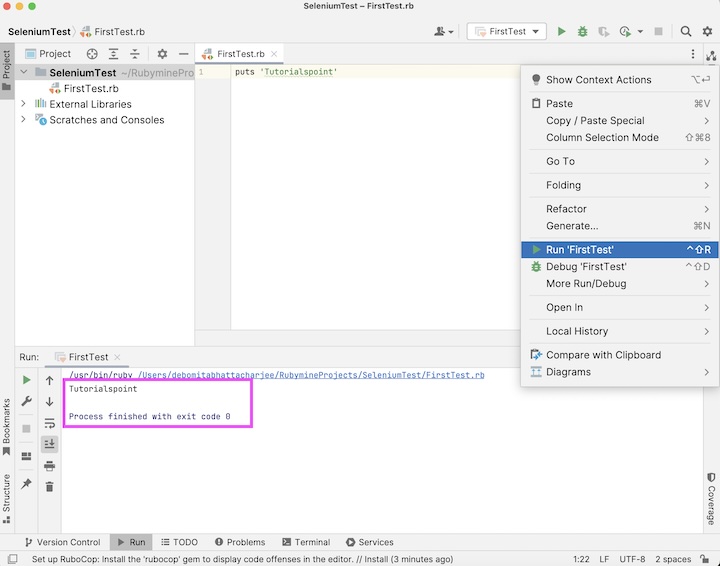
它將顯示以下輸出:
Tutorialspoint

Process finished with exit code 0
在上面的示例中,訊息“Tutorialspoint”已捕獲到控制檯中,並且收到了訊息“程序已退出,退出程式碼為 0”,表示程式碼已成功執行。
步驟 9 - 要安裝 Selenium,請從終端執行以下命令:
gem install selenium-webdriver
步驟 10 - 在 FirstTest.rb 檔案中新增以下程式碼。
require 'selenium-webdriver'

# Initiate Webdriver
driver = Selenium::WebDriver.for :edge

# adding implicit wait of 15 seconds
driver.manage.timeouts.implicit_wait = 15

# launch an application
driver.get 'https://tutorialspoint.tw/selenium/practice/text-box.php'

# get page title
puts 'Page Title: ' + driver.title
它將顯示以下輸出:
Page title: Selenium Practice - Text Box

Process finished with exit code 0
在上面的示例中,我們首先啟動了 Edge 瀏覽器並打開了一個應用程式,然後檢索了瀏覽器標題並在控制檯中顯示訊息“頁面標題:Selenium 實踐 - 文字框”。此外,Chrome 瀏覽器啟動時在頂部顯示訊息“Edge 正在受自動化測試軟體控制”。
最後,收到了訊息“程序已退出,退出程式碼為 0”,表示程式碼已成功執行。
使用 Selenium Ruby 啟動瀏覽器並退出驅動程式
我們可以使用 get 方法啟動瀏覽器並開啟應用程式,最後使用 quit 方法退出瀏覽器。
程式碼實現
require 'selenium-webdriver'

# Initiate Webdriver
driver = Selenium::WebDriver.for :edge

# adding implicit wait of 15 seconds
driver.manage.timeouts.implicit_wait = 15

# launch an application
driver.get 'https://tutorialspoint.tw/selenium/practice/selenium_automation_practice.php'

# get page title
puts 'Browser title after launch: ' + driver.title

# close browser
driver.quit
它將顯示以下輸出:
Browser title after launch: Selenium Practice - Student Registration Form

Process finished with exit code 0
在上面的示例中,我們首先啟動了 Edge 瀏覽器,然後檢索了瀏覽器標題,最後退出了瀏覽器,並在控制檯中收到了訊息“啟動後瀏覽器標題:Selenium 實踐 - 學生登錄檔單”。
最後,收到了訊息“程序已退出,退出程式碼為 0”,表示程式碼已成功執行。
使用 Selenium Ruby 識別元素並檢查其功能
導航到網頁後,我們必須與頁面上可用的 Web 元素進行互動,例如單擊連結/按鈕、在編輯框中輸入文字等,以完成我們的自動化測試用例。
為此,我們的首要任務應該是識別元素。我們可以使用連結的連結文字進行識別,並使用 find_element(name: '<value of name attributes>') 方法。這樣,將返回第一個具有與 name 屬性值匹配的值的元素。
如果不存在具有與 name 屬性值匹配的值的元素,則將丟擲 NoSuchElementException。
讓我們看看下圖中編輯框的 html 程式碼:
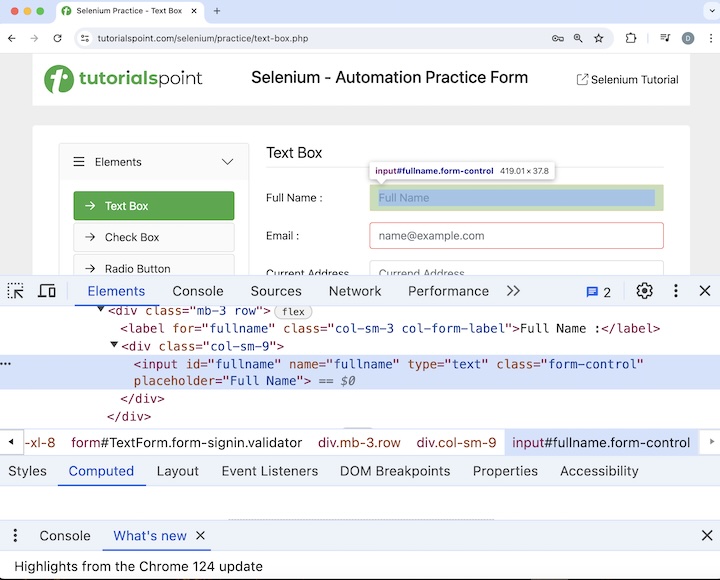
<input id="fullname" name="fullname" type="text" class="form-control" placeholder="Full Name">
上圖中突出顯示的“FullName:”標籤旁邊的編輯框具有一個名為“fullname”的 name 屬性。讓我們在識別它後將文字“Selenium”輸入到此編輯框中。最後我們將退出瀏覽器。
程式碼實現
require 'selenium-webdriver'

# Initiate Webdriver
driver = Selenium::WebDriver.for :edge

# adding implicit wait of 15 seconds
driver.manage.timeouts.implicit_wait = 15

# launch an application
driver.get'https://tutorialspoint.tw/selenium/practice/text-box.php'

# identify element then enter text
name = driver.find_element(:name ,'fullname')
name.send_keys("Selenium")

# close browser
driver.quit
在上面的示例中,我們首先啟動了 Edge 瀏覽器並打開了一個應用程式,然後在輸入框中輸入了文字 Selenium。
最後,收到了訊息“程序已退出,退出程式碼為 0”,表示程式碼已成功執行。
結論
至此,我們完成了有關 Selenium Ruby 教程的全面講解。我們從介紹如何使用 Ruby 設定 Selenium 並使用 Selenium Ruby 退出會話開始,然後介紹瞭如何使用 Selenium Ruby 啟動瀏覽器並退出會話,以及如何使用 Selenium Ruby 識別元素並檢查其功能。
這為您提供了有關 Selenium Ruby 教程的深入知識。明智的做法是不斷練習您學到的知識,並探索與 Selenium 相關的其他內容,以加深您的理解並拓寬您的視野。