
- Selenium 教程
- Selenium - 首頁
- Selenium - 概述
- Selenium - 元件
- Selenium - 自動化測試
- Selenium - 環境設定
- Selenium - 遠端控制
- Selenium IDE 教程
- Selenium - IDE 簡介
- Selenium - 特性
- Selenium - 限制
- Selenium - 安裝
- Selenium - 建立測試
- Selenium - 建立指令碼
- Selenium - 控制流
- Selenium - 儲存變數
- Selenium - 警報和彈出視窗
- Selenium - Selenese 命令
- Selenium - Actions 命令
- Selenium - Accessors 命令
- Selenium - Assertions 命令
- Selenium - Assert/Verify 方法
- Selenium - 定位策略
- Selenium - 指令碼除錯
- Selenium - 驗證點
- Selenium - 模式匹配
- Selenium - JSON 資料檔案
- Selenium - 瀏覽器執行
- Selenium - 使用者擴充套件
- Selenium - 程式碼匯出
- Selenium - 程式碼輸出
- Selenium - JavaScript 函式
- Selenium - 外掛
- Selenium WebDriver 教程
- Selenium - 簡介
- Selenium WebDriver vs RC
- Selenium - 安裝
- Selenium - 第一個測試指令碼
- Selenium - 驅動程式會話
- Selenium - 瀏覽器選項
- Selenium - Chrome 選項
- Selenium - Edge 選項
- Selenium - Firefox 選項
- Selenium - Safari 選項
- Selenium - 雙擊
- Selenium - 右擊
- Python 中的 HTML 報告
- 處理編輯框
- Selenium - 單個元素
- Selenium - 多個元素
- Selenium Web 元素
- Selenium - 檔案上傳
- Selenium - 定位器策略
- Selenium - 相對定位器
- Selenium - 查詢器
- Selenium - 查詢所有連結
- Selenium - 使用者互動
- Selenium - WebElement 命令
- Selenium - 瀏覽器互動
- Selenium - 瀏覽器命令
- Selenium - 瀏覽器導航
- Selenium - 警報和彈出視窗
- Selenium - 處理表單
- Selenium - 視窗和標籤頁
- Selenium - 處理連結
- Selenium - 輸入框
- Selenium - 單選按鈕
- Selenium - 複選框
- Selenium - 下拉框
- Selenium - 處理 iframe
- Selenium - 處理 Cookie
- Selenium - 日期時間選擇器
- Selenium - 動態 Web 表格
- Selenium - Actions 類
- Selenium - Action 類
- Selenium - 鍵盤事件
- Selenium - 鍵上/下
- Selenium - 複製和貼上
- Selenium - 處理特殊鍵
- Selenium - 滑鼠事件
- Selenium - 拖放
- Selenium - 筆事件
- Selenium - 滾動操作
- Selenium - 等待策略
- Selenium - 顯式/隱式等待
- Selenium - 支援特性
- Selenium - 多選
- Selenium - 等待支援
- Selenium - 選擇支援
- Selenium - 顏色支援
- Selenium - ThreadGuard
- Selenium - 錯誤和日誌記錄
- Selenium - 異常處理
- Selenium - 其他
- Selenium - 處理 Ajax 呼叫
- Selenium - JSON 資料檔案
- Selenium - CSV 資料檔案
- Selenium - Excel 資料檔案
- Selenium - 跨瀏覽器測試
- Selenium - 多瀏覽器測試
- Selenium - 多視窗測試
- Selenium - JavaScript 執行器
- Selenium - 無頭執行
- Selenium - 捕獲螢幕截圖
- Selenium - 捕獲影片
- Selenium - 頁面物件模型
- Selenium - 頁面工廠
- Selenium - 錄製和回放
- Selenium - 框架
- Selenium - 瀏覽上下文
- Selenium - DevTools
- Selenium Grid 教程
- Selenium - 概述
- Selenium - 架構
- Selenium - 元件
- Selenium - 配置
- Selenium - 建立測試指令碼
- Selenium - 測試執行
- Selenium - 端點
- Selenium - 自定義節點
- Selenium 報告工具
- Selenium - 報告工具
- Selenium - TestNG
- Selenium - JUnit
- Selenium - Allure
- Selenium & 其他技術
- Selenium - Java 教程
- Selenium - Python 教程
- Selenium - C# 教程
- Selenium - Javascript 教程
- Selenium - Kotlin 教程
- Selenium - Ruby 教程
- Selenium - Maven & Jenkins
- Selenium - 資料庫測試
- Selenium - LogExpert 日誌記錄
- Selenium - Log4j 日誌記錄
- Selenium - Robot Framework
- Selenium - AutoIT
- Selenium - Flash 測試
- Selenium - Apache Ant
- Selenium - Github 教程
- Selenium - SoapUI
- Selenium - Cucumber
- Selenium - IntelliJ
- Selenium - XPath
- Selenium 其他概念
- Selenium - IE 驅動程式
- Selenium - 自動化框架
- Selenium - 基於關鍵字的框架
- Selenium - 基於資料的框架
- Selenium - 混合驅動框架
- Selenium - SSL 證書錯誤
- Selenium - 替代方案
- Selenium 有用資源
- Selenium - 問答
- Selenium - 快速指南
- Selenium - 有用資源
- Selenium - 自動化實踐
- Selenium - 討論
Selenium WebDriver - 檔案上傳
Selenium WebDriver 可用於自動化需要在網頁上上傳檔案的測試。在 HTML 中,檔案上傳元素由名為input的標籤名稱標識。此外,它應該有一個屬性type,其值為file。
在 HTML 中識別上傳功能
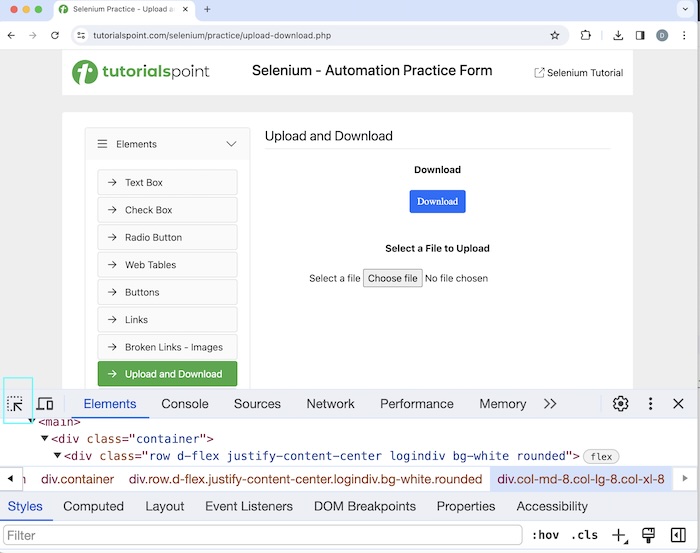
右鍵單擊下面顯示的頁面,然後單擊 Chrome 瀏覽器中的“檢查”按鈕。結果,整個頁面的完整 HTML 程式碼將可見。要檢查頁面上的“選擇檔案”按鈕,請單擊左側向上的箭頭,如下所示。
單擊並將箭頭指向“選擇檔案”文字旁邊的按鈕後,其 HTML 程式碼可見,反映了input標籤名稱及其值為file的type屬性。
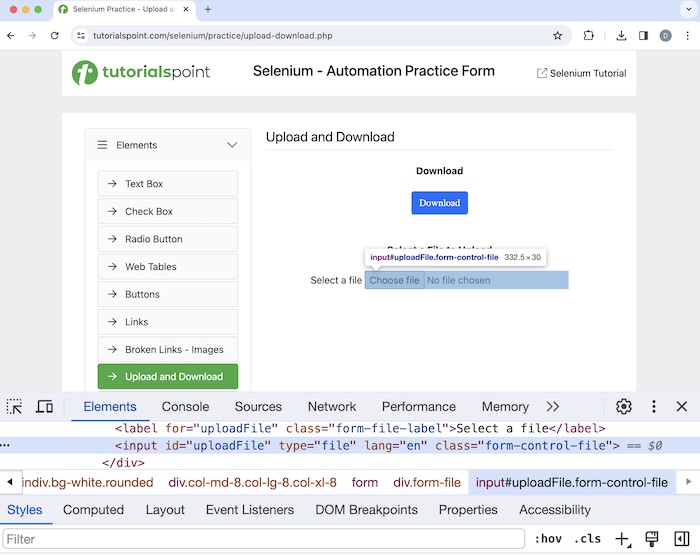
<input id="uploadFile" type="file" lang="en" class="form-control-file">
要上傳檔案,我們將使用sendKeys()方法。要上傳的檔案路徑作為引數傳遞給該方法。
示例
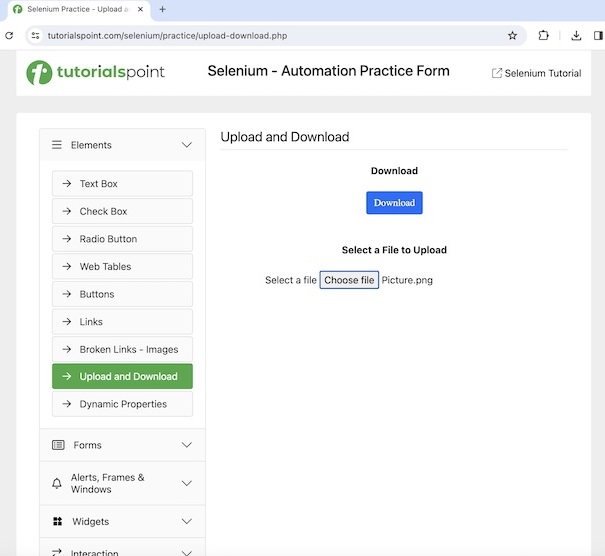
讓我們以下面的頁面為例,我們將透過單擊“選擇檔案”按鈕上傳檔案Picture.png。成功上傳後,檔案Picture.png應該在網頁上可見。
語法
WebDriver driver = new ChromeDriver();

// identify element the element
WebElement l = driver.findElement(By.xpath("value of xpath locator"));

// getting file path to be uploaded
File f = new File("./Picture.png");
System.out.println("Getting the file path to be uploaded: " + f.getAbsolutePath());

// uploading file with path of file uploaded
m.sendKeys(f.getAbsolutePath());
程式碼實現
package org.example;

import org.openqa.selenium.By;
import org.openqa.selenium.WebDriver;
import org.openqa.selenium.WebElement;
import org.openqa.selenium.chrome.ChromeDriver;
import java.io.File;
import java.util.concurrent.TimeUnit;

public class FilesUpload {
   public static void main(String[] args) throws InterruptedException {

      // Initiate the Webdriver
      WebDriver driver = new ChromeDriver();

      // adding implicit wait of 15 secs
      driver.manage().timeouts().implicitlyWait(15, TimeUnit.SECONDS);

      // Opening the webpage where we will upload a file
      driver.get("https://tutorialspoint.tw/selenium/practice/upload-download.php");

      // identify element with xpath for file upload
      WebElement m = driver.findElement(By.xpath("//*[@id='uploadFile']"));

      // getting file path to be uploaded
      File f = new File("./Picture.png");
      System.out.println("Getting the file path to be uploaded: " + f.getAbsolutePath());

      // uploading file with path of file uploaded
      m.sendKeys(f.getAbsolutePath());

      // check if file uploaded successfully
      if (m.getAttribute("value").equalsIgnoreCase("Picture.png")) {
         System.out.println("File uploaded successfully ");
      } else {
         System.out.println("File uploaded unsuccessfully ");
      }

      // Closing browser
      driver.quit();
   }
}
在 pom.xml 檔案中新增的依賴項:
<?xml version="1.0" encoding="UTF-8"?>
<project xmlns="http://maven.apache.org/POM/4.0.0"
   xmlns:xsi="http://www.w3.org/2001/XMLSchema-instance"
   xsi:schemaLocation="http://maven.apache.org/POM/4.0.0
   http://maven.apache.org/xsd/maven-4.0.0.xsd">
   <modelVersion>4.0.0</modelVersion>

   <groupId>org.example</groupId>
   <artifactId>SeleniumJava</artifactId>
   <version>1.0-SNAPSHOT</version>

   <properties>
      <maven.compiler.source>16</maven.compiler.source>
      <maven.compiler.target>16</maven.compiler.target>
      <project.build.sourceEncoding>UTF-8</project.build.sourceEncoding>
   </properties>

   <!-- https://mvnrepository.com/artifact/org.seleniumhq.selenium/selenium-java -->
   <dependencies>
      <dependency>
         <groupId>org.seleniumhq.selenium</groupId>
         <artifactId>selenium-java</artifactId>
         <version>4.11.0</version>
      </dependency>
   </dependencies>
</project>
輸出
Getting the file path to be uploaded: /Users/IdeaProjects/Selenium Java/./Picture.png
File uploaded unsuccessfully

Process finished with exit code 0
在上面的示例中,我們獲得了要上傳的檔案路徑以及控制檯中的訊息 - 正在獲取要上傳的檔案路徑:/Users/IdeaProjects/Selenium Java/./Picture.png。然後我們成功上傳了檔案,控制檯中的訊息為 - 檔案上傳失敗。
最後,收到訊息程序已完成,退出程式碼為 0,表示程式碼已成功執行。
檔案路徑錯誤的異常
讓我們再舉一個例子,其中將錯誤的檔案路徑作為引數傳遞給 sendKeys() 方法(即要上傳的檔名為Picture1.png而不是 Picture.png)。在這種情況下,檔案將不會上傳,並且會丟擲異常。
示例
package org.example;

import org.openqa.selenium.By;
import org.openqa.selenium.WebDriver;
import org.openqa.selenium.WebElement;
import org.openqa.selenium.chrome.ChromeDriver;
import java.io.File;
import java.util.concurrent.TimeUnit;

public class FilesExcUpload {
   public static void main(String[] args) throws InterruptedException {

      // Initiate the Webdriver
      WebDriver driver = new ChromeDriver();

      // adding implicit wait of 15 secs
      driver.manage().timeouts().implicitlyWait(15, TimeUnit.SECONDS);

      // Opening the webpage where we will upload a file
      driver.get("https://tutorialspoint.tw/selenium/practice/upload-download.php");

      // identify element with xpath for file upload
      WebElement m = driver.findElement(By.xpath("//*[@id='uploadFile']"));

      // getting file path to be uploaded
      File f = new File("./Picture1.png");
      System.out.println("Getting the file path to be uploaded: " + f.getAbsolutePath());

      // uploading file with path of file uploaded
      m.sendKeys(f.getAbsolutePath());

      // check if file uploaded successfully
      if (m.getAttribute("value").equalsIgnoreCase("Picture1.png")) {
         System.out.println("File uploaded successfully ");
      } else {
         System.out.println("File uploaded unsuccessfully ");
      }

      // Closing browser
      driver.quit();
   }
}
輸出
Getting the file path to be uploaded:
   /Users/IdeaProjects/Selenium Java/./Picture1.png
Exception in thread "main"
   org.openqa.selenium.InvalidArgumentException: invalid argument:
   File not found : /Users/IdeaProjects/Selenium Java/./Picture1.png

Process finished with exit code 1
在上面的示例中,我們獲得了要上傳的檔案路徑以及控制檯中的訊息 - 正在獲取要上傳的檔案路徑:/Users/IdeaProjects/Selenium Java/./Picture1.png。然後由於傳送了錯誤的檔案路徑進行上傳,因此收到異常。
最後,收到訊息程序已完成,退出程式碼為 1,表示程式碼執行失敗。
結論
本教程全面介紹了 Selenium WebDriver 檔案上傳。我們從描述如何在 HTML 中識別上傳功能開始,並透過示例來說明如何在 Selenium WebDriver 中上傳檔案。這使您深入瞭解 Selenium WebDriver 檔案上傳。明智的做法是繼續練習您所學的內容,並探索與 Selenium 相關的其他內容,以加深您的理解並拓寬您的視野。