
- Selenium 教程
- Selenium - 首頁
- Selenium - 概述
- Selenium - 元件
- Selenium - 自動化測試
- Selenium - 環境設定
- Selenium - 遠端控制
- Selenium IDE 教程
- Selenium - IDE 簡介
- Selenium - 特性
- Selenium - 限制
- Selenium - 安裝
- Selenium - 建立測試
- Selenium - 建立指令碼
- Selenium - 控制流
- Selenium - 儲存變數
- Selenium - 警報和彈出視窗
- Selenium - Selenese 命令
- Selenium - 操作命令
- Selenium - 訪問器命令
- Selenium - 斷言命令
- Selenium - 斷言/驗證方法
- Selenium - 定位策略
- Selenium - 指令碼除錯
- Selenium - 驗證點
- Selenium - 模式匹配
- Selenium - JSON 資料檔案
- Selenium - 瀏覽器執行
- Selenium - 使用者擴充套件
- Selenium - 程式碼匯出
- Selenium - 程式碼輸出
- Selenium - JavaScript 函式
- Selenium - 外掛
- Selenium WebDriver 教程
- Selenium - 簡介
- Selenium WebDriver vs RC
- Selenium - 安裝
- Selenium - 第一個測試指令碼
- Selenium - 驅動程式會話
- Selenium - 瀏覽器選項
- Selenium - Chrome 選項
- Selenium - Edge 選項
- Selenium - Firefox 選項
- Selenium - Safari 選項
- Selenium - 雙擊
- Selenium - 右鍵單擊
- Python 中的 HTML 報告
- 處理編輯框
- Selenium - 單個元素
- Selenium - 多個元素
- Selenium Web 元素
- Selenium - 檔案上傳
- Selenium - 定位器策略
- Selenium - 相對定位器
- Selenium - 查詢器
- Selenium - 查詢所有連結
- Selenium - 使用者互動
- Selenium - WebElement 命令
- Selenium - 瀏覽器互動
- Selenium - 瀏覽器命令
- Selenium - 瀏覽器導航
- Selenium - 警報和彈出視窗
- Selenium - 處理表單
- Selenium - 視窗和選項卡
- Selenium - 處理連結
- Selenium - 輸入框
- Selenium - 單選按鈕
- Selenium - 複選框
- Selenium - 下拉框
- Selenium - 處理 IFrame
- Selenium - 處理 Cookie
- Selenium - 日期時間選擇器
- Selenium - 動態 Web 表格
- Selenium - Actions 類
- Selenium - Action 類
- Selenium - 鍵盤事件
- Selenium - 鍵上/下
- Selenium - 複製和貼上
- Selenium - 處理特殊鍵
- Selenium - 滑鼠事件
- Selenium - 拖放
- Selenium - 筆事件
- Selenium - 滾動操作
- Selenium - 等待策略
- Selenium - 顯式/隱式等待
- Selenium - 支援功能
- Selenium - 多選
- Selenium - 等待支援
- Selenium - 選擇支援
- Selenium - 顏色支援
- Selenium - ThreadGuard
- Selenium - 錯誤和日誌記錄
- Selenium - 異常處理
- Selenium - 雜項
- Selenium - 處理 Ajax 呼叫
- Selenium - JSON 資料檔案
- Selenium - CSV 資料檔案
- Selenium - Excel 資料檔案
- Selenium - 跨瀏覽器測試
- Selenium - 多瀏覽器測試
- Selenium - 多視窗測試
- Selenium - JavaScript 執行器
- Selenium - 無頭執行
- Selenium - 捕獲螢幕截圖
- Selenium - 捕獲影片
- Selenium - 頁面物件模型
- Selenium - 頁面工廠
- Selenium - 記錄和回放
- Selenium - 框架
- Selenium - 瀏覽上下文
- Selenium - DevTools
- Selenium Grid 教程
- Selenium - 概述
- Selenium - 架構
- Selenium - 元件
- Selenium - 配置
- Selenium - 建立測試指令碼
- Selenium - 測試執行
- Selenium - 端點
- Selenium - 自定義節點
- Selenium 報告工具
- Selenium - 報告工具
- Selenium - TestNG
- Selenium - JUnit
- Selenium - Allure
- Selenium 和其他技術
- Selenium - Java 教程
- Selenium - Python 教程
- Selenium - C# 教程
- Selenium - Javascript 教程
- Selenium - Kotlin 教程
- Selenium - Ruby 教程
- Selenium - Maven 和 Jenkins
- Selenium - 資料庫測試
- Selenium - LogExpert 日誌記錄
- Selenium - Log4j 日誌記錄
- Selenium - Robot Framework
- Selenium - AutoIT
- Selenium - Flash 測試
- Selenium - Apache Ant
- Selenium - Github 教程
- Selenium - SoapUI
- Selenium - Cucumber
- Selenium - IntelliJ
- Selenium - XPath
Python Selenium 教程
Selenium 用於為大多數基於 Web 的應用程式開發測試用例。它可以與多種程式語言一起使用,例如 Java、Python、Kotlin 等。
使用 Python 設定 Selenium 並啟動瀏覽器
步驟 1 - 從連結 Windows 最新版本 下載並安裝 Python。
要更詳細地瞭解如何設定 Python,請參閱連結 Python 環境設定。
成功安裝 Python 後,透過執行命令:python –version(在命令提示符下)確認其安裝。執行的命令輸出將指向機器中安裝的 Python 版本。
步驟 2 - 從連結 PyCharm 安裝名為 PyCharm 的 Python 程式碼編輯器。
使用此編輯器,我們可以開始處理 Python 專案以啟動我們的測試自動化。要更詳細地瞭解如何設定 PyCharm,請參閱以下連結 Pycharm 教程。
步驟 3 - 從命令提示符執行命令:pip install selenium。這是為了安裝 Selenium。要確認機器中安裝的 Selenium 版本,請執行命令 -
pip show selenium
此命令的輸出給出了以下結果 -
Name: selenium
Version: 4.19.0
Summary: None
Home-page: https://selenium.programming.tw
Author: None
Author-email: None
License: Apache 2.0.
步驟 4 - 完成步驟 3 後,重新啟動 PyCharm。
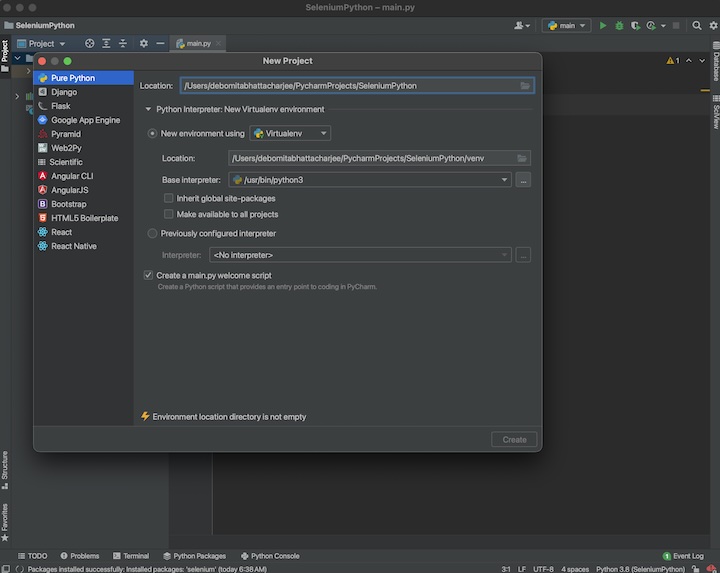
步驟 5 - 開啟 PyCharm 並透過導航到“檔案”選單建立一個新專案。
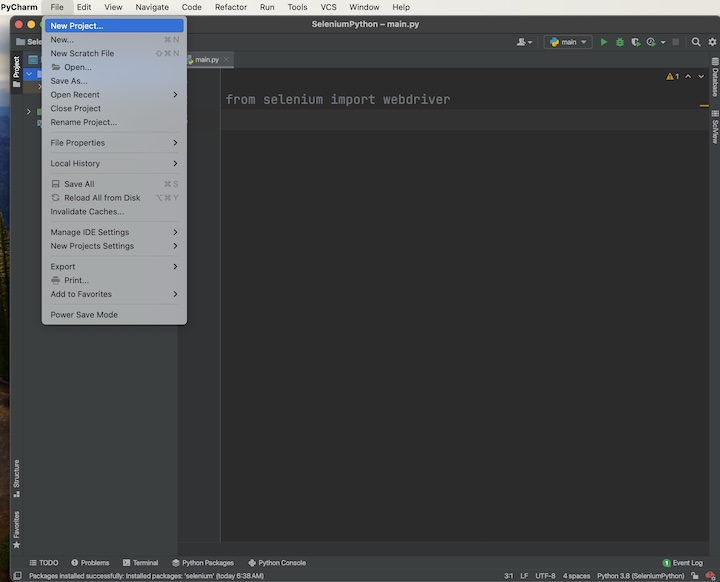
在“位置”欄位中輸入專案名稱和位置,然後單擊“建立”按鈕。
步驟 6 - 從 PyCharm 編輯器的右下角,選擇“直譯器設定”選項。
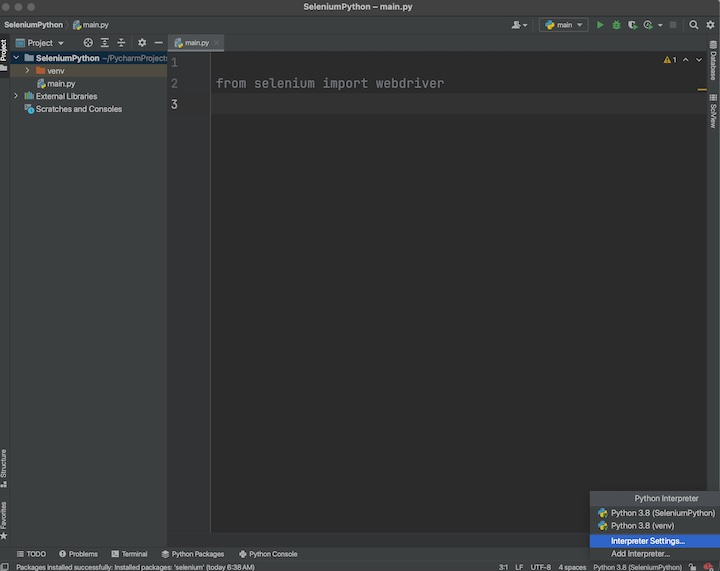
從左側選擇“Python 直譯器”選項,然後單擊“+”。
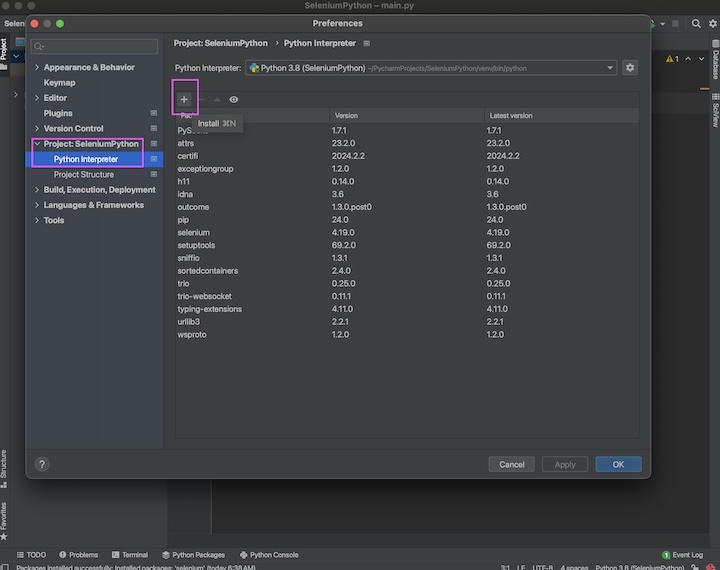
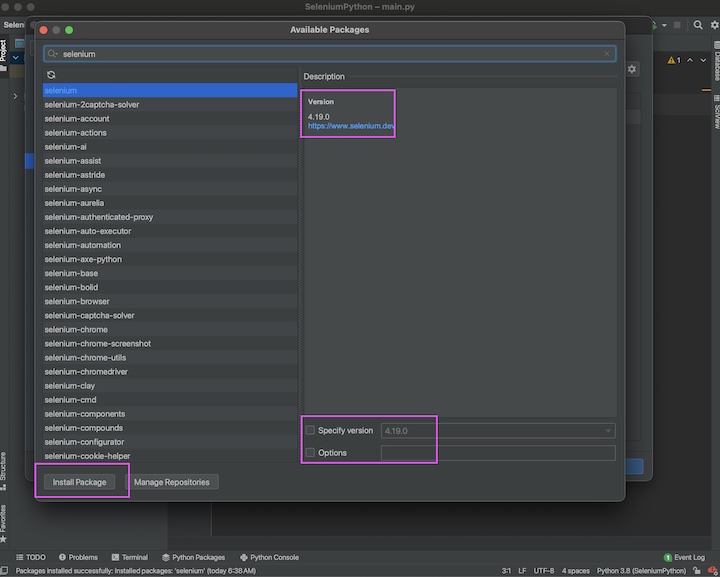
步驟 7 - 在“可用包”彈出視窗內的包搜尋框中輸入 selenium,然後搜尋結果將與右側的“描述”一起顯示。描述包含有關將要安裝的 Selenium 包版本的資訊。
在“指定版本”欄位旁邊還有一個安裝特定版本 Selenium 包的選項。然後單擊“安裝包”按鈕。安裝成功後,應顯示訊息“包'selenium'安裝成功”。
步驟 8 - 在“可用包”彈出視窗內的包搜尋框中輸入 webdriver-manager,並以相同的方式安裝它。
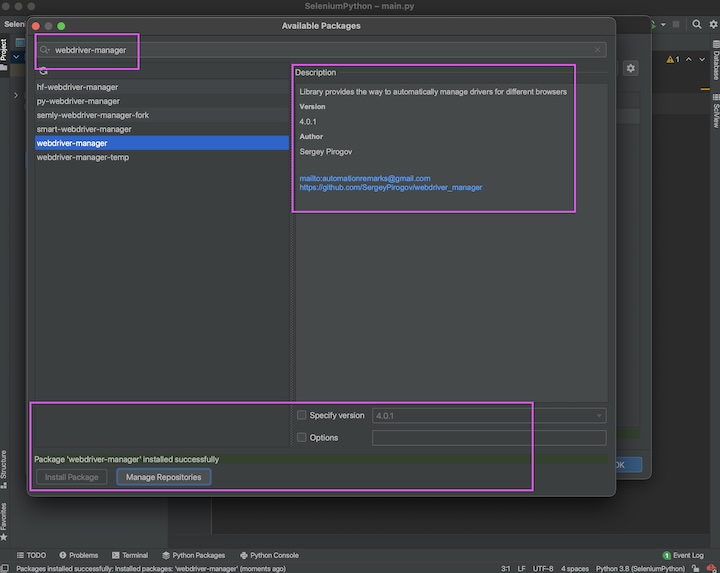
退出“可用包”彈出視窗。
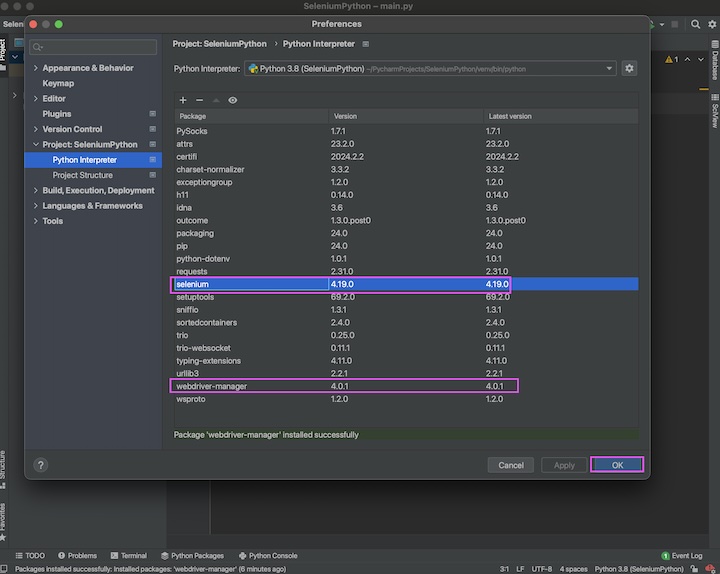
步驟 9 - selenium 和 webdriver-manager 這兩個包都應該反映在“包”下。單擊“確定”按鈕。重新啟動 PyCharm。
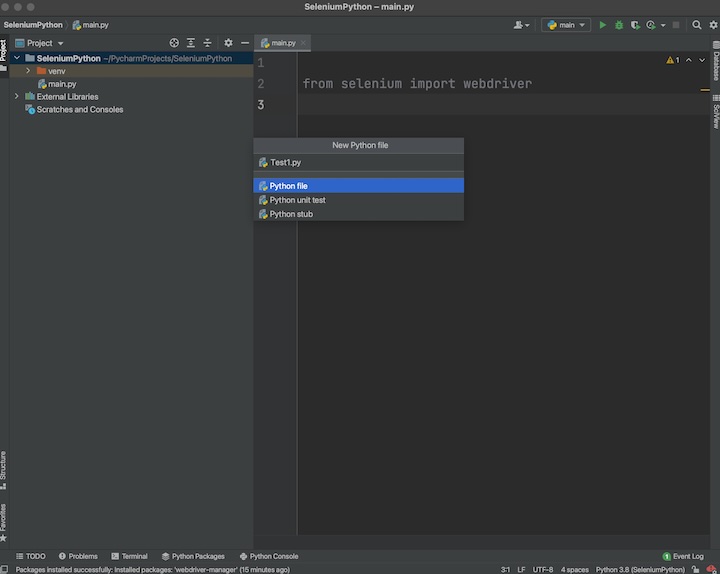
步驟 10 - 透過右鍵單擊專案資料夾建立第一個測試用例。這裡,我們將專案名稱命名為 SeleniumPython。然後單擊“新建”,最後單擊“Python 檔案”選項。
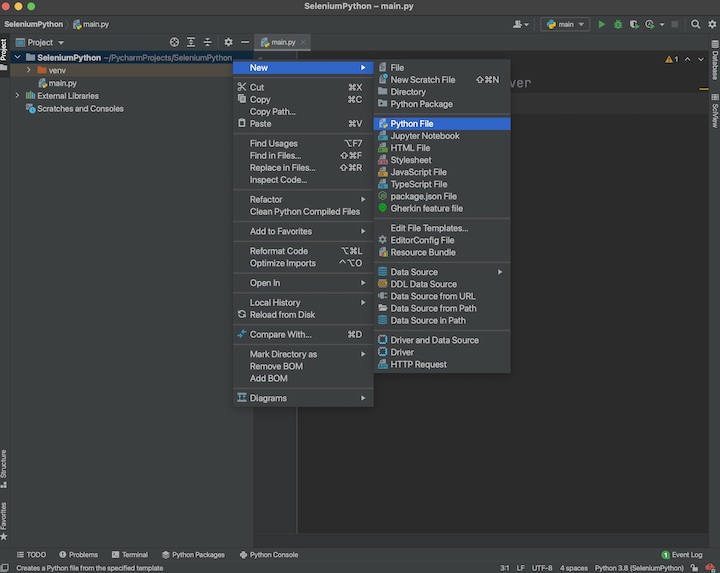
步驟 11 - 輸入檔名,例如 Test1.py,並選擇“Python 檔案”選項,最後單擊 Enter。
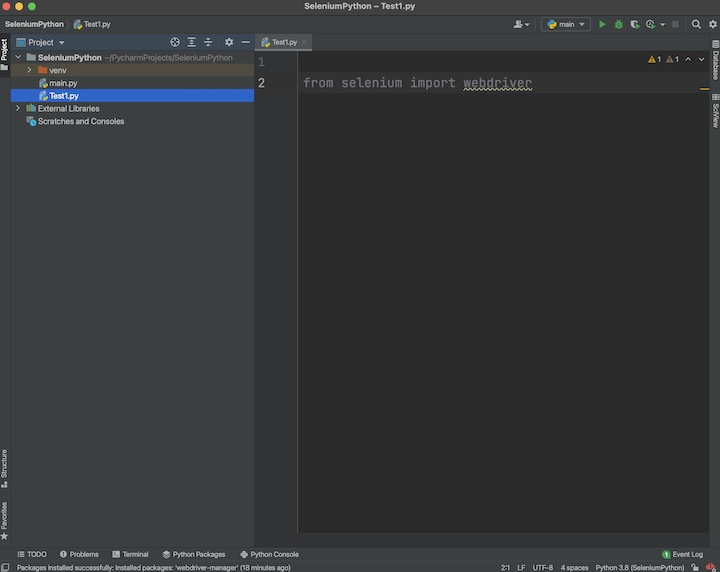
Test1.py 應該顯示在左側的 SeleniumPython 專案資料夾下。
步驟 12 - 開啟新建立的名稱為 Test1.py 的 Python 檔案,並獲取以下頁面的頁面標題 - Selenium Practice - Alerts。

示例
from selenium import webdriver

# create instance of webdriver
driver = webdriver.Chrome()

# launch application
driver.get("https://tutorialspoint.tw/selenium/practice/alerts.php")

# get page title
print("Page title is: " + driver.title)

# quitting browser
driver.quit
輸出
Page title is: Selenium Practice - Alerts

Process finished with exit code 0
在上面的示例中,我們啟動了一個應用程式並在控制檯中獲取了其頁面標題,訊息為 - 頁面標題為:Selenium Practice - Alerts。
輸出顯示訊息 - 程序退出程式碼為 0,這意味著上述程式碼已成功執行。
使用 Selenium Python 識別元素並檢查其功能
當應用程式啟動後,使用者會在網頁上的 Web 元素上執行操作,例如單擊連結或按鈕、在輸入框中輸入文字、提交表單等,以自動化測試用例。
第一步是找到元素。Selenium 中有多種定位器可用,例如 id、類名、類、名稱、標籤名、部分連結文字、連結文字、標籤名、xpath 和 css。這些定位器與 Python 中的 find_element() 方法一起使用。
例如,driver.find_element("classname", 'btn-primary') 定位第一個類名屬性值為 btn-primary 的元素。如果不存在具有該類名屬性匹配值的元素,則會丟擲 NoSuchElementException。
讓我們看看下面影像中突出顯示的單擊我按鈕的 html 程式碼 -
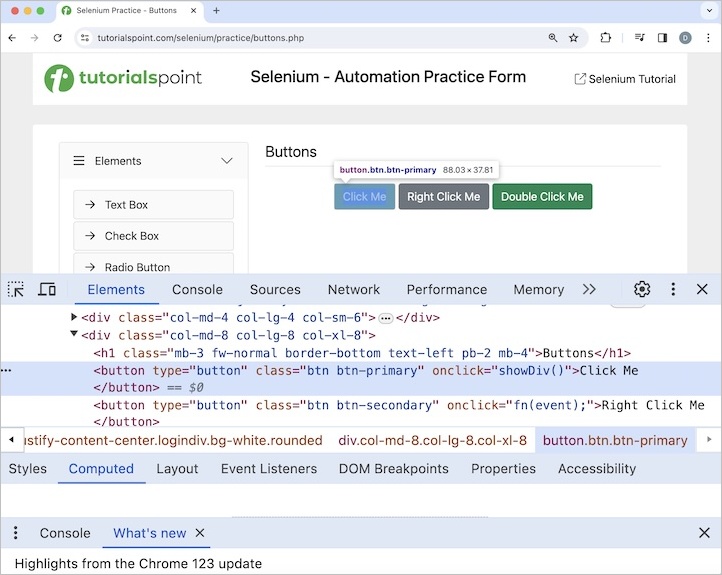
它的類名屬性值為btn-primary。單擊“單擊我”按鈕後,文字您已完成動態點選將出現在頁面上。

示例
from selenium import webdriver
from selenium.webdriver.common.by import By

# create instance of webdriver
driver = webdriver.Chrome()

# implicit wait of 15 seconds
driver.implicitly_wait(15)

# launch application
driver.get("https://tutorialspoint.tw/selenium/practice/buttons.php")

# identify element with class name
button = driver.find_element(By.CLASS_NAME, 'btn-primary')

# click on button
button.click()

# identify element with id
txt = driver.find_element(By.ID, 'welcomeDiv')

# get text
print("Text obtained is: " + txt.text)

# quitting browser
driver.quit
輸出
Text obtained is: You have done a dynamic click
點選Click Me按鈕後,我們在控制檯獲取了文字 - 獲取到的文字為:You have done a dynamic click。
結論
本教程全面介紹了 Selenium Python 教程。我們從介紹如何使用 Python 設定 Selenium 並啟動瀏覽器開始,然後講解了如何識別元素並使用 Selenium Python 檢查其功能。這使您能夠深入瞭解 Selenium Python 教程。建議您不斷練習所學內容,並探索其他與 Selenium 相關的知識,以加深理解並拓寬視野。