
- Selenium 教程
- Selenium - 首頁
- Selenium - 概述
- Selenium - 元件
- Selenium - 自動化測試
- Selenium - 環境搭建
- Selenium - 遠端控制
- Selenium IDE 教程
- Selenium - IDE 簡介
- Selenium - 特性
- Selenium - 限制
- Selenium - 安裝
- Selenium - 建立測試
- Selenium - 建立指令碼
- Selenium - 控制流
- Selenium - 儲存變數
- Selenium - 警報和彈出視窗
- Selenium - Selenese 命令
- Selenium - 操作命令
- Selenium - 訪問器命令
- Selenium - 斷言命令
- Selenium - 斷言/驗證方法
- Selenium - 定位策略
- Selenium - 指令碼除錯
- Selenium - 驗證點
- Selenium - 模式匹配
- Selenium - JSON 資料檔案
- Selenium - 瀏覽器執行
- Selenium - 使用者擴充套件
- Selenium - 程式碼匯出
- Selenium - 程式碼輸出
- Selenium - JavaScript 函式
- Selenium - 外掛
- Selenium WebDriver 教程
- Selenium - 簡介
- Selenium WebDriver 與 RC
- Selenium - 安裝
- Selenium - 第一個測試指令碼
- Selenium - 驅動程式會話
- Selenium - 瀏覽器選項
- Selenium - Chrome 選項
- Selenium - Edge 選項
- Selenium - Firefox 選項
- Selenium - Safari 選項
- Selenium - 雙擊
- Selenium - 右鍵單擊
- Python 中的 HTML 報告
- 處理編輯框
- Selenium - 單個元素
- Selenium - 多個元素
- Selenium Web 元素
- Selenium - 檔案上傳
- Selenium - 定位器策略
- Selenium - 相對定位器
- Selenium - 查詢器
- Selenium - 查詢所有連結
- Selenium - 使用者互動
- Selenium - WebElement 命令
- Selenium - 瀏覽器互動
- Selenium - 瀏覽器命令
- Selenium - 瀏覽器導航
- Selenium - 警報和彈出視窗
- Selenium - 處理表單
- Selenium - 視窗和選項卡
- Selenium - 處理連結
- Selenium - 輸入框
- Selenium - 單選按鈕
- Selenium - 複選框
- Selenium - 下拉框
- Selenium - 處理 iframe
- Selenium - 處理 Cookie
- Selenium - 日期時間選擇器
- Selenium - 動態 Web 表格
- Selenium - Actions 類
- Selenium - Action 類
- Selenium - 鍵盤事件
- Selenium - 鍵向上/向下
- Selenium - 複製和貼上
- Selenium - 處理特殊鍵
- Selenium - 滑鼠事件
- Selenium - 拖放
- Selenium - 筆事件
- Selenium - 滾動操作
- Selenium - 等待策略
- Selenium - 顯式/隱式等待
- Selenium - 支援功能
- Selenium - 多選
- Selenium - 等待支援
- Selenium - 選擇支援
- Selenium - 顏色支援
- Selenium - ThreadGuard
- Selenium - 錯誤和日誌記錄
- Selenium - 異常處理
- Selenium - 其他
- Selenium - 處理 Ajax 呼叫
- Selenium - JSON 資料檔案
- Selenium - CSV 資料檔案
- Selenium - Excel 資料檔案
- Selenium - 跨瀏覽器測試
- Selenium - 多瀏覽器測試
- Selenium - 多視窗測試
- Selenium - JavaScript 執行器
- Selenium - 無頭執行
- Selenium - 捕獲螢幕截圖
- Selenium - 捕獲影片
- Selenium - 頁面物件模型
- Selenium - 頁面工廠
- Selenium - 錄製和回放
- Selenium - 框架
- Selenium - 瀏覽上下文
- Selenium - DevTools
- Selenium Grid 教程
- Selenium - 概述
- Selenium - 架構
- Selenium - 元件
- Selenium - 配置
- Selenium - 建立測試指令碼
- Selenium - 測試執行
- Selenium - 端點
- Selenium - 自定義節點
- Selenium 報告工具
- Selenium - 報告工具
- Selenium - TestNG
- Selenium - JUnit
- Selenium - Allure
- Selenium 和其他技術
- Selenium - Java 教程
- Selenium - Python 教程
- Selenium - C# 教程
- Selenium - Javascript 教程
- Selenium - Kotlin 教程
- Selenium - Ruby 教程
- Selenium - Maven 和 Jenkins
- Selenium - 資料庫測試
- Selenium - LogExpert 日誌記錄
- Selenium - Log4j 日誌記錄
- Selenium - Robot Framework
- Selenium - AutoIT
- Selenium - Flash 測試
- Selenium - Apache Ant
- Selenium - Github 教程
- Selenium - SoapUI
- Selenium - Cucumber
- Selenium - IntelliJ
- Selenium - XPath
Selenium - 環境搭建
Selenium Webdriver 可用於自動化 Web 應用程式的測試。Selenium 可以與多種語言一起使用,例如 Java、Python、Ruby 等。
讓我們討論如何使用 Java 設定 Selenium 的環境。Selenium 的安裝可以透過以下步驟完成:
步驟 1 - 我們需要在本地系統中下載並安裝 Java。這可以透過導航到以下連結來完成:
要更詳細地瞭解如何設定 Java,我們可以參考以下連結:
https://www.youtube.com/watch?v=bxIZ1GVWYkQ
成功安裝 Java 後,我們可以透過執行以下命令確認其安裝:java(在命令提示符下)。
C:\java
它將在螢幕上顯示以下資訊:
Usage: java [options] <mainclass> [args...]
           (to execute a class)
   or  java [options] -jar <jarfile> [args...]
           (to execute a jar file)
   or  java [options] -m <module>[/<mainclass>] [args...]
       java [options] --module <module>[/<mainclass>] [args...]
           (to execute the main class in a module)
   or  java [options] <sourcefile> [args]
           (to execute a single source-file program)

 Arguments following the main class, source file, -jar <jarfile>,
 -m or --module <module>/<mainclass> are passed as the arguments to
 main class.

 where options include:

    -cp <class search path of directories and zip/jar files>
    -classpath <class search path of directories and zip/jar files>
    --class-path <class search path of directories and zip/jar files>
                  A ; separated list of directories, JAR archives,
                  and ZIP archives to search for class files.
    -p <module path>
    --module-path <module path>...
                  A ; separated list of directories, each directory
                  is a directory of modules.
    --upgrade-module-path <module path>...
                  A ; separated list of directories, each directory
                  is a directory of modules that replace upgradeable
                  modules in the runtime image
    --add-modules <module name>[,<module name>...]
                  root modules to resolve in addition to the initial module.
                  <module name> can also be ALL-DEFAULT, ALL-SYSTEM,
                  ALL-MODULE-PATH.
    --enable-native-access <module name>[,<module name>...]
                  modules that are permitted to perform restricted native operations.
                  <module name> can also be ALL-UNNAMED.
    --list-modules
                  list observable modules and exit
    -d <module name>
    --describe-module <module name>
                  describe a module and exit
    --dry-run     create VM and load main class but do not execute main method.
                  The --dry-run option may be useful for validating the
                  command-line options such as the module system configuration.
    --validate-modules
                  validate all modules and exit
                  The --validate-modules option may be useful for finding
                  conflicts and other errors with modules on the module path.
    -D<name>=<value>
                  set a system property
    -verbose:[class|module|gc|jni]
                  enable verbose output for the given subsystem
    -version      print product version to the error stream and exit
    --version     print product version to the output stream and exit
    -showversion  print product version to the error stream and continue
    --show-version
                  print product version to the output stream and continue
    --show-module-resolution
                  show module resolution output during startup
    -? -h -help
                  print this help message to the error stream
    --help        print this help message to the output stream
    -X            print help on extra options to the error stream
    --help-extra  print help on extra options to the output stream
    -ea[:<packagename>...|:<classname>]
    -enableassertions[:<packagename>...|:<classname>]
                  enable assertions with specified granularity
    -da[:<packagename>...|:<classname>]
    -disableassertions[:<packagename>...|:<classname>]
                  disable assertions with specified granularity
    -esa | -enablesystemassertions
                  enable system assertions
    -dsa | -disablesystemassertions
                  disable system assertions
    -agentlib:<libname>[=<options>]
                  load native agent library <libname>, e.g. -agentlib:jdwp
                  see also -agentlib:jdwp=help
    -agentpath:<pathname>[=<options>]
                  load native agent library by full pathname
    -javaagent:<jarpath>[=<options>]
                  load Java programming language agent, see java.lang.instrument
    -splash:<imagepath>
                  show splash screen with specified image
                  HiDPI scaled images are automatically supported and used
                  if available. The unscaled image filename, e.g. image.ext,
                  should always be passed as the argument to the -splash option.
                  The most appropriate scaled image provided will be picked up
                  automatically.
                  See the SplashScreen API documentation for more information
    @argument files
                  one or more argument files containing options
    --disable-@files
                  prevent further argument file expansion
    --enable-preview
                  allow classes to depend on preview features of this release
To specify an argument for a long option, you can use --<name>=<value> or
--<name> <value>.
接下來,我們將透過執行以下命令確認已安裝的 Java 版本:
java –version
它將顯示以下輸出:
openjdk version "17.0.9" 2023-10-17
OpenJDK Runtime Environment Homebrew (build 17.0.9+0)
OpenJDK 64-Bit Server VM Homebrew (build 17.0.9+0, mixed mode, sharing)
執行的命令的輸出表明系統中安裝的 Java 版本為 17.0.9。
我們還需要使用以下連結在系統中安裝 Maven:
https://maven.apache.org/download.cgi。
要更詳細地瞭解如何設定 Maven,我們可以參考以下連結:
https://tutorialspoint.tw/maven/maven_environment_setup.htm
接下來,我們將透過執行以下命令確認已安裝的 Maven 版本:
mvn –version
它將顯示以下輸出:
Apache Maven 3.9.6 (bc0240f3c744dd6b6ec2920b3cd08dcc295161ae)
Maven home: /opt/homebrew/Cellar/maven/3.9.6/libexec
Java version: 21.0.1, vendor: Homebrew, runtime: /opt/homebrew/Cellar/openjdk/21.0.1/libexec/openjdk.jdk/Contents/Home
Default locale: en_IN, platform encoding: UTF-8
OS name: "mac os x", version: "14.0", arch: "aarch64", family: "mac"
執行的命令的輸出表明系統中安裝的 Maven 版本為 Apache Maven 3.9.6。
步驟 2 - 接下來,我們將安裝 IntelliJ 編輯器來執行 Selenium 測試。市場上有許多可用的編輯器,例如:Eclipse、IntelliJ、Atom 等。使用這些編輯器,我們可以開始使用 Java 專案來啟動我們的測試自動化。今天,我們將討論如何在 IntelliJ 中設定我們的 Selenium 程式碼。
對於 IntelliJ 安裝,應安裝最新版本的 Java。
讓我們開始吧:
步驟 1 - 使用以下連結導航到 IntelliJ 的官方網站(它是 Jetbrains 的產品),然後單擊下載:
https://www.jetbrains.com/idea/。

步驟 2 - 導航到下一頁後,我們將獲得在各種作業系統(如 Windows、macOS 和 Linux)中下載 IntelliJ 的選項。單擊與您當前系統中使用的作業系統相對應的選項卡。
IntelliJ 有兩個版本,付費版和社群版(免費版)。
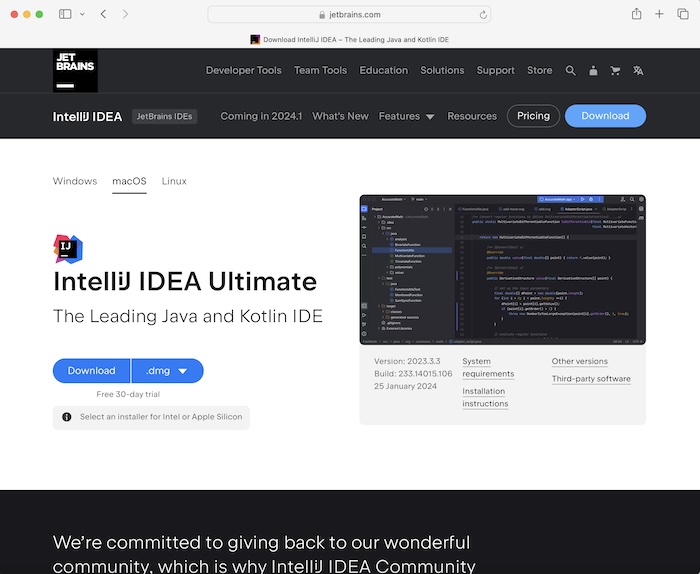
我們將下載社群版。為此,我們將導航到 IntelliJ IDEA 社群版部分,然後單擊下載。

在 macOS 中完成下載後,我們將 IntelliJ IDEA CE 檔案從 Downloads 資料夾拖到 Applications 資料夾。
步驟 3 - IntelliJ 徽標應顯示幾秒鐘,然後出現 JETBRAINS 社群版條款。選中複選框以接受條款和條件,然後單擊繼續。
步驟 4 - 歡迎使用 IntelliJ IDEA 應出現。單擊新建專案按鈕。
步驟 5 - 在名稱:欄位下輸入名稱。選擇語言為 Java,構建系統為 Maven,以及 JDK 版本,然後單擊建立。
步驟 6 - 輸入 ArtifactId 並單擊建立。
步驟 7 - IntelliJ 編輯器設定應已成功完成。
步驟 8 - 接下來,我們將從以下連結新增 Selenium Maven 依賴項:
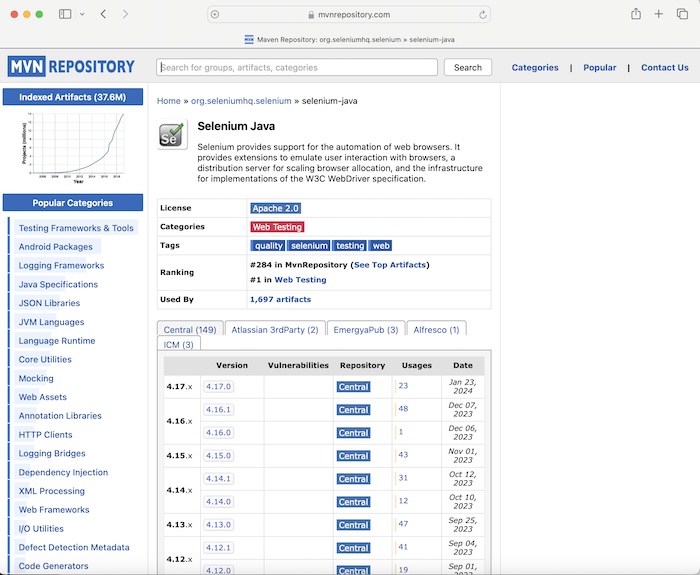
步驟 9 - 選擇並單擊中央選項卡下的版本連結。我們導航到 Selenium Java>><version> 頁面。複製 Maven 選項卡下的依賴項。
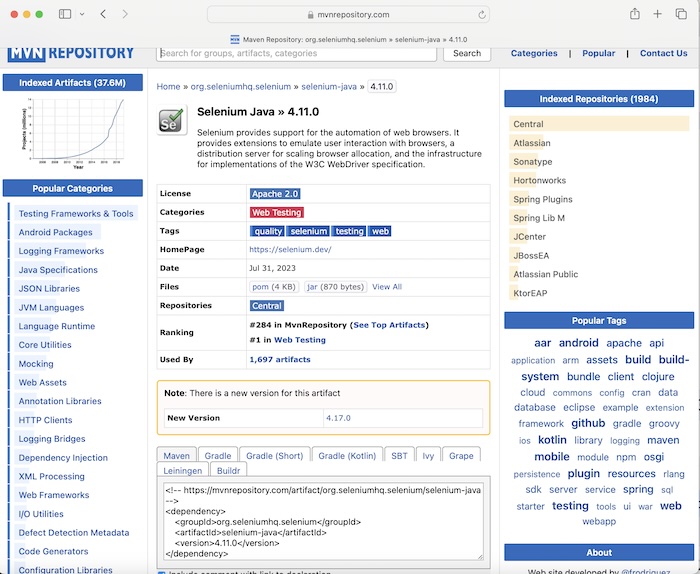
依賴項示例:
<!-- https://mvnrepository.com/artifact/org.seleniumhq.selenium/selenium-java -->
<dependency>
   <groupId>org.seleniumhq.selenium</groupId>
   <artifactId>selenium-java</artifactId>
   <version>4.11.0</version>
</dependency>
步驟 10 - 將步驟 9 中複製的依賴項貼上到 pom.xml 檔案中(位於 IntelliJ 工作區中建立的 Maven 專案下)。
步驟 11 - 在 Main.java 檔案中新增以下程式碼。
示例
Main.java 類檔案中的程式碼實現:
package org.example;

import org.openqa.selenium.WebDriver;
import org.openqa.selenium.chrome.ChromeDriver;
import java.util.concurrent.TimeUnit;

public class Main {
   public static void main(String[] args) throws InterruptedException {

      // Initiate the Webdriver
      WebDriver driver = new ChromeDriver();

      // adding implicit wait of 15 secs
      driver.manage().timeouts().implicitlyWait(15, TimeUnit.SECONDS);

      // URL launch
      driver.get("https://www.google.com");

      // get browser title after browser launch
      System.out.println("Browser title: " + driver.getTitle());

   }
}
pom.xml 檔案中新增的依賴項:
<?xml version="1.0" encoding="UTF-8"?>
<project xmlns="http://maven.apache.org/POM/4.0.0"
   xmlns:xsi="http://www.w3.org/2001/XMLSchema-instance"
   xsi:schemaLocation="http://maven.apache.org/POM/4.0.0
   http://maven.apache.org/xsd/maven-4.0.0.xsd">
   <modelVersion>4.0.0</modelVersion>

   <groupId>org.example</groupId>
   <artifactId>SeleniumJava</artifactId>
   <version>1.0-SNAPSHOT</version>

   <properties>
      <maven.compiler.source>16</maven.compiler.source>
      <maven.compiler.target>16</maven.compiler.target>
      <project.build.sourceEncoding>UTF-8</project.build.sourceEncoding>
   </properties>

   <!-- https://mvnrepository.com/artifact/org.seleniumhq.selenium/selenium-java -->
   <dependencies>
      <dependency>
         <groupId>org.seleniumhq.selenium</groupId>
         <artifactId>selenium-java</artifactId>
         <version>4.11.0</version>
      </dependency>
   </dependencies>
</project>
步驟 11 - 右鍵單擊並選擇執行“Main.main()”選項。等待執行完成。
步驟 12 - Chrome 瀏覽器啟動,我們在控制檯中獲得了輸出 - 瀏覽器標題:Google,以及訊息 Process finished with exit code 0,表示程式碼已成功執行。
輸出
Browser title: Google

Process finished with exit code 0
此外,Chrome 瀏覽器啟動,頂部顯示訊息Chrome 正在由自動化測試軟體控制。
要更詳細地瞭解如何設定 Eclipse,我們可以參考以下連結:
https://tutorialspoint.tw/eclipse/index.htm
Selenium 也可以與 Python 一起配置,為此我們需要 PyCharm 編輯器。要更詳細地瞭解如何設定 PyCharm,我們可以參考以下連結:
https://tutorialspoint.tw/pycharm/index.htm。
讓我們再舉一個例子,我們將啟動瀏覽器並開啟一個應用程式,最後退出瀏覽器。
示例
MainBrowserQuit.java 類檔案中的程式碼實現。
package org.example;

import org.openqa.selenium.WebDriver;
import org.openqa.selenium.chrome.ChromeDriver;
import java.util.concurrent.TimeUnit;

public class MainBrowserQuit {
   public static void main(String[] args) throws InterruptedException {

      // Initiate the Webdriver
      WebDriver driver = new ChromeDriver();

      // adding implicit wait of 15 secs
      driver.manage().timeouts().implicitlyWait(15, TimeUnit.SECONDS);

      // URL launch and get the browser title
      driver.get("https://tutorialspoint.tw/selenium/practice/selenium_automation_practice.php");
      System.out.println( "Browser title after launch: " + driver.getTitle());

      // close browser
      driver.quit();

   }
}
輸出
Browser title after launch: Selenium Practice - Student Registration Form

Process finished with exit code 0
在上面的示例中,我們首先啟動了 Chrome 瀏覽器,然後檢索了瀏覽器標題,然後退出了瀏覽器,並在控制檯中收到了訊息 - 啟動後瀏覽器標題:Selenium Practice - 學生登錄檔單。
最後,收到了訊息Process finished with exit code 0,表示程式碼已成功執行。
因此,我們已成功完成了本教程中的 Selenium 環境設定。