- 生成式AI教程
- 生成式AI - 首頁
- 生成式AI基礎
- 生成式AI基礎
- 生成式AI發展史
- 機器學習與生成式AI
- 生成式AI模型
- 判別式模型與生成式模型
- 生成式AI模型型別
- 機率分佈
- 機率密度函式
- 最大似然估計
- 生成式AI網路
- GAN的工作原理?
- GAN - 架構
- 條件GAN
- StyleGAN和CycleGAN
- 訓練GAN
- GAN應用
- 生成式AI Transformer
- Transformer在生成式AI中的應用
- Transformer在生成式AI中的架構
- Transformer中的輸入嵌入
- 多頭注意力機制
- 位置編碼
- 前饋神經網路
- Transformer中的殘差連線
- 生成式AI自編碼器
- 自編碼器在生成式AI中的應用
- 自編碼器型別及應用
- 使用Python實現自編碼器
- 變分自編碼器
- 生成式AI和ChatGPT
- 一個生成式AI模型
- 生成式AI雜項
- 生成式AI在製造業中的應用
- 生成式AI在開發者中的應用
- 生成式AI在網路安全中的應用
- 生成式AI在軟體測試中的應用
- 生成式AI在市場營銷中的應用
- 生成式AI在教育中的應用
- 生成式AI在醫療保健中的應用
- 生成式AI在學生中的應用
- 生成式AI在工業中的應用
- 生成式AI在電影中的應用
- 生成式AI在音樂中的應用
- 生成式AI在烹飪中的應用
- 生成式AI在媒體中的應用
- 生成式AI在通訊中的應用
- 生成式AI在攝影中的應用
- 生成式AI資源
- 生成式AI - 有用資源
- 生成式AI - 討論
使用Python實現自編碼器
自編碼器是一種用於學習未標記資料高效編碼的人工神經網路 (ANN)。它們已成為機器學習和深度學習領域的重要工具。本章提供了一個分步指南,介紹如何在Python程式語言中實現自編碼器。我們將使用MNIST資料集作為示例。
我們將介紹必要的設定、資料預處理、模型構建、訓練和結果視覺化。我們將使用手寫數字的MNIST資料集作為示例。
使用Python實現自編碼器的分步指南
讓我們探索使用Python程式語言實現自編碼器的步驟:
步驟1:設定環境
在開始實現之前,我們必須確保已安裝必要的庫。如果尚未安裝,可以使用以下給出的pip命令安裝它們:
pip install numpy matplotlib tensorflow
步驟2:匯入庫
安裝完成後,我們需要匯入必要的庫:
# Import necessary libraries
import numpy as np
import matplotlib.pyplot as plt
from tensorflow.keras.datasets import mnist
from tensorflow.keras.models import Model
from tensorflow.keras.layers import Input, Dense, Flatten, Reshape
from tensorflow.keras.optimizers import Adam
步驟3:載入和預處理MNIST資料集
在此步驟中,我們將載入MNIST手寫數字資料集並對畫素值進行歸一化,如下所示:
# Load the dataset
(x_train, _), (x_test, _) = mnist.load_data()

# Normalize the data
x_train = x_train.astype('float32') / 255.0
x_test = x_test.astype('float32') / 255.0

# Reshape the data to include the channel dimension
x_train = np.reshape(x_train, (len(x_train), 28, 28, 1))
x_test = np.reshape(x_test, (len(x_test), 28, 28, 1))
步驟4:構建自編碼器模型
在此步驟中,我們將透過定義編碼器和解碼器部分來構建自編碼器模型:
# Define the input shape for the autoencoder
input_shape = (28, 28, 1)

# Define the encoder part of the autoencoder
input_img = Input(shape=input_shape)
x = Flatten()(input_img)
encoded = Dense(64, activation='relu')(x)

# Define the decoder part of the autoencoder
decoded = Dense(784, activation='sigmoid')(encoded)
decoded = Reshape((28, 28, 1))(decoded)

# Define the complete autoencoder model
autoencoder = Model(input_img, decoded)
autoencoder.compile(optimizer=Adam(), loss='binary_crossentropy')

# Print the summary of the autoencoder model
autoencoder.summary()
步驟5:訓練自編碼器模型
接下來,我們需要使用訓練資料訓練自編碼器,如下所示:
# Train the autoencoder
autoencoder.fit(x_train, x_train,
   epochs = 50,		# Number of epochs to train
   batch_size=256,	# Batch size for training
   shuffle=True,
   validation_data = (x_test, x_test)
)
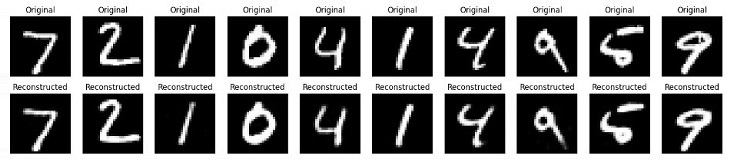
步驟6:視覺化原始資料和重建資料
在此最後一步中,我們將視覺化一些原始影像和重建影像,以檢查自編碼器的效能如何。
# Predict the reconstructed images from the test set
decoded_imgs = autoencoder.predict(x_test)

# Number of digits to display
n = 10

# Create a figure with a specified size
plt.figure(figsize=(20, 4))

# Loop through the first n test images

for i in range(n):

   # Display the original image
   ax = plt.subplot(2, n, i + 1)  # Create a subplot for the original image

   # Reshape and plot the original image
   plt.imshow(x_test[i].reshape(28, 28), cmap='gray')
   plt.title("Original")  # Set the title of the plot
   plt.axis('off')

   # Display the reconstructed image
   ax = plt.subplot(2, n, i + 1 + n)
   plt.imshow(decoded_imgs[i].reshape(28, 28), cmap='gray')
   plt.title("Reconstructed")
   plt.axis('off')

# Show the figure
plt.show()
完整的Python實現程式碼
以下是上述示例及其輸出的完整Python指令碼:
# Import necessary libraries
import numpy as np
import matplotlib.pyplot as plt
from tensorflow.keras.datasets import mnist
from tensorflow.keras.models import Model
from tensorflow.keras.layers import Input, Dense, Flatten, Reshape
from tensorflow.keras.optimizers import Adam

# Load the dataset
(x_train, _), (x_test, _) = mnist.load_data()

# Normalize the data
x_train = x_train.astype('float32') / 255.0
x_test = x_test.astype('float32') / 255.0

# Reshape the data to include the channel dimension
x_train = np.reshape(x_train, (len(x_train), 28, 28, 1))
x_test = np.reshape(x_test, (len(x_test), 28, 28, 1))

# Define the input shape for the autoencoder
input_shape = (28, 28, 1)

# Define the encoder part of the autoencoder
input_img = Input(shape=input_shape)
x = Flatten()(input_img)
encoded = Dense(64, activation='relu')(x)

# Define the decoder part of the autoencoder
decoded = Dense(784, activation='sigmoid')(encoded)
decoded = Reshape((28, 28, 1))(decoded)

# Define the complete autoencoder model
autoencoder = Model(input_img, decoded)

autoencoder.compile(optimizer=Adam(), loss='binary_crossentropy')

# Print the summary of the autoencoder model
autoencoder.summary()

# Train the autoencoder
autoencoder.fit(x_train, x_train,
   epochs=50,  # Number of epochs to train
   batch_size=256,  # Batch size for training
   shuffle=True,
   validation_data=(x_test, x_test)
)

# Predict the reconstructed images from the test set
decoded_imgs = autoencoder.predict(x_test)

# Number of digits to display
n = 10

# Create a figure with a specified size
plt.figure(figsize=(20, 4))

# Loop through the first n test images
for i in range(n):
   # Display the original image
   ax = plt.subplot(2, n, i + 1)
   plt.imshow(x_test[i].reshape(28, 28), cmap='gray')
   plt.title("Original")  # Set the title of the plot
   plt.axis('off')

   # Display the reconstructed image
   ax = plt.subplot(2, n, i + 1 + n)
   plt.imshow(decoded_imgs[i].reshape(28, 28), cmap='gray')
   plt.title("Reconstructed")
   plt.axis('off')

# Show the figure
plt.show()
輸出
執行上述指令碼後,它將首先列印自編碼器模型的摘要,然後是訓練輪數。最後,我們將得到一個顯示原始資料和重建資料的圖表。
Model: "functional_1"
| 層 (型別) | 輸出形狀 | 引數數量 |
|---|---|---|
| input_layer_3 (InputLayer) | (None, 28, 28, 1) | 0 |
| flatten_3 (Flatten) | (None, 784) | 0 |
| dense_6 (Dense) | (None, 64) | 50, 240 |
| dense_7 (Dense) | (None, 784) | 50, 960 |
| reshape_3 (Reshape) | (None, 28, 28, 1) | 0 |
Total params: 101,200 (395.31 KB)
Trainable params: 101,200 (395.31 KB)
Non-trainable params: 0 (0.00 B)
結論
自編碼器是強大的無監督學習工具,可以應用於各種任務,例如降維、特徵提取和影像去噪。
在本章中,我們解釋瞭如何使用Python實現簡單的自編碼器並將其應用於MNIST手寫資料集。這包括設定環境、預處理資料、構建和訓練模型以及視覺化結果以評估模型的效能。
廣告