- Kivy 教程
- Kivy - 首頁
- Kivy 基礎
- Kivy - 入門
- Kivy - 安裝
- Kivy - 架構
- Kivy - 檔案語法
- Kivy - 應用程式
- Kivy - Hello World
- Kivy - 應用生命週期
- Kivy - 事件
- Kivy - 屬性
- Kivy - 輸入
- Kivy - 行為
- Kivy 按鈕
- Kivy - 按鈕
- Kivy - 按鈕事件
- Kivy - 按鈕顏色
- Kivy - 按鈕大小
- Kivy - 按鈕位置
- Kivy - 圓形按鈕
- Kivy - 停用按鈕
- Kivy - 圖片按鈕
- Kivy 元件
- Kivy - 元件
- Kivy - 標籤
- Kivy - 文字輸入
- Kivy - 畫布
- Kivy - 線
- Kivy - 複選框
- Kivy - 下拉列表
- Kivy - 視窗
- Kivy - 滾動檢視
- Kivy - 旋轉木馬
- Kivy - 滑塊
- Kivy - 圖片
- Kivy - 彈出視窗
- Kivy - 開關
- Kivy - 微調器
- Kivy - 分隔器
- Kivy - 進度條
- Kivy - 氣泡
- Kivy - 標籤頁面板
- Kivy - 散點圖
- Kivy - 手風琴
- Kivy - 檔案選擇器
- Kivy - 顏色選擇器
- Kivy - 程式碼輸入
- Kivy - 模態檢視
- Kivy - 切換按鈕
- Kivy - 相機
- Kivy - 樹形檢視
- Kivy - reStructuredText
- Kivy - 操作欄
- Kivy - 播放器
- Kivy - 模板檢視
- Kivy - 虛擬鍵盤
- Kivy - 觸控漣漪
- Kivy - 音訊
- Kivy - 影片
- Kivy - 拼寫檢查
- Kivy - 效果
- Kivy - 輸入錄製器
- Kivy - OpenGL
- Kivy - 文字
- Kivy - 文字標記
- Kivy - 設定
- Kivy 佈局
- Kivy - 佈局
- Kivy - 浮動佈局
- Kivy - 網格佈局
- Kivy - 盒子佈局
- Kivy - 堆疊佈局
- Kivy - 錨點佈局
- Kivy - 相對佈局
- Kivy - 頁面佈局
- Kivy - 回收佈局
- Kivy - 佈局巢狀
- Kivy 高階概念
- Kivy - 配置物件
- Kivy - 圖集
- Kivy - 資料載入器
- Kivy - 快取管理器
- Kivy - 控制檯
- Kivy - 動畫
- Kivy - 多筆畫
- Kivy - 時鐘
- Kivy - SVG
- Kivy - UrlRequest
- Kivy - 剪貼簿
- Kivy - 工廠
- Kivy - 手勢
- Kivy - 語言
- Kivy - 圖形
- Kivy - 繪製
- Kivy - 打包
- Kivy - 花園
- Kivy - 儲存
- Kivy - 向量
- Kivy - 工具類
- Kivy - 檢查器
- Kivy - 工具
- Kivy - 日誌記錄器
- Kivy - 幀緩衝區
- Kivy 應用程式和專案
- Kivy - 繪圖應用程式
- Kivy - 計算器應用程式
- Kivy - 計時器應用程式
- Kivy - 相機處理
- Kivy - 圖片檢視器
- Kivy - 貝塞爾曲線
- Kivy - 畫布壓力測試
- Kivy - 圓形繪製
- Kivy - 元件動畫
- Kivy - 雜項
- Kivy 有用資源
- Kivy - 快速指南
- Kivy - 有用資源
- Kivy - 討論
Kivy - 元件動畫
Kivy 工具包中的任何小部件都可以進行動畫處理。您需要做的就是定義一個 Animation 類的物件,選擇目標小部件的至少一個屬性進行動畫處理,並指定動畫效果完成後要達到的最終值。呼叫 Animation 物件的 start() 方法,並將目標小部件傳遞給它。
anim = Animation(property1=value1, property2=value2, ..)
anim.start(widget)
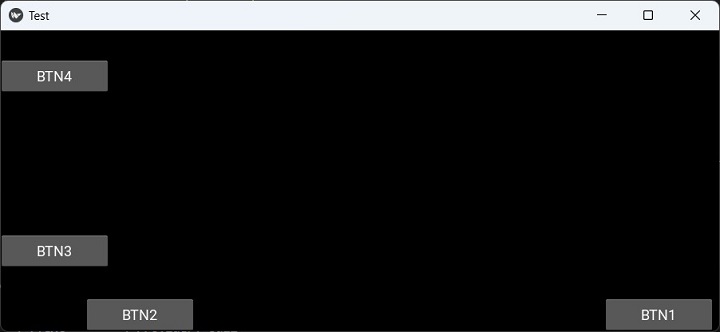
在下面的示例中,我們放置了四個 Kivy 按鈕。兩個按鈕沿 X 軸放置,將“y”座標保持為 0,並將“x”座標隨機化,以便一個按鈕放置在前半部分,另一個按鈕放置在後半部分。
同樣,另外兩個按鈕沿 Y 軸放置,它們的“x”座標為 0,並且 y 座標值被隨機分配。
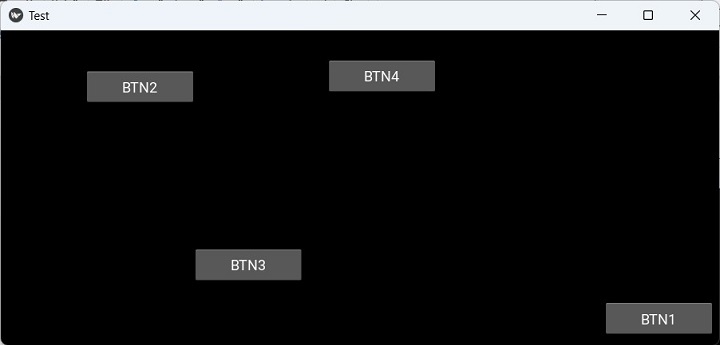
沿 X 軸放置的按鈕會向上和向下移動動畫。 “y”座標值從其初始值一直到視窗的最大高度,然後返回到原始位置。向上和向下移動是迴圈的,因為 repeat 屬性設定為 True。兩個水平放置的按鈕都繫結到下面的方法 -
def animate1(self, instance):
   animation = Animation(pos=(instance.pos[0], Window.height))
   animation += Animation(pos=(instance.pos[0], 0))
   animation.repeat=True
   animation.start(instance)
同樣,垂直排列的按鈕 b3 和 b4 繫結到以下方法。它們的“x”座標值從其當前值更改為最大寬度,然後再返回。
def animate2(self, instance):
   animation = Animation(pos=(Window.width, instance.pos[1]))
   animation += Animation(pos=(0, instance.pos[1]))
   animation.repeat=True
   animation.start(instance)
雖然可以透過按下每個按鈕來開始每個按鈕的動畫,但我們可以在觸控按下事件上使所有四個按鈕同時開始動畫。以上回調由 trigger_action() 方法觸發。
def on_touch_down(self, *args):
   self.b1.trigger_action(5)
   self.b2.trigger_action(10)
   self.b3.trigger_action(15)
   self.b4.trigger_action(20)
其餘程式碼只是在 App 類的 build() 方法中設定四個按鈕的 UI。
示例
以下是完整程式碼 -
import kivy
kivy.require('1.0.7')
import random
from kivy.animation import Animation
from kivy.app import App
from kivy.uix.button import Button
from kivy.uix.floatlayout import FloatLayout
from kivy.core.window import Window

Window.size = (720,400)

class TestApp(App):
   def animate1(self, instance):
      animation = Animation(pos=(instance.pos[0], Window.height))
      animation += Animation(pos=(instance.pos[0], 0))
      animation.repeat=True
      animation.start(instance)

   def animate2(self, instance):
      animation = Animation(pos=(Window.width, instance.pos[1]))
      animation += Animation(pos=(0, instance.pos[1]))
      animation.repeat=True
      animation.start(instance)

   def on_touch_down(self, *args):
      self.b1.trigger_action(5)
      self.b2.trigger_action(10)
      self.b3.trigger_action(15)
      self.b4.trigger_action(20)

   def build(self):
      box=FloatLayout()
      # create a button and attach animate() method
      # as a on_press handler
      self.b1 = Button(
         size_hint=(.15, .08), text='BTN1',
         pos=(random.randint(Window.width/2, Window.width), 0),
         on_press=self.animate1
      )
      self.b2 = Button(
         size_hint=(.15, .08), text='BTN2',
         pos=(random.randint(0, Window.width/2), 0),
         on_press=self.animate1
      )
      self.b3 = Button(
         size_hint=(.15, .08), text='BTN3',
         pos=(0, random.randint(0, Window.height/2)),
         on_press=self.animate2
      )
      self.b4 = Button(
         size_hint=(.15, .08), text='BTN4',
         pos=(0, random.randint(Window.height/2, Window.height)),
         on_press=self.animate2
      )

      box.add_widget(self.b1)
      box.add_widget(self.b2)
      box.add_widget(self.b3)
      box.add_widget(self.b4)

      box.bind(on_touch_down=self.on_touch_down)
      return box

if __name__ == '__main__':
   TestApp().run()
輸出
程式以隨機化的按鈕位置開始。點選應用程式視窗的任意位置。按鈕 b1 和 b2 將開始上下移動。按鈕 b3 和 b4 將開始前後移動。
這是初始位置 -
下圖是按鈕在移動時的螢幕截圖 -
廣告