- Yii 教程
- Yii - 首頁
- Yii - 概述
- Yii - 安裝
- Yii - 建立頁面
- Yii - 應用程式結構
- Yii - 入口指令碼
- Yii - 控制器
- Yii - 使用控制器
- Yii - 使用操作
- Yii - 模型
- Yii - 小部件
- Yii - 模組
- Yii - 檢視
- Yii - 佈局
- Yii - 資源
- Yii - 資源轉換
- Yii - 擴充套件
- Yii - 建立擴充套件
- Yii - HTTP 請求
- Yii - 響應
- Yii - URL 格式
- Yii - URL 路由
- Yii - URL 規則
- Yii - HTML 表單
- Yii - 驗證
- Yii - 特設驗證
- Yii - AJAX 驗證
- Yii - 會話
- Yii - 使用快閃記憶體資料
- Yii - Cookie
- Yii - 使用 Cookie
- Yii - 檔案上傳
- Yii - 格式化
- Yii - 分頁
- Yii - 排序
- Yii - 屬性
- Yii - 資料提供程式
- Yii - 資料小部件
- Yii - ListView 小部件
- Yii - GridView 小部件
- Yii - 事件
- Yii - 建立事件
- Yii - 行為
- Yii - 建立行為
- Yii - 配置
- Yii - 依賴注入
- Yii - 資料庫訪問
- Yii - 資料訪問物件
- Yii - 查詢構建器
- Yii - Active Record
- Yii - 資料庫遷移
- Yii - 主題
- Yii - RESTful API
- Yii - RESTful API 實踐
- Yii - 欄位
- Yii - 測試
- Yii - 快取
- Yii - 片段快取
- Yii - 別名
- Yii - 日誌記錄
- Yii - 錯誤處理
- Yii - 身份驗證
- Yii - 授權
- Yii - 本地化
- Yii - Gii
- Gii – 建立模型
- Gii – 生成控制器
- Gii – 生成模組
- Yii 有用資源
- Yii - 快速指南
- Yii - 有用資源
- Yii - 討論
Yii - 檢視
檢視負責將資料呈現給終端使用者。在 Web 應用程式中,檢視只是包含 HTML 和 PHP 程式碼的 PHP 指令碼檔案。
建立檢視
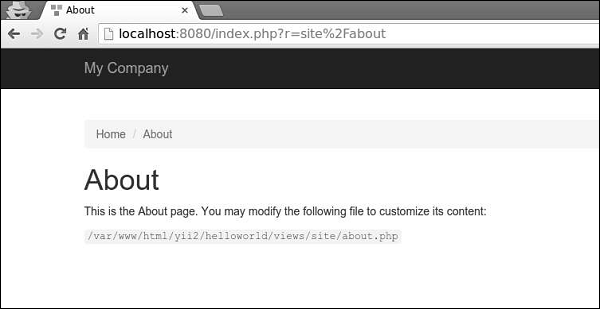
步驟 1 − 讓我們看看基本應用程式模板的“關於”檢視。
<?php
   /* @var $this yii\web\View */
   use yii\helpers\Html;
   $this->title = 'About';
   $this->params['breadcrumbs'][] = $this->title;
?>
<div class="site-about">
   <h1><?= Html::encode($this->title) ?></h1>
   <p>
      This is the About page. You may modify the following file to customize its content:
   </p>
   <code><?= __FILE__ ?></code>
</div>
$this 變數指的是管理和渲染此檢視模板的檢視元件。
“關於”頁面如下所示:
為了避免 XSS 攻擊,對來自終端使用者的資料進行編碼和/或過濾非常重要。您應始終透過呼叫 yii\helpers\Html::encode() 對純文字進行編碼,並透過呼叫 yii\helpers\HtmlPurifier 對 HTML 內容進行編碼。
步驟 2 − 以以下方式修改“關於”檢視。
<?php
   /* @var $this yii\web\View */
   use yii\helpers\Html;
   use yii\helpers\HtmlPurifier;
   $this->title = 'About';
   $this->params['breadcrumbs'][] = $this->title;
?>
<div class="site-about">
   <h1><?= Html::encode($this->title) ?></h1>
   <p>
      This is the About page. You may modify the following file to customize its content:
   </p>
   <p>
      <?= Html::encode("<script>alert('alert!');</script><h1>ENCODE EXAMPLE</h1>>") ?>
   </p>
   <p>
      <?= HtmlPurifier::process("<script>alert('alert!');</script><h1> HtmlPurifier EXAMPLE</h1>") ?>
   </p>
   <code><?= __FILE__ ?></code>
</div>
步驟 3 − 現在鍵入https://:8080/index.php?r=site/about。您將看到以下螢幕。
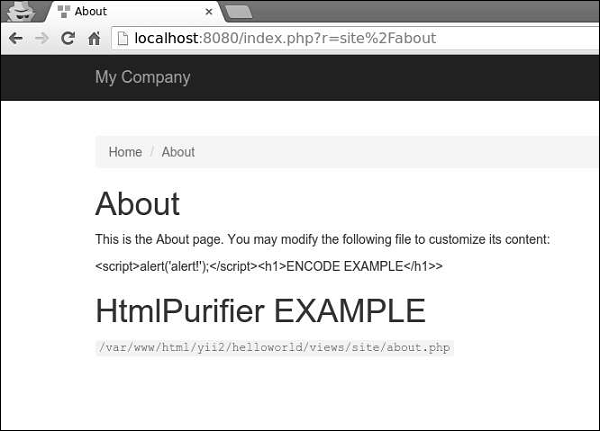
請注意,Html::encode() 函式內的 JavaScript 程式碼顯示為純文字。HtmlPurifier::process() 呼叫也是如此。僅顯示 h1 標籤。
檢視遵循以下約定:
由控制器渲染的檢視應放在@app/views/controllerID資料夾中。
在小部件中渲染的檢視應放在widgetPath/views資料夾中。
要在控制器內渲染檢視,您可以使用以下方法:
render() − 渲染檢視並應用佈局。
renderPartial() − 渲染檢視但不應用佈局。
renderAjax() − 渲染檢視但不應用佈局,但注入所有註冊的 js 和 css 檔案。
renderFile() − 在給定的檔案路徑或別名中渲染檢視。
renderContent() − 渲染靜態字串並應用佈局。
要在另一個檢視內渲染檢視,您可以使用以下方法:
render() − 渲染檢視。
renderAjax() − 渲染檢視但不應用佈局,但注入所有註冊的 js 和 css 檔案。
renderFile() − 在給定的檔案路徑或別名中渲染檢視。
步驟 4 − 在 views/site 資料夾內,建立兩個檢視檔案:_part1.php 和 _part2.php。
_part1.php −
<h1>PART 1</h1>
_part2.php −
<h1>PART 2</h1>
步驟 5 − 最後,在“關於”檢視中渲染這兩個新建立的檢視。
<?php
   /* @var $this yii\web\View */
   use yii\helpers\Html;
   $this->title = 'About';
   $this->params['breadcrumbs'][] = $this->title;
?>
<div class="site-about">
   <h1><?= Html::encode($this->title) ?></h1>
   <p>
      This is the About page. You may modify the following file to customize its content:
   </p>
   <?= $this->render("_part1") ?>
   <?= $this->render("_part2") ?>
   <code><?= __FILE__ ?></code>
</div>
您將看到以下輸出:

渲染檢視時,您可以使用檢視名稱或檢視檔案路徑/別名來定義檢視。檢視名稱以以下方式解析:
檢視名稱可以省略副檔名。例如,about 檢視對應於 about.php 檔案。
如果檢視名稱以“/”開頭,則如果當前活動模組為 forum,並且檢視名稱為 comment/post,則路徑將為 @app/modules/forum/views/comment/post。如果沒有活動模組,則路徑將為 @app/views/comment/post。
如果檢視名稱以“//”開頭,則對應的路徑將為 @app/views/ViewName。例如,//site/contact 對應於 @app/views/site/contact.php。
如果檢視名稱為 contact,並且上下文控制器為 SiteController,則路徑將為 @app/views/site/contact.php。
如果 price 檢視在 goods 檢視中渲染,則如果它在 @app/views/invoice/goods.php 中渲染,則 price 將解析為 @app/views/invoice/price.php。
在檢視中訪問資料
要在檢視中訪問資料,應將資料作為第二個引數傳遞給檢視渲染方法。
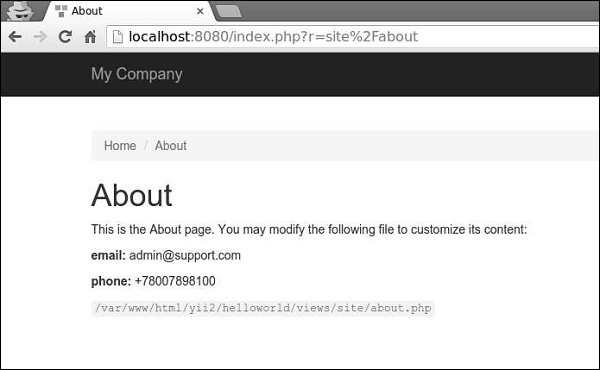
步驟 1 − 修改SiteController的actionAbout。
public function actionAbout() {
   $email = "admin@support.com";
   $phone = "+78007898100";
   return $this->render('about',[
      'email' => $email,
      'phone' => $phone
   ]);
}
在上面給出的程式碼中,我們將兩個變數$email和$phone傳遞到About檢視中進行渲染。
步驟 2 − 更改 about 檢視程式碼。
<?php
   /* @var $this yii\web\View */
   use yii\helpers\Html;
   $this->title = 'About';
   $this->params['breadcrumbs'][] = $this->title;
?>
<div class = "site-about">
   <h1><?= Html::encode($this->title) ?></h1>
   <p>
      This is the About page. You may modify the following file to customize its content:
   </p>
   <p>
      <b>email:</b> <?= $email ?>
   </p>
   <p>
      <b>phone:</b> <?= $phone ?>
   </p>
   <code><?= __FILE__ ?></code>
</div>
我們剛剛添加了兩個從SiteController接收到的變數。
步驟 3 − 在 Web 瀏覽器中鍵入 URLhttps://:8080/index.php?r=site/about,您將看到以下內容。