- Yii 教程
- Yii - 首頁
- Yii - 概述
- Yii - 安裝
- Yii - 建立頁面
- Yii - 應用結構
- Yii - 入口指令碼
- Yii - 控制器
- Yii - 使用控制器
- Yii - 使用操作
- Yii - 模型
- Yii - 小部件
- Yii - 模組
- Yii - 檢視
- Yii - 佈局
- Yii - 資源
- Yii - 資源轉換
- Yii - 擴充套件
- Yii - 建立擴充套件
- Yii - HTTP 請求
- Yii - 響應
- Yii - URL 格式
- Yii - URL 路由
- Yii - URL 規則
- Yii - HTML 表單
- Yii - 驗證
- Yii - 特設驗證
- Yii - AJAX 驗證
- Yii - 會話
- Yii - 使用快閃記憶體資料
- Yii - Cookie
- Yii - 使用 Cookie
- Yii - 檔案上傳
- Yii - 格式化
- Yii - 分頁
- Yii - 排序
- Yii - 屬性
- Yii - 資料提供者
- Yii - 資料小部件
- Yii - ListView 小部件
- Yii - GridView 小部件
- Yii - 事件
- Yii - 建立事件
- Yii - 行為
- Yii - 建立行為
- Yii - 配置
- Yii - 依賴注入
- Yii - 資料庫訪問
- Yii - 資料訪問物件
- Yii - 查詢構建器
- Yii - 活動記錄
- Yii - 資料庫遷移
- Yii - 主題
- Yii - RESTful API
- Yii - RESTful API 實戰
- Yii - 欄位
- Yii - 測試
- Yii - 快取
- Yii - 碎片快取
- Yii - 別名
- Yii - 日誌
- Yii - 錯誤處理
- Yii - 身份驗證
- Yii - 授權
- Yii - 本地化
- Yii - Gii
- Gii – 建立模型
- Gii – 生成控制器
- Gii – 生成模組
- Yii 有用資源
- Yii - 快速指南
- Yii - 有用資源
- Yii - 討論
Yii - 主題
主題功能 giúp bạn thay thế một tập hợp các view bằng một tập hợp khác mà không cần phải sửa đổi các tệp view gốc. Bạn nên đặt thuộc tính theme của thành phần ứng dụng view để sử dụng chủ đề.
Bạn cũng nên định nghĩa các thuộc tính sau −
yii\base\Theme::$basePath − Định nghĩa thư mục gốc cho CSS, JS, hình ảnh, v.v.
yii\base\Theme::$baseUrl − Định nghĩa URL gốc của các tài nguyên có chủ đề.
yii\base\Theme::$pathMap − Định nghĩa các quy tắc thay thế.
Ví dụ: nếu bạn gọi $this->render('create') trong UserController, tệp view @app/views/user/create.php sẽ được hiển thị. Tuy nhiên, nếu bạn bật chủ đề như trong cấu hình ứng dụng sau, tệp view @app/themes/basic/user/create.php sẽ được hiển thị thay thế.
步驟 1 - 修改config/web.php檔案。
<?php
   $params = require(__DIR__ . '/params.php');
   $config = [
      'id' => 'basic',
      'basePath' => dirname(__DIR__),
      'bootstrap' => ['log'],
      'components' => [
         'request' => [
            // !!! insert a secret key in the following (if it is empty) - this
               //is required by cookie validation
            'cookieValidationKey' => 'ymoaYrebZHa8gURuolioHGlK8fLXCKjO',
         ],
         'cache' => [
            'class' => 'yii\caching\FileCache',
         ],
         'user' => [
            'identityClass' => 'app\models\User',
            'enableAutoLogin' => true,
         ],
         'errorHandler' => [
            'errorAction' => 'site/error',
         ],
         'mailer' => [
            'class' => 'yii\swiftmailer\Mailer',
            // send all mails to a file by default. You have to set
            // 'useFileTransport' to false and configure a transport
            // for the mailer to send real emails.
            'useFileTransport' => true,
         ],
         'log' => [
            'traceLevel' => YII_DEBUG ? 3 : 0,
            'targets' => [
               [
                  'class' => 'yii\log\FileTarget',
                  'levels' => ['error', 'warning'],
               ],
            ],
         ],
         'view' => [
            'theme' => [
               'basePath' => '@app/themes/basic',
               'baseUrl' => '@web/themes/basic',
               'pathMap' => [
                  '@app/views' => '@app/themes/basic',
               ],
            ],
         ],
         'db' => require(__DIR__ . '/db.php'),
      ],
      'modules' => [
         'hello' => [
            'class' => 'app\modules\hello\Hello',
         ],
      ],
      'params' => $params,
   ];
   if (YII_ENV_DEV) {
      // configuration adjustments for 'dev' environment
      $config['bootstrap'][] = 'debug';
      $config['modules']['debug'] = [
         'class' => 'yii\debug\Module',
      ];
      $config['bootstrap'][] = 'gii';
      $config['modules']['gii'] = [
         'class' => 'yii\gii\Module',
      ];
   }
   return $config;
?>
我們添加了檢視應用程式元件。
步驟 2 - 現在建立web/themes/basic目錄結構和themes/basic/site。在themes/basic/site資料夾內建立一個名為about.php的檔案,內容如下。
<?php
   /* @var $this yii\web\View */
   use yii\helpers\Html;
   $this->title = 'About';
   $this->params['breadcrumbs'][] = $this->title;
   $this->registerMetaTag(['name' => 'keywords', 'content' => 'yii, developing,
      views, meta, tags']);
   $this->registerMetaTag(['name' => 'description', 'content' => 'This is the
      description of this page!'], 'description');
?>

<div class = "site-about">
   <h1><?= Html::encode($this->title) ?></h1>

   <p style = "color: red;">
      This is the About page. You may modify the following file to customize its content:
   </p>
</div>
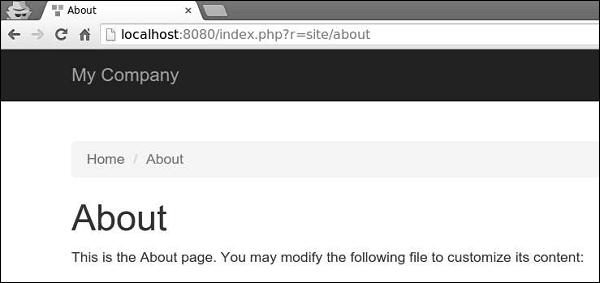
步驟 3 - 現在,訪問https://:8080/index.php?r=site/about,將渲染themes/basic/site/about.php檔案,而不是views/site/about.php。
步驟 4 - 要為模組設定主題,請按以下方式配置yii\base\Theme::$pathMap屬性。
'pathMap' => [
   '@app/views' => '@app/themes/basic',
   '@app/modules' => '@app/themes/basic/modules',
],
步驟 5 - 要為小部件設定主題,請按以下方式配置yii\base\Theme::$pathMap屬性。
'pathMap' => [
   '@app/views' => '@app/themes/basic',
   '@app/widgets' => '@app/themes/basic/widgets', // <-- !!!
],
有時您需要指定一個基本主題,其中包含應用程式的基本外觀和感覺。要實現此目標,您可以使用主題繼承。
步驟 6 - 按以下方式修改檢視應用程式元件。
'view' => [
   'theme' => [
      'basePath' => '@app/themes/basic',
      'baseUrl' => '@web/themes/basic',
      'pathMap' => [
         '@app/views' => [
            '@app/themes/christmas',
            '@app/themes/basic',
         ],
      ]
   ],
],
在以上配置中,@app/views/site/index.php檢視檔案將被主題化為@app/themes/christmas/site/index.php或@app/themes/basic/site/index.php,取決於哪個檔案存在。如果兩個檔案都存在,則使用第一個檔案。
步驟 7 - 建立themes/christmas/site目錄結構。
步驟 8 - 現在,在themes/christmas/site資料夾內,建立一個名為about.php的檔案,內容如下。
<?php
   /* @var $this yii\web\View */
   use yii\helpers\Html;
   $this->title = 'About';
   $this->params['breadcrumbs'][] = $this->title;
   $this->registerMetaTag(['name' => 'keywords', 'content' => 'yii, developing,
      views, meta, tags']);
   $this->registerMetaTag(['name' => 'description', 'content' => 'This is the
      description of this page!'], 'description');
?>

<div class = "site-about">
   <h2>Christmas theme</h2>
   <img src = "http://pngimg.com/upload/fir_tree_PNG2514.png" alt = ""/>
   <p style = "color: red;">
      This is the About page. You may modify the following file to customize its content:
   </p>
</div>
步驟 9 - 如果您訪問https://:8080/index.php?r=site/about,您將看到使用聖誕節主題更新後的關於頁面。
