- Yii 教程
- Yii - 首頁
- Yii - 概述
- Yii - 安裝
- Yii - 建立頁面
- Yii - 應用結構
- Yii - 入口指令碼
- Yii - 控制器
- Yii - 使用控制器
- Yii - 使用動作
- Yii - 模型
- Yii - 小部件
- Yii - 模組
- Yii - 檢視
- Yii - 佈局
- Yii - 資源
- Yii - 資源轉換
- Yii - 擴充套件
- Yii - 建立擴充套件
- Yii - HTTP 請求
- Yii - 響應
- Yii - URL 格式
- Yii - URL 路由
- Yii - URL 規則
- Yii - HTML 表單
- Yii - 驗證
- Yii - 特設驗證
- Yii - AJAX 驗證
- Yii - 會話
- Yii - 使用快閃記憶體資料
- Yii - Cookie
- Yii - 使用 Cookie
- Yii - 檔案上傳
- Yii - 格式化
- Yii - 分頁
- Yii - 排序
- Yii - 屬性
- Yii - 資料提供者
- Yii - 資料小部件
- Yii - ListView 小部件
- Yii - GridView 小部件
- Yii - 事件
- Yii - 建立事件
- Yii - 行為
- Yii - 建立行為
- Yii - 配置
- Yii - 依賴注入
- Yii - 資料庫訪問
- Yii - 資料訪問物件
- Yii - 查詢構建器
- Yii - Active Record
- Yii - 資料庫遷移
- Yii - 主題
- Yii - RESTful API
- Yii - RESTful API 實踐
- Yii - 欄位
- Yii - 測試
- Yii - 快取
- Yii - 片段快取
- Yii - 別名
- Yii - 日誌記錄
- Yii - 錯誤處理
- Yii - 身份驗證
- Yii - 授權
- Yii - 本地化
- Yii - Gii
- Gii – 建立模型
- Gii – 生成控制器
- Gii – 生成模組
- Yii 有用資源
- Yii - 快速指南
- Yii - 有用資源
- Yii - 討論
Yii - 模型
模型是表示業務邏輯和規則的物件。要建立模型,您應該擴充套件yii\base\Model類或其子類。
屬性
屬性表示業務資料。它們可以像陣列元素或物件屬性一樣訪問。每個屬性都是模型的公共可訪問屬性。要指定模型擁有的屬性,您應該重寫yii\base\Model::attributes()方法。
讓我們看一下基本應用程式模板的ContactForm模型。
<?php
   namespace app\models;
   use Yii;
   use yii\base\Model;
   /**
   * ContactForm is the model behind the contact form.
   */
   class ContactForm extends Model {
      public $name;
      public $email;
      public $subject;
      public $body;
      public $verifyCode;
      /**
      * @return array the validation rules.
      */
      public function rules() {
         return [
            // name, email, subject and body are required
            [['name', 'email', 'subject', 'body'], 'required'],
            // email has to be a valid email address
            ['email', 'email'],
            // verifyCode needs to be entered correctly
            ['verifyCode', 'captcha'],
         ];
      }
      /**
      * @return array customized attribute labels
      */
      public function attributeLabels() {
         return [
            'verifyCode' => 'Verification Code',
         ];
      }
      /**
      * Sends an email to the specified email address using the information
         collected by this model.
      * @param  string  $email the target email address
      * @return boolean whether the model passes validation
      */
      public function contact($email) {
         if ($this->validate()) {
            Yii::$app->mailer->compose()
               ->setTo($email)
               ->setFrom([$this->email => $this->name])
               ->setSubject($this->subject)
               ->setTextBody($this->body)
               ->send();
            return true;
         }
         return false;
      }
   }
?>
步驟 1 - 在SiteController中建立一個名為actionShowContactModel的函式,程式碼如下。
public function actionShowContactModel() {
   $mContactForm = new \app\models\ContactForm();
   $mContactForm->name = "contactForm";
   $mContactForm->email = "user@gmail.com";
   $mContactForm->subject = "subject";
   $mContactForm->body = "body";
   var_dump($mContactForm);
}
在上面的程式碼中,我們定義了ContactForm模型,設定了屬性,並在螢幕上顯示了模型。
步驟 2 - 現在,如果您在 Web 瀏覽器的位址列中輸入https://:8080/index.php?r=site/show-contact-model,您將看到以下內容。
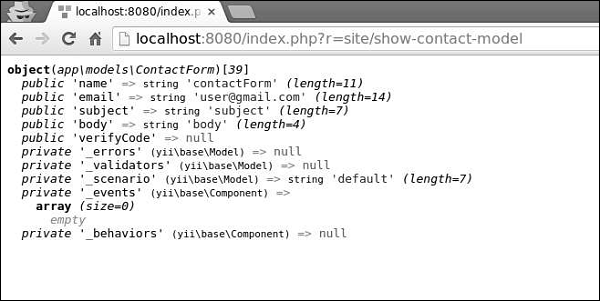
如果您的模型擴充套件自yii\base\Model,則其所有成員變數(公共和非靜態)都是屬性。ContactForm模型中有五個屬性 - name、email、subject、body、verifyCode,您可以輕鬆新增新的屬性。
屬性標籤
您通常需要顯示與屬性關聯的標籤。預設情況下,屬性標籤由yii\base\Model::generateAttributeLabel()方法自動生成。要手動宣告屬性標籤,您可以重寫yii\base\Model::attributeLabels()方法。
步驟 1 - 如果您開啟https://:8080/index.php?r=site/contact,您將看到以下頁面。
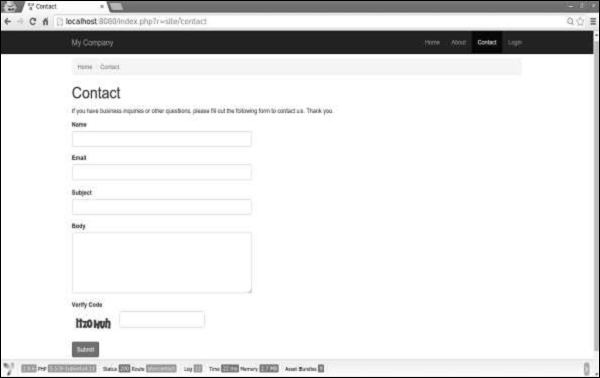
請注意,屬性標籤與其名稱相同。
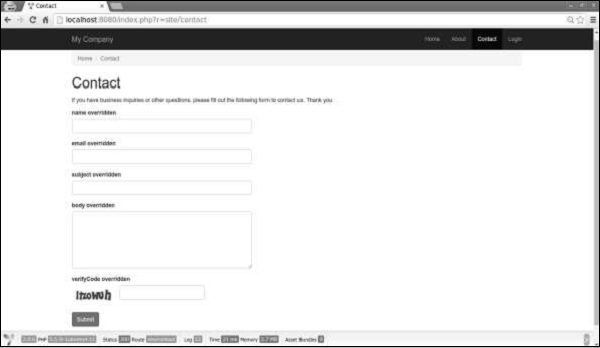
步驟 2 - 現在,以以下方式修改ContactForm模型中的attributeLabels函式。
public function attributeLabels() {
   return [
      'name' => 'name overridden',
      'email' => 'email overridden',
      'subject' => 'subject overridden',
      'body' => 'body overridden',
      'verifyCode' => 'verifyCode overridden',
   ];
}
步驟 3 - 如果您再次開啟https://:8080/index.php?r=site/contact,您會注意到標籤已更改,如下所示。
場景
您可以在不同的場景中使用模型。例如,當訪客想要傳送聯絡表單時,我們需要所有模型屬性。當用戶想要執行相同的操作時,他已經登入,因此我們不需要他的姓名,因為我們可以輕鬆地從資料庫中獲取。
要宣告場景,我們應該重寫scenarios()函式。它返回一個數組,其鍵是場景名稱,值是活動屬性。活動屬性是需要驗證的屬性。它們也可以批次賦值。
步驟 1 - 以以下方式修改ContactForm模型。
<?php
   namespace app\models;
   use Yii;
   use yii\base\Model;
   /**
   * ContactForm is the model behind the contact form.
   */
   class ContactForm extends Model {
      public $name;
      public $email;
      public $subject;
      public $body;
      public $verifyCode;
      const SCENARIO_EMAIL_FROM_GUEST = 'EMAIL_FROM_GUEST';
      const SCENARIO_EMAIL_FROM_USER = 'EMAIL_FROM_USER';
      public function scenarios() {
         return [
            self::SCENARIO_EMAIL_FROM_GUEST => ['name', 'email', 'subject',
               'body', 'verifyCode'],
            self::SCENARIO_EMAIL_FROM_USER => ['email' ,'subject', 'body',
               'verifyCode'],
         ];
      }
      /**
      * @return array the validation rules.
      */
      public function rules() {
         return [
            // name, email, subject and body are required
            [['name', 'email', 'subject', 'body'], 'required'],
            // email has to be a valid email address
            ['email', 'email'],
            // verifyCode needs to be entered correctly
            ['verifyCode', 'captcha'],
         ];
      }
      /**
      * @return array customized attribute labels
      */
      public function attributeLabels() {
         return [
            'name' => 'name overridden',
            'email' => 'email overridden',
            'subject' => 'subject overridden',
            'body' => 'body overridden',
            'verifyCode' => 'verifyCode overridden',
         ];
      }
      /**
      * Sends an email to the specified email address using the information
         collected by this model.
      * @param  string  $email the target email address
      * @return boolean whether the model passes validation
      */
      public function contact($email) {
         if ($this -> validate()) {
            Yii::$app->mailer->compose()
               ->setTo($email)
               ->setFrom([$this->email => $this->name])
               ->setSubject($this->subject)
               ->setTextBody($this->body)
               ->send();
            return true;
         }
         return false;
      }
   }
?>
我們添加了兩個場景。一個是針對訪客的,另一個是針對已認證使用者的。當用戶已認證時,我們不需要他的姓名。
步驟 2 - 現在,修改SiteController的actionContact函式。
public function actionContact() {
   $model = new ContactForm();
   $model->scenario = ContactForm::SCENARIO_EMAIL_FROM_GUEST;
   if ($model->load(Yii::$app->request->post()) && $model->
      contact(Yii::$app->params ['adminEmail'])) {
         Yii::$app->session->setFlash('contactFormSubmitted');
         return $this->refresh();
   }
   return $this->render('contact', [
      'model' => $model,
   ]);
}
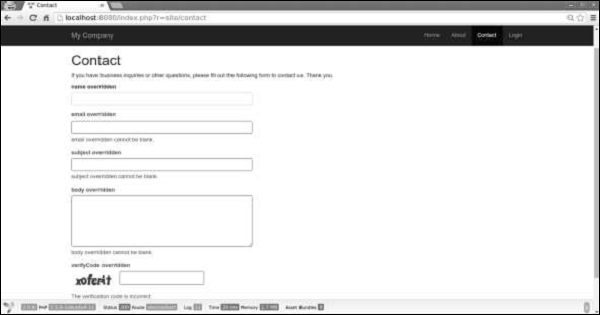
步驟 3 - 在 Web 瀏覽器中輸入https://:8080/index.php?r=site/contact。您會注意到,目前所有模型屬性都是必需的。

步驟 4 - 如果您按照以下程式碼中給出的方式更改actionContact中模型的場景,您會發現 name 屬性不再是必需的。
$model->scenario = ContactForm::SCENARIO_EMAIL_FROM_USER;
批次賦值
批次賦值是一種透過一行程式碼從多個輸入屬性建立模型的便捷方法。
程式碼行是:
$mContactForm = new \app\models\ContactForm;
$mContactForm->attributes = \Yii::$app->request->post('ContactForm');
上面給出的程式碼行等效於:
$mContactForm = new \app\models\ContactForm;
$postData = \Yii::$app->request->post('ContactForm', []);
$mContactForm->name = isset($postData['name']) ? $postData['name'] : null;
$mContactForm->email = isset($postData['email']) ? $postData['email'] : null;
$mContactForm->subject = isset($postData['subject']) ? $postData['subject'] : null;
$mContactForm->body = isset($postData['body']) ? $postData['body'] : null;
前者更簡潔。請注意,批次賦值僅適用於安全屬性。它們只是scenario()函式中列出的當前場景屬性。
資料匯出
模型通常需要匯出為不同的格式。要將模型轉換為陣列,請修改SiteController的actionShowContactModel函式:
public function actionShowContactModel() {
   $mContactForm = new \app\models\ContactForm();
   $mContactForm->name = "contactForm";
   $mContactForm->email = "user@gmail.com";
   $mContactForm->subject = "subject";
   $mContactForm->body = "body";
   var_dump($mContactForm->attributes);
}
在位址列中輸入https://:8080/index.php?r=site/show-contact-model,您將看到以下內容:

要將模型轉換為JSON格式,請以以下方式修改actionShowContactModel函式:
public function actionShowContactModel() {
   $mContactForm = new \app\models\ContactForm();
   $mContactForm->name = "contactForm";
   $mContactForm->email = "user@gmail.com";
   $mContactForm->subject = "subject";
   $mContactForm->body = "body";
   return \yii\helpers\Json::encode($mContactForm);
}
瀏覽器輸出:
{
   "name":"contactForm",
   "email":"user@gmail.com",
   "subject":"subject",
   "body":"body ",
   "verifyCode":null
}
要點
在設計良好的應用程式中,模型通常比控制器快得多。模型應該:
- 包含業務邏輯。
- 包含驗證規則。
- 包含屬性。
- 不嵌入 HTML。
- 不直接訪問請求。
- 不要有太多場景。